Sorry for the silence!
Pre-Thanksgiving I was busy working and prepping for guests. I took the day off on Thanksgiving, then worked Friday and Sunday. Saturday Jax was sick with sneezes and a runny nose so I took care of him while I worked on our family portraits (more on that in a moment.) Of course because I was wiping a snotty toddler nose and getting sneezed on all night while I nursed him, I caught the cold too. So my Sunday of working was pretty bad, and today is 100x worse. I’m sooo sick! But, I’m a contractor and don’t get paid if I don’t work, so work I must! Luckily, thanks to all the nursing, Jax was all better after just 36 hours with a light cold.

the photo we chose for our wall
We’ve been owing our relatives family portraits for some time. We actually had none that included Jax and he is almost 2! $500 photographers just aren’t in our budget, and mall photo studios hold your pictures’ copyrights hostage, which I don’t like. So it was time for some DIY!
 I’ve been reading an ebook about my camera for a little while now which is a big help. I spent a couple weeks searching Pinterest and Google for tips on poses, outfits, lighting and taking your own family portraits. I knew that I was going to have to get creative and do a lot of Photoshopping.
I planned to do 2 separate shoots: one of Jax and I and one of my husband and Jax. I included pictures of us adults on our own as well. The plan was to take them all in the same location then Photoshop us together into different combinations. I ended up having to take them on two different mornings, but the light was very close both days.
The results came out much better than I’d expected! The lighting in the playroom was perfect. The poses came together the best they could. Photographers recommend everyone we very close and in contact with each other, but that wasn’t really possible the way I was doing it. We still got some great pictures.
Some behind the scenes:
In order to make Jax smile, I set up our iPad just under the camera. During my photoshoot with him, I played a YouTube video of a laughing baby to get him to smile. During the second shoot, I put on his favorite show, Peppa Pig. When I was in the photos, I used a remote to trigger the shutter. I made sure to take the pictures at the same time each day and left the camera on the tripod in the same spot between shoots.


I set up a Photoshop file with a clean wall photo I’d taken during the shoot, then cut us out of all the best shots and worked on arraigning us together. I spent a lot of time making sure all the edges were clean and added shadows and highlights to make it all come together.
See above for my camera setup, a silly screenshot with two of me and an outtake.


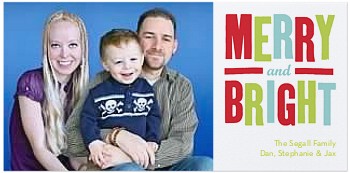
The goal was a nice, large black & white photo for our living room wall, some photos to send off to relatives, and a picture for our holiday cards. Yesterday evening I got everything ordered from Shutterfly. I used a coupon code for 25 free 4×8″ photo cards from saving up baby wipe points to get our cards. I used the promo code SHIP30 for free shipping, so I just paid for the prints.
What do you think of our DIY photos?
I wish I didn’t know they were photoshopped – now I keep thinking I can tell (which I know I can’t) 😛 Great job! Don’t tell your family (if they don’t read this) and see if they can tell…..
It’s amazing what you can do with a computer. I’m going to start adding Dan’s long hair back in his pictures….LOL!
Hah, do you miss his hair?
The key to not having it looked too Photoshopped was to take the picture in the exact same spot as if we were all there. Though Dan seemed annoyed when I had him put his arm around an empty chair…
Ah, so amazing! Such a great idea and it looks so much better than a cheesy mall photographer picture 🙂