I’ve been quiet here, but busy busy busy! This week has been work, time with Jax and sewing the latest addition to Jax’s vacation quiet book: an ice cream parlor! (If you are a fan of the Facebook page, you can see little sneak previews as I sew up new pages.)
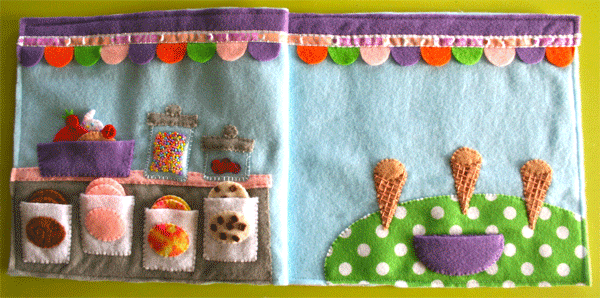
 This page is a mostly for-fun one, but does involve some matching (putting the ice cream away) and coordination (stacking the scoops on the cones.) Jax likes to count the scoops as he stacks. Our trips to the beach always involve walking to the ice cream parlor, so I knew I had to make this page! Please note that the pieces on this page are small. Scale them larger for a younger child and always supervise their play!
For this page I used: the pattern, 2 9″ x 12″ sky blue background felt sheets, felt (in purple, orange, lime green, pink, hot pink, gray, white, tan, brown, cream, lime green dots and yellow tie dye), ice cream ribbon, clear vinyl scraps, seed beads, sequins and embroidery floss. I got the patterned felt and spool of ribbon from my local craft store. I chose my felt colors based on the ribbon.
Can’t find ice cream ribbon? I’m giving away my extra here!

Background Elements: Sew down the table, ice cream case and and counter. The case is a simple gray rectangle, and the counter is a strip of pink. Pin your awning scallops under strips of matching felt (mine are purple) and sew a strip of ribbon across.

Bowls & Jars: For the purple ice cream bowl and the toppings tray, sew through both layers of felt along the sides and bottom. Along the top, sew only through the bottom layer, making a pocket. For the sprinkles jar, take a small rectangle of clear vinyl and felt in your background color. Sew up three sides, fill it with seed beads, and sew the top closed. I did this on the sewing machine to insure they couldn’t leak out. Sew the pouch down to the page. Sew a strip of gray felt across the top and a small circle as the jar lid handle. Repeat for the sequin “cherry” jar. You could also use bugle beads to make a jar of “jimmies”, but I didn’t have any in my stash.

Ice Cream Containers: Sew the labels to the bucket shapes so that you have one to match each flavor. I decorated two of mine first: dark brown stitched “fudge” swirls and little felt “chocolate chips”. Sew the buckets to the ice cream case along three sides, leaving the tops open. I staggered mine a bit to give them a little more room.
Ice Cream Scoops: Decorate both sides of the scoop if needed (I did the fudge swirls and chocolate chips mentioned above) then sew the two sides together. I decided not to use Velcro, snaps or magnets, but you could. I find that Velcro snags the background felt and wears the quiet book out faster. I wanted my ice cream page to be about free-play, so Jax can decide where they go.

Ice Cream Cones: I’d originally planned to have the cones be loose pieces, but the ice cream wasn’t staying on. I changed my plans and sewed three of them down to the table. This made it easier because I didn’t have to embroider both sides of each cone! I used 4 strands of tan embroidery floss and stitched a curving line to show where the inside of the cone was. Then I made long stitches in one direction down the length of the cone. Switching to perpendicular stitches, I wove the thread over and under to make a basket weave effect.

Toppings: I used the syrup pattern only as a guide for the basic shape and size, but cut the drips out different for each topping. Cut two sides for each one. I made three, but could have gone on forever! For my hot fudge sauce, I cut out two of the whipped cream pieces and decorated them with seed bead sprinkles. I sewed the two sides of the fudge together, then sandwiched that between the two whipped cream pieces, sewing them together as well. For the berry topping, I stitched the syrup together in hot pink. I free-hand cut out two oval shapes for the strawberry and one spiky green piece for the leaves. I pinned the strawberry around the top of the syrup with the green bit sticking out of the top and sewed it together. The caramel syrup with a cherry was done the same way, minus the green. I then sewed a sequin on to each side of the cherry to make it match the cherries in the jar.

I didn’t have to tell Jax what this page was (“Ice creams!”) despite him never having had an ice cream cone (we get bowls of frozen yogurt usually.) I did show him how to stack them on the cones and put them in the bowl and buckets and he took it from there. This is a fun page for both of us!


I’d love to see this made in different colors than we chose. Please share a photo if you decide to make this page! Stay tuned for a post with a chance to win lengths of my extra ice cream ribbon!
Wow!! I don’t think I’ve ever seen such intricate quiet book pages. They are amazing!! Nice work. I wish I would have seen these 6 years ago when I made my original quiet books…I’m looking for new ideas to add to my books and you have some great pages. Thanks for sharing.
Hi! Just wanted to say I received my ribbon!! Thank you! 🙂 can’t wait to make this page! But I can’t find polka dot felt sheets anywhere! Where did you find yours?
WOW! Your quiet book pages are amazing! Thank you so much for the free patterns and instructions. I cant wait to try some of these. My favorite so far is the ice crea parlor, but I adore all your pages!
Just wondering do you sew your pages in landscape or portrait form (position of felt), and also is there any trimming, what is the size of the page when completed? Awesome work!
Check out this page and let me know if you have further questions!
http://www.imagineourlife.com/2011/11/01/how-to-sew-quiet-book-pages/
You are so very talented! I am starting my quiet book today and am all the more excited since I’ve found your site here. You have done an amazing job! Love all of your quiet book pages! You go girl!
This is such an adorable page. I’m making a book for my daughters and I think they would love this. Very creative! Thanks for the inspiration!
Does the felt pages hold up to a lot of use? I have a 3 year and 18 month old who will play with them & I’m debating if I should do cotton & interfacing, but that will be harder & more time consuming to make.
I’ve found the felt holds up, but cheaper craft felt gets fuzzy fast. Only places I’ve seen wear is around grommets on heavily used pages.
Pingback: The Scoop | Fast Food Style
Have you found that the regular thin vinyl you can get at craft stores works fine for the “jars”? The stuff I have seems like it might look ‘pocked’ or creased (for lack of a better word) after some use. I see that they sell it at american felt & craft and thought about ordering some, but it may be the same stuff.
Thanks!
I buy my vinyl in the home decor section of a fabric store so that I can feel each one and decide what feels strong enough. I know they come in different weights/guages. I’ll try to pay attention next time I get some.
Do you sell the quiet book pages?
Are you willing to make and sell Ny of these quiet book pages?
I absolutely love your quiet book pages. I am making my first quiet book and I have a couple basic questions. First, besides sewing do you use a specific type of marker or paint for writing on the pages so the lettering is crisp and doesn’t blur. Also, what is your preferred method on binding?