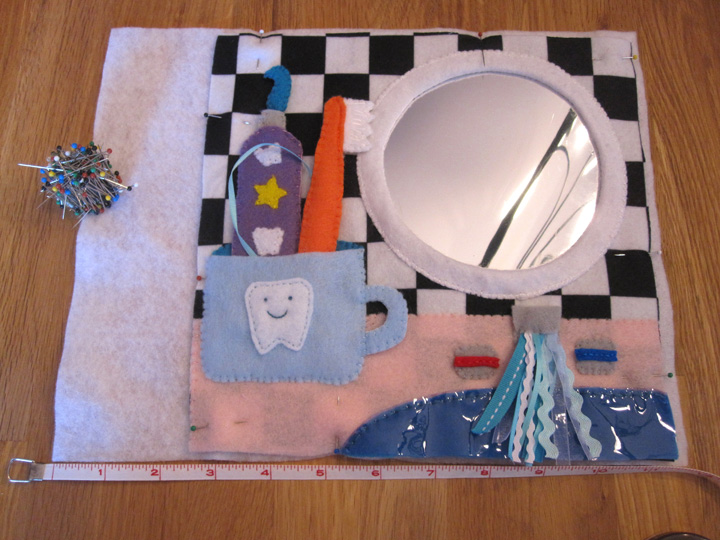
Here is a little tutorial on how I sew up my final quiet book pages. My designs are 9″ x 9″ on a felt background. I sew my final pages using 9″ x 12″ felt sheets – white for the front and colored or patterned for the back. If your pages are a different size you’ll have to modify accordingly.
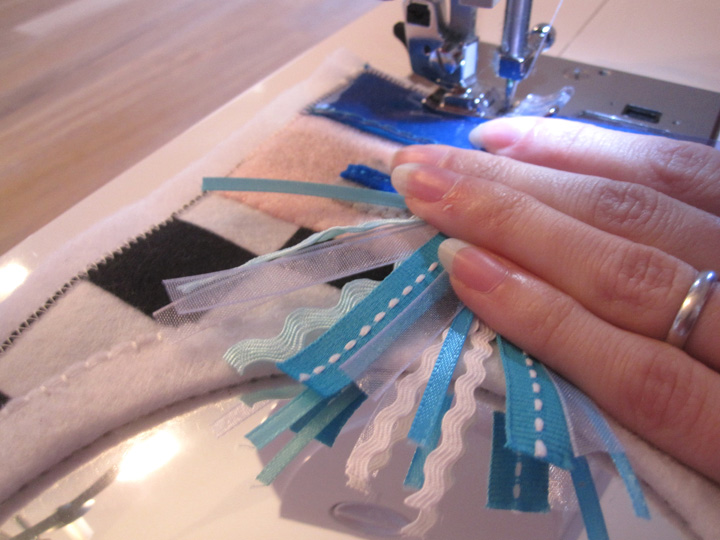
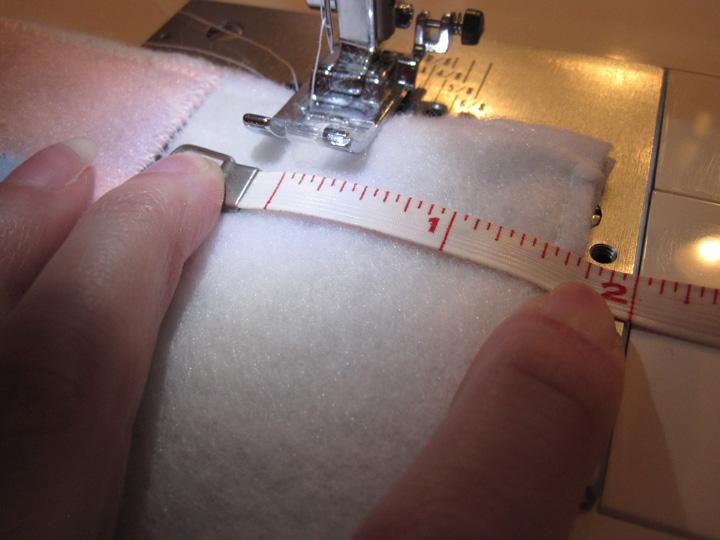

- Pin your design to the white felt. I put mine close to the right edge but leave about a half inch.
- Zigzag stitch around all four sides. If you have dangly bits, make sure you hold them out of the way!
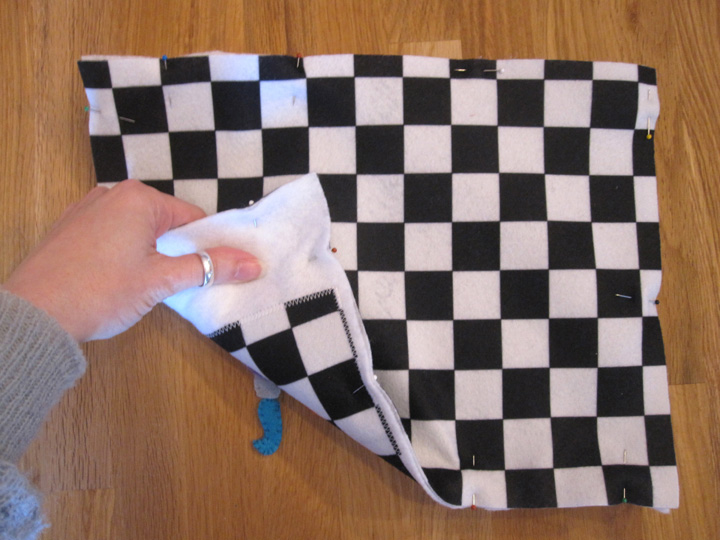
- On the reverse side, pin on the background (wrong sides facing.)
- Sew all the way around.
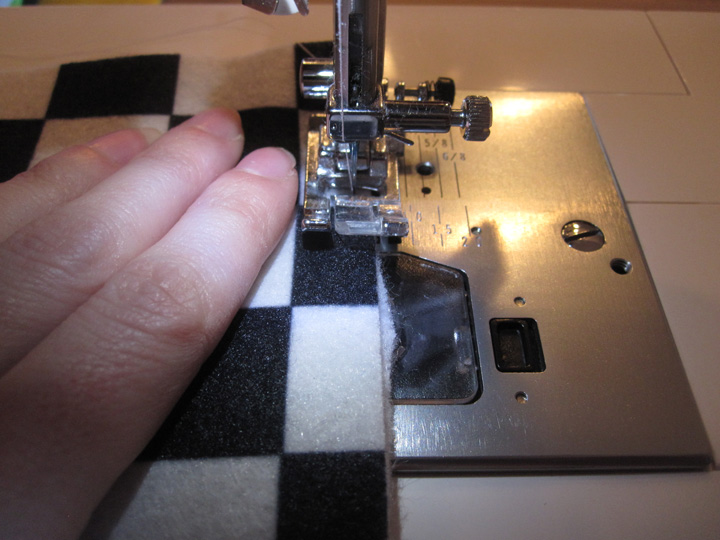
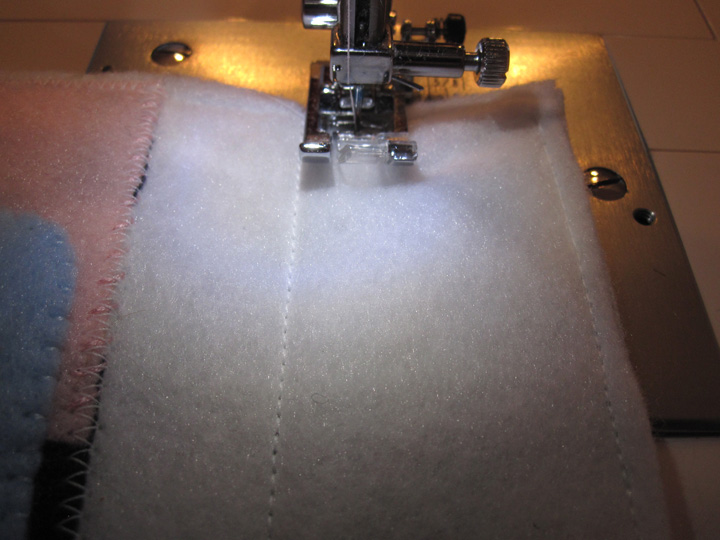
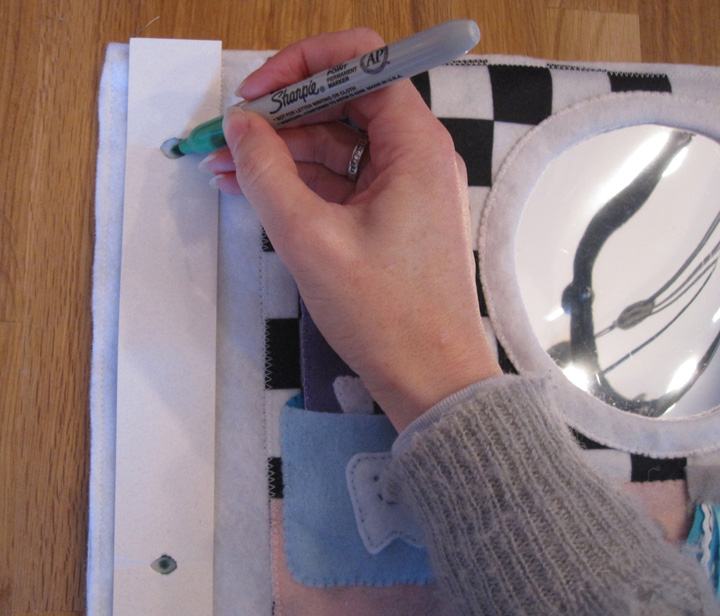
- On the front, I sew a line 1.75″ from the left edge. I use a hole on my machine as my guide.
- Sew another line just inside of it. I use my presser foot as my guide.
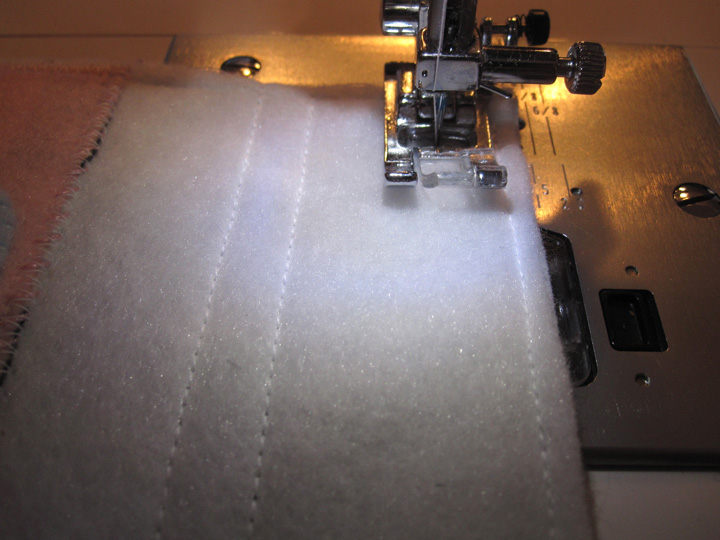
- Sew a line just to the side of the far left seam like in step 6.
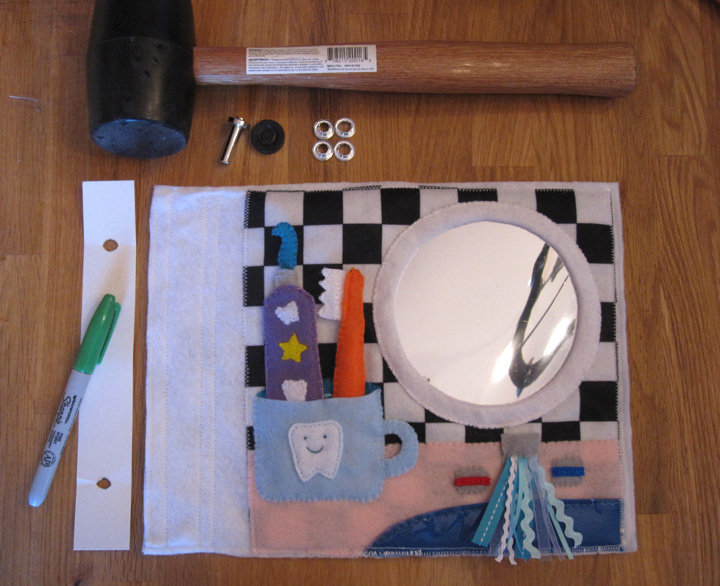
- Gather what you need to put in grommets. I made a template so all of my pages would match up.
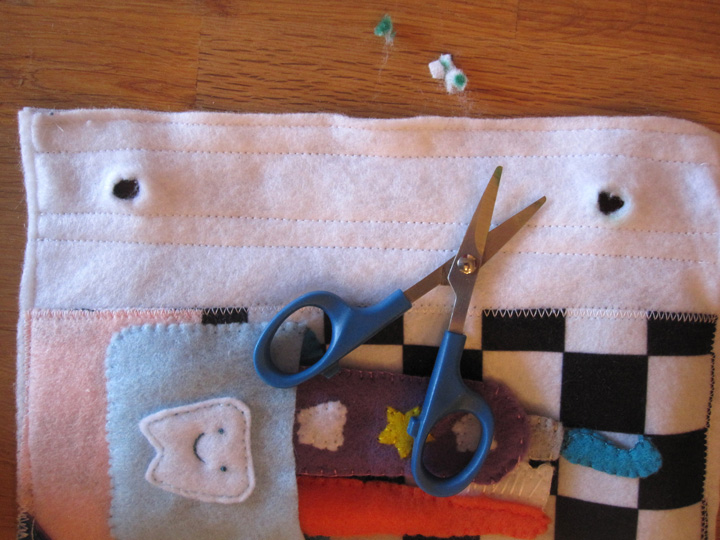
- Mark your holes. Place them in the channel you made for strength.
- Cut out holes as directed on your grommet package.
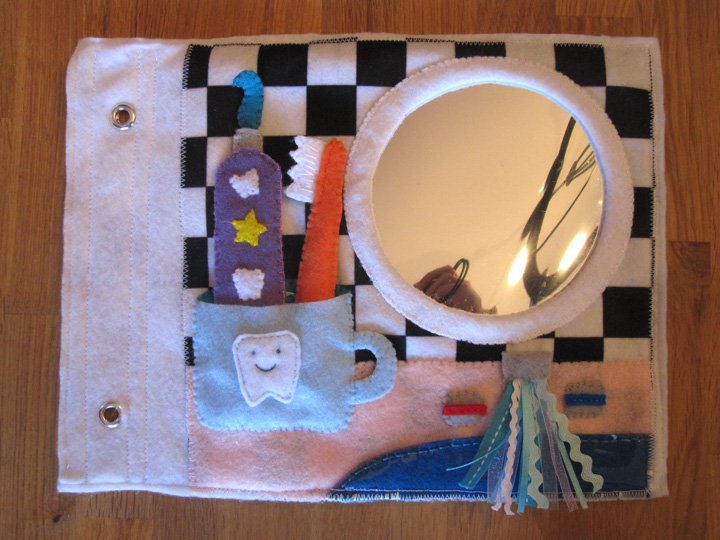
- Put in your grommets as directed on the package.
- All done!

When I have a 2-page spread, I sew the right-hand page with steps 1 – 4. Sew the left-hand page like steps 1 – 4 but align everything to the left of the page instead of the right. Place the pages together, right sides facing. Sew over the far left seam, then make the same seams as in steps 5 – 7. Continue on to make your grommets. You’ll now have a separate page you can take out of the book and the two halves will always stay together!
I hope this helps! I’ll post about my cover soon… I still have to make it!
Thank you for posting all of your quite book pages. I am making one for my son using your patterns. I love them. One question, am I right that the back of each page is blank? So, when you open it you would have an activity page and then a blank page on the other side (unless you have a double page spread) and then the next page is another activiy then blank and so on? You don’t sew the activity pages together? I’m not to that point just yet, but I don’t want to mess it up;) Thanks!
That’s the way I did mine – just a solid color on the back. It’s just personal preference. I wanted to be able to mix and match the pages in my book(s) without taking more than one activity out at the same time. You could certainly sew them back to back if you wanted to keep them in a permanent order.
I’m really enjoying all the patterns that you’ve provided through this blog! I was wondering what size grommets you use when binding the book? Thanks!
I tossed my current packaging, but the holes measure 1/4″. Hope that helps!
Ok, thanks! : )
I used a bunch of your patterns and finally finished my own quiet book.
Thanks for all the patterns!
http://beebeebellies.blogspot.com/2012/05/quiet-book.html
I love your posts and have done several of your pages with more on the way. When you sew your pages together back to back do you put anything in between, example pellon or anything. thanks for the really cute ideas.
I love your posts and have done several of your pages with more on the way. When you sew your pages together back to back do you put anything in between, example pellon or anything or just the two finished pages? thanks for the really cute ideas.
I don’t add anything in between. My quiet books get so packed full that two layers of felt (plus whatever is sewn on the page) makes them plenty thick!
Hi there. LOVE your quiet book! I’m trying to figure out all the specifics of the one I’m making and was wondering how wide your spacing is for the grommets. I have a double needle for the 2 lines on each side but can’t for the life of me figure out how wide the gutter should be. Thanks! 🙂
I’ll have to measure… It doesn’t really matter, just as long as you are consistent!
Thank you so much for sharing your templates! They are amazing! I just made my first page (the Sandcastle.) I am completely new to sewing and blanket stitched everything easily. Where did you get the metal rings to hold it all together? Thanks!
I got mine on Amazon… The price has gone up since I bought them, but you do get 10 of them. http://tinyurl.com/binderrings
Thanks for all your tutorials. I finished the circus train, mailbox, and made a few of my own (“paper” doll dress-up and ladybug counting beads) after looking through all the inspiration! My question is, do you have any trouble with the grommets not holding? Once I assembled the book with the binder rings, several of the grommets have pulled out when the felt stretched as the pages are turned. Maybe I need to try another size or style of grommet? Thanks for any advice you can offer.
Hm, I’ve only had one come out, because I cut the hole for it too big. You want to go as small as possible with the hole, and preferably have at least 2-3 sheets of felt you are going through. You could try sewing button holes if you are patient!
I have one question I don’t see here, have you had any problems with the buttons coming undone? I love the idea of making something like this for my granddaughters, but the thought of buttons scares the beans right out of me!
I haven’t had any buttons come loose, but Jax doesn’t play with his quietbooks unattended (and I sew them on very strong!) If you have concerns, you should think about swapping them for felt. Do what works best for your situation!
I notice a lot of the items on your pages are hand stitched, do you just use normal thread or embroidery thread??
Hi there! Do you mind sharing what sewing machine you use? I have just been creating felt projects by hand and wanted to tackle a machine (clearly a newbie here!) A nice beginner machine would be nice, but I understand working with this type of material might require something else.
Thanks!! You’re an inspiration to moms to be as creative as possible 🙂
Hi! So i have just came across your site….and let me say its amazing! You have the easiest patterns and explanations not to mention the SUPER cute quiet book pages! I have decided that um I can TOTALLY do this with your pattern. 🙂 I have cut out the solar system page, sock matching page ( my 4 year old like to match socks! That did not come from me. lol) and the fire truck page. Im sure i will have many many questions, but first i saw that you made the fire station page and was wondering when we can get the pattern for that??? So i have it all cut out and now i go to assembling….which i know can be a time eating task. (Still working on my stocking of Holly Hobbie) Im excited and sooo glad to come across your amazing page!
I’ll be posting the fire station in installments soon! I’ve been swapped in my day job…
Where did you get the grommets? And what size did you use? Hardest part so far of making my quiet book!
I got my grommets in the notions aisle of Joann’s Fabrics. I think the size is just called “large”.
Hi Stephanie, I LOVE your quiet book pages and am enjoying many of your templates. I’ve noticed that some of your pages look like they were sewn together rather than using the grommet method and was wondering if it was true and if there was a tutorial on on you did it. Thanks!
My question is same as Ashley’s, Mar. 16, 2013. Is there a tutorial for pages sewn together rather than using the grommet method. Do the sewn together pages go in a different book & cover? I’m planning to make most of your patterns for 2 great grandchildren. They are great.(your patterns) Thanks.
Thank You so much for sharing. I have downloaded the patterns I want to do in the Quiet Books. I can’t wait to get started.
Can you show an example of a finished two page spread?
Here is one: http://www.imagineourlife.com/2013/04/25/bumble-bee-lacing-maze-quiet-book-page/
an idea instead of having them lose so you have heaps of blank pages but not stitching them together, use those white little clips (having a brain block on their names) so the backs can join together but can be changed. Make it so the first (left) page has on side for all of them and the second (right) page has all the other so they all can be interchangeable.
Not sure what you mean!
I generally don’t mix, except I like to use cheap craft felt as the backing piece when sewing the final page together.
Hi Stephanie.. You are so talented in your crafts thanks so much for sharing. I am excited to make a quiet book and following your website. I was just curious because I am on a budget. Do you buy your craft supplies (felt, etc.) in bulk online or just buy everything at your local craft store?
I currently have a felt sponsor that helps me buy nicer felt on sponsored projects. Otherwise, I use coupons for items sold in the craft store and look around for the lowest prices on felt (usually on Etsy). I buy bit-by-bit and try to use every scrap.
I’m starting my first quiet book and enjoy looking at all your designs! I noticed you replied to someone saying, “I like to use cheap craft felt as the backing piece when sewing the final page together.” Is that the 9×12 “final” white sheet you sew your designed side to? And craft felt is acrylic and not wool blend, is that correct?
I’m trying to make sure I understand everything before I run out a buy supplies! I’ve seen several other blogs make mention of not using the acrylic felt because it’s not durable.
The backing the the blank 9×12 felt sheet that goes on the back side of the fully finished page. Yes, I mean acrylic or polyester felt you find in craft stores for around 30 cents a sheet. I hope that helps!
I find that cheaper craft felt tends to pill over time, so some of my older pages have a “loved” look. But everything done in wool blend felt has held up well. When I have tiny pieces to sew, I make sure to use enough tiny stitches. More recently ‘ve added the step for felt glue for the little bits. I still sew afterwards.
I am going to attempt a quiet book project. I am so grateful for your templates and tutorials. I wonder if you are doing any quiet books soon that you might be able to record how you do the pages (how you sew them together after they are “decorated”). I just don’t get that part. 🙂 Believe it or not there isn’t a YouTube video on that subject either.
Thanks!
BTW- You are so talented!!!
I’ll be making two quiet books and I love everything you have for the ones you’ve done! At this point, mine will be 2 feet thick!
What grommet tool do you use?
I use a mallet to hit a little metal thin that came with my grommets. I have no idea what it is called!
Thanks so much for sharing your patterns and all your creative ideas. I am getting started on quiet book pages for my kids. I love your patterns, but as a fairly new sewer, can you tell me how to transfer the patterns on to the felt? Thanks again!
I just cut out my paper pattern, pin it to the felt, then cut it out. Ylu can also print it on “freezer paper”, then iron that to the felt and cut it out.
For all your hand sewing — do you use embroidery floss? How many strands? Your pages are amazing!
I use two strands. Here’s a tutorial!
http://www.imagineourlife.com/2012/05/15/sewing-basics-embroidery-floss-and-back-stitch/
Great idea! Thank you for sharing!
Good afternoon !! Congratulations on your creativity and talent. I will like to sew on my first quiet book for my grandaughter. She just turned 1 year old a month ago.
What are your suggestions on quiet book pages for this age? Don’t know how old your Jax is so can’t relate by your yearly pages what are the correct ones for our girl.
Thank you and congratulations, again, on your amazing talent.
This might be a dumb question but what do you use to make your “loose” pieces stick to the page? Velcro? Like with your sandcastle page how do you get the sandcastle to stick to the “sand” when you are building it?
Love your pages. I’m new to the world of quiet books and love your ideas. I’m attempting my first for my brand new grandson (to be born in September). I quilt and am in the process of making him an interactive floor quilt with a variety of felt objects. Started pages for the book using fabric and some stabilizer and your method of sewing them together. You have so many wonderful designs I look forward to piecing things on to the pages. The r a te I’m going it will be huge.
Do you have any recommendations on pens to use on felt that are permanent, won’t bleed and are fairly fine tipped? Love your quiet book. Glad I stumbled upon it!
I have just finished my first quiet book for my grand daughter using your patterns. I thought it would be the ideal gift for her from her nanny because she lives in Paris I live in Australia so it’s very expensive to post over. They are the perfect gift for her and it’s something that can be handed down. She is a bit little at the moment for the book so I am making pages to put in a pillow that I can add to. I will be using teaching pages like the Bumble Bee lacing Maze,itsy bitsy spider, flip-flop matching and things like that to fill the pillow up so when she travels to come and visit nanny she will have something to keep her happy on the trip. Eliza is 2. So thank you very much for your wonderfull patterns I find it very calming I can sit and sew for hours.
Just came across these recently and love them!
I was wondering what size needle do you use for sewing the felt? Do you use a universal or sharp? What stitch length do you recommend on the machine?
I am making quiet books for my granddaughters and used your monkeys on the bed pattern. It is adorable!! Thank you so, so much for sharing!
Hi! I only heard about quiet books for the first time yesterday, and am currently sat here making my first page!! Absolutely love your site and this page in particular is very helpful. I am confused though. I am putting my 9×9″ activity directly onto a 12×9″ piece of felt, which it looks like you do – piggy bank, sock sorting etc – so would you then back that with something to make the page sturdier and hide any stitching? Would the backing be 9×9 or 12×9? Or do you just leave if one layer thick? Thanks, I don’t know what to do for the best! Seems a bit thin at the moment.
do you use velcro? i’ve tried the sticky type it isn’t working very well
Pingback: In Depth Guide to Joining Quiet Book Pages – Part Three of Three – Simply Kyra
When you sew the Velcro, which side is on the actual page and which do you sew to the pieces? I don’t want the sticky side to “pick” at the facing felt page when the book is closed, but the sticky side sewn to the pieces will stick them together when placed in the pocket. What would you recommend?
Pingback: What is a Quiet Book? - Felt With Love Designs
Pingback: S’s Quiet Book – The Sojourning Dunns