Do you want to make and sell items from this pattern? Commercial licenses are available!
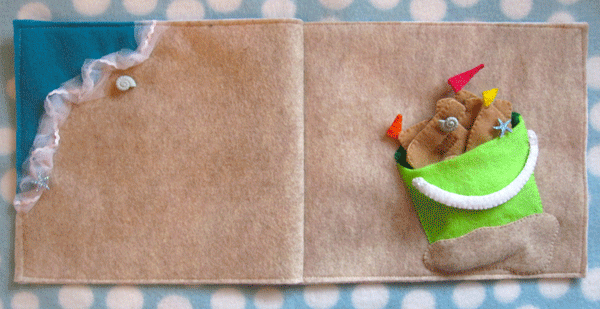
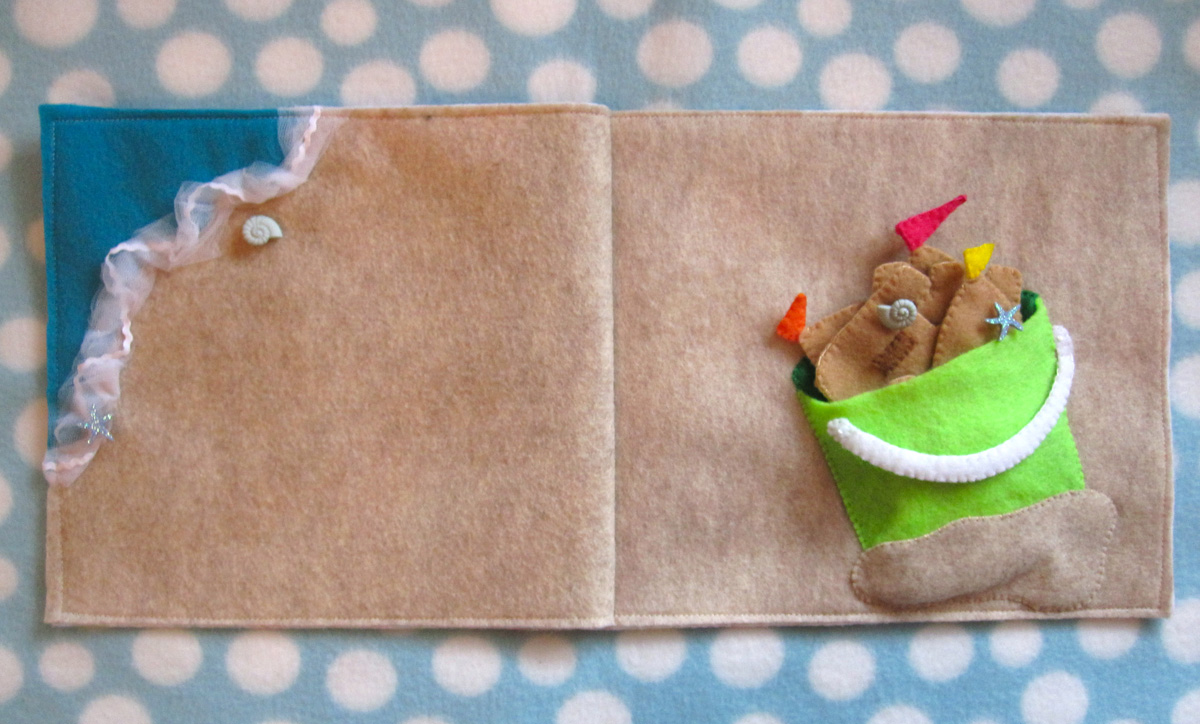
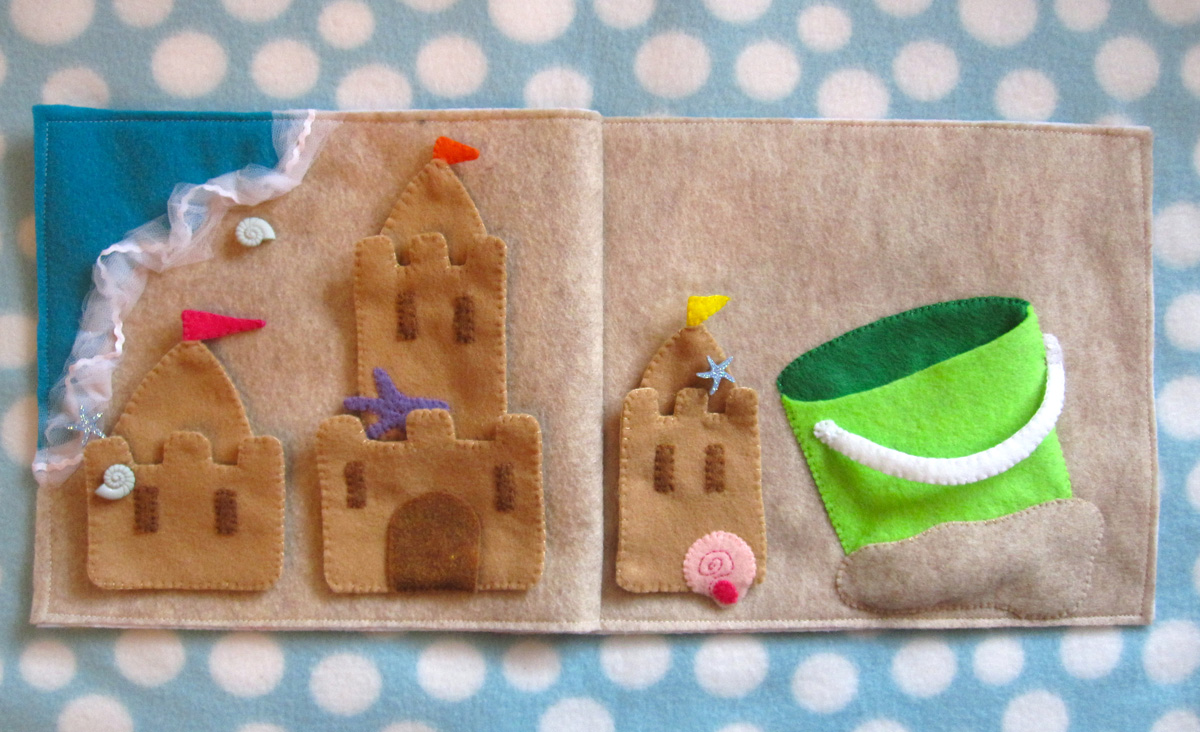
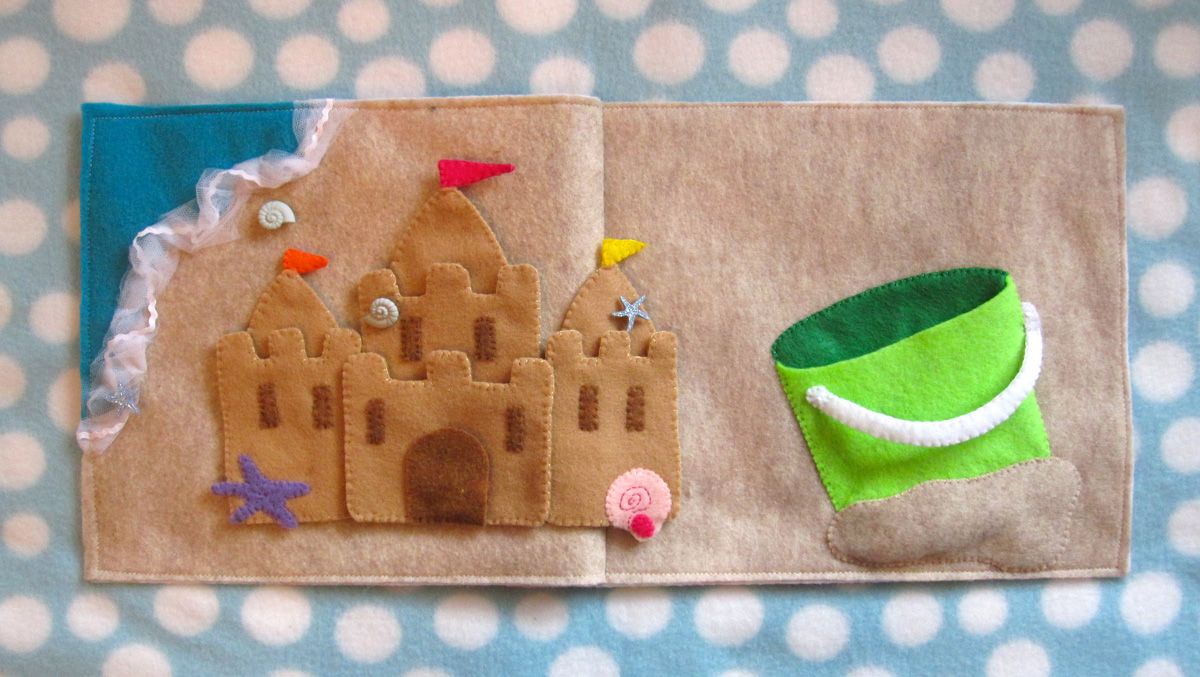
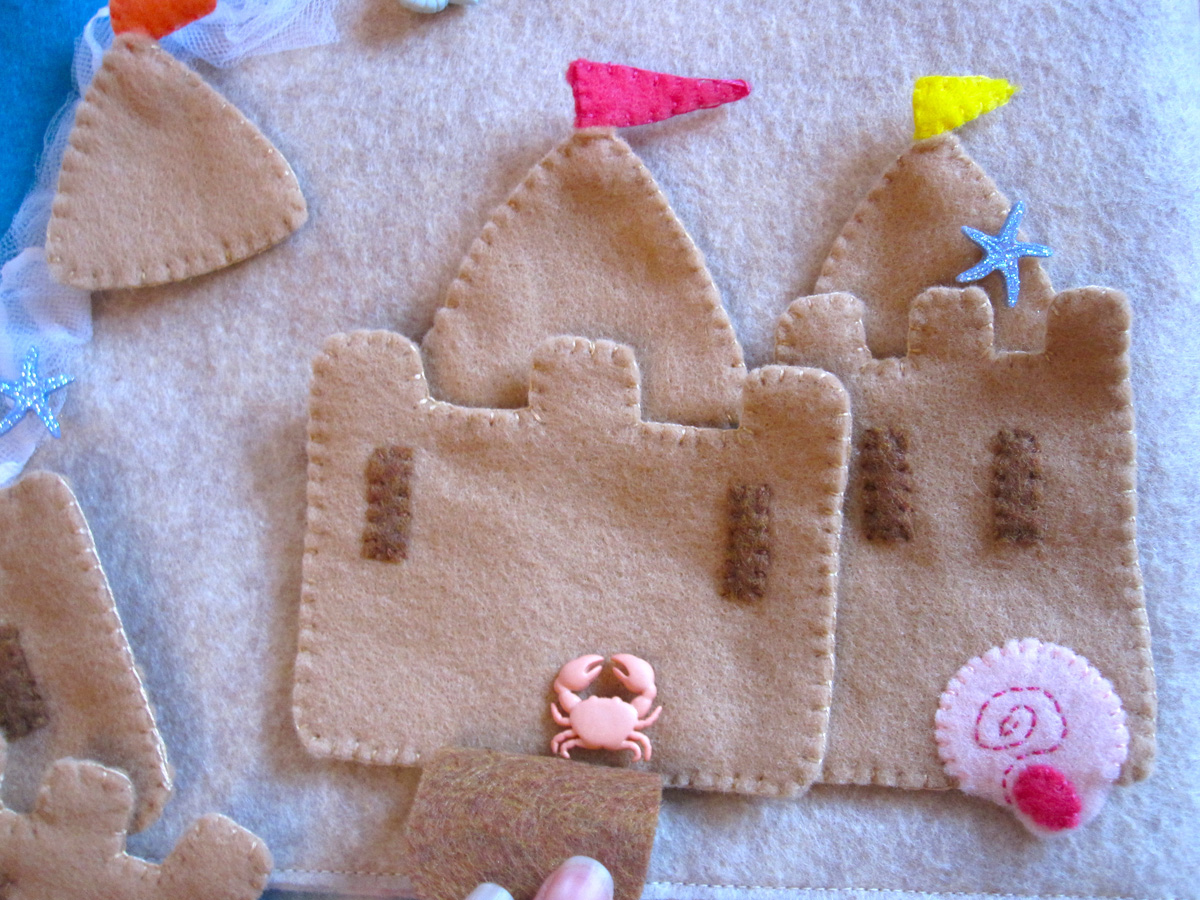
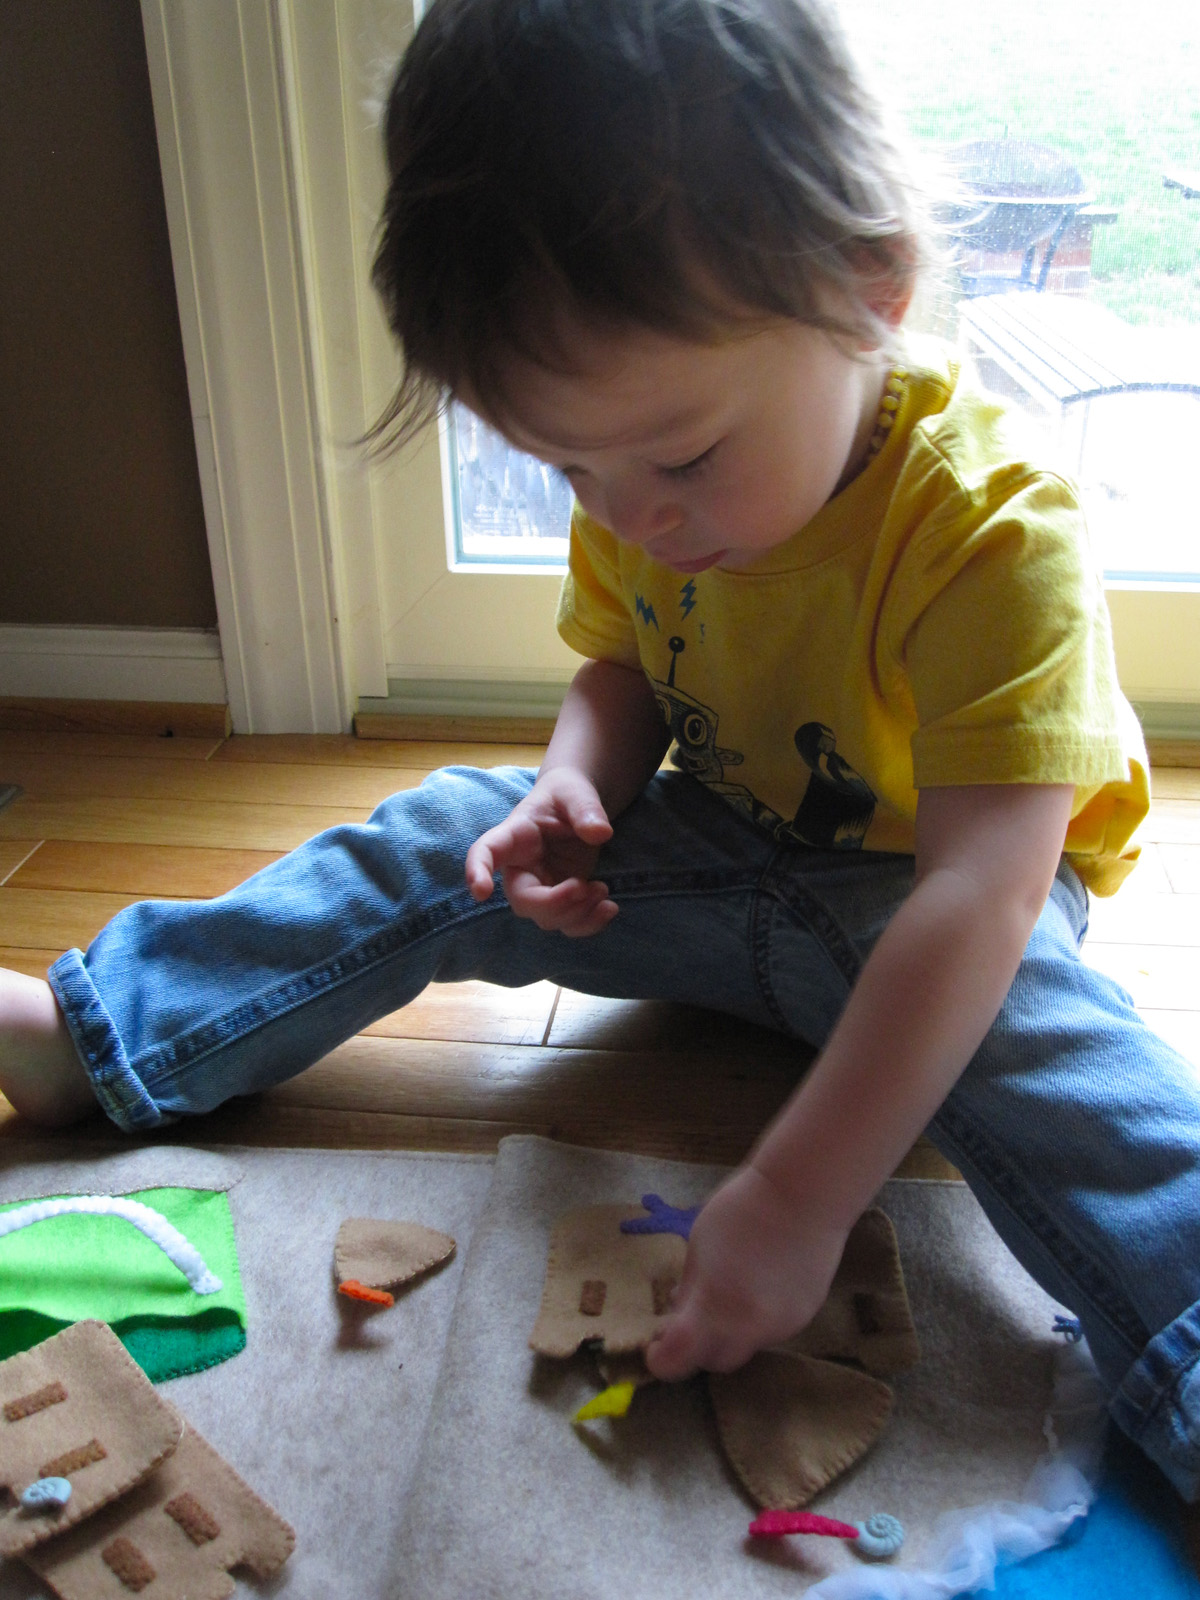
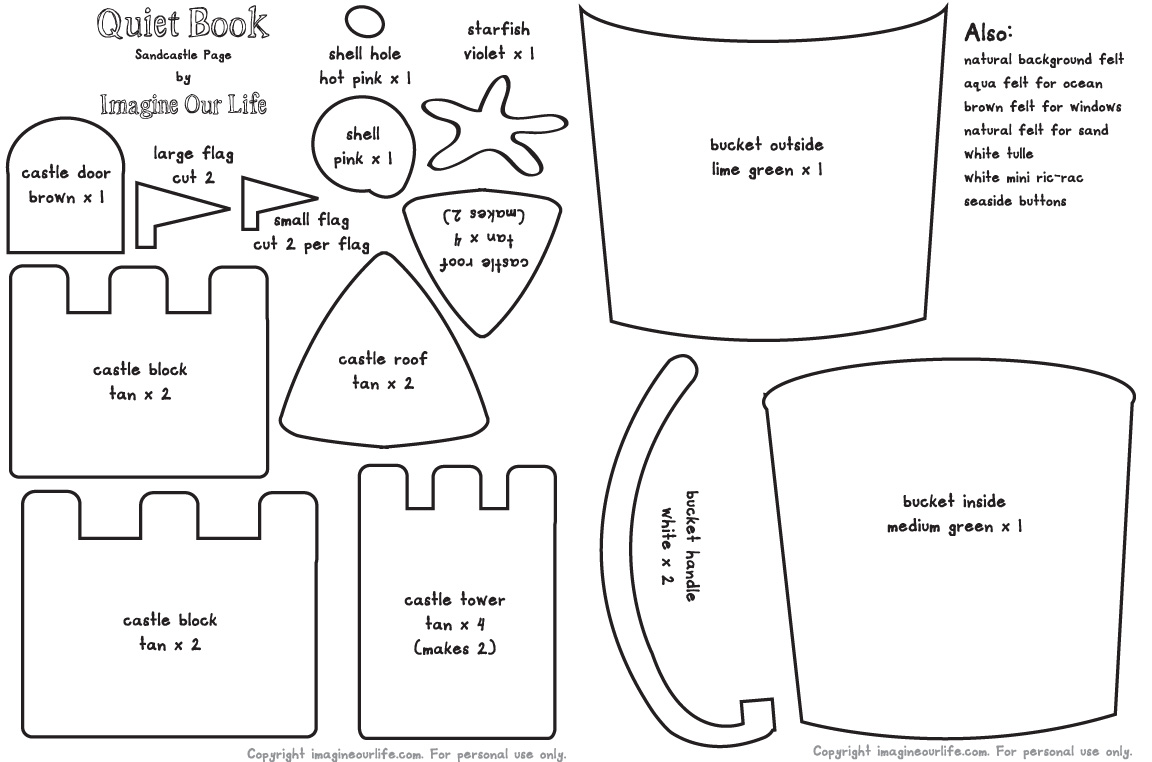
 Our latest quiet book page is another beach themed one for our upcoming vacation. Jax is thrilled with it and couldn’t wait to try it out. It is a very simple page featuring sandcastle parts you can build into any structure you’d like, then store away in the bucket.
Here is what I used for this page: the pattern, natural-colored background felt, felt (in natural, tan, brown, medium green, lime green, white, aqua, pink, hot pink, violet, orange and yellow), a scrap of white tulle, white mini ric-rac and seaside buttons (from the craft store – left over from my iSpy page.)

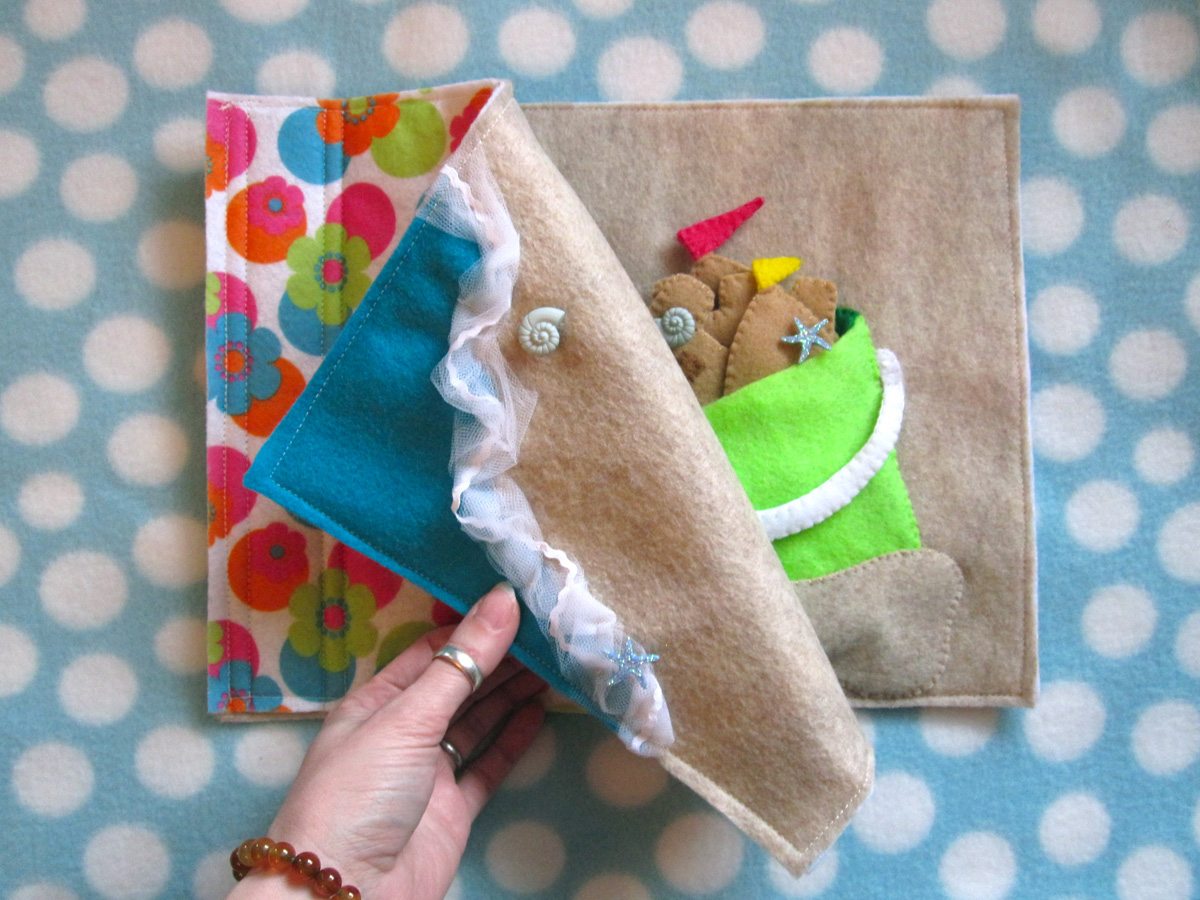
Bucket: Sew the two layers of your handle together. Lay the bucket pieces onto the background and decide how you’d like it to be. I wanted mine to be buried in the sand at an angle. Pin the bottom layer of the bucket to the page, and sew it down across the top. Cut out a scrap of natural felt to be the sand the bucket is buried in and pin it to the top layer of the bucket. Sew across the top of the sand piece to attach it to the bucket front. Pin the bucket front and handle to the page, layering the right side of the handle under all bucket layers. Sew the left side of the handle to the bucket front layer. Sew through both bucket layers down the sides, then sew around the sand on the bottom, making a large pocket that goes from the top of the bucket to the bottom of the sand.

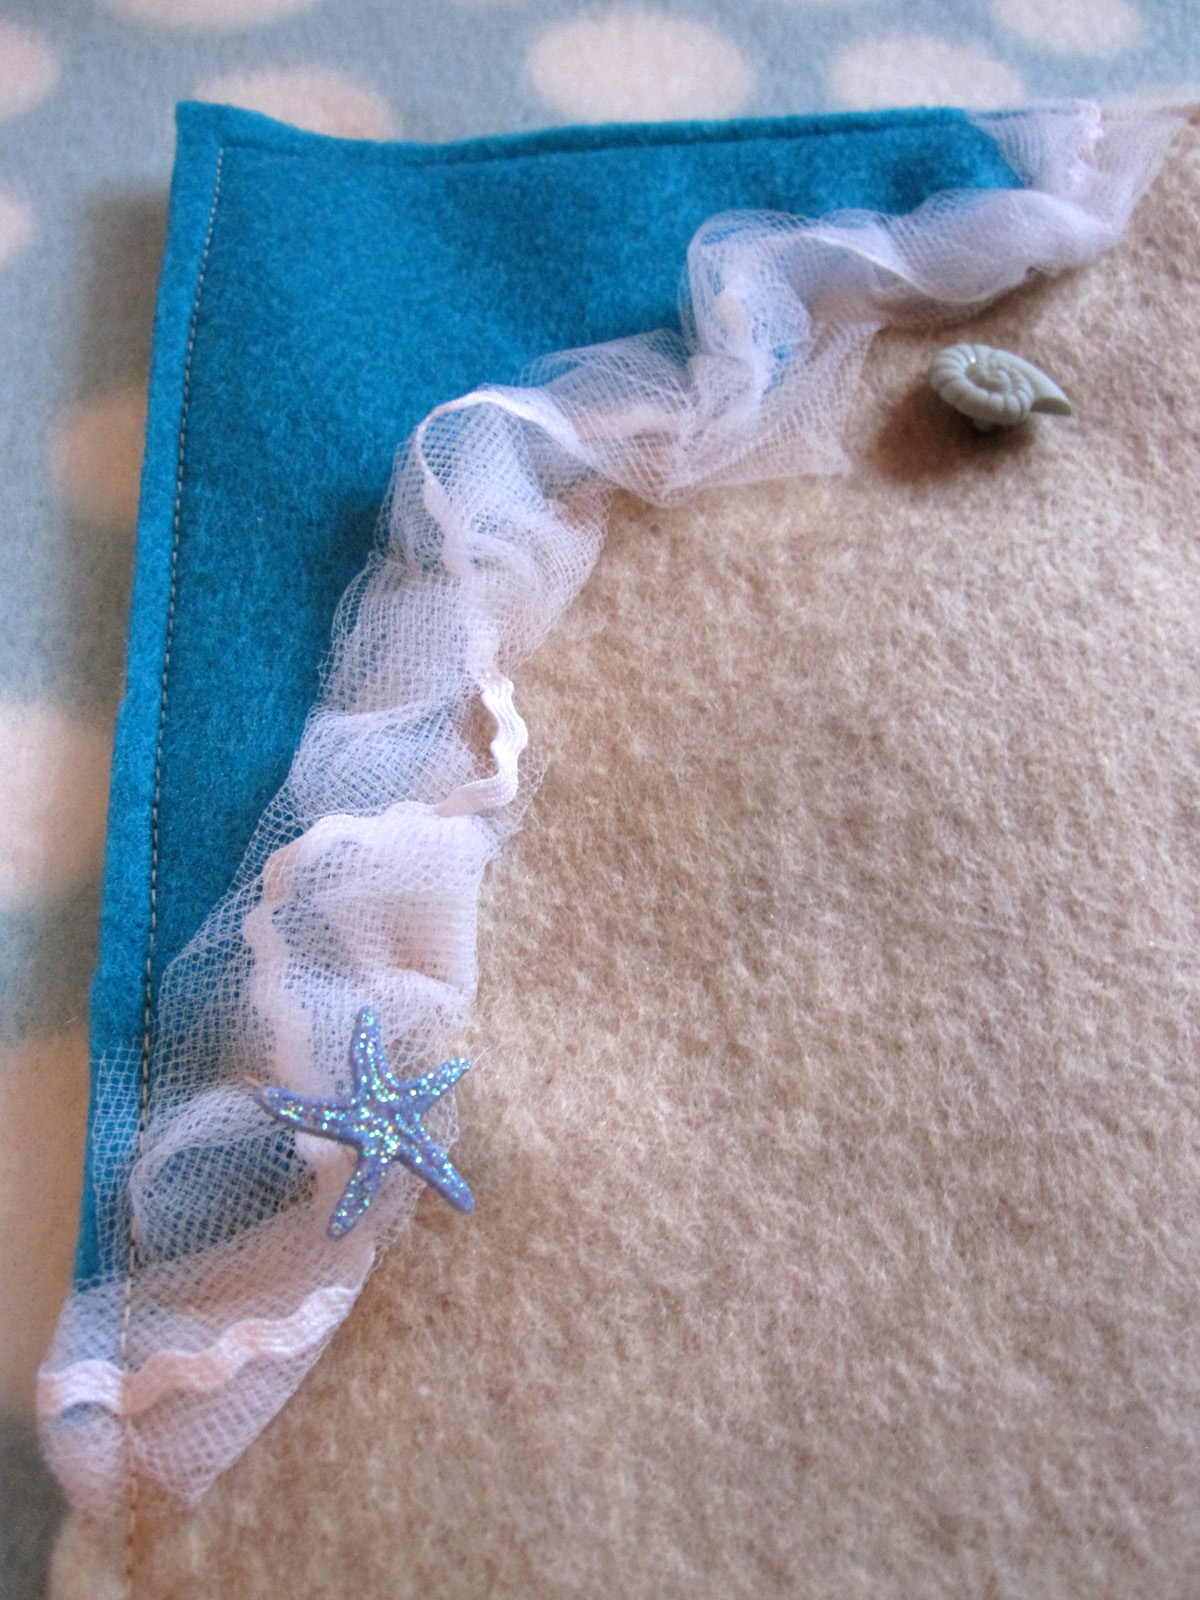
Ocean: Cut a wavy aqua piece of felt to fit in the upper left corner of the left page. Sew it down. Cut a strip of white tulle and a length of white mini ric-rac long enough to follow the ocean’s edge. Pin it down to the edge, twisting it randomly along the way. Sew small stitches through both the tulle and the ric-rac – just enough to hold it down but not totally smush it. Add shell and starfish buttons if you’d like.

Sandcastle: Cut small brown rectangle to use as windows, and sew them to the fronts of the castle segments. Decorate all the fronts. For the starfish, I sewed it down then added a star burst of straight stitches in the center. For the shell, I stitched a spiral. For the door, I only sewed it down across the bottom, and I added a little crab button underneath. I added some leftover shell buttons to some pieces. Sew all your flags together. Layer them between the roof pieces when you sew the two sides together. Sew all fronts to backs, then you are done!
Jax wouldn’t let me put this page away after I showed it to him. He wanted to keep playing with it, and started making castles for his little wooden farm animals. I’d say this page was a success!

Love it!!! Such a cute page…makes me really excited for summer!!! Wonderful pattern…thank you so much!!
How necessary is it to have a front and a back piece?
Well felt can be ripped fairly easily if you only have one layer. And if you do any stitching on it, your stitches would show on the back. I don’t like to use only one thickness, but you certainly could if you didn’t mind more wear and tear.
Thanks, totally makes sense. Thanks for sharing your ideas. I can’t wait to get these pages done.
Oh my goodness, this is amazing. I’m very new to sewing but really want to make a quite book for my kids (I’m from the UK and hadn’t heard of them until recently). My daughter loves the beach so I had planned to include a beach page. Thank you for including the patterns and instructions, it’s all so perfect.
You are AMAZING! I just found your blog through pinterest and I’m ready to dive in. Thanks for sharing your patterns with us! I love how unique and interactive your pages are! thanks for sharing your talent!
Thank you so much for all the patterns. I have been looking for a blog that has the patterns, I am not much of a artist so this is great. You are so kind to let go of your patterns. My grandson will love this
These pages you create are absolutely lovely! I’m going to try my ‘hand’ at them and am wondering what the dimensions of your book are? 12 x 9?
The pages are 12″ x 9″ as that is the size of most felt sheets. My binding is about 2″ and I typically leave about an inch around the center seam clear so it can fold closed easily.
Pingback: Quiet Book Page Two! « QUIET WORKINGS (or not so quiet).
Do you attach Velcro on the backs of the pieces or just rely on felt sticking to fely?
On this page, I didn’t use Velcro. I don’t like sticking Velcro to felt, as it makes the felt fuzzy. I either skip it, or use snag-free Velcro (which requires two sides to stick).
I tried this page and well as your cookie cutter pages. Such a cute idea, both of them, you are so talented! Here is a link if you want to see what I have done. I am clearly not as talented as you, as I didn’t do either of them justice. Thanks so much for sharing your patterns!
http://loveithateitwouldnttradeit.blogspot.com/2012/06/i-have-started-making-quiet-book-for-my.html
Great job so far!
Pingback: Quiet Book : Pen & Ink Artist
Steph, These pages are great. I thought I would start with the sandcastle as it looks a little less challenging (here’s hoping!). I have a really dumb question. I have the pattern and all the felt, I have poured over yours and many other sites but no-one explains the best way to cut out/transfer the pattern. Can you help?
I am working on this now, thsnk you very much for sharing your patterns. I am wondering how you stitched the castle pieces together. Did you use a blanket stitch?
Yes! Blanket stitch in matching thread!
Thank you so much for sharing your pattern with the rest of the world. I´m creating a quietbook for my little son and used your sandcastle page here: http://filzekater.blogspot.de/2013/05/fuhlbuch-seite-1.html
Greetings from germany
I am taking my four monkeys on a long trip to Oregon this summer and found this page so darling I am going to make it for each of them. Thanks so much for the pattern, it is very kind of you to share.
Do you do all your pages on full sized felt sheets? My first page that I did of yours was the itsy bitsy spider and you cut that page down. Was that the only one you did that with? I love this page and want it to be the next one I make for my daughter. TIA.
I started out cutting my pages to squares, then sewing them to a background to add room for the binding. In more recent pages, I just used them full sheet and saved two inches on one side knowing the binding needed space. It works either way!
Hi Stephanie! I love love love this sand castle page! I am not a sewer…is that even a word?!?! Anyway, I am determined to make a quiet book and want this page included! I am wondering where you get your felt. If you could share I would really appreciate it! Awesome work snd hope mine turns out okay.
This page was done with craft felt from Joann’s Fabric. Now I use wool blend felt of a higher quality for my more recent pages. This is from American Felt and Craft online.
I’ve had to order my wool blend felt online. I shop from American Felt and Craft or Etsy. Joann’s Fabric has 10% wool by the yard, but I’ve not tried it.
Pingback: Der Strand im Quiet Book | StempelJuli
Thank you for the great idea and fun pattern!
This is amazing! Thank you so very much for sharing your hard work and great idea!!
I love this design! Thanks for sharing it, Stephanie. I do have a few questions, but first, a little context: I’ve been invited to a quiet book page exchange. I found this sandcastle pattern of yours via Pinterest, and I offered to make it for the exchange. The exchange is happening rather soon, but I some more details in order to make your design.
I want to scale this down to fit one 9×9 page rather than two pages; I have to make 17 of pages of this design total, so the less work and items to buy, the better. I can resize the pattern myself, but I need some kind of baseline as to how much felt, etc., you bought when you made first made your version of these sandcastle quiet pages.
The list at the beginning of this post (“Here is what I used for this page”) doesn’t mention amounts or quantities. I know you posted this years ago, but do you have any estimate on what you purchased, please?
Let me know. Thank you so much!
HI Stephanie,
I am starting a quiet book for my daughter. I love your patterns and details. I have not sewn before so this is going to be fun learning.
I am trying to start with the Sandcastle page, but I am having a hard time finding felt for the pages and sand. I can not find natural and tan on American felt page. I did however order quite a bit for up coming pages from them. Could you help me I really like the color and texture of what you have photo graphed
I made two of these sandcastles for my neice and nephew in 2017. It was the first quiet book page I saw that I thought I could maybe really sew! Since then, I designed my own felty pages that turned out ugly but okay! The kids love them. And now I am sewing fabric baby books, toys, baby blankets, bibs, and all sorts of fun things from patterns online. A whole world opened up for me when I began to sew, and I find joy in sewing. So thank you very, very much!
Pingback: 45 Free Quiet Book Templates & Pages | The Yellow Birdhouse