Tag Archives: Valentine

Felt Valentine Play Set

Felt Valentine Play Set

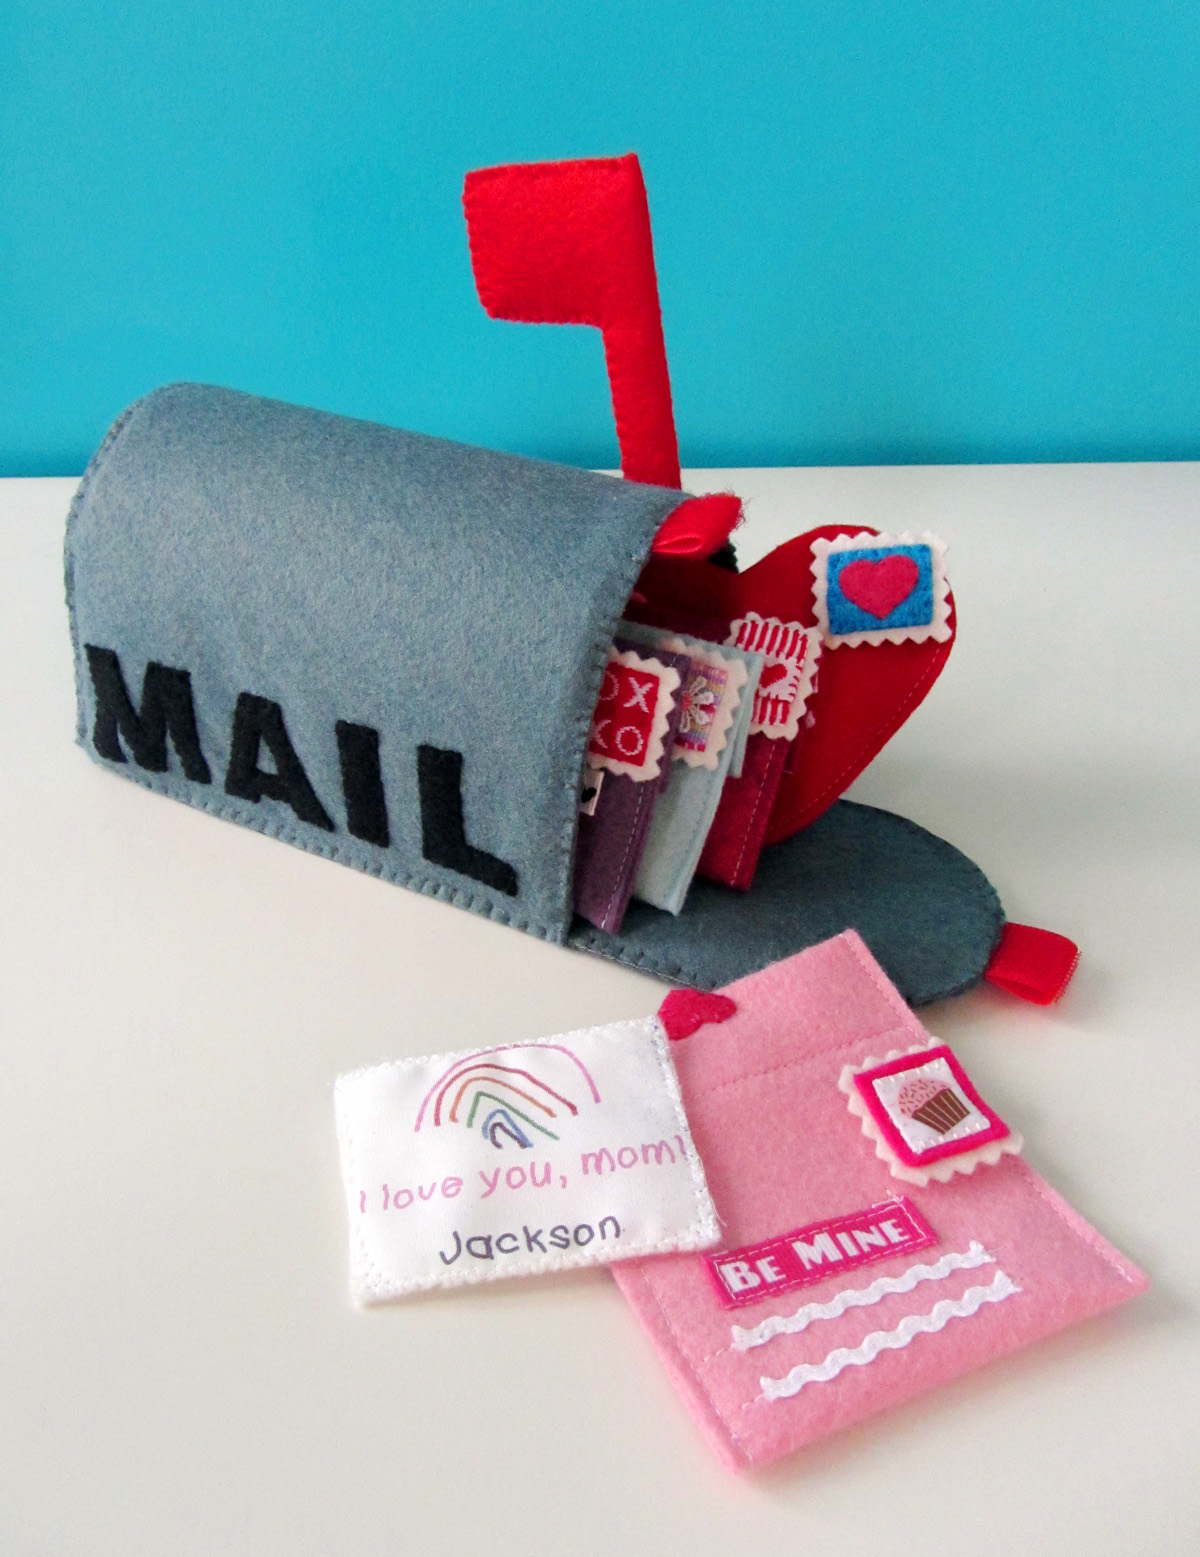
I really wanted to make something cute for Jax to play with this Valentine’s day. He loves checking the mail with me (and our post box!), and he loves putting things into other things. Simple pleasures, I guess! While I’ve already made him a mail box quiet book page, I wanted to make him something 3 dimensional that he can have for his playroom. As a bonus, it will help him learn about the process of writing and sending letters.

Big, big thank-yous to reader Jill, who gifted us with a roll of photo fabric. Thanks to her generosity, this project is so much more personal and special.
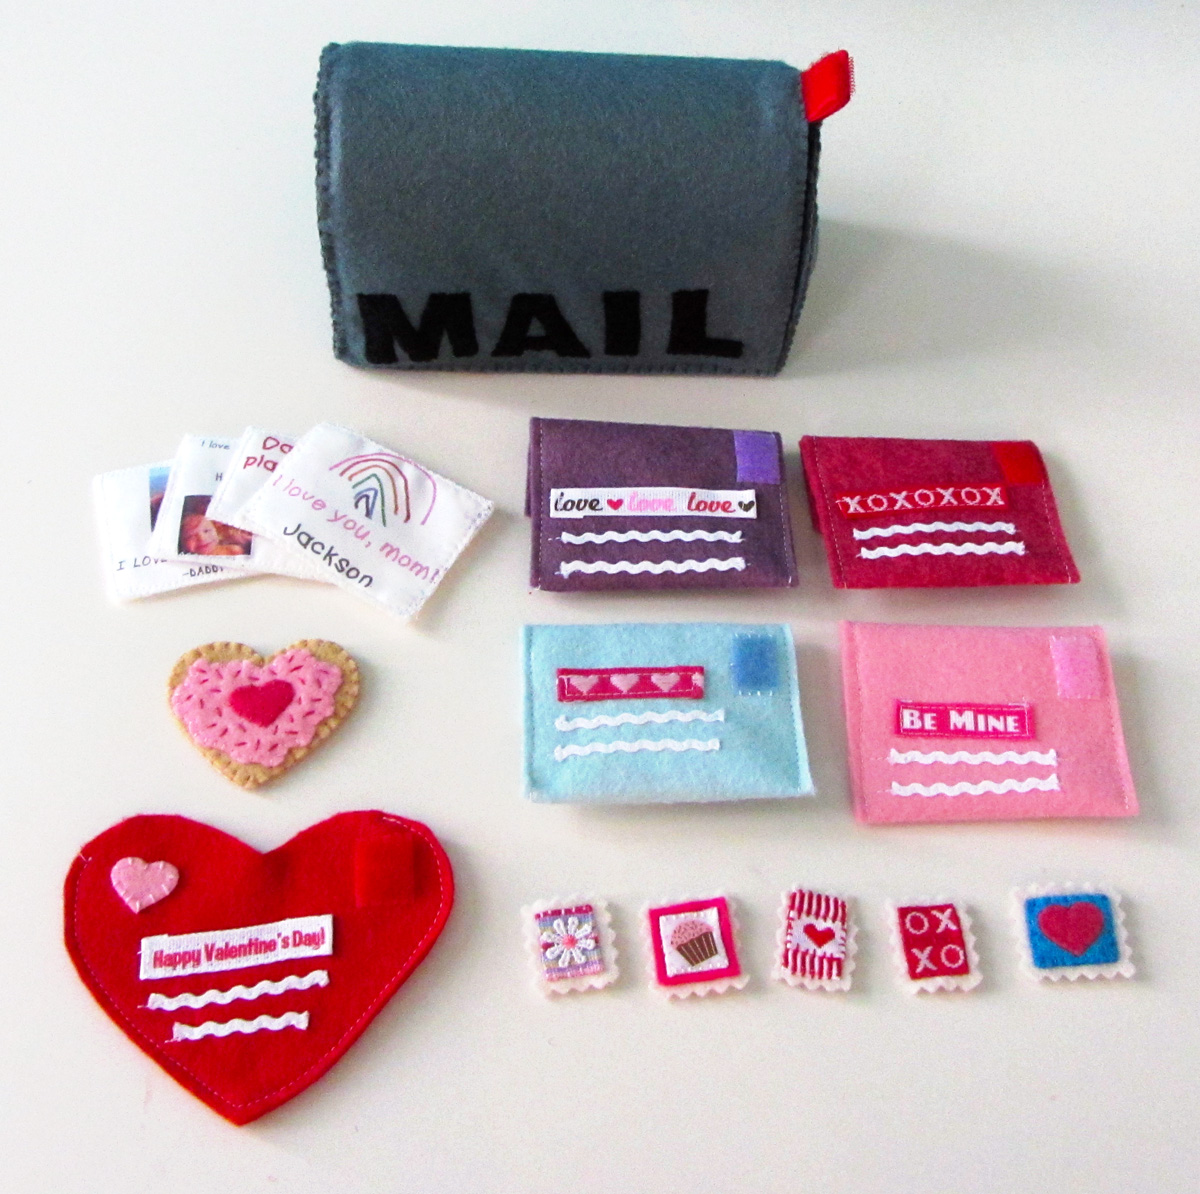
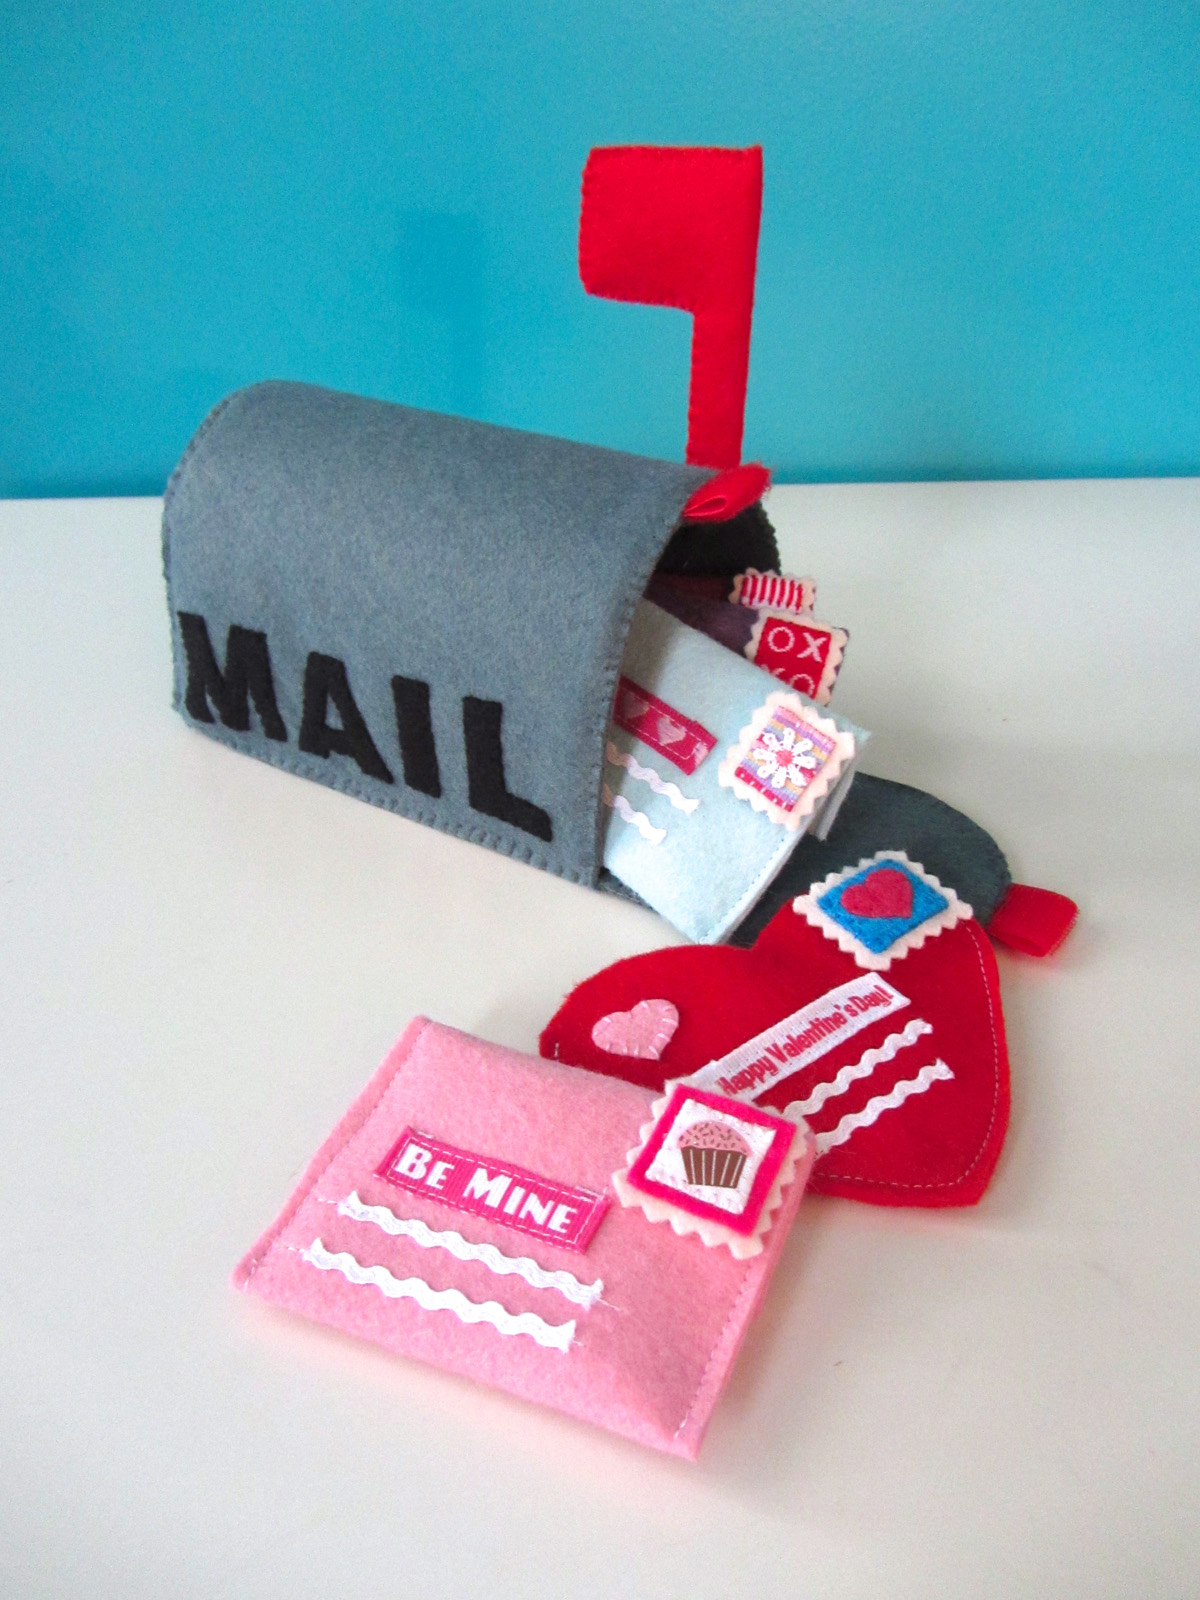
The full set.

The full set.

What I Used:

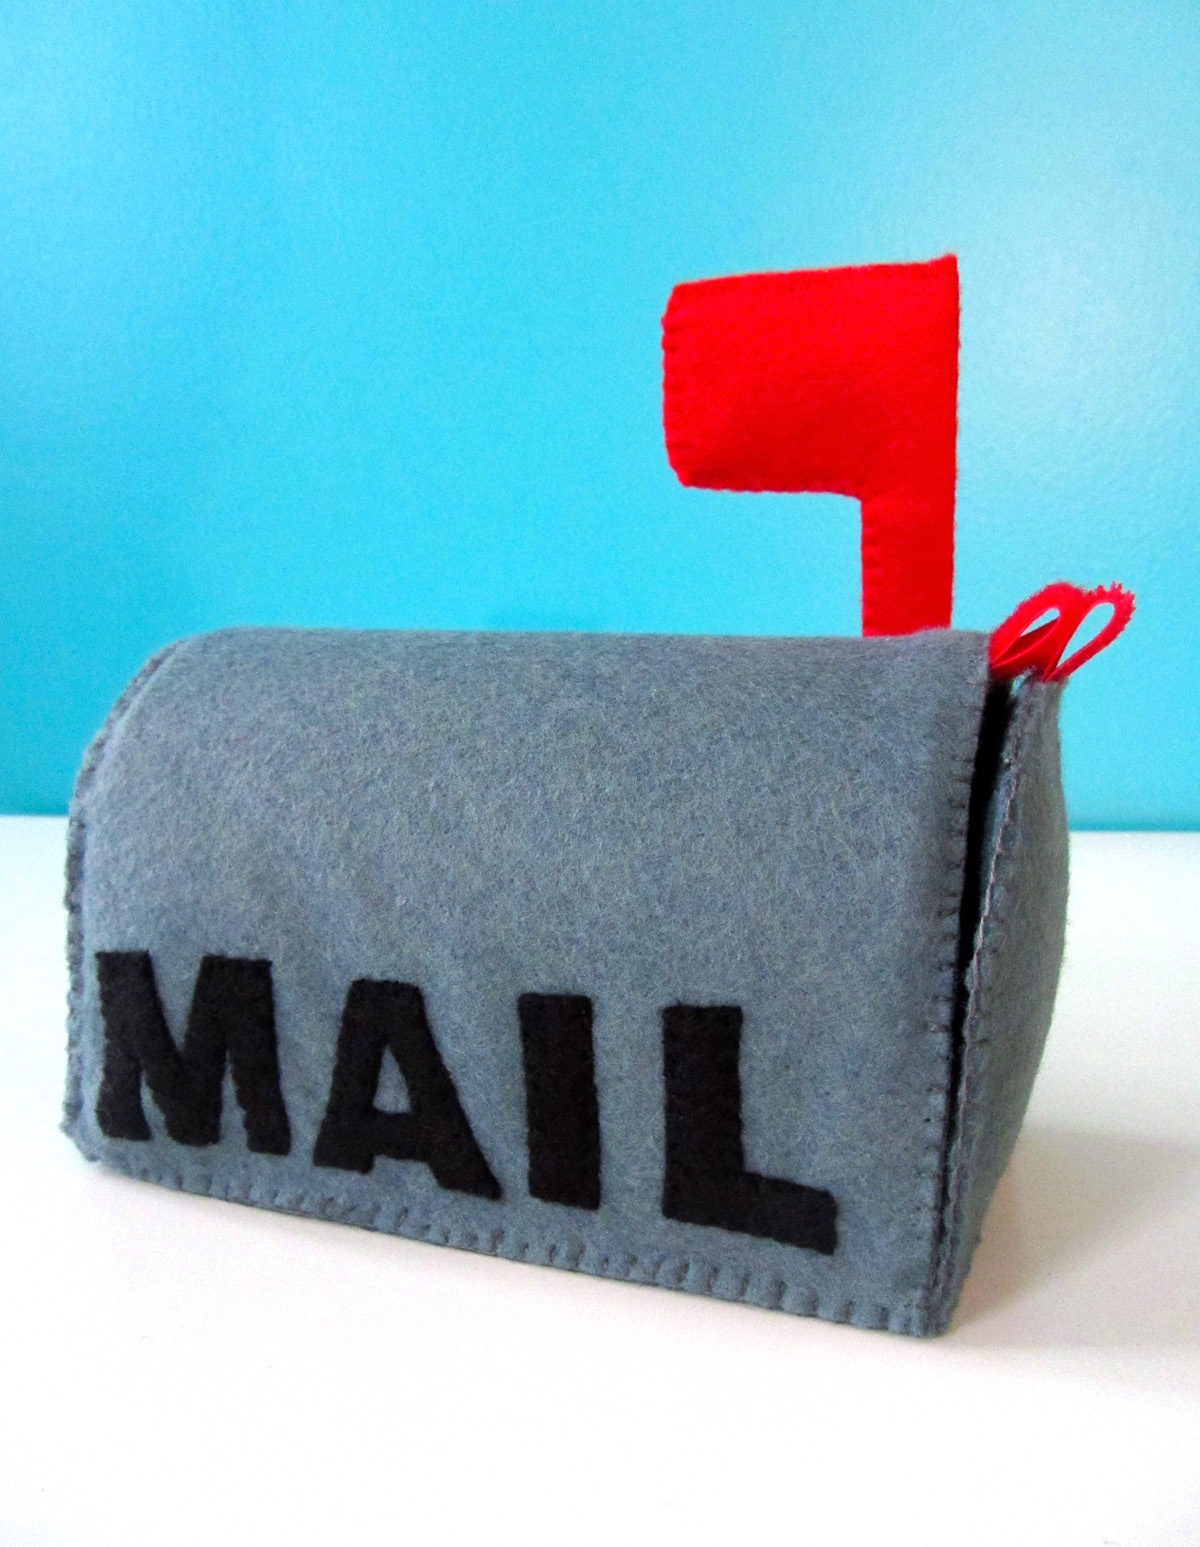
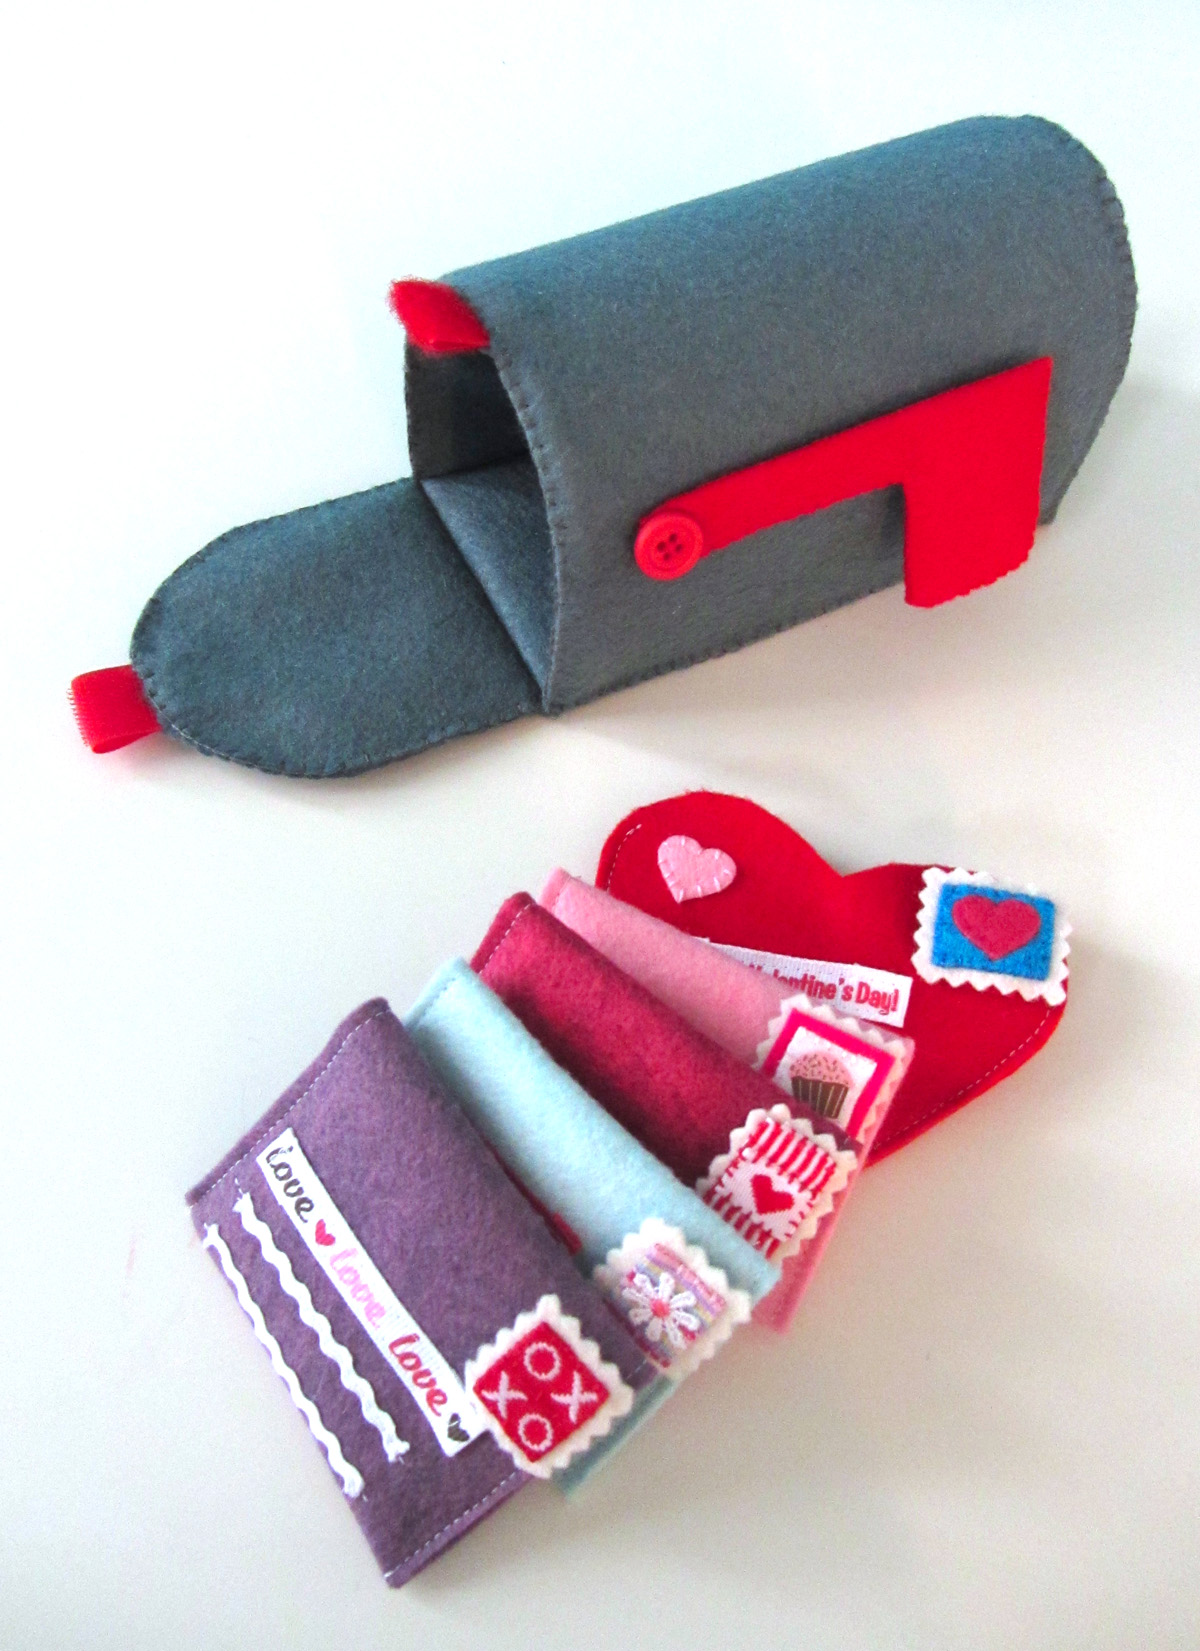
Mailbox: I started but stitching the MAIL letters down to the outer layer of the mailbox top piece. I cut a piece of plastic canvas 1/4″ smaller all around than the felt, and sandwiched it between the two layers. I pinned it well, then sewed along the long edge by the L, pausing halfway to insert a folded piece of red hook (soft) Velcro.

Felt Valentine Play Set

I cut some plastic canvas 1/4″ smaller all around for the mailbox base, and layered it in between the felt pieces, pining them in place. I pinned the mailbox top on top of the mailbox base with a long edge of the base matched up to the MAIL edge of the top, and I sewed them together. I bent the top up to form a tunnel and sewed its short edge to the other long edge of the base. You may need to trim the inside layer of the mailbox top after pinning it, as it is the inside curve and is slightly smaller.

Felt Valentine Play Set

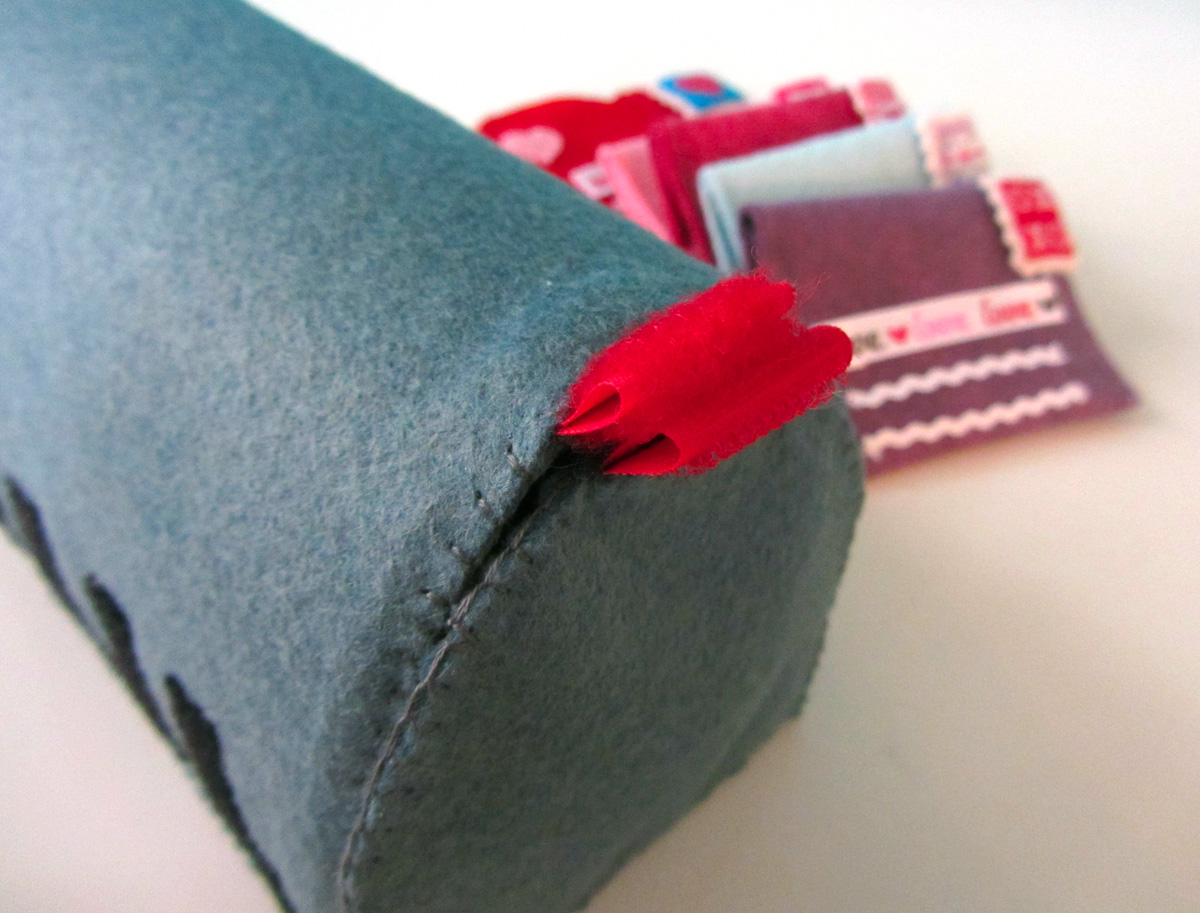
I cut two pieces of plastic canvas 1/4″ smaller around than the mailbox door/back pieces. I pinned them between the two sets of felt and sewed around the curved edges of one, catching a folded loop of red hook (hard) Velcro in the middle of one. I sewed the one without Velcro to the back of the mailbox all around. I sewed the door with Velcro to the front, laying inside the mailbox and sewing it along the bottom before pulling it out.

IMG_1457

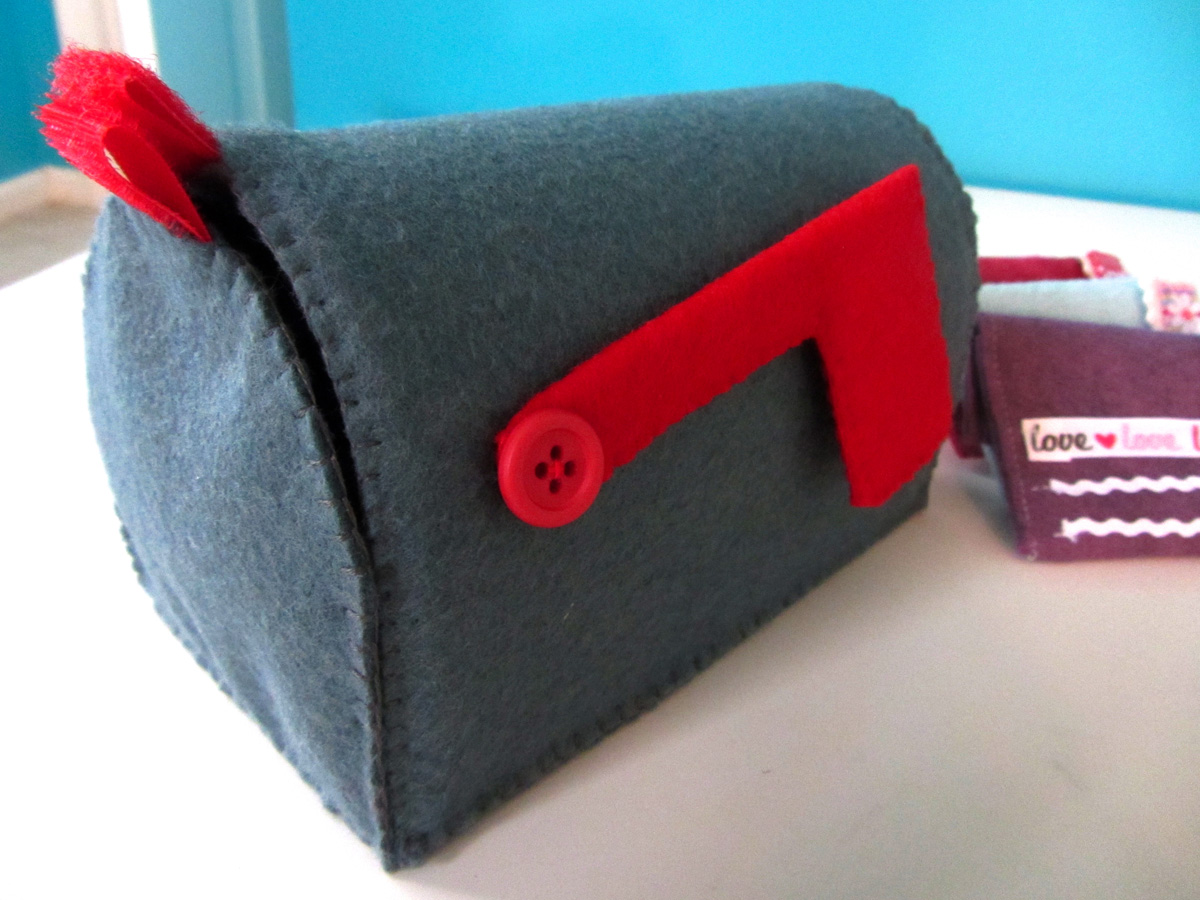
I cut some plastic canvas to go inside the mailbox flag, but you might be able to get away without it. I didn’t have the canvas go all the way down the post – I left room at the base so I could cut a small hole through the whole flag after sewing the layers together. I stitched around my tiny hole with a buttonhole stitch. You could perhaps use a tiny eyelet, but you really only want the hole big enough to sew a button though it. If it is too large, the flag will just flop down. After I sewed the edge of the hole, I very carefully sewed a button to the side of the mailbox, running the stitched through the hole in the flag to attach it. I took some red scrap ribbon and wound it between the mailbox and the button until the flag stopped flopping but could still move, then tied the ribbon in a tight knot and trimmed it to hide it.

Felt Valentine Play Set

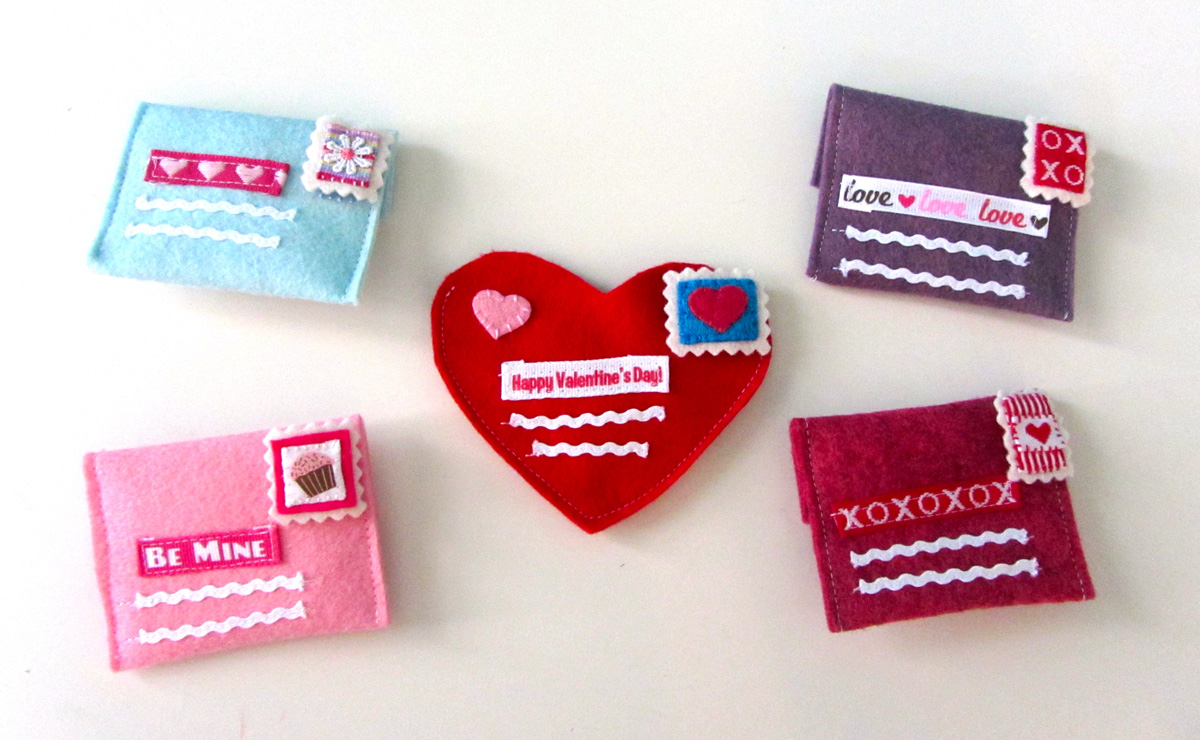
Envelopes: I cut one piece of felt for each envelope. With the wrong side up, I folded the top part down and the bottom part up, and pinned to find the positions of my Velcro. With them unpinned, I stitched Velcro in place to close the envelopes and some loop Velcro on the front corners to hold stamps.

Felt Valentine Play Set

I used my machine to sew scraps of ribbon and ric rac on as the address, then refolded then and sewed along the sides and the edge where the top is folded down. I finished them with a little felt heart (cut from a trim I got at Target) to the envelope flap.

Felt Valentine Play Set  Felt Valentine Play Set

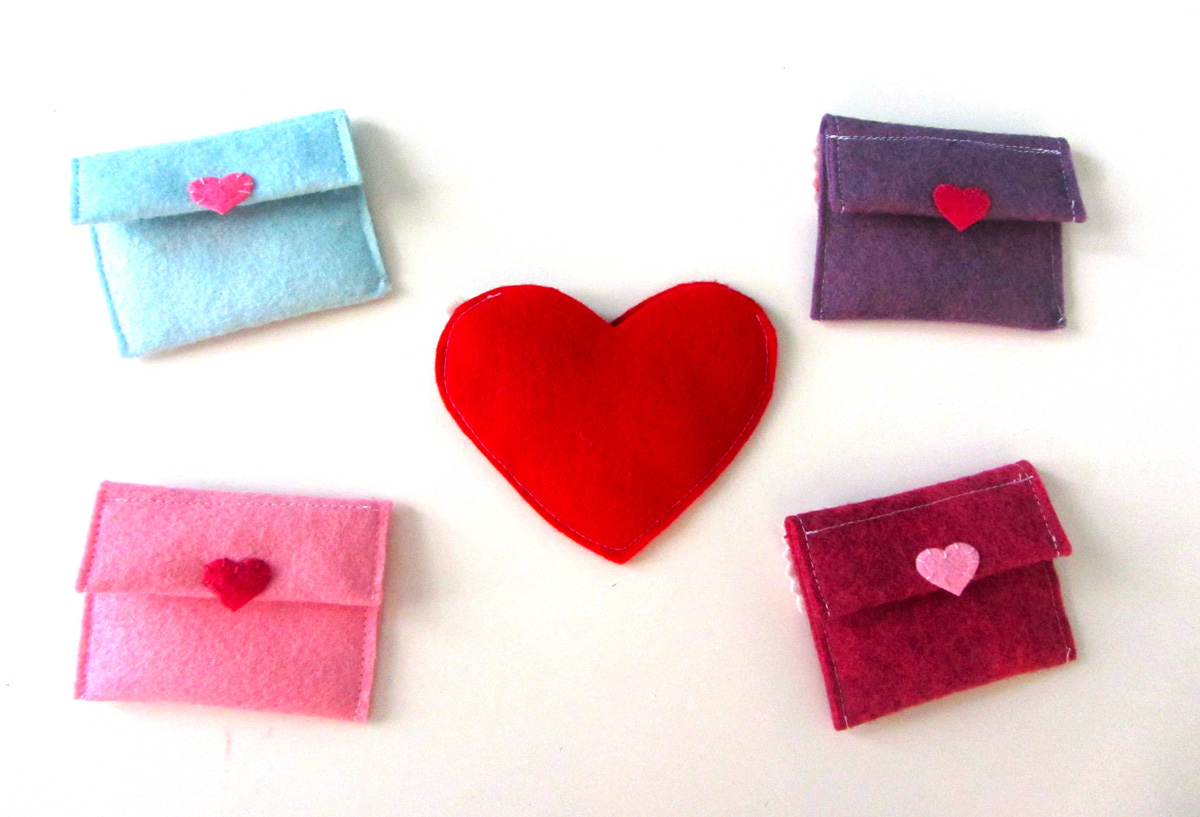
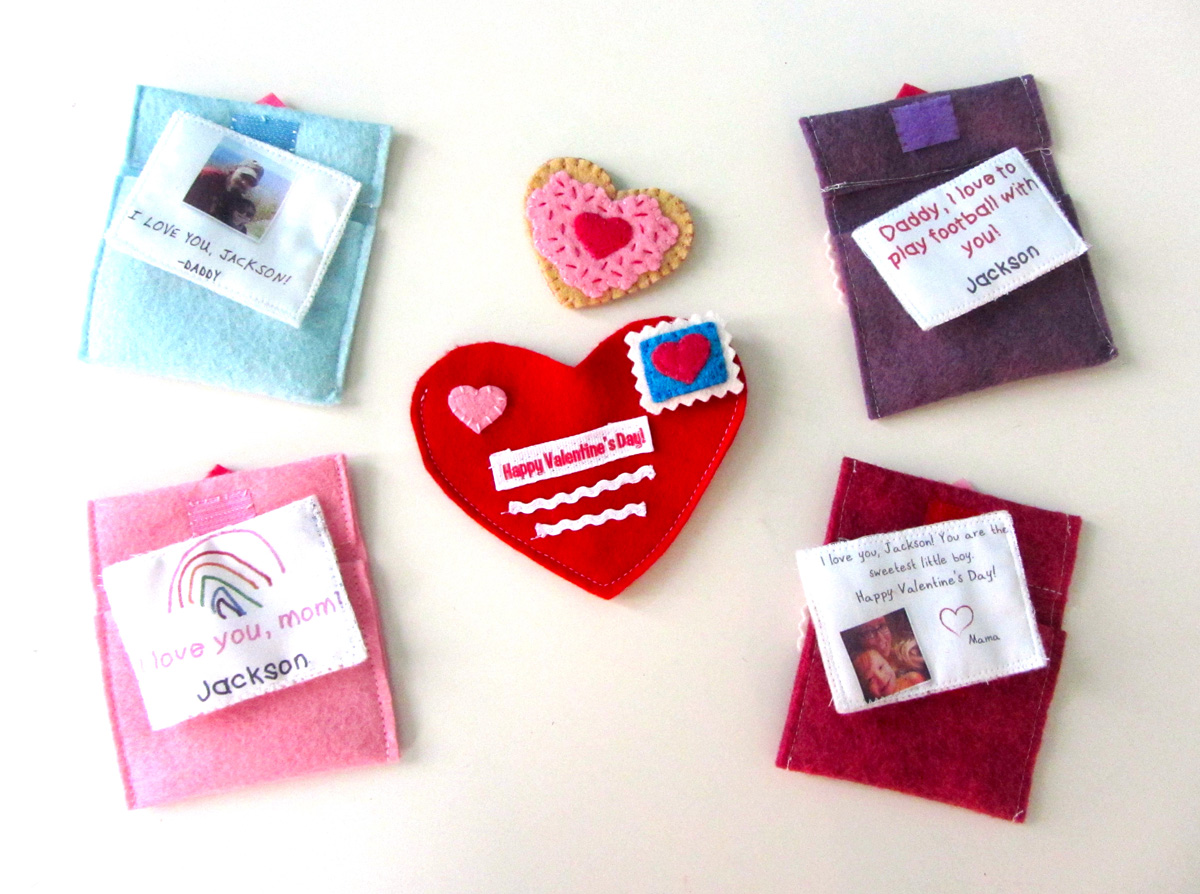
Heart Envelope: I decorated the front with ribbons and ric rac the same as the envelopes, and I added some Velcro for the stamp. I sewed on a little felt heart to look like a sticker. Then I sewed around the edge, leaving the top open.

Felt Valentine Play Set

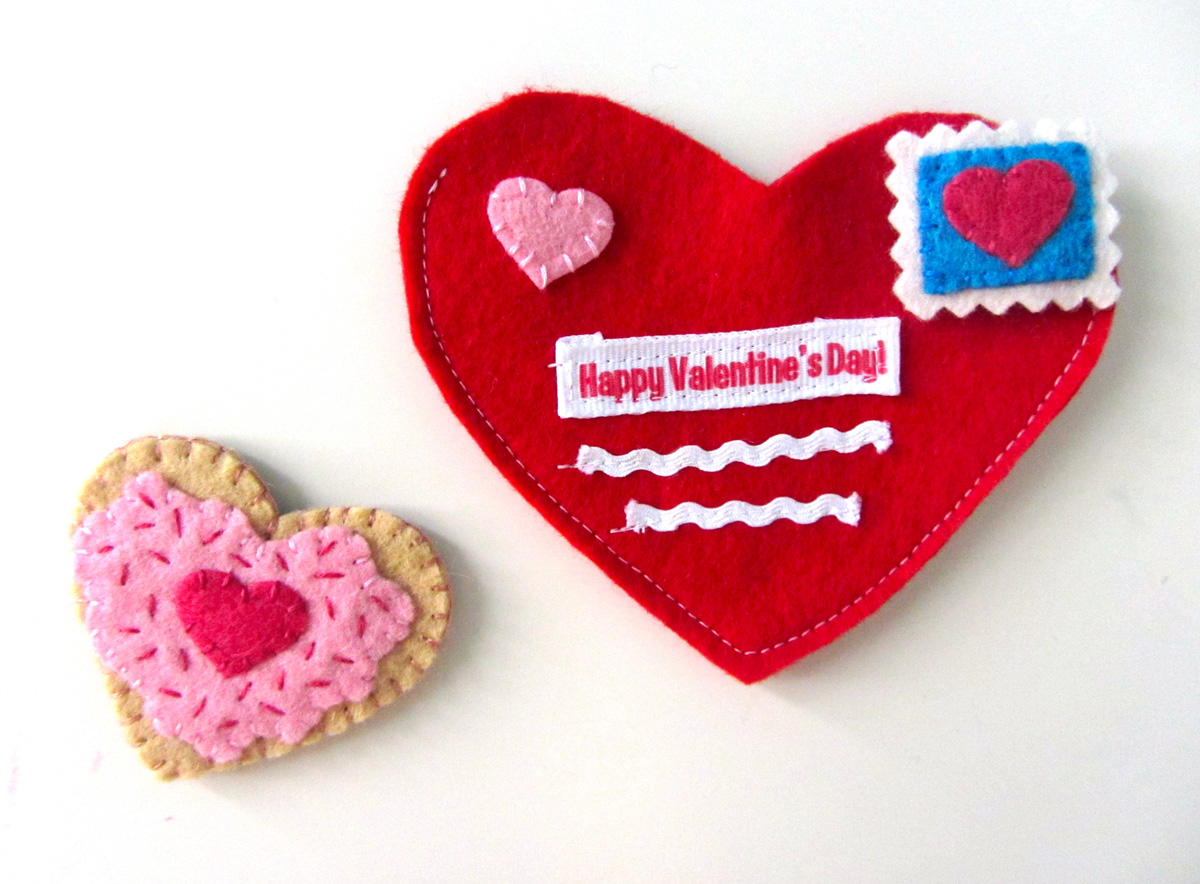
Sugar Cookie: I sewed the pink icing down to the top cookie piece, the added a felt heart and some long stitches as sprinkles. Then I sewed the front and back together.

Felt Valentine Play Set

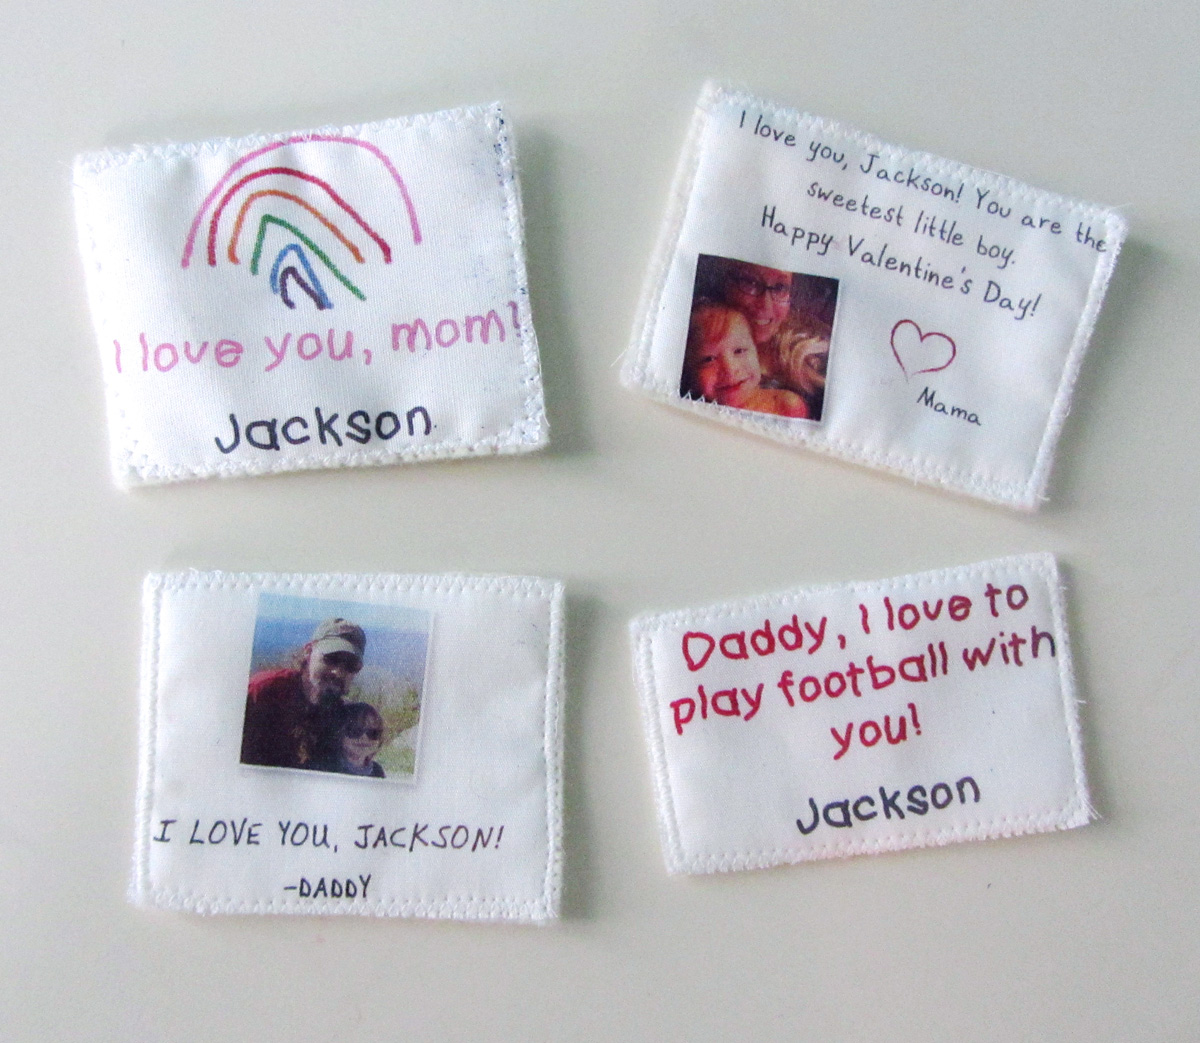
Letters: I did some prep work before creating the letters. Using my hand-me-down iPad 1 and the app iFontmaker, Jax and I made handwriting fonts. I used those to type out small Valentine messages in Photoshop (you could even use Word). I just chose a font I had for my husband’s letter. I asked Jax questions to figure out what to write on his letters, as he doesn’t understand Valentines yet. Then I had him draw me a picture (rainbows are the only thing he draws besides squiggles) in our Drawing Pad app, and I added that and some little photos.

Felt Valentine Play Set

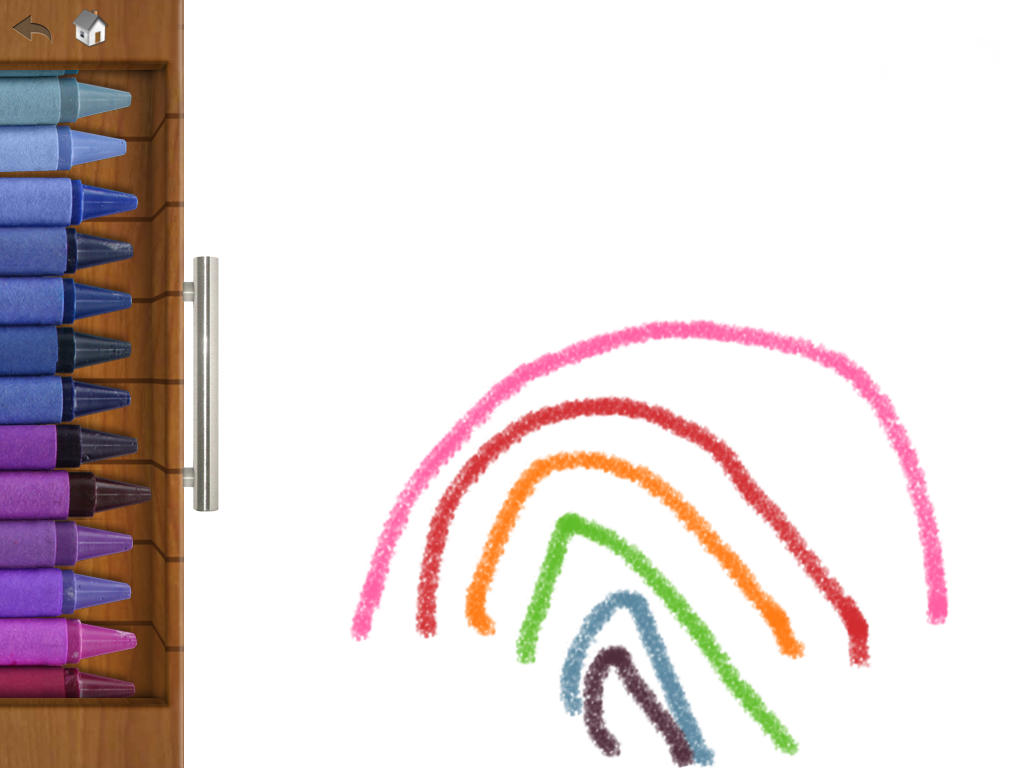
I cut my photo fabric down to fit my 4×6 printer – the only one in the house that currently prints black ink (I’ve been printing pattern is pale gray for months!) It worked great, but I did get smudges of ink on the rainbows both times I tried printing it.

Felt Valentine Play Set

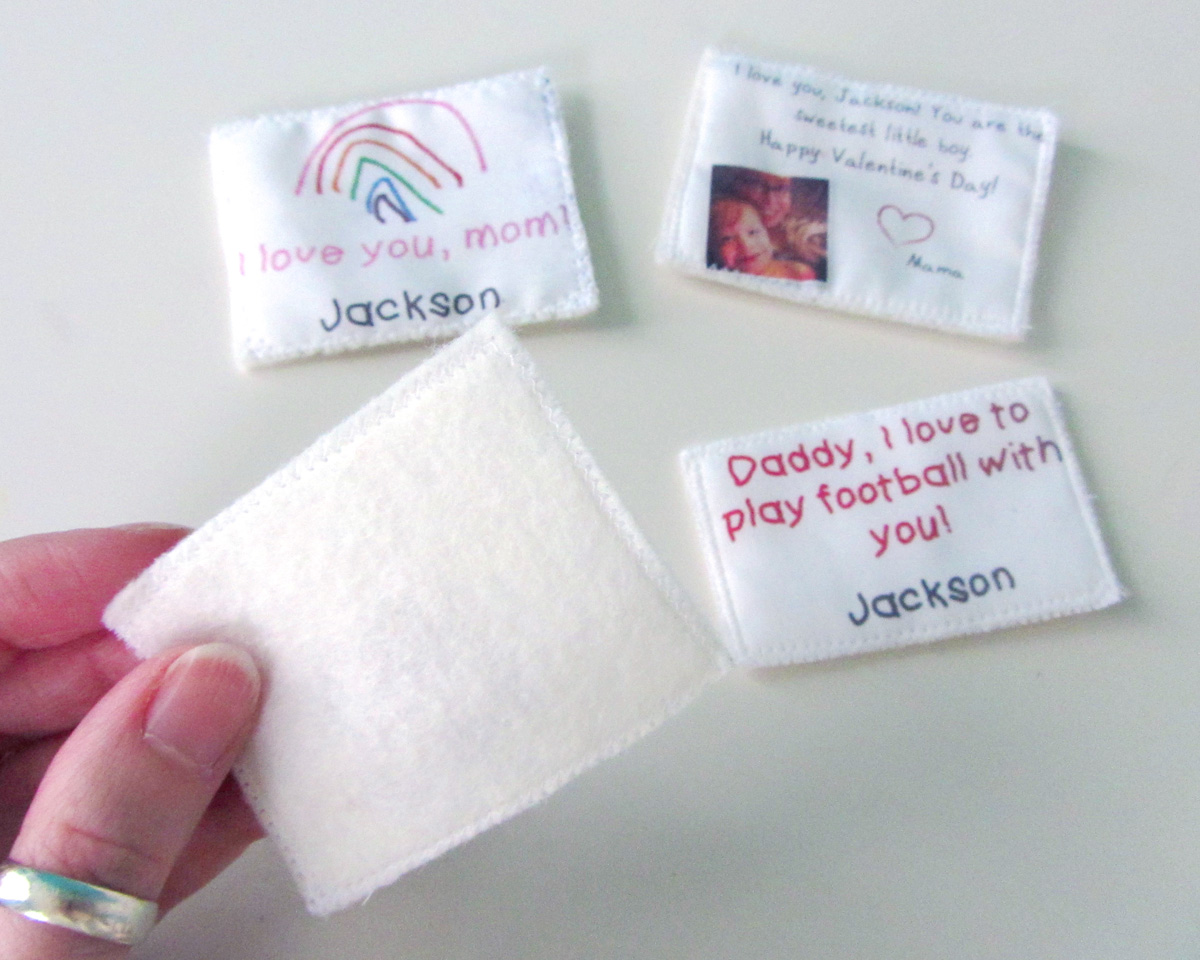
I cut out the printed fabric after peeling off the paper backing. I didn’t worry about the size except to make sure they fit in the envelopes. I zigzag stitched them to pieces of white felt.

Felt Valentine Play Set

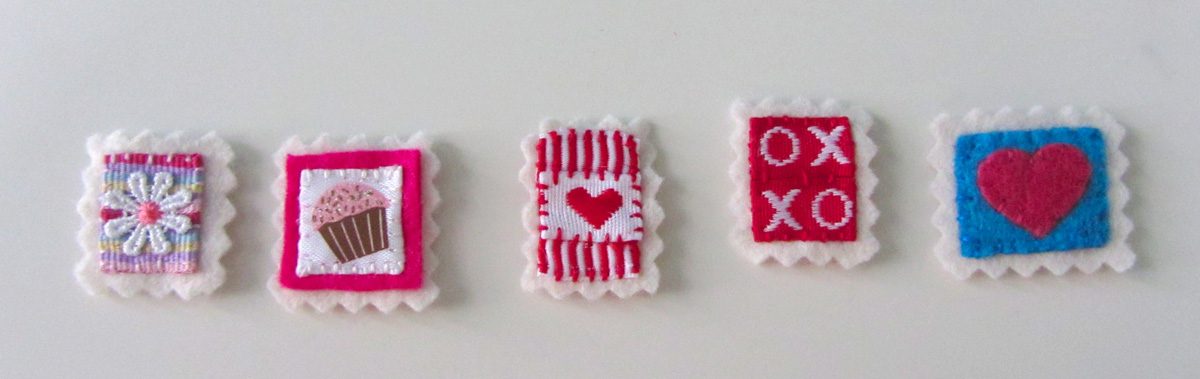
Stamps: I didn’t follow a pattern for the stamps. I just sewed bits of felt and ribbon onto off-white felt (you could use white) then trimmed around the white edges with my pinking shears.

Felt Valentine Play Set

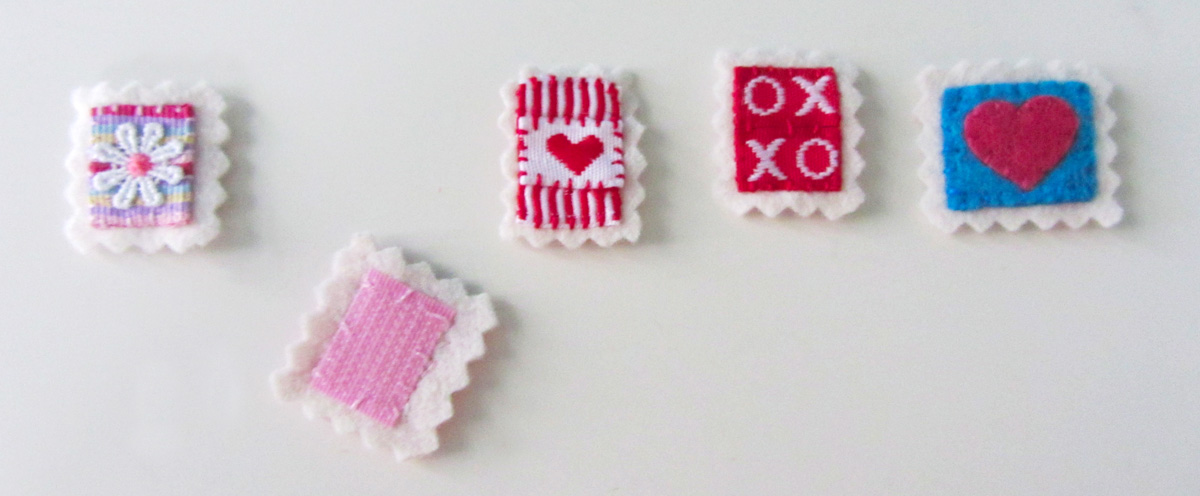
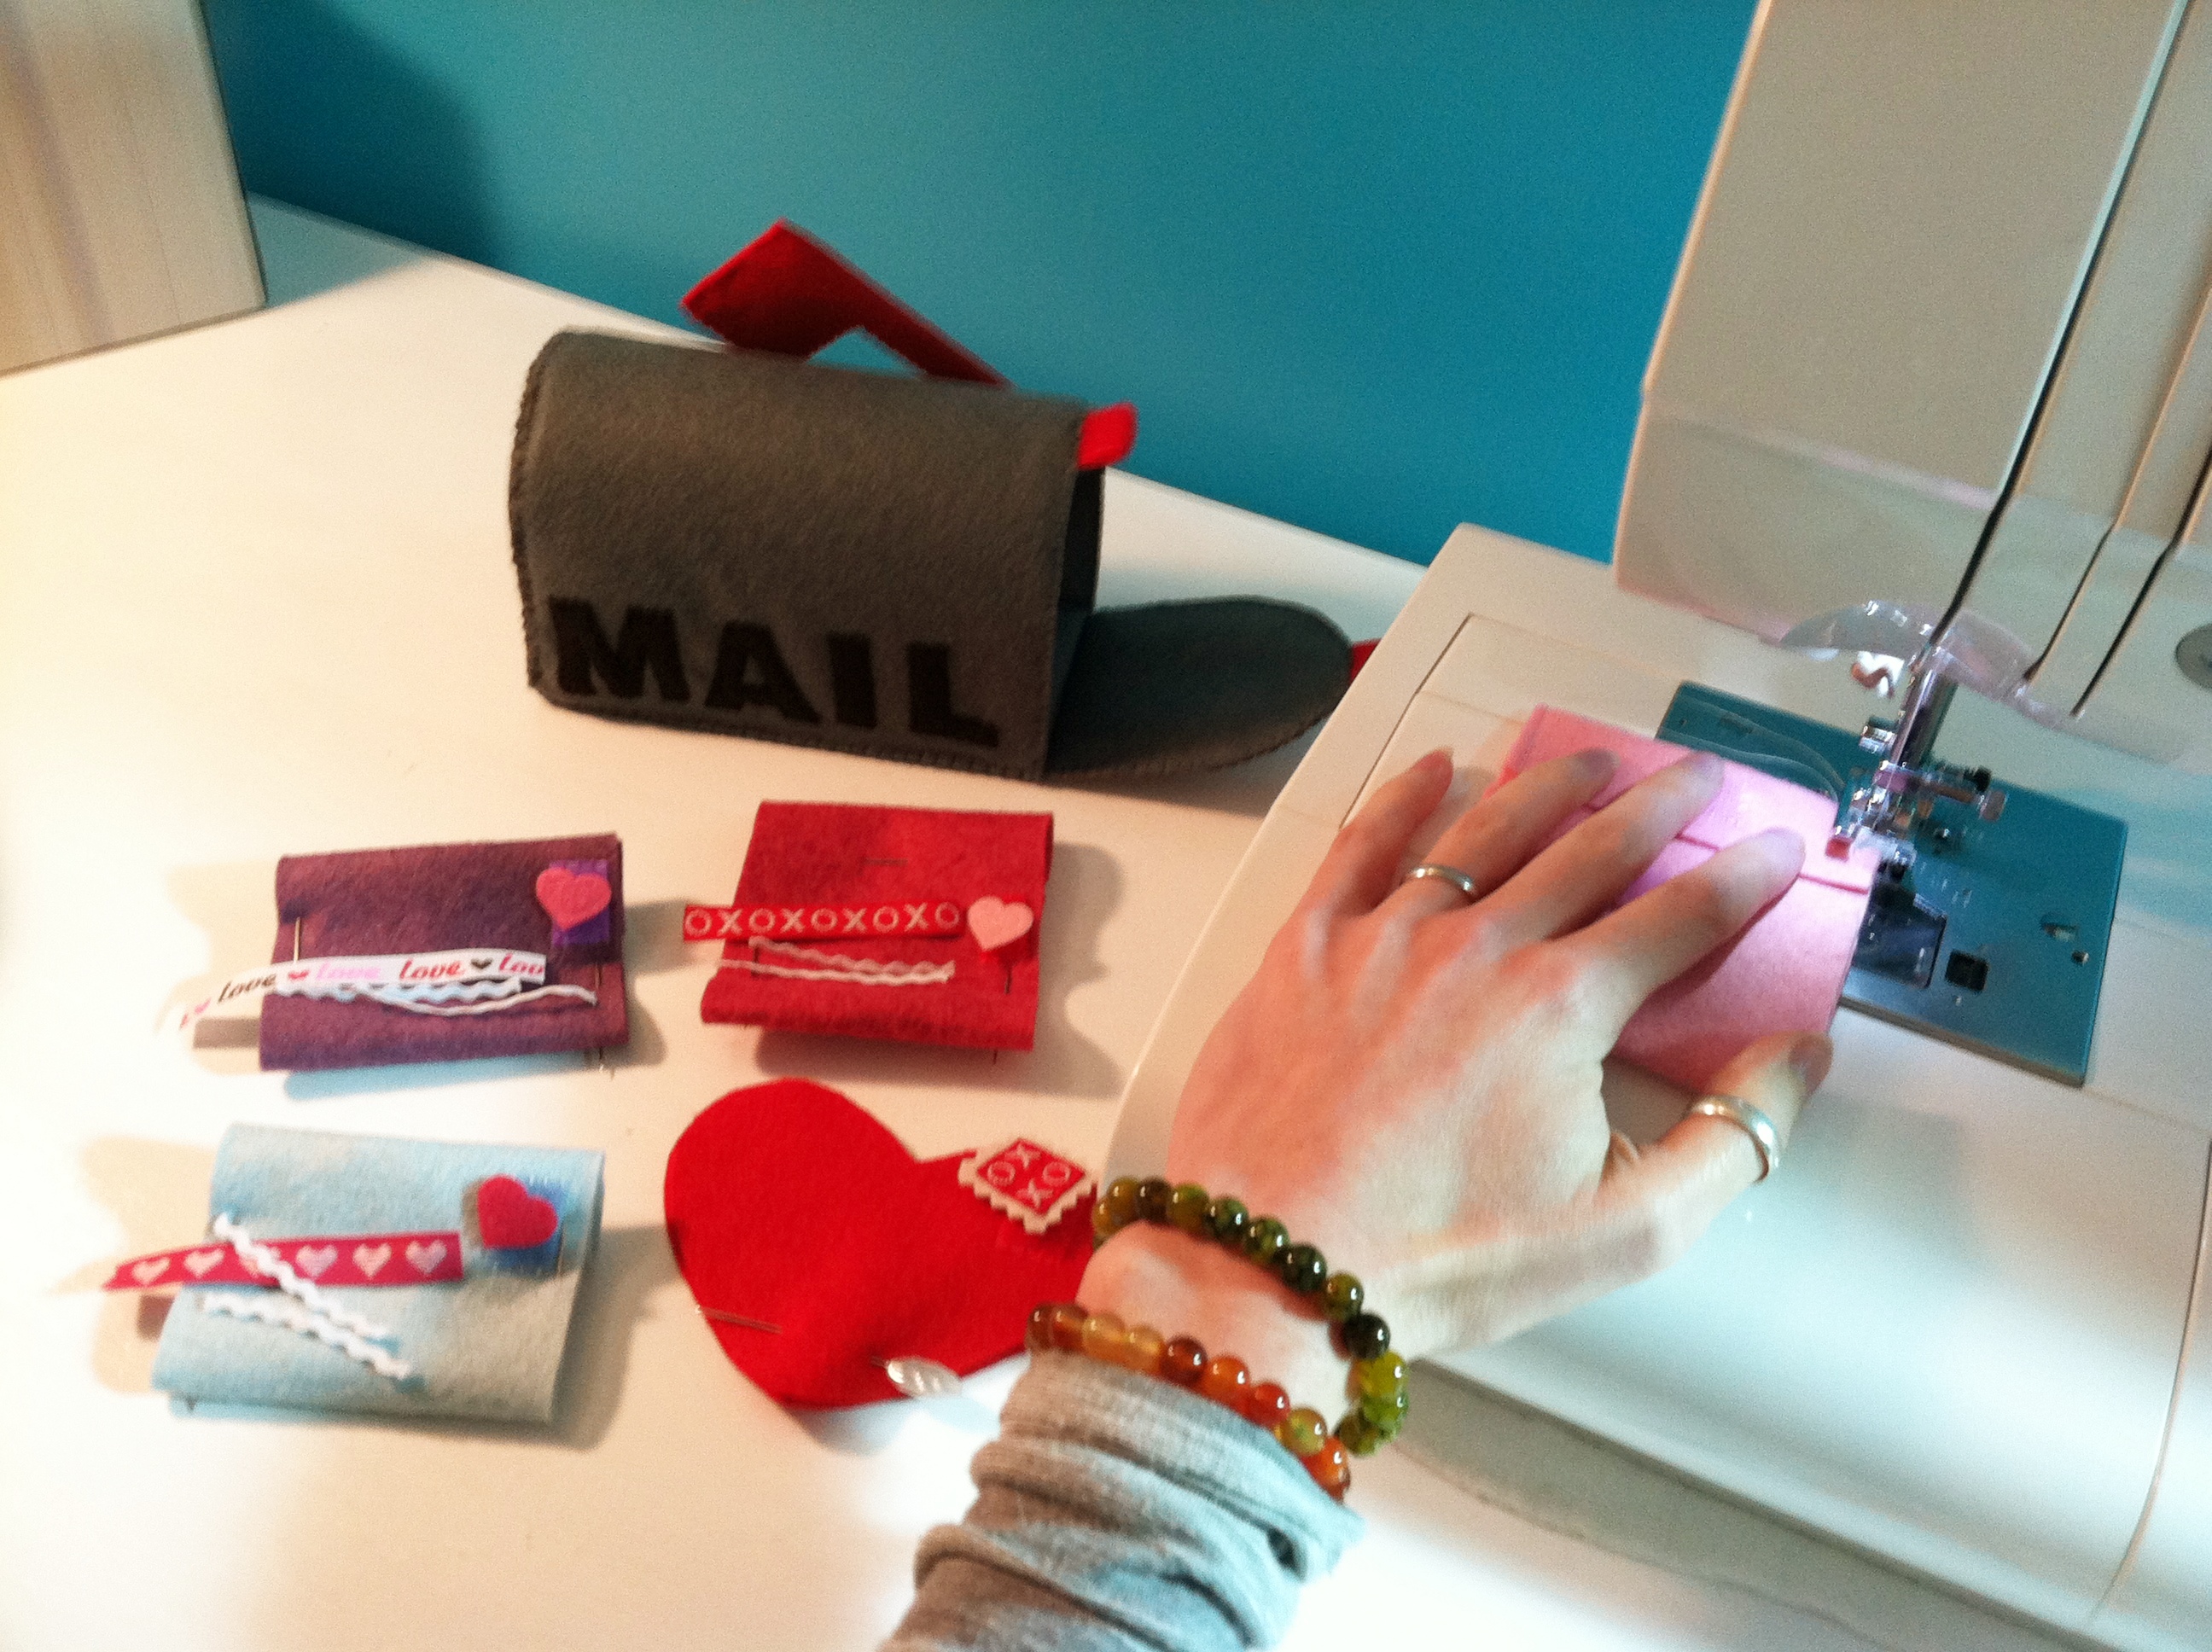
On the back sides, I sewed hook Velcro on. I sewed all the Velcro by hand in this project and it was the lamest part! My thumb was bruised the next day.

Felt Valentine Play Set

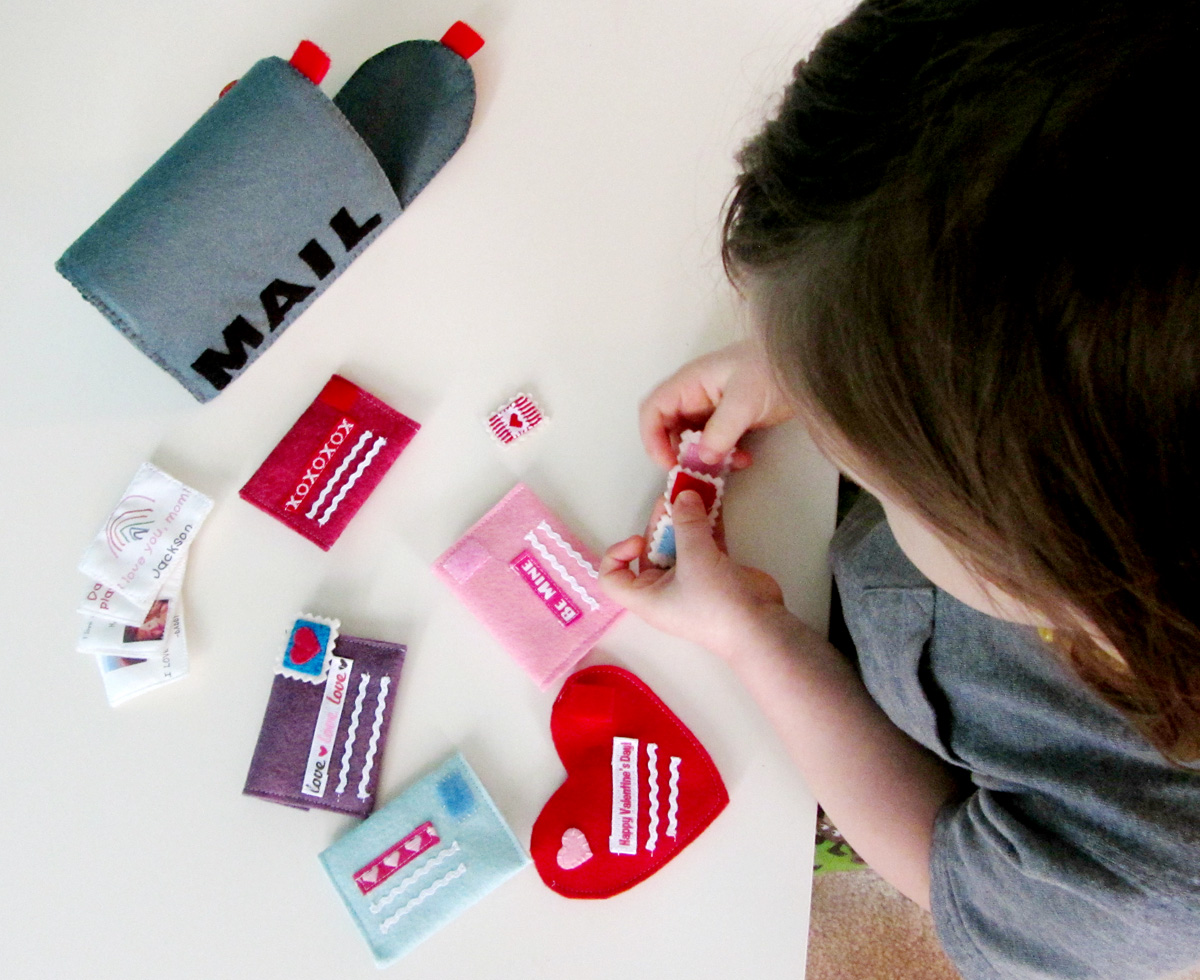
The set was a hit with Jax, though he is rather fond of pulling everything apart and just shoving all the pieces into the mailbox. We’ll play with it together so he can learn that letters go in the envelopes, stamps on the outside, then they get put in the mailbox.

Felt Valentine Play Set

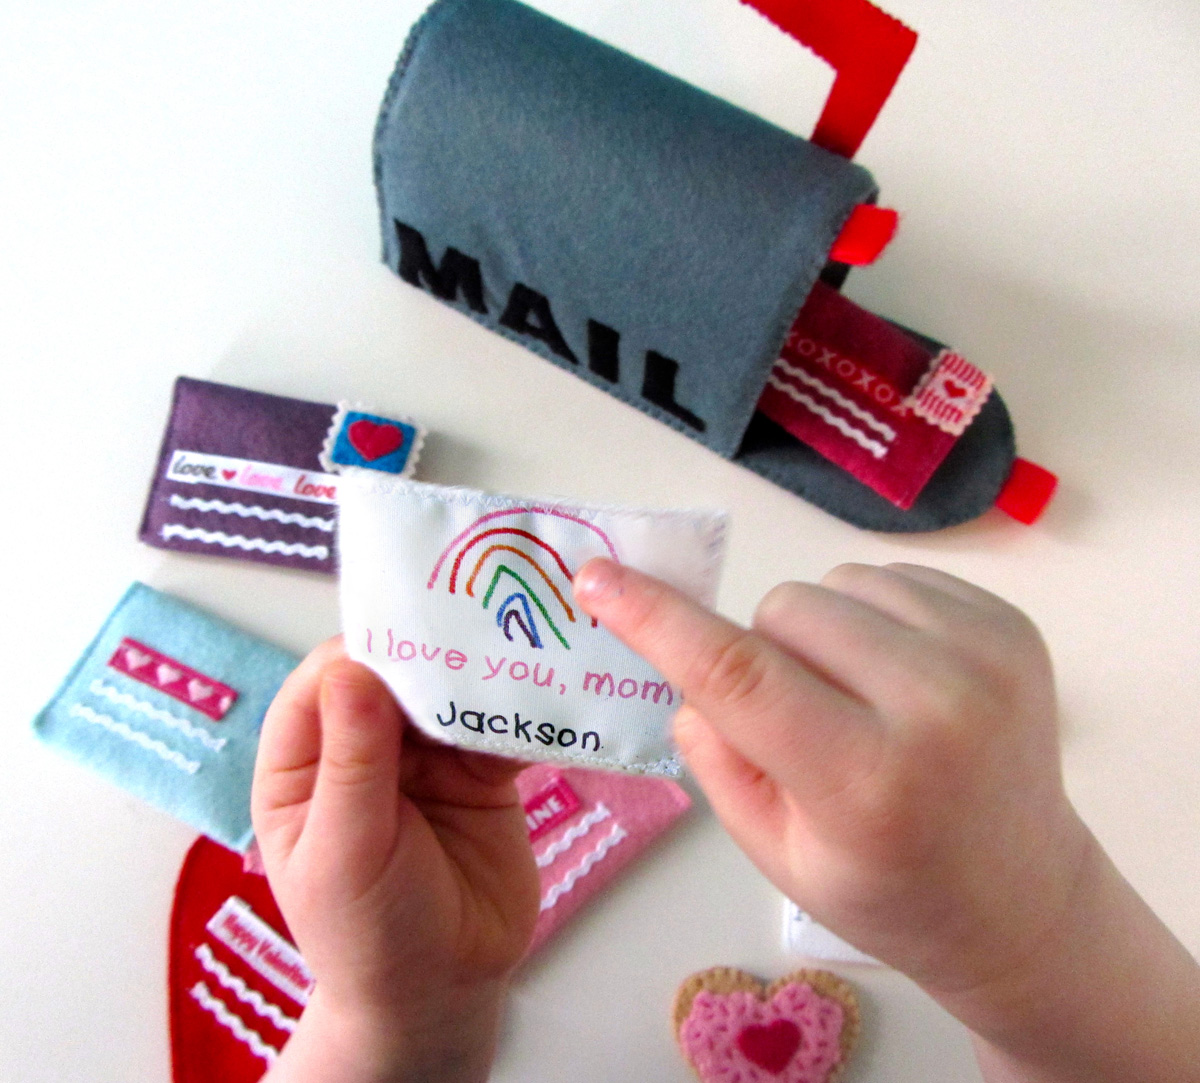
And he is SO proud to see his name and the rainbow he drew!

Felt Valentine Play Set

I hope you enjoy making this set for your little one! It has a lot of options for really customizing it and making it your own. If you make one, I’d love to see it! Email me photos or post them to our Facebook page. As always, I’ll be posting updates every day or two to the FB page with photos of my current projects. Next up: a bug themed party favor before returning to the fire station project!

Felt Valentine Play Set

Happy Valentine’s Day!

Link-o-rama!

Happy Tuesday!

I am hoping to have a party post for you soon, but I only have half of the photos so far. A friend helped out taking photos of the second half of the party. Jax LOVED his party! He alternated between stealing watermelon off the food table, playing with friends (new and old) in the playroom and asking to sit at the table and snack on all the tasty food. He loved getting sung to and blowing out his candle SO much that we did it twice!

Here are some links for you while I wait for the photos:

Image via How About Orange

Now that the party madness is over (though I admit I haven’t taken down the pretty lanterns and cranes just yet!), it’s time to get back to sewing some new quiet book pages! I hope to have something to share very soon.

Weaving Heart & Cupcake – Valentine Quiet Book

I created a pattern for a sweet and simple mini (6″ square) quiet book to share with you all. I will be posting instructions in sections as I complete my sewing. Do you have a little one you’d like to give a Valentine to?

Tutorials:
Front/Back Cover
Flowers & Chocolates
Weaving Heart & Cupcake (this page)
Book Assembly & Giveaway – coming soon!

Yes, I said giveaway! I’ll be sending off my finished book to one lucky reader in time for Valentine’s gift giving.

These pages use: 12″ w x 6″ h hot pink felt background, a hot pink square slightly smaller than the 6″ page, felt (in light pink, red, lavender, white, brown, and wine), purple ribbon, a ribbon scrap, sew-on gems, sew-on snaps and embroidery floss.


Weaving Heart: This is a very simple page to make! Lay the two halves of the heart on the page in a heart shape as shown. I made the pattern so there is about a 1/4″ extra at the ends of the strips. This leaves some wiggle room for weaving. Weave the two halves together before you pin them so you know you have it just right. Snip the slits between the strips a bit longer if needed. Once they are pinned down, sew the top of each one down in a half circle, leaving the strips loose.


Cupcake: This page features a tasty cupcake you can decorate! I made mine chocolate with a raspberry center (“ras-ras” according to Jax) and you can decorate it with pink frosting, a cupcake paper, whipped cream and a cherry! You could definitely make multiple options from the same pattern in different colors. I designed the page to be a pocket to hold the parts.

First you need to cut a square of felt to be your pocket. Pin and sew down your cupcake and heart filling to the pocket piece.

To make the cupcake paper, first cut the top of your felt pieces with pinking shears to make a zigzag. Sew some ribbon strips to the front piece to look like the pleated paper. Sew half of a snap to the top of the back piece and sew the halves together. Lay the cupcake paper on the pocket to see where the other half of the snap should be placed, then sew it down.

For the frosting, you’ll need to first embellish the front piece. I chose to make stitched sprinkles in two colors and added 3 sew-on gems. Sew half of a snap to the top of the back piece then pin the two halves together. You can add a loop of ribbon like I did to be a little candle. Sew the two sides together and add the other half of the snap to the pocket as you did before.

The whipped topping is sewn together with the snap sewn on the back. I then wrapped the two sides of the cherry around the whipped cream and sewed it in place. Sew the other half of the snap to the pocket.

I sewed my pocket to the page with the sewing machine as I was planning to sew the book together right then anyway. You could hand-sew it if you prefer.

I love the cupcake! I might have to reuse that pattern to make a full cupcake page. Jax is into anything food or baking related, so I know he’d like it.

Our next post will be on sewing it together and our big giveaway of my sample book!

Flowers & Chocolates – Valentine Mini Quiet Book

I created a pattern for a sweet and simple mini (6″ square) quiet book to share with you all. I will be posting instructions in sections as I complete my sewing. Do you have a little one you’d like to give a Valentine to?

Tutorials:
Front/Back Cover
Flowers & Chocolates (this page)
Weaving Heart & Cupcake – coming soon!
Book Assembly & Giveaway – coming soon!

Yes, I said giveaway! I’ll be sending off my finished book to one lucky reader in time for Valentine’s gift giving.

These pages use: 12″ w x 6″ h lavender felt background, felt (in light pink, red, hot pink, brown, a lilac floral and purple), green ribbon, ribbon scraps, sew-on gems, sew-on snaps, 2 hot pink & 2 light pink magnetic purse snaps (found at Joann’s in the purse-making aisle) and embroidery floss. You could use buttons or snaps on the flowers instead. I really loved the cute colored purse snaps and wanted to try them out. I used regular snaps on the chocolates. I find that Velcro snags the felt so I’ve been avoiding it lately.

Because of the smaller parts (flowers and chocolates) I’d recommend this book for the three and up crowd unless supervised closely. No eating felt chocolates, kids!


Flowers:
Embellish the front pieces of the 4 removable flowers (skip this or just use felt to decorate if you are sewing buttonholes later.) Attach one half of a magnetic snap to each flower back. I put the thinner side on my flowers and the thicker side on the page. I pressed each flower against the prongs on the snap half to make marks where I needed to make holes. I made two tiny snips where the marks were then pushed the snap prongs through and slide on the washer. Using the flat, closed metal blade of my scissors, I folded the prongs in to hold the snap in place. (Skip all that if you are doing buttons!) Sew the two sides of each flower together. (Here is where you would add buttonholes if that was your choice.)

Flower Page: Start by laying out your ribbon stems in the arrangement you like. Make sure you lay out the flowers and vase as well to make sure everything fits. Trim the ribbons as needed to fit the page and sew them down. Sew down the vase. (Really its the paper that bouquets come wrapped in but I have no idea what that’s called!) I added a ribbon scrap before I attached mine to add a little detail. Sew the small flower to the center stem. I used a scrap of a floral patterned felt sheet because I liked the shade of lilac. You could use any color you like. Attach the other half of your magnetic snaps (or your buttons) over top of the ends of the ribbon stems.


Chocolates: Embellish the front pieces of your chocolates. For the rectangle, I used a scrap of brown ribbon with hearts. On my square and heart, I used sew-on gems. I stitched a stem stitch spiral on the circle, and I did French knot and straight stitch sprinkles on the triangle. Sew one half of a snap to the back piece of each chocolate. Sew all the halves together.

Chocolates Page: Start by pinning your chocolates patterns down on the box heart how you’d like them to be arranged. There’s no right or wrong! Then stitch around the paper to make shape outlines. I used a darker red floss, but you could make it more obvious and use light pink or a dark brown. Sew the other half of each snap down in the center of each shape. Pin the heart down to the page and add a bit of ribbon along the lower left side as shown. I didn’t worry about trimming the ends of my ribbon when I pinned it. I sewed the ribbon along the side that is against the box, making sure to catch the box’s felt in each stitch. Then I took my scissor and snipped the ribbon ends off into angles that matched the box’s. Sew down the other side of the ribbon and all the way around the box.

Note: Turns out the ribbon I bought for this page was sticky-back scrapbook ribbon. Oops! It was a little slower to sew through, but worked great when I was laying it out on the page. I didn’t have to pin it and it stayed in the curve I placed it in. Martha Stewart makes some cute Valentines ribbons.

What do you think of these pages?

Almost done the mini book! Next installment will be the weaving heart page and cupcake page. Stay tuned, and stop by the Facebook page for sneak peeks.

Cover – Valentine Mini Quiet book

Would you like to sew along with me?

I created a pattern for a sweet and simple mini (6″ square) quiet book to share with you all. I will be posting instructions in sections as I complete my sewing. Do you have a little one you’d like to give a Valentine to?

The sections will be: the front/back cover, page 1 (flowers) & 2 (chocolates), page 3 (weaving) & 4 (cupcake) and book assembly & giveaway. Yes, I said giveaway! I’ll be sending off my finished book to one lucky reader in time for Valentine’s gift giving.

I am posting the entire pattern now so you know what you’ll need. I cut all my felt and ribbons and sorted my notions for all the pages at once. I’m keeping each page’s goodies in a ziplock bag till I’m ready for them. If you want to take a look at all the layouts, there is a photo on the Facebook page showing everything pinned (and unpinned) in place. Most of my ribbons were from the $1 bin at Joann’s Fabrics. I also got my purse snaps and gems there with a coupon.

The cover uses: 12″ w x 6″ h light pink felt background, felt (in light pink, glitter red, red, hot pink (I had two shades) and purple), ribbon scraps, batting or stuffing and embroidery floss. You can add a paper valentine to the pocket on the back, or make a felt one like I did from my mailbox tutorial.

To make the front cover, pin everything in place on the right half of your background felt. You’ll want to put some batting or stuffing under the big heart to make it puffy. Fold the ribbon behind the hot pink heart before you pin it down. The rest is simple – sew it all down!

The back cover is on the left half of the background felt. It has a pocket to put valentines or a note from you to the book’s recipient. Start by pinning your “xoxo” pattern to the pocket piece. I sewed right through the paper using stem stitch. Once it is all stitched, you can gently rip the paper away.

Lay your pocket and other felt pieces on the page and pin the kiss and little heart to the pocket where they overlap it. Sew them to the pocket. You can leave your thread tails in place (just pull off the needle) so that when you pin it all down to the page, you can re-thread the needle and sew the rest down. Sew the pocket down with ribbon scrap loops on one side. Simple!

I think it looks adorable with a little play letter in the pocket!

Next installment will be the flower page and chocolate page. Those have a lot more little parts, but will be so cute!