Monthly Archives: December 2012

DIY My Little Pony Plushie

DIY Pinkie Pie MLP Plushie

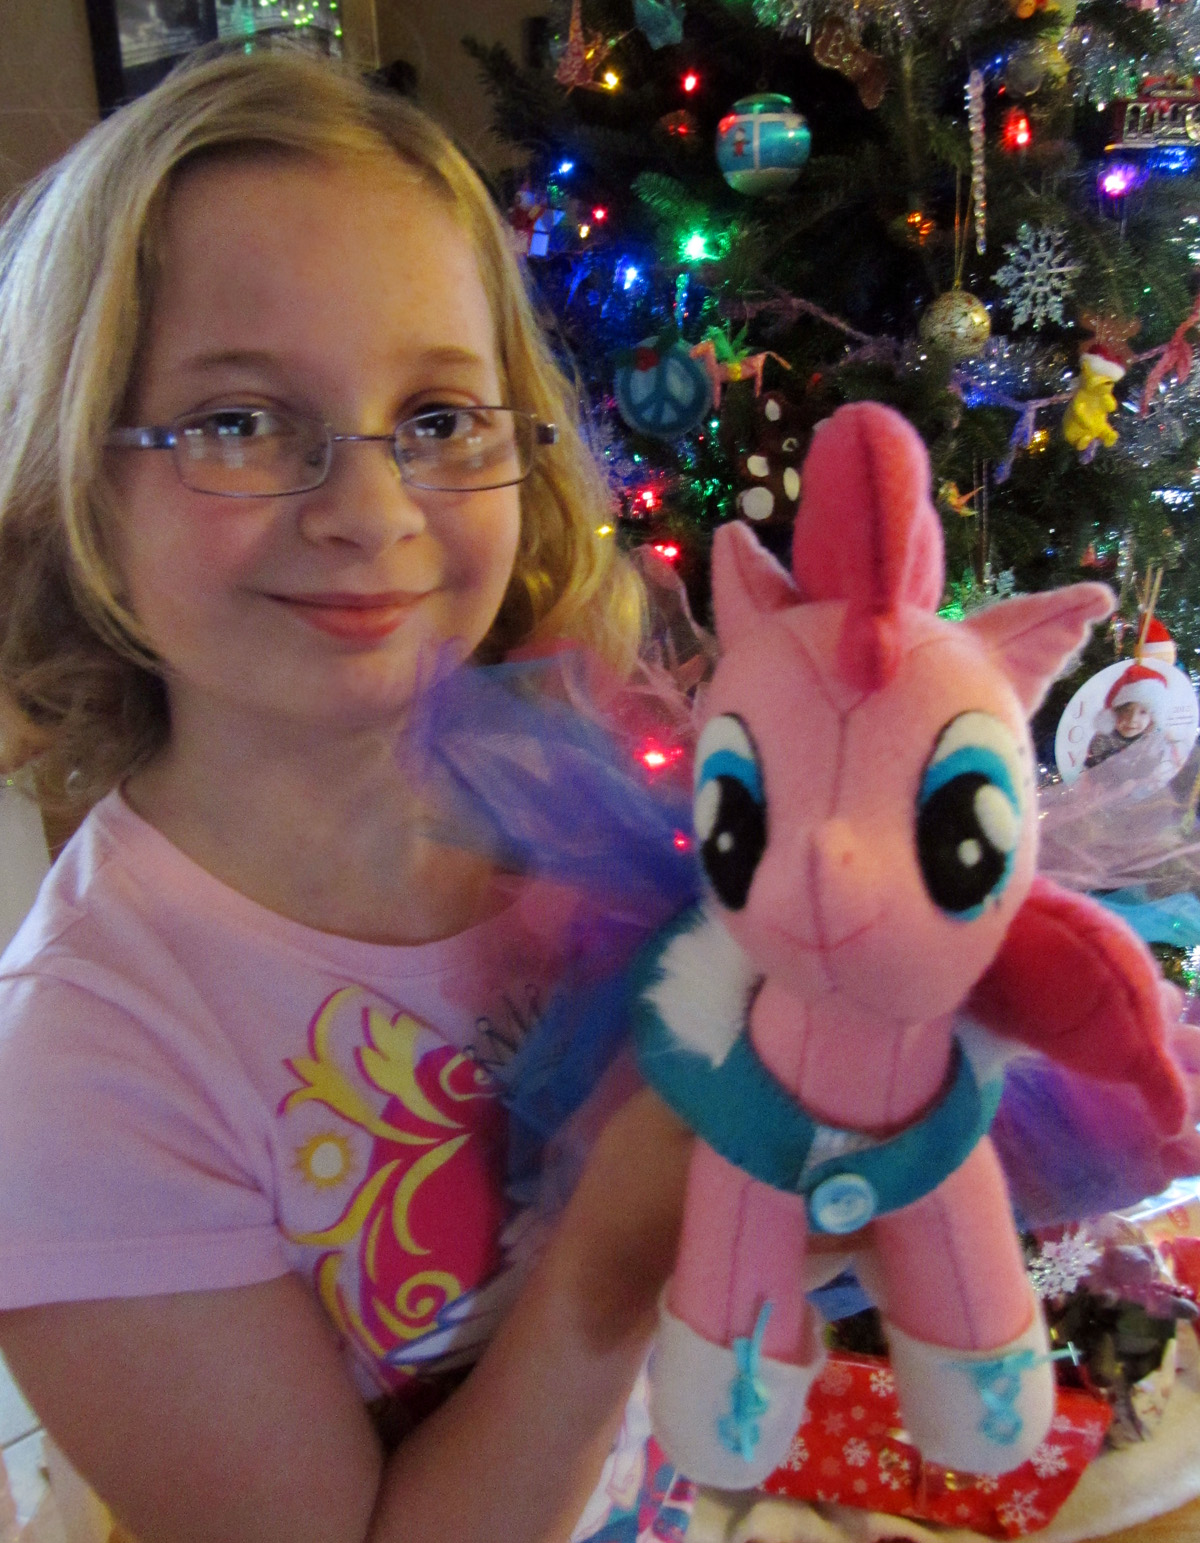
When I asked my brother if there was anything I could make for my niece this Christmas, I was a little overwhelmed when he suggested a My Little Pony – Friendship is Magic plushie of “Pinkie Pie”. I’d never sewn a stuffed animal before, and I’d be a pony newbie creating something to give to a pony expert!

DIY Pinkie Pie MLP Plushie  DIY Pinkie Pie MLP Plushie  IMG_1281

I let the idea brew in the back of my mind for a while, as I tend to do for all sewing projects, when one day a box full of gorgeous recycled felt arrived from a friend. Two shades of pink? Check! The project was on! I planned an entire weekend of sewing, but ended up adding 2 evenings so I could add pony clothing to the gift.

The felt was purchased from FeltForLess on Etsy, who is unfortunately closed over the holidays as I am writing this, so I do not have prices for you. I will say that the thickness is similar to the wool blend felt I get from American Felt and Craft. It seemed to stretch a bit easier than the wool, and didn’t have the subtle color variations that make wool felt so rich. But the colors were bright and it cut like dream. I had no trouble working with it. I did lack that subtle “wool sweater feel” love so much about wool felt, but I’d use it again! (FYI – when sewing the pony construction (anything getting turn right-side-out afterwards) I preferred to use two strands of machine thread instead of my normal 2 strands of floss. It seemed stronger.)

DIY Pinkie Pie MLP Plushie

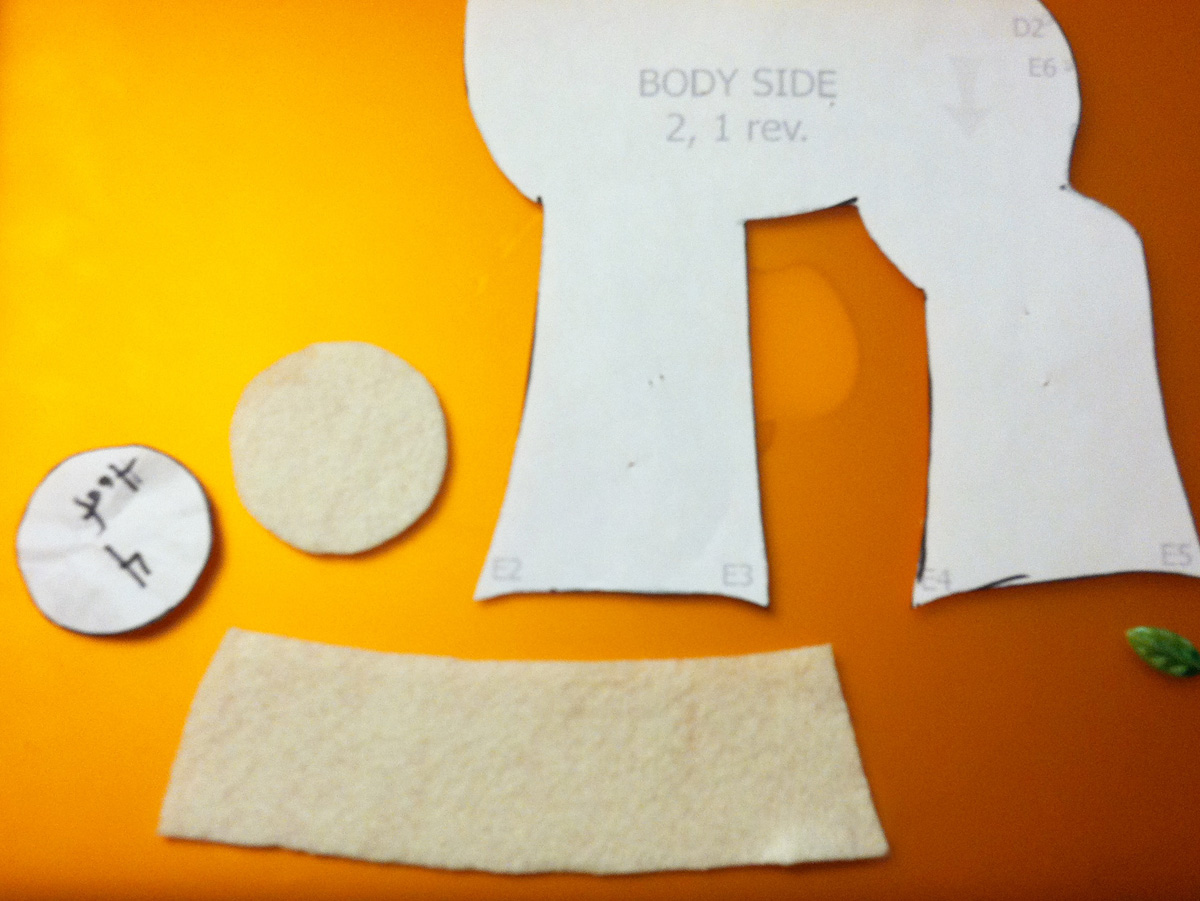
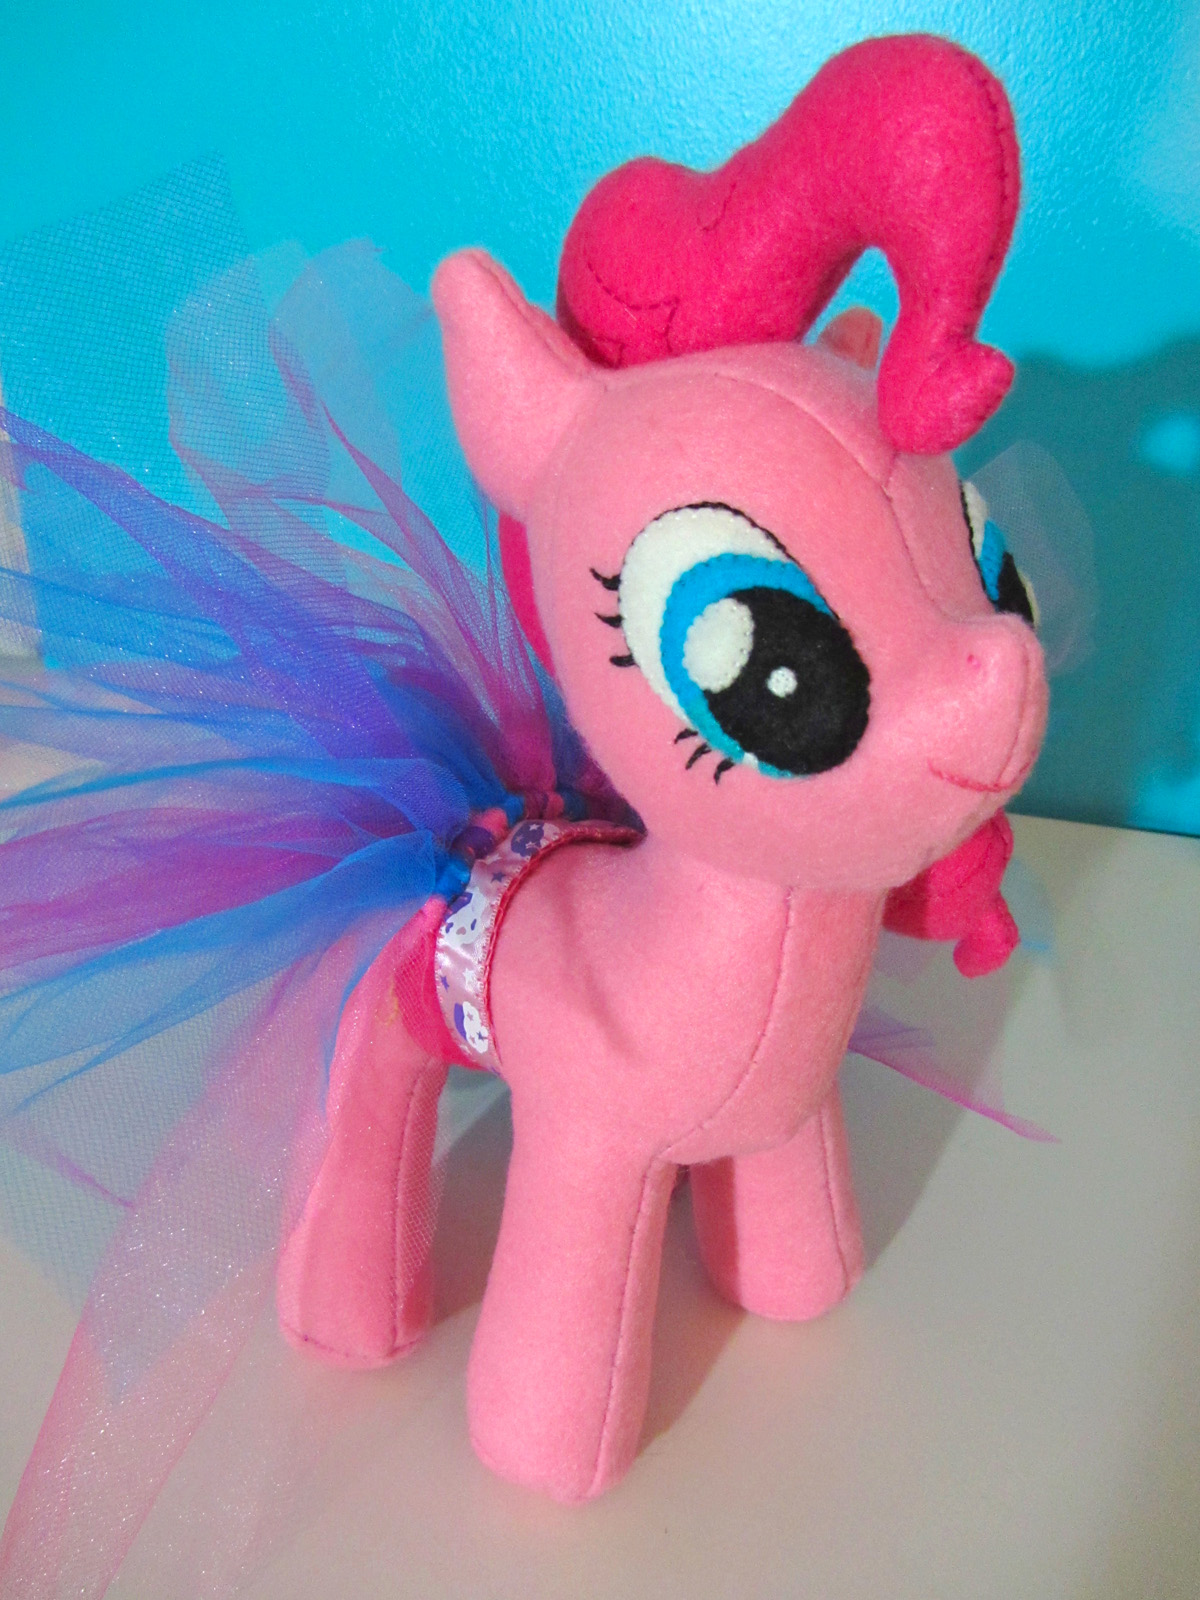
As I had never made a stuffed animal, my first stop was to find a pattern for the pony’s body. There are many free patterns online for MLP. While there are people out there that make and sell these plush ponies, I think it is risky due to copyrights. All the patterns I saw were free. I did a quick search, but chose the most complex pattern I found. I liked that it was more accurate thanks to details like darts by the legs. Thank you Voodoo-tiki for the great pattern and tutorial!

I enlarged the pattern a bit. I didn’t want to deal with turning it right-side-out with tiny parts made of felt. Even enlarged, I still ran into that with the main and tail. If you want to make a pony of similar size to mine, resize the pattern so the height of the “body side” piece is 11.25″. I had to break up the two largest pattern pieces over multiple pages to print them.

DIY Pinkie Pie MLP Plushie  DIY Pinkie Pie MLP Plushie  DIY Pinkie Pie MLP Plushie

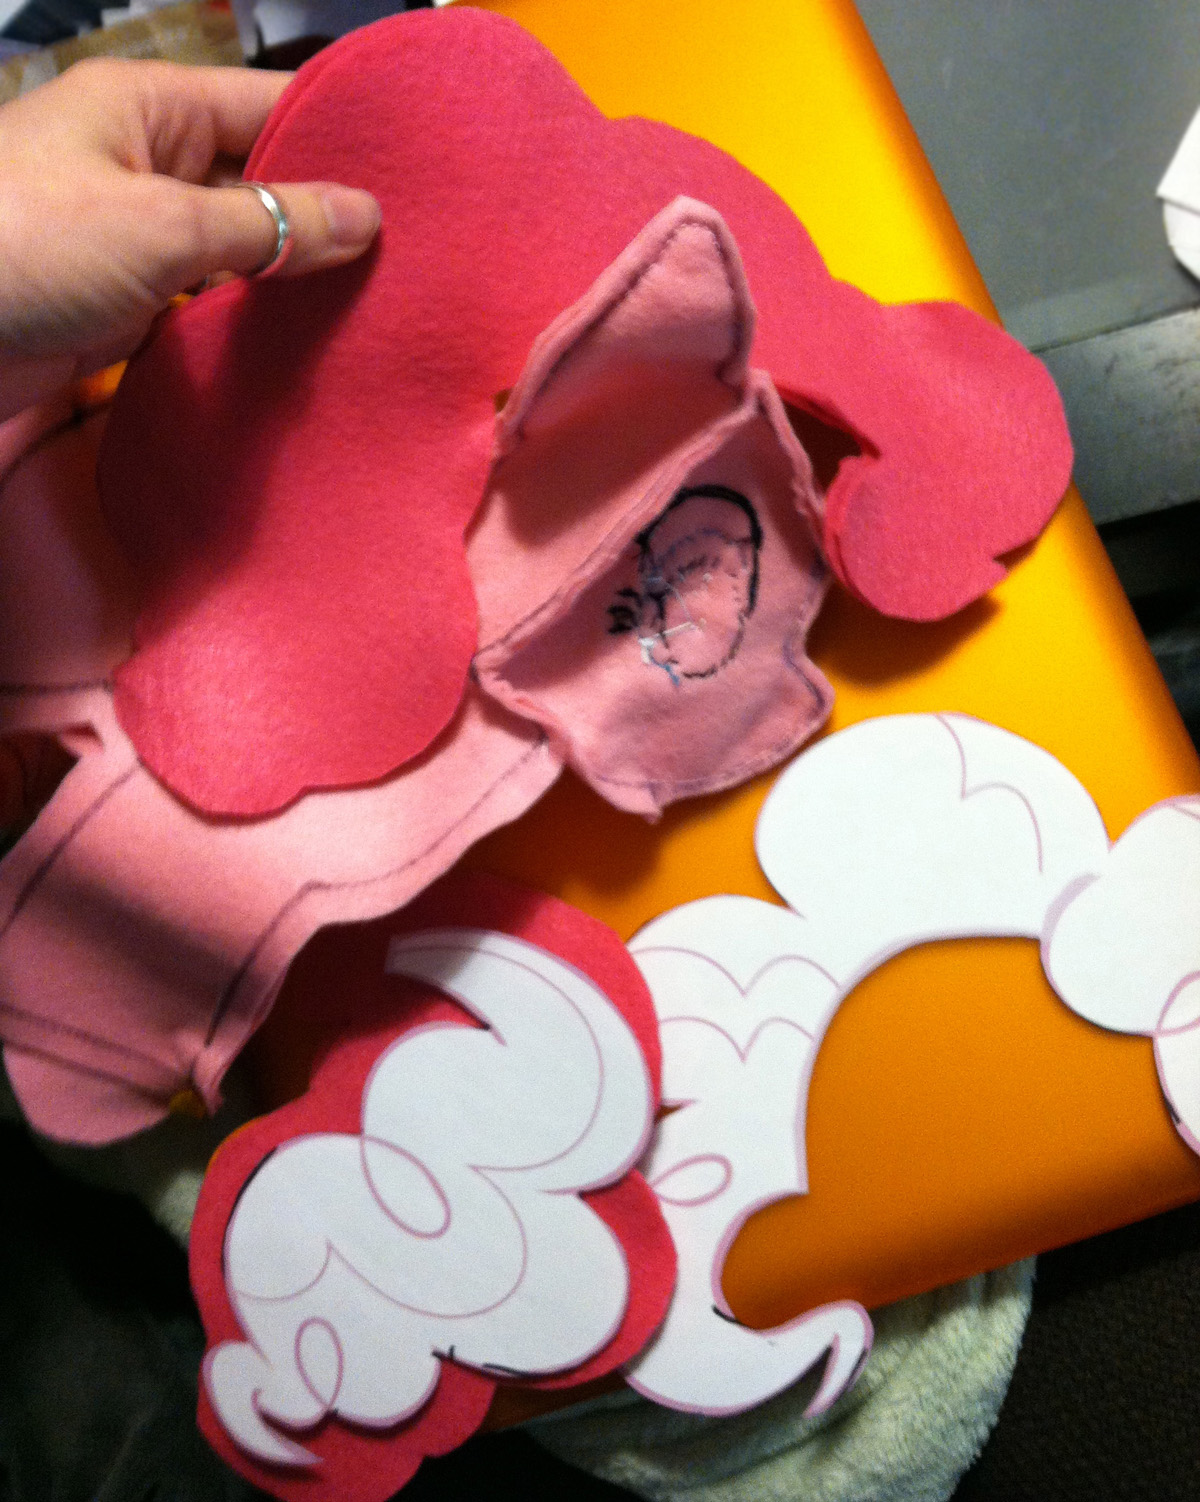
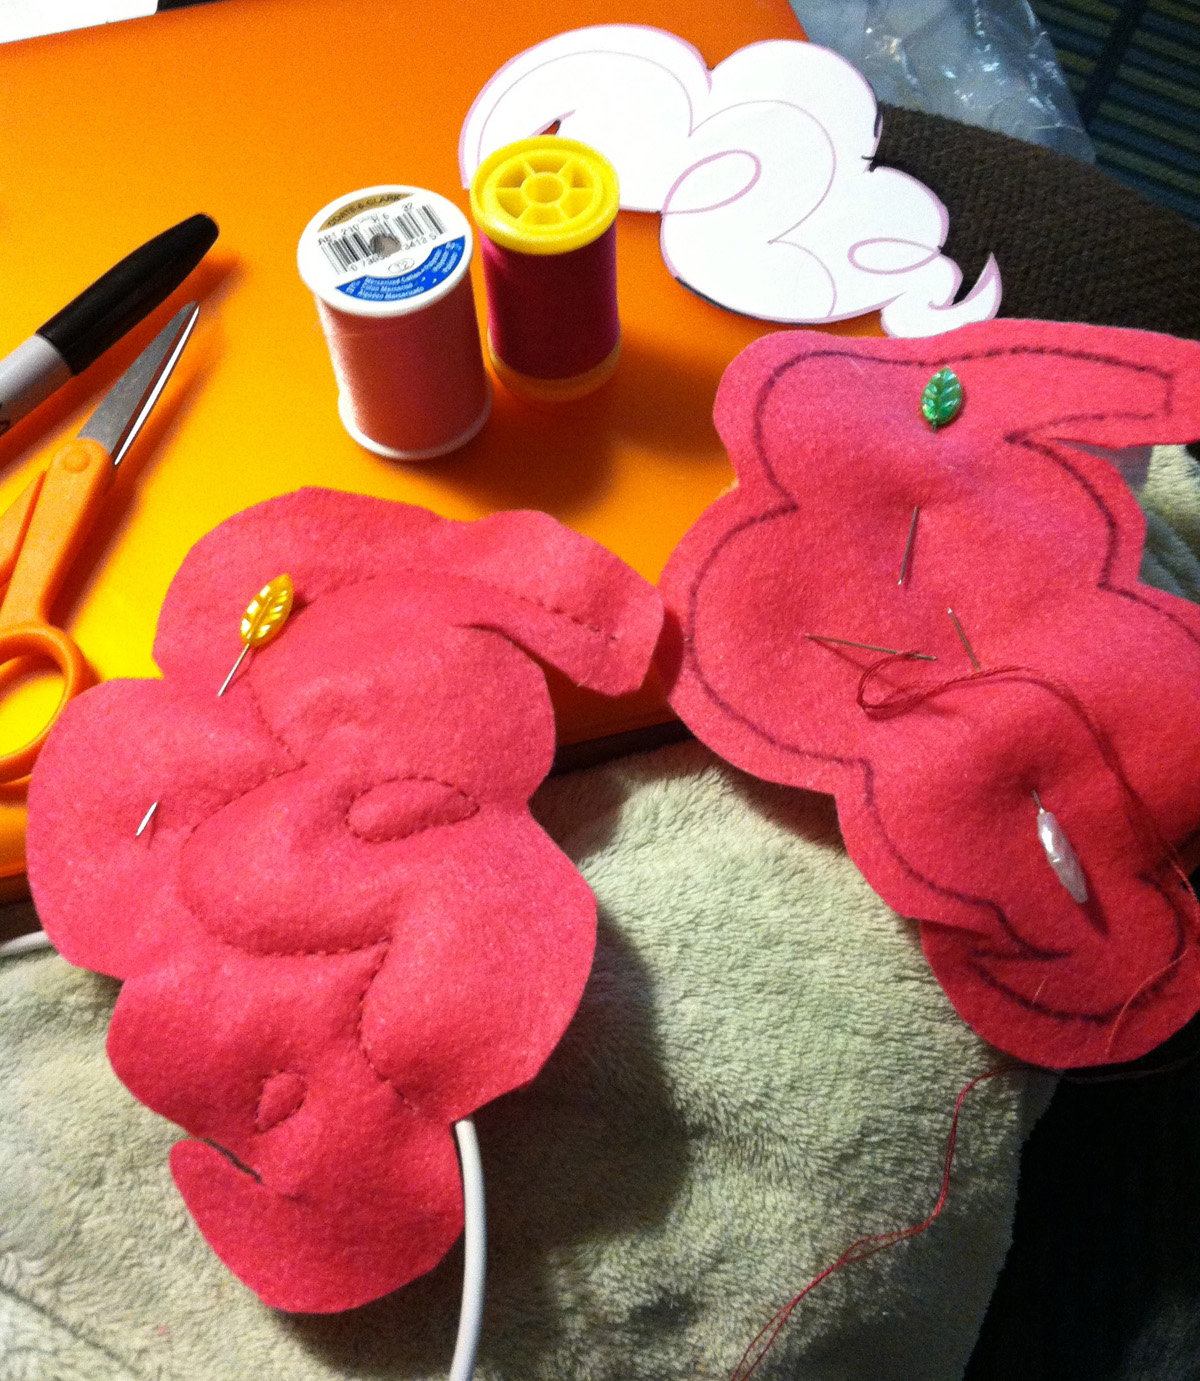
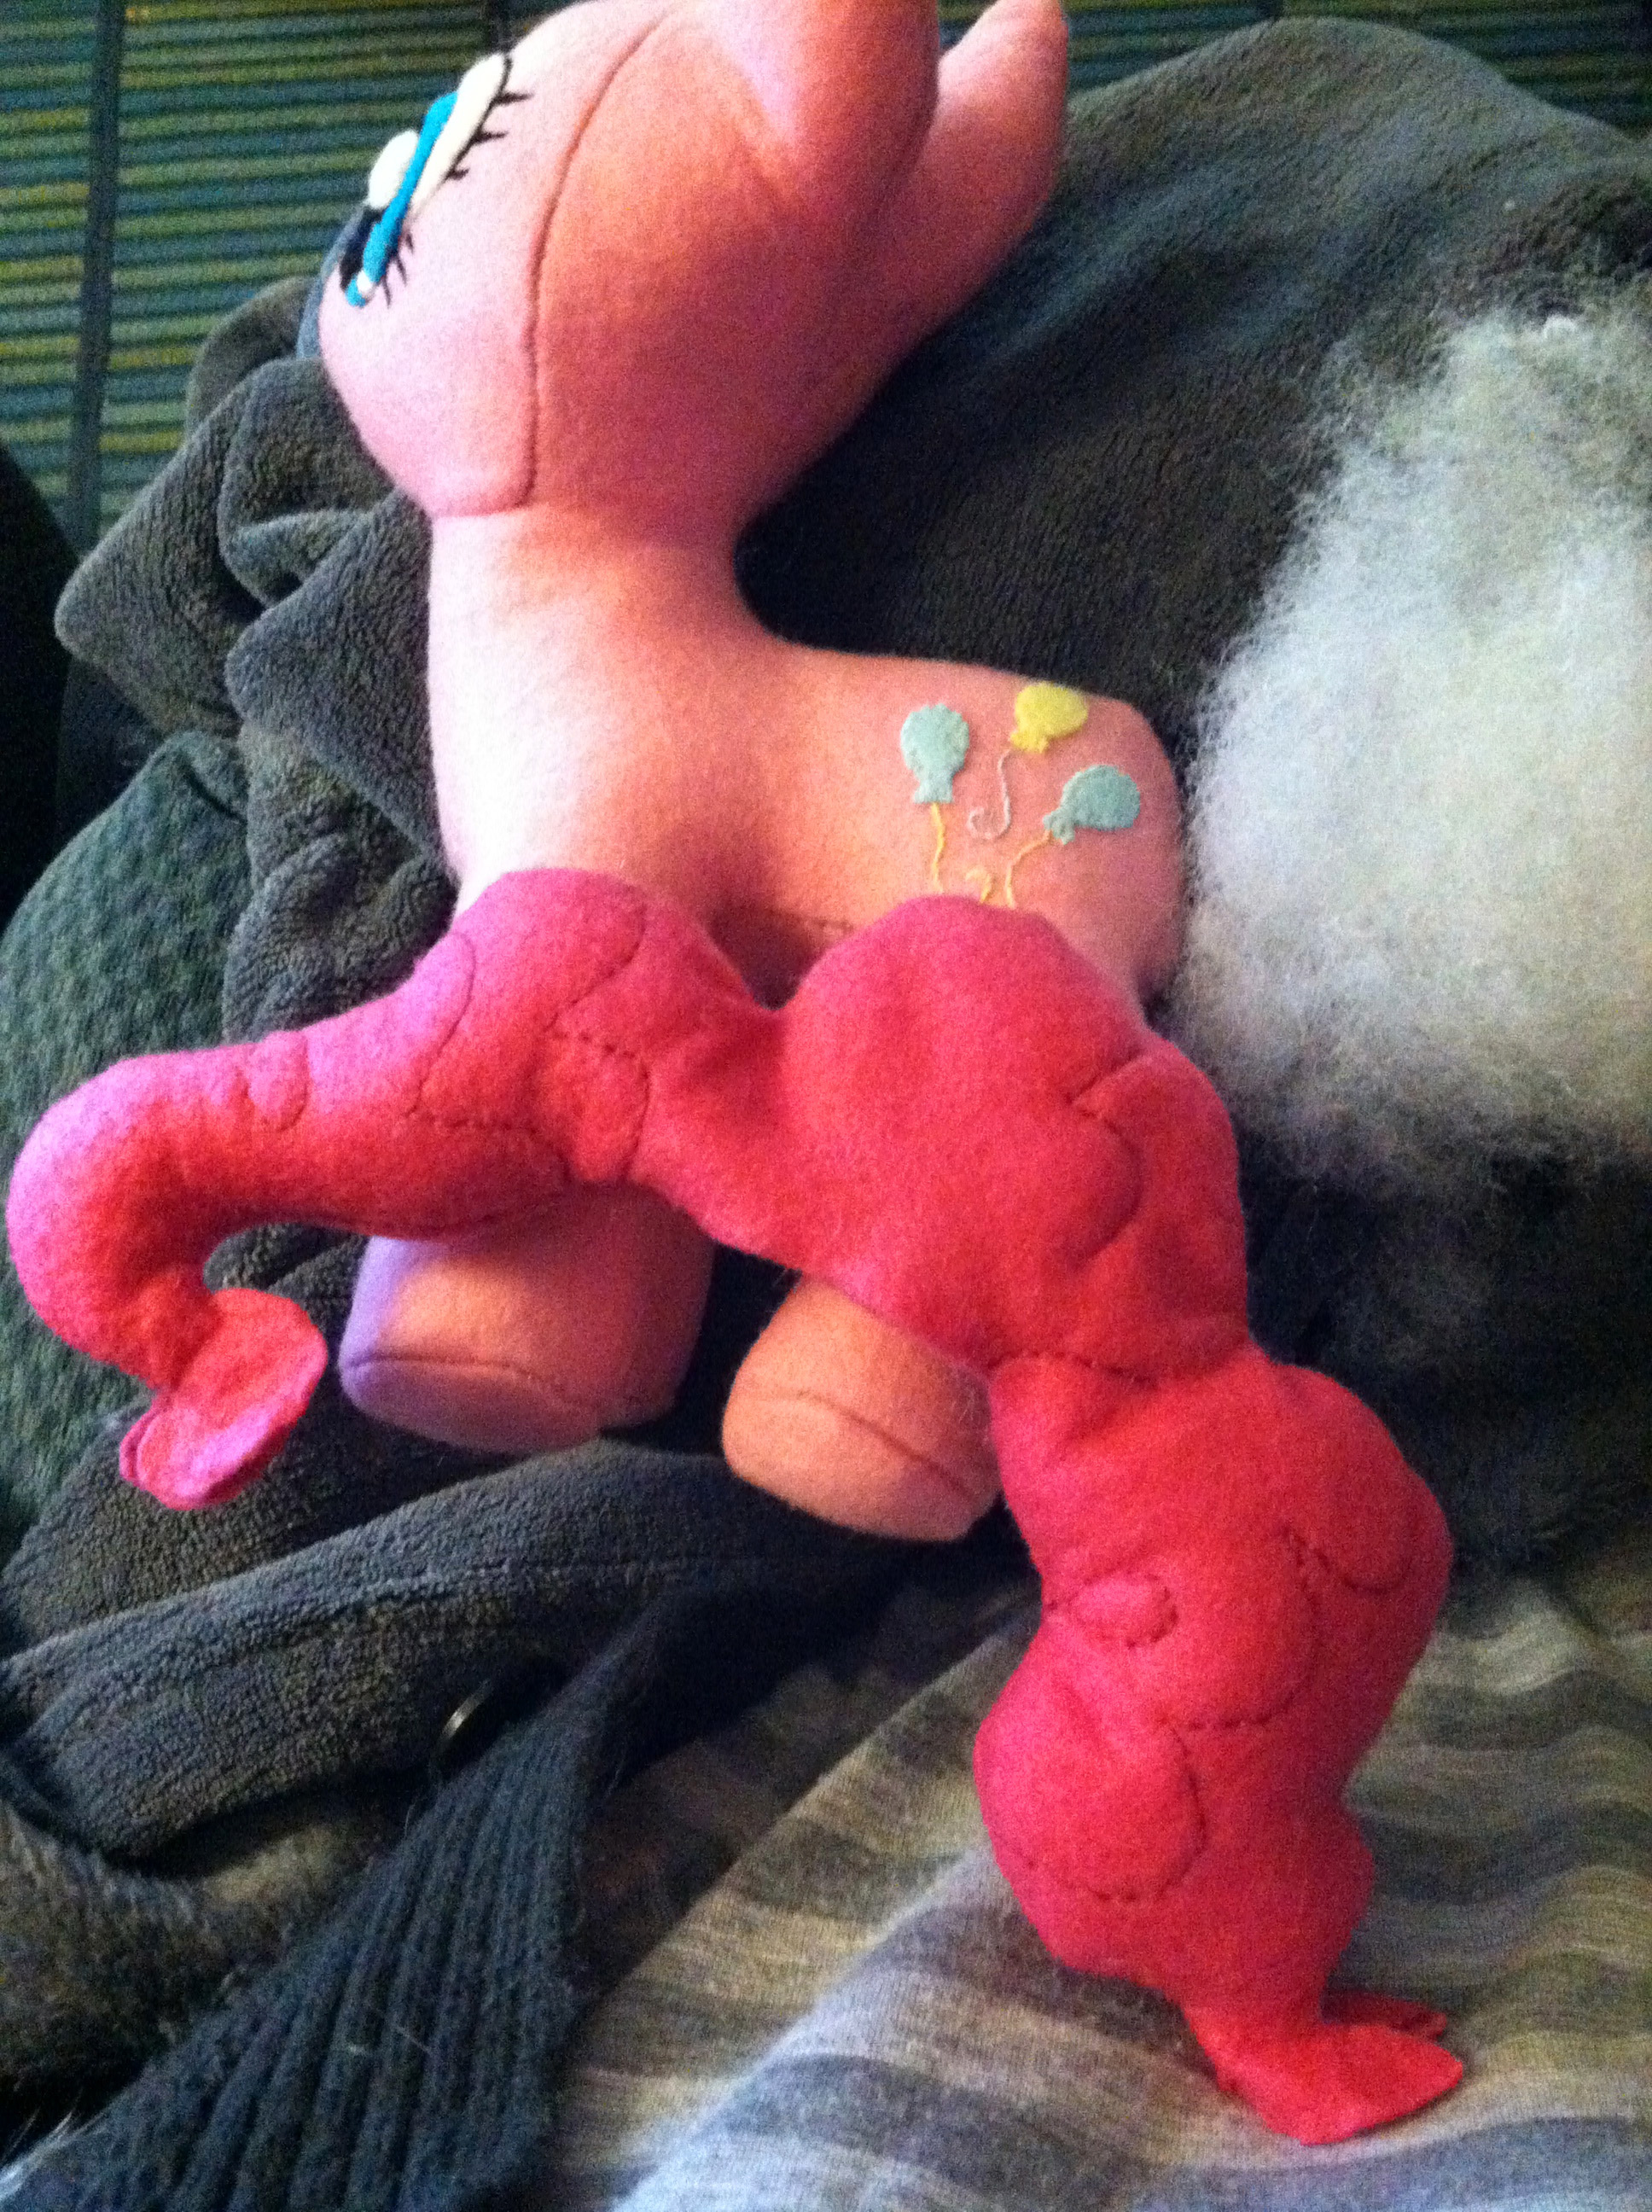
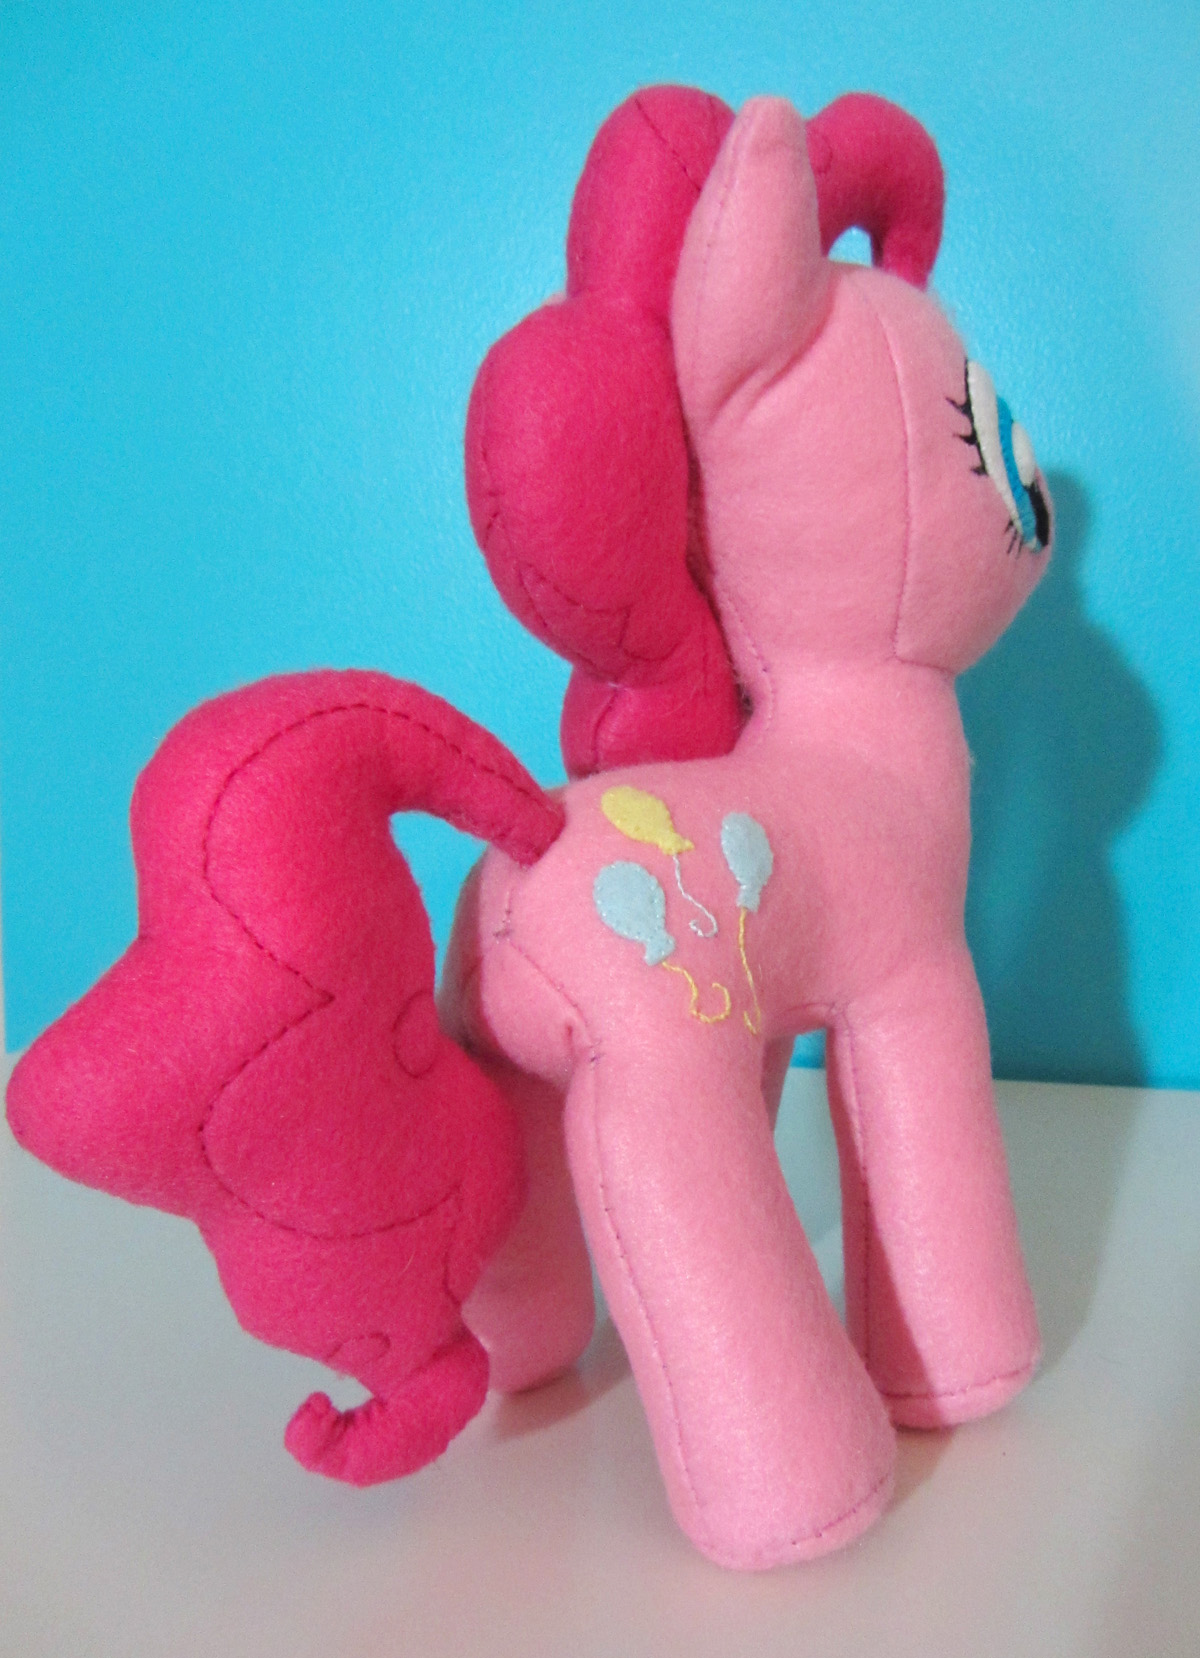
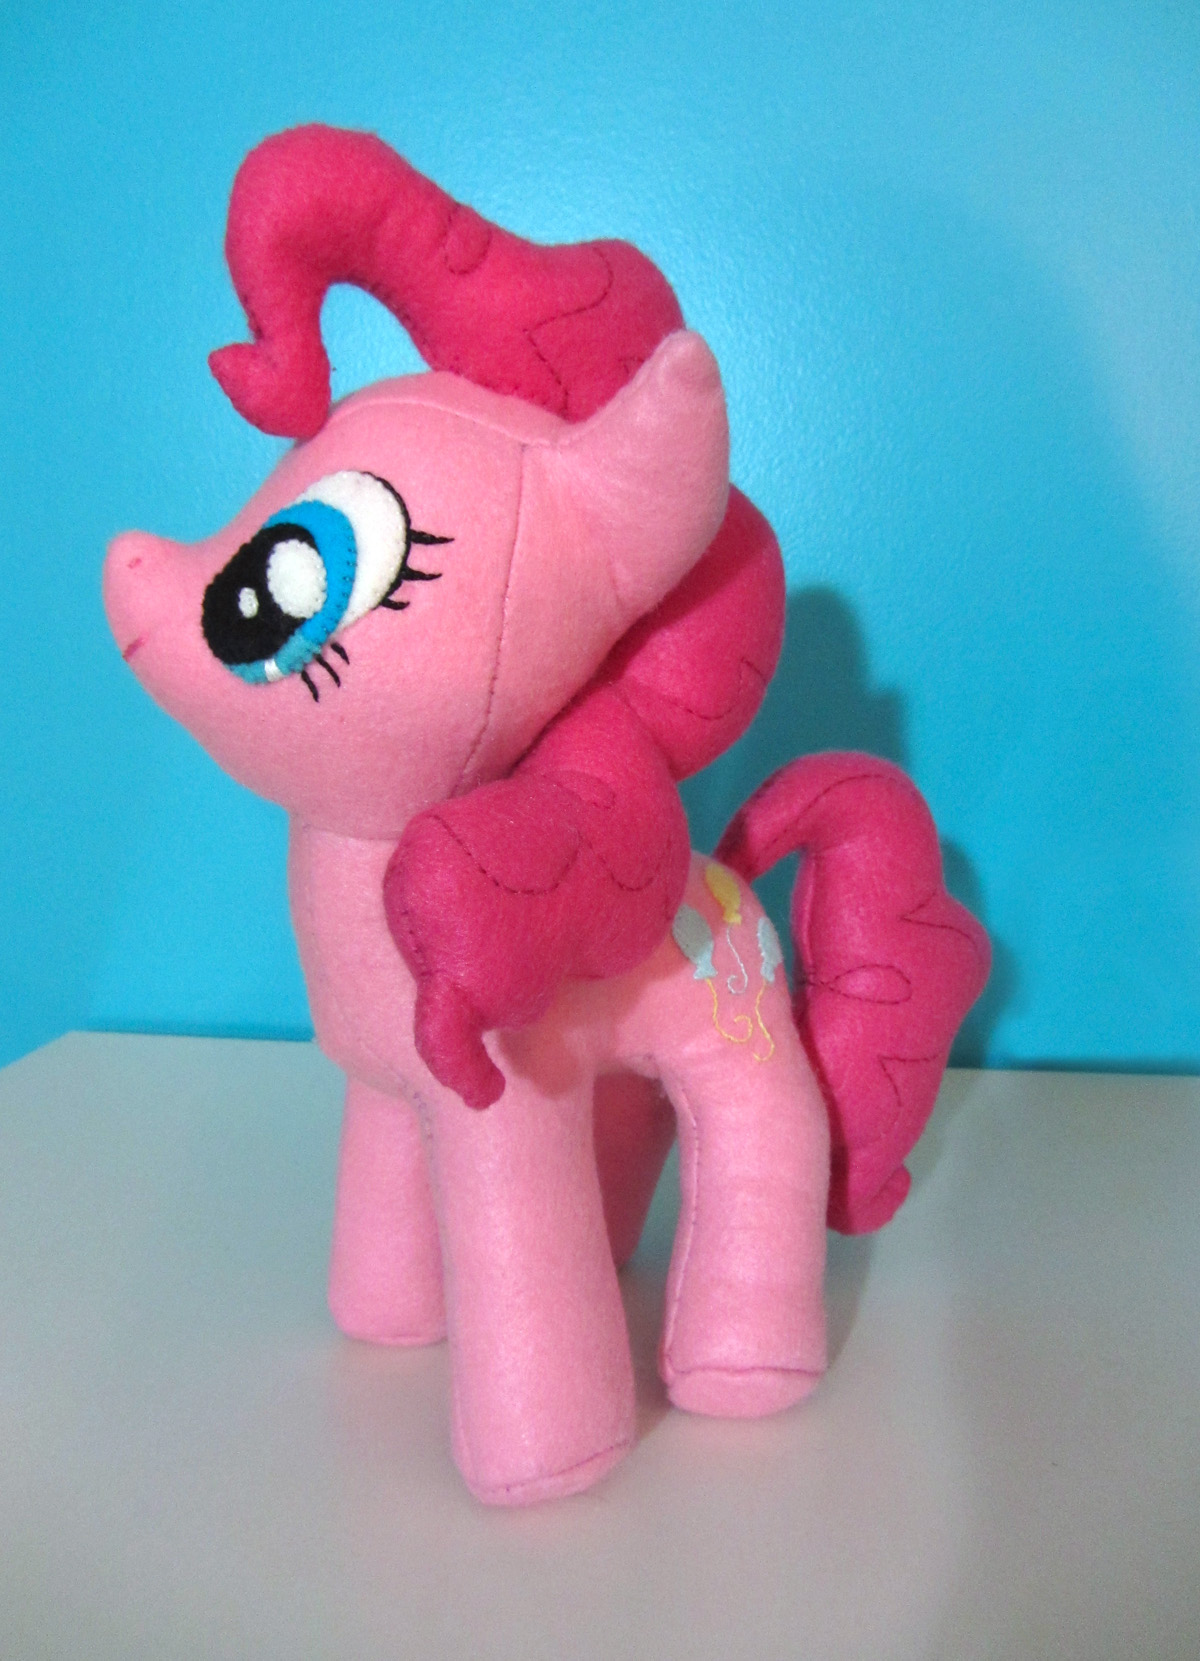
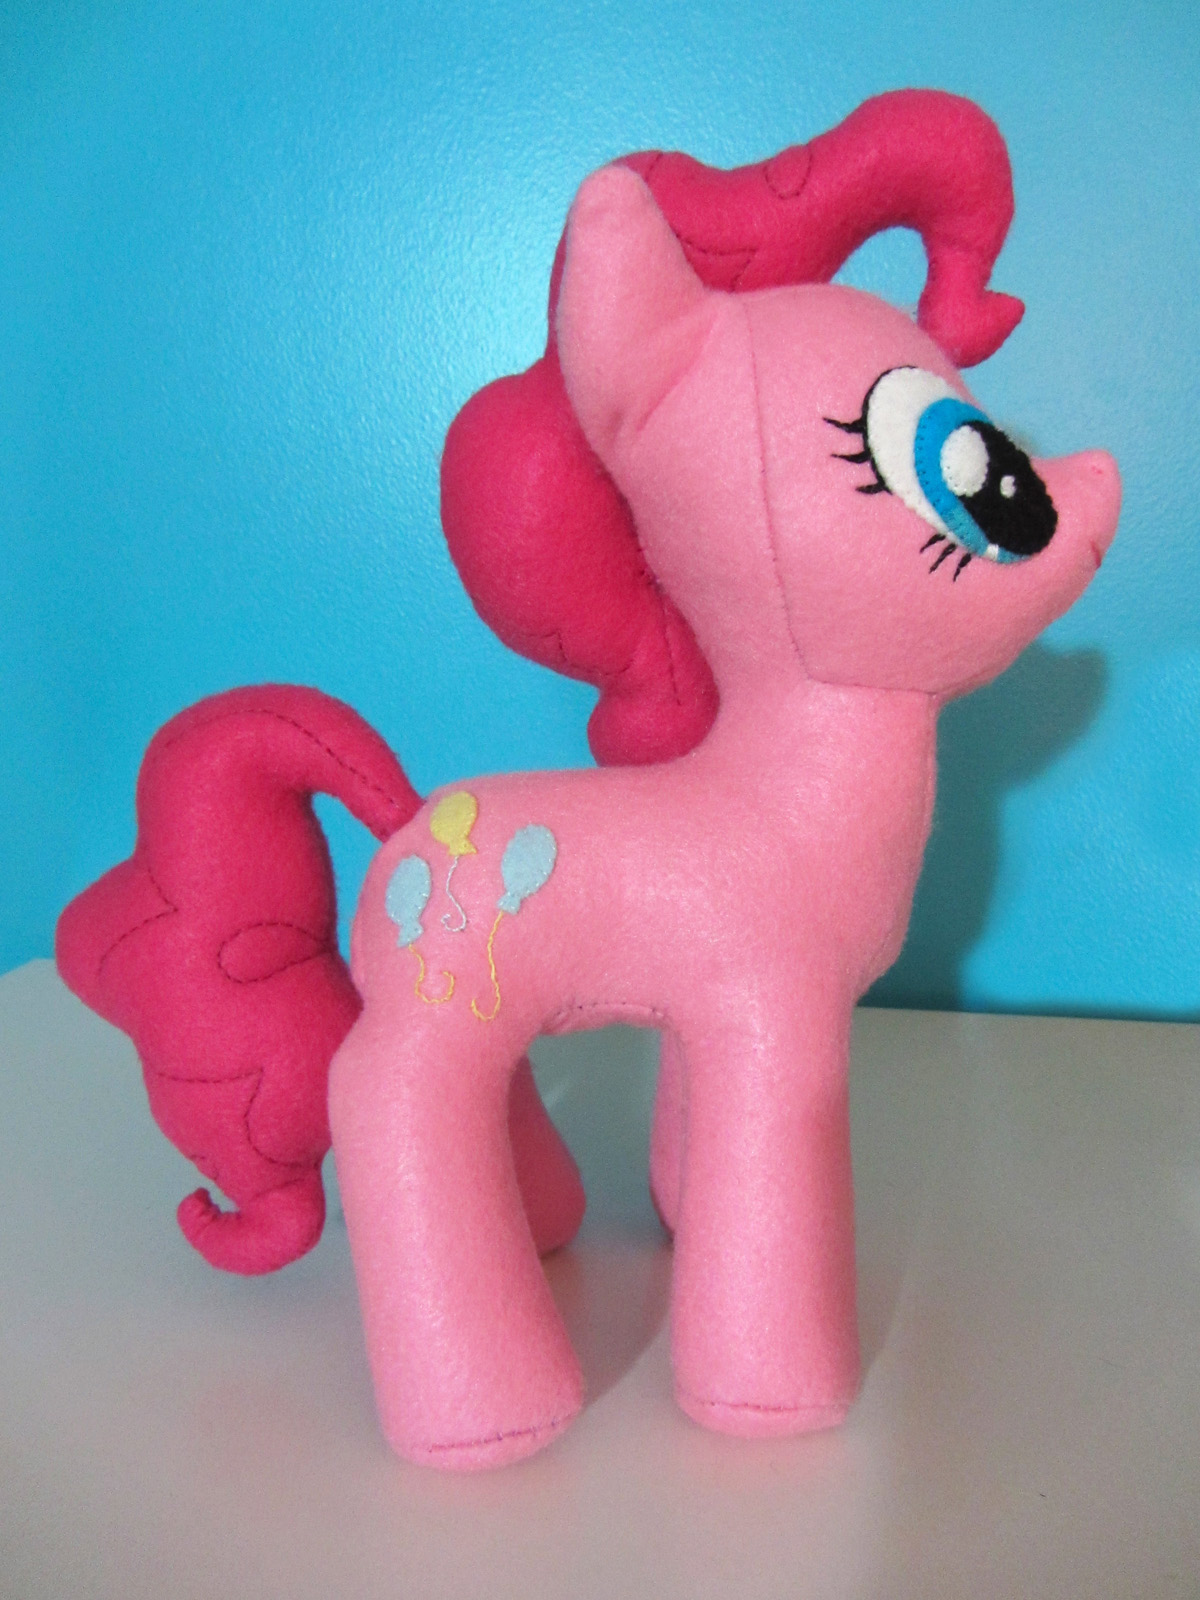
For the main and tail, I used the same technique mentioned in this tutorial to create a pattern. Thank you Meowplease! When I sewed the swirl patterns of her hair onto the felt pieces, I added a layer of batting to the back to add dimension. It would have worked better with more batting and thinner fabric. My results were subtle. I ran into trouble while trying to turn the sewn piece right-side-out. The little flippy curls were too small. I ended up ripping out the stitches for all the tiny curled bits, then sewed them while the piece was right-side-out using a ladder stitch. I used this technique to attach the main and tail. Thank you MLPPlushies!

DIY Pinkie Pie MLP Plushie

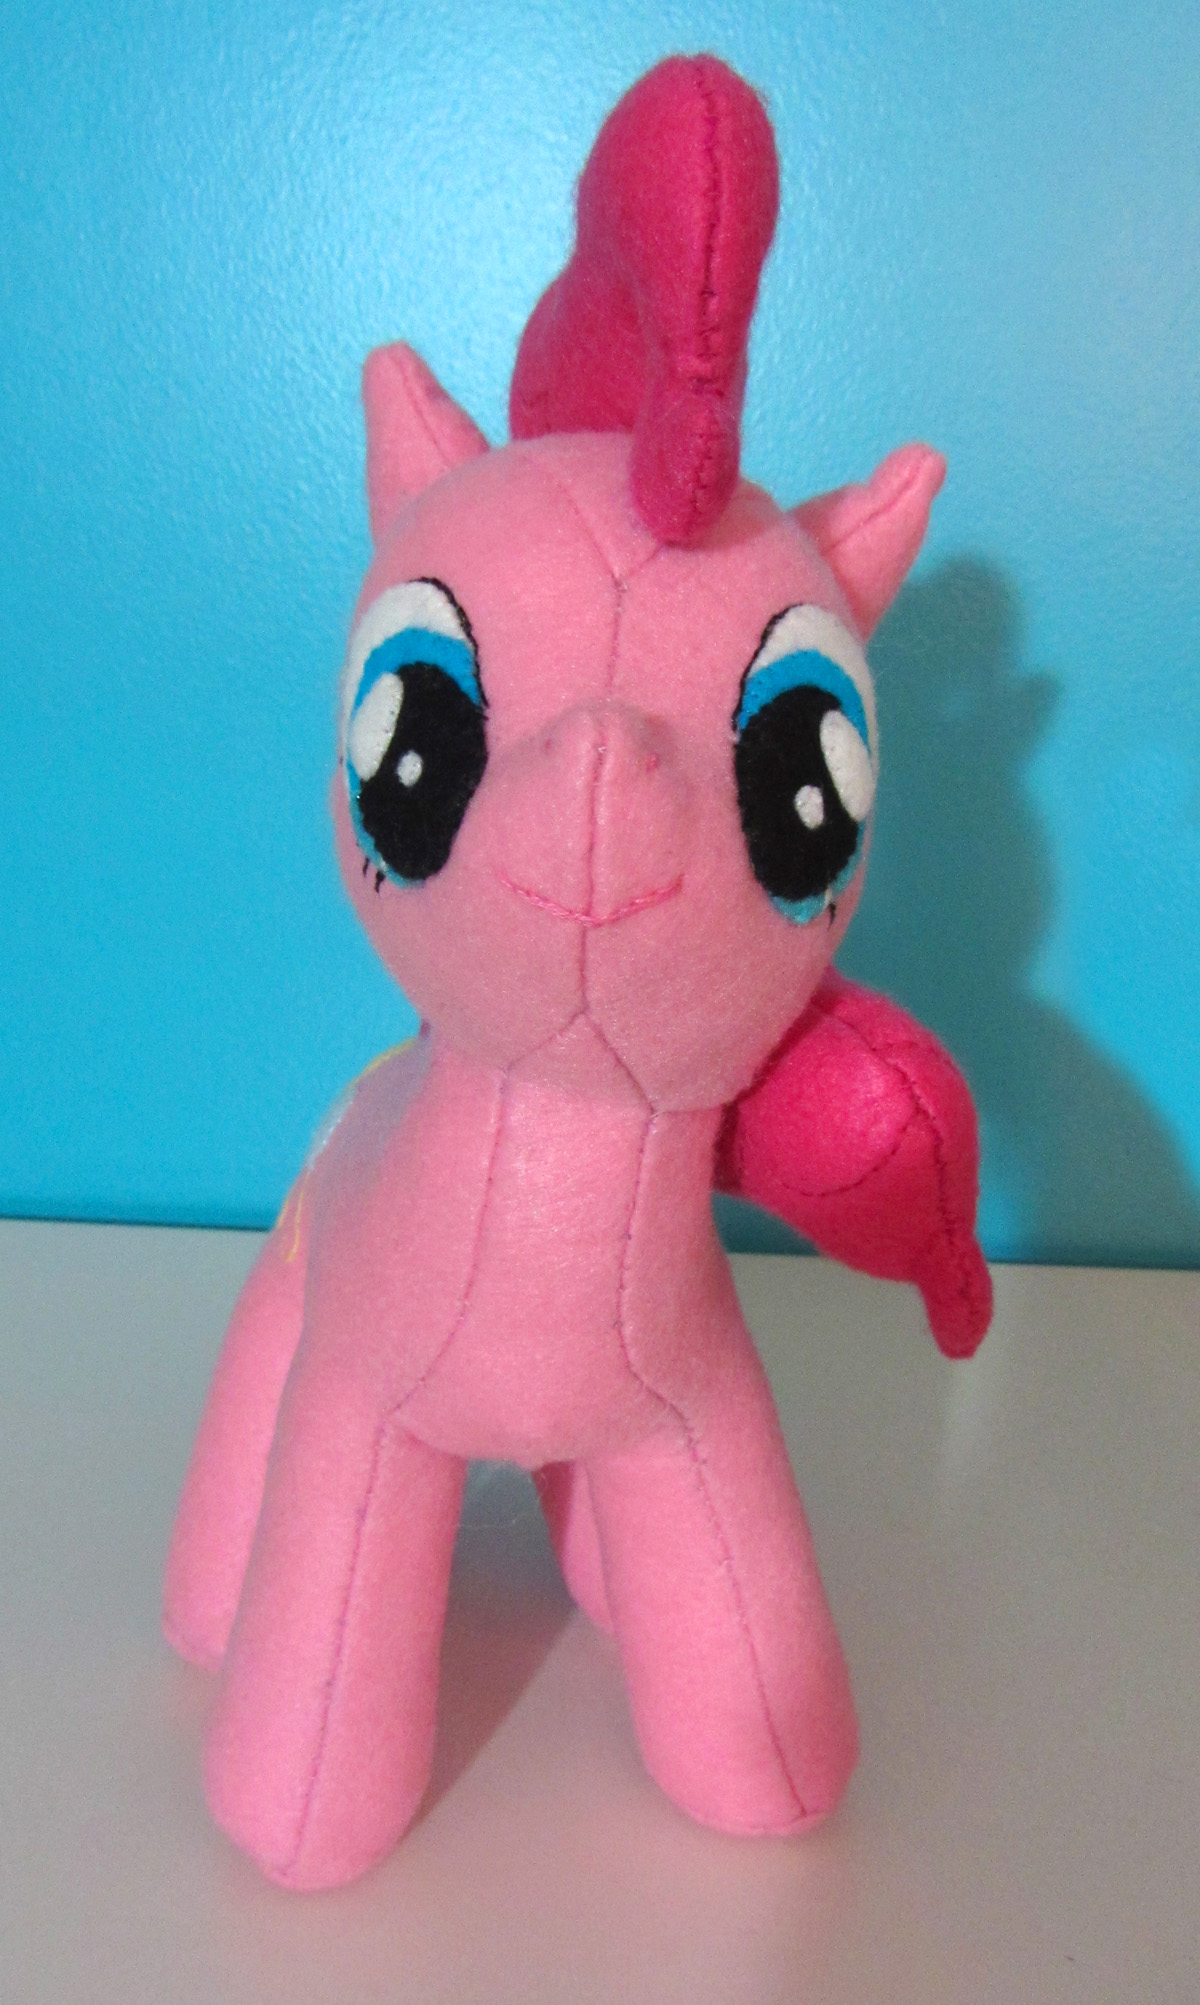
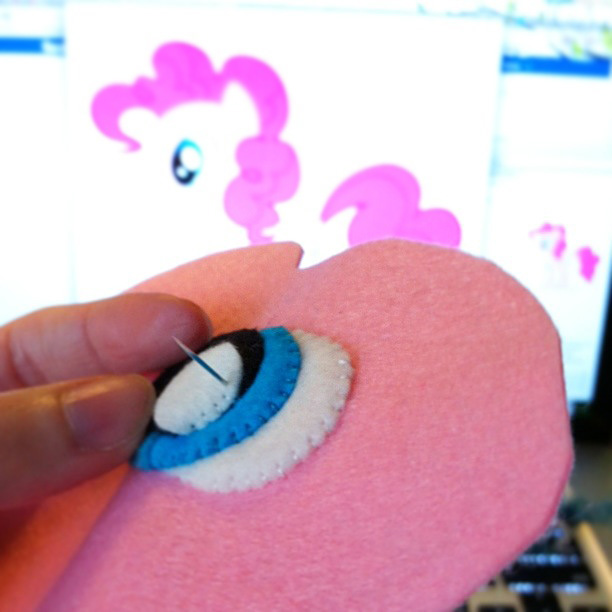
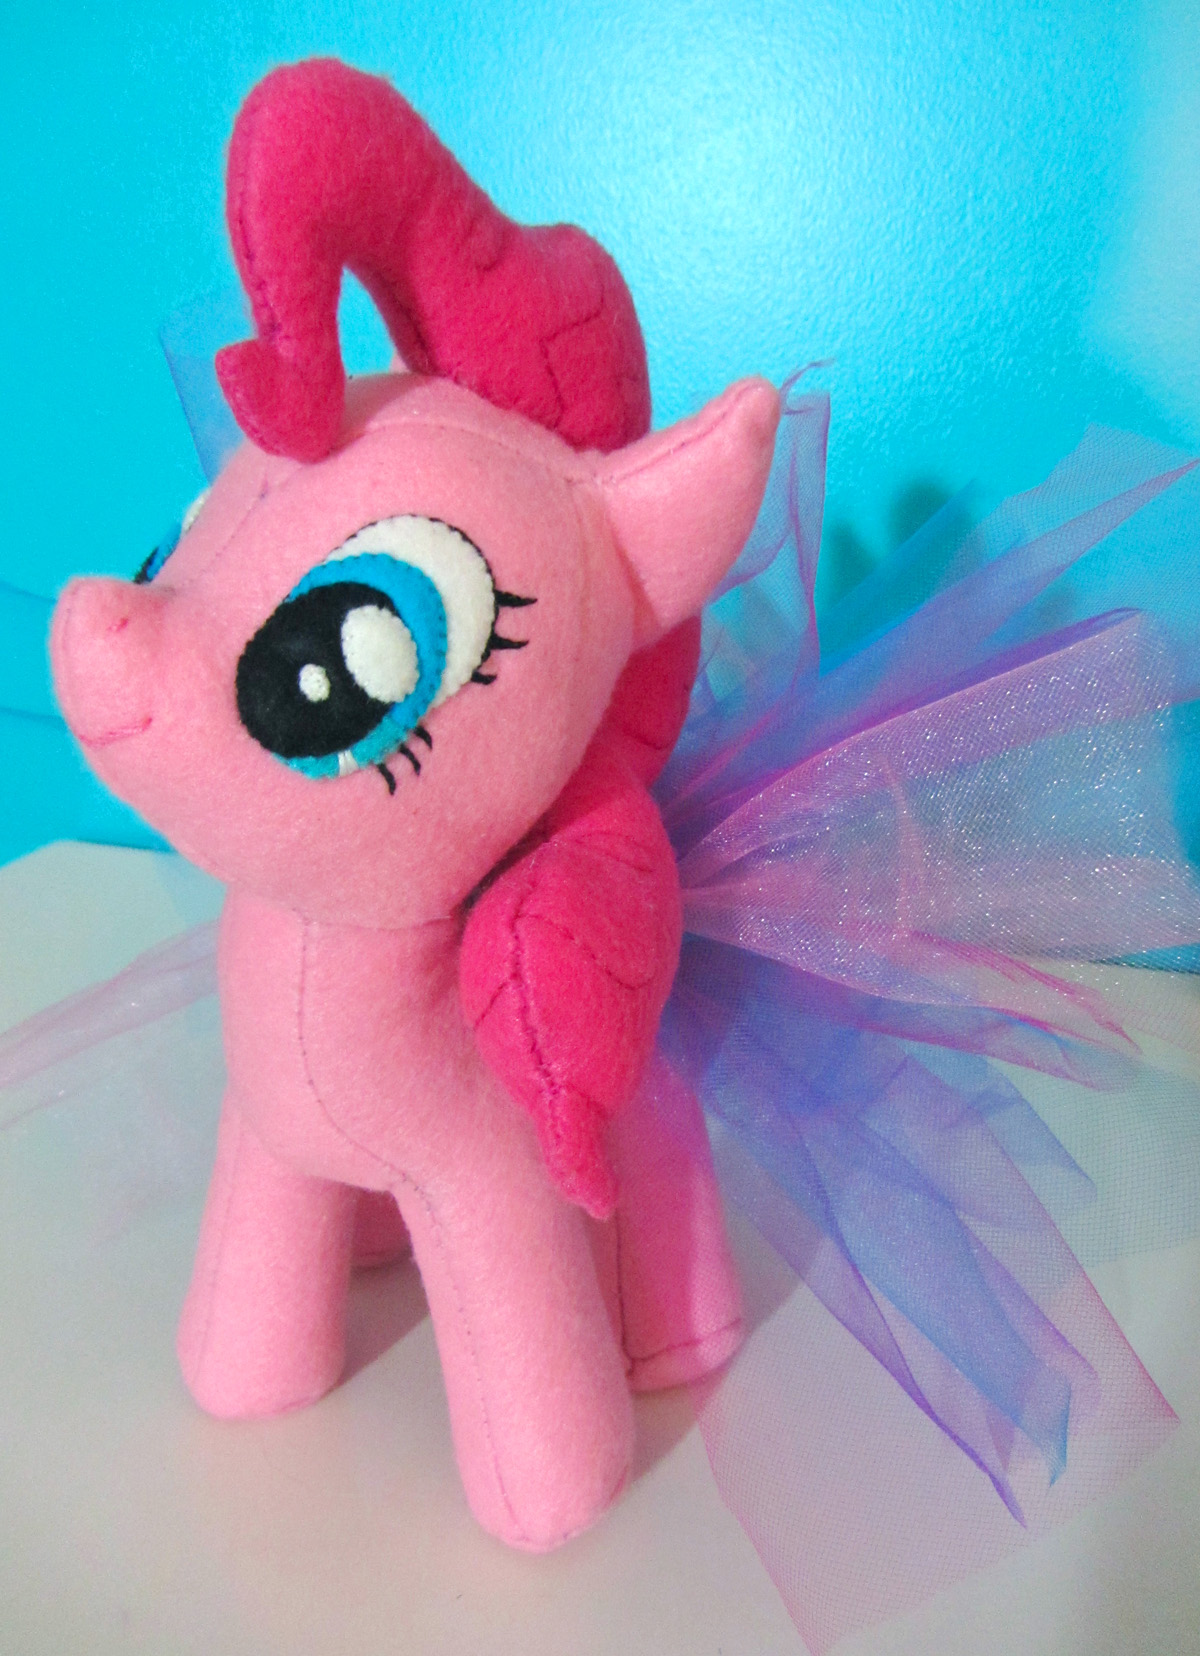
The eyes were my own creation. I do not have an embroidery machine (that’s called “my hands”!), which seems to be the preferred way to sew pony eyes and “cutie marks” (butt tattoos!) I layered felt ovals to make all the main parts, added a wedge of lighter blue at the side of the iris for shading and stitched a satin stitch wedge of white for a highlight. The eyelashes were a combination of back stitch and satin stitch. In my quest to do well, the eyes took 3 hours!

DIY Pinkie Pie MLP Plushie

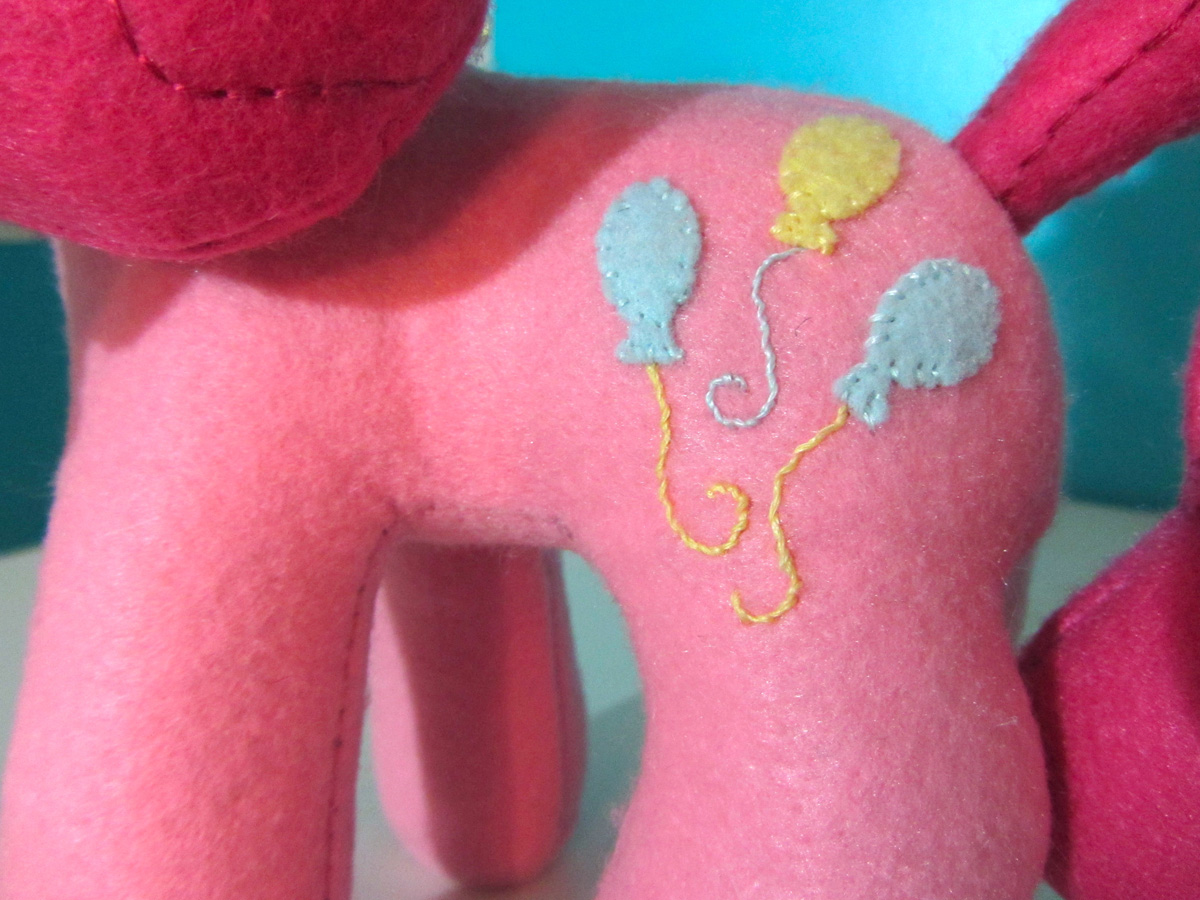
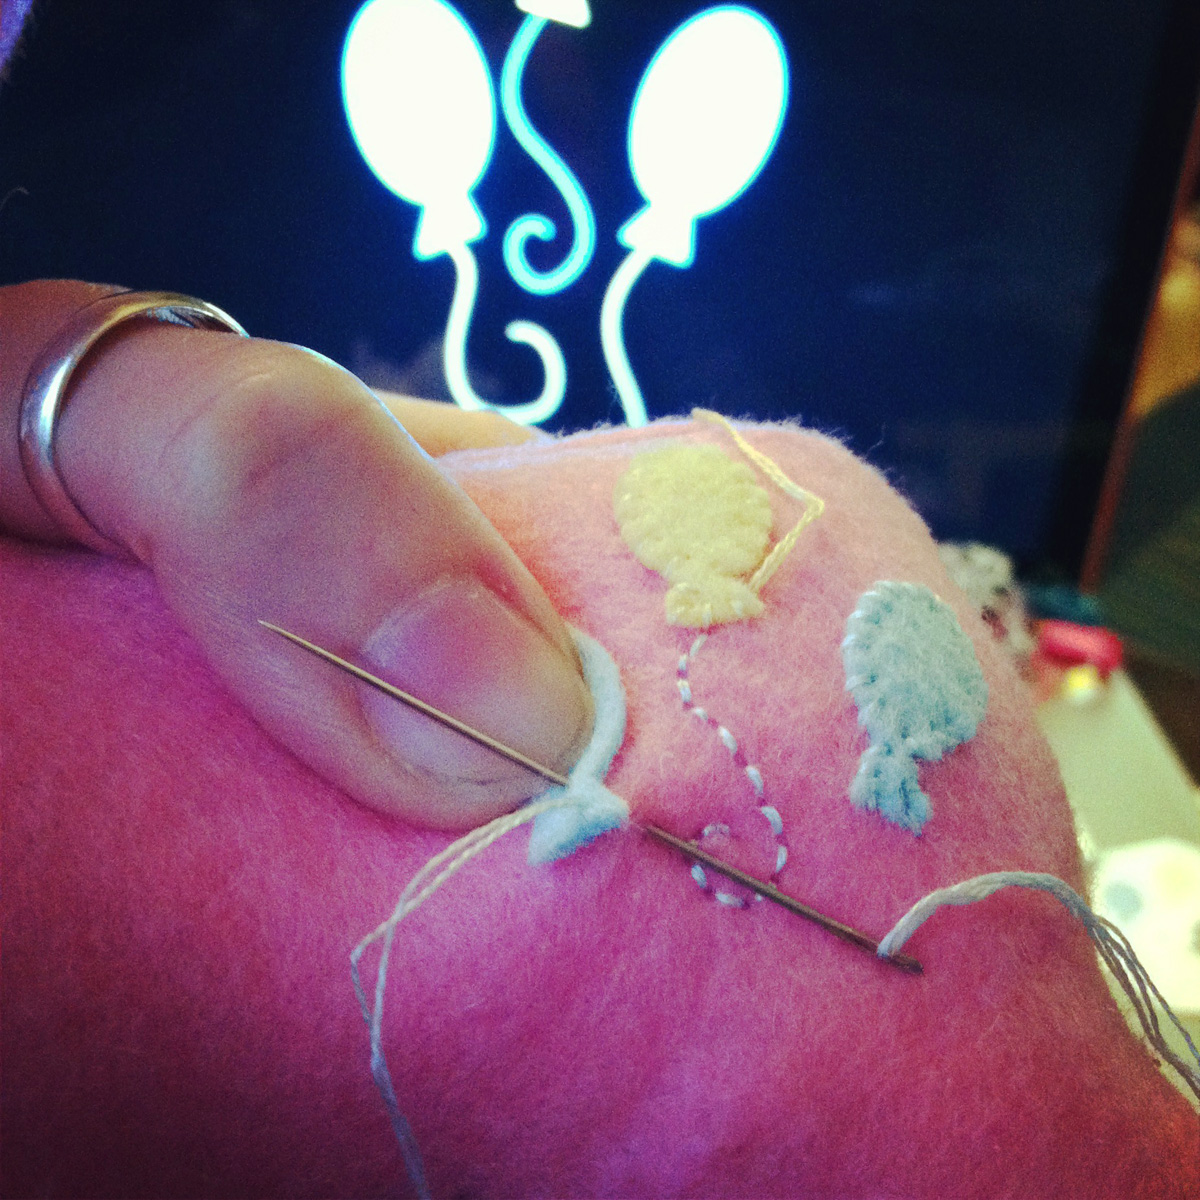
The “cutie mark” was done in felt. I started out with the balloon strings done in back stitch. I decided I wanted something more solid, and wove my needle right-to-left through every stitch to fill it in. The result was similar to stem stitch, which I used for the mouth. The “cutie marks” took me an hour each.

DIY Pinkie Pie MLP Plushie  DIY Pinkie Pie MLP Plushie

The clothing was all my own ideas. While I searched a bit through images online, thanks to my brother’s information, I decided to do my own thing. I didn’t have the materials needed to do anything “show accurate” so I went with colors that matched Pinkie and my niece liked.

DIY Pinkie Pie MLP Plushie

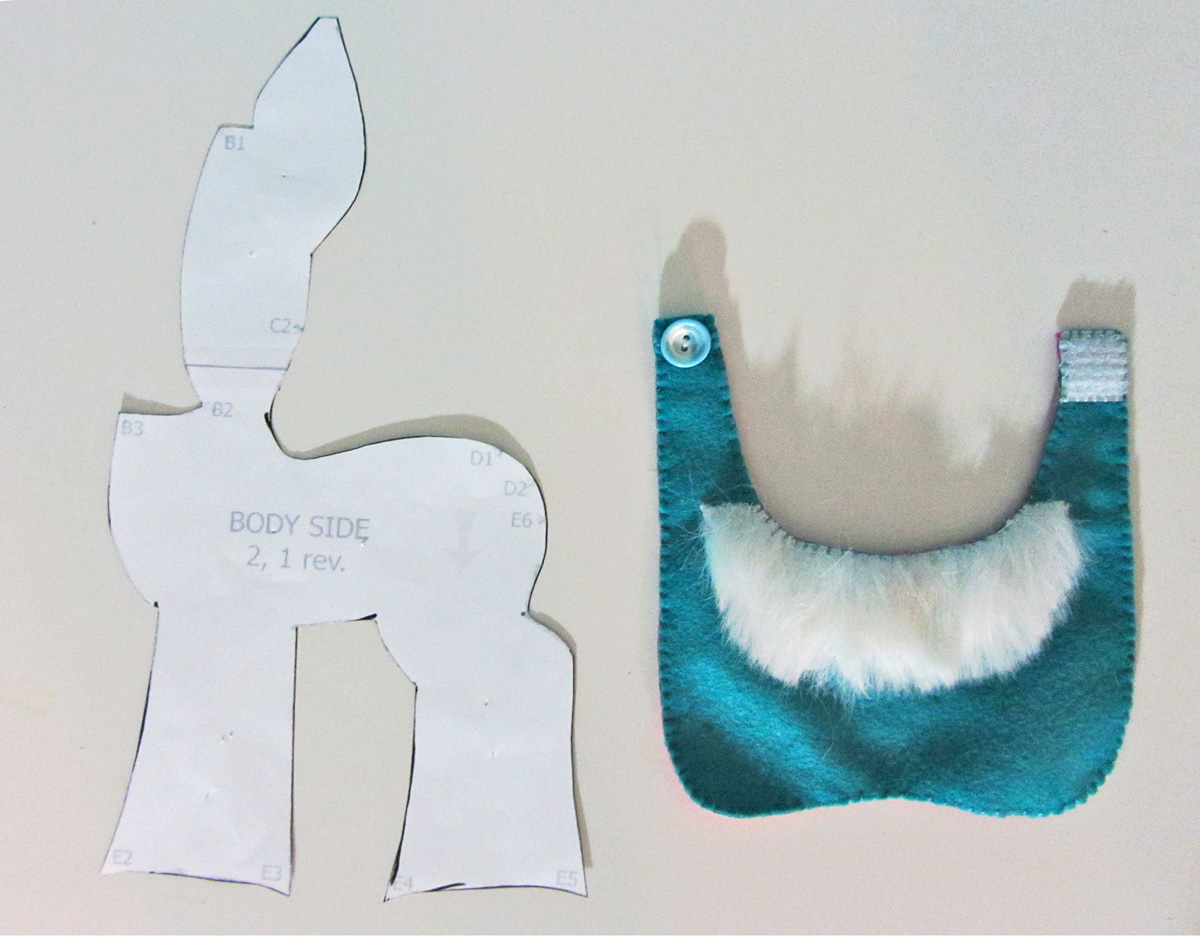
The cape was made with the darker pink eco felt on the inside and peacock wool felt on the outside. I cut a bib shape with a slight concave curve at the bottom to allow for her tail. I used snag-free Velcro to close it and decorated the front with a vintage button of my mother’s. I also sewed on a collar of faux fur.

DIY Pinkie Pie MLP Plushie  DIY Pinkie Pie MLP Plushie

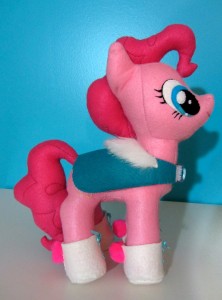
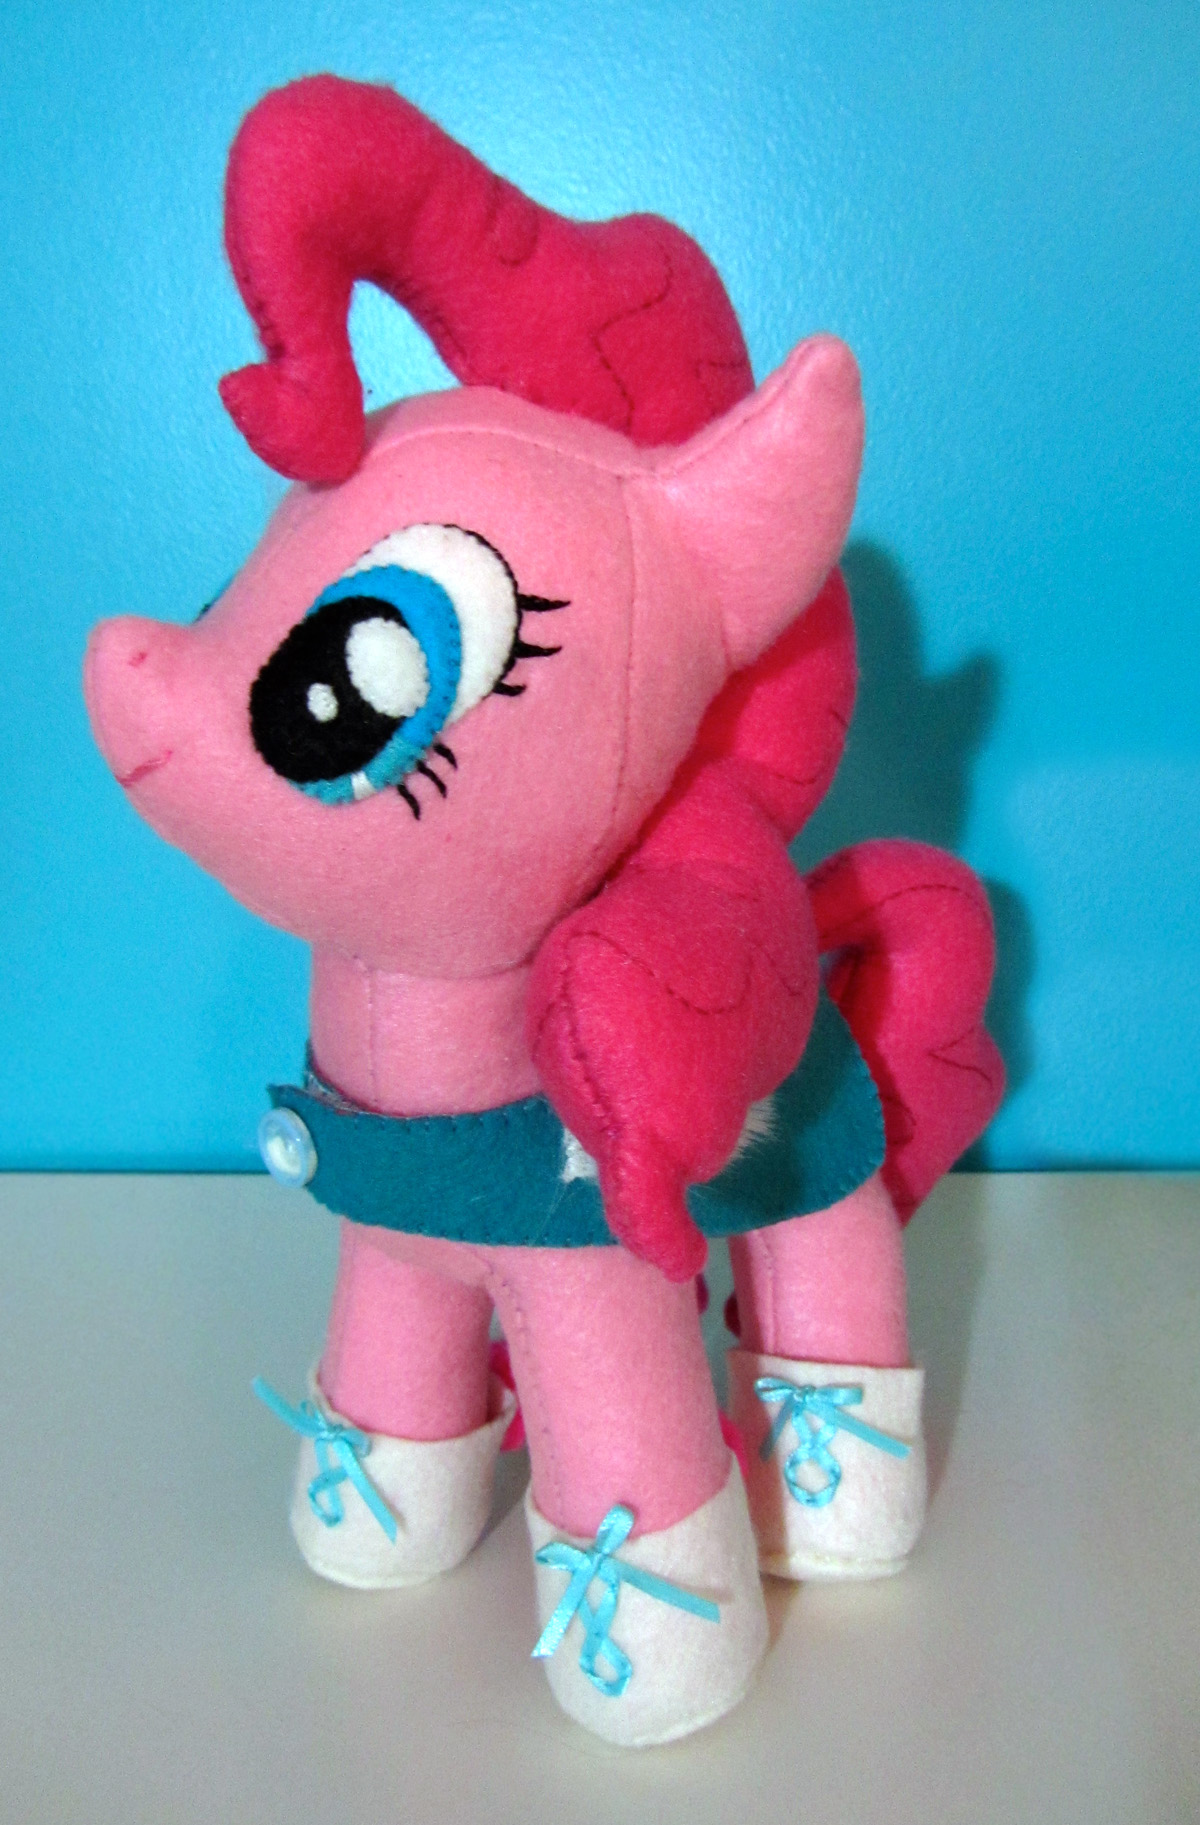
I wanted some boots for her, despite the fact I’d have to make 4 of them. I used some of the eco felt in white, and cut circles slightly larger than her finished feet. The boot bodies were strips of felt with a subtle curve. I wrapped the first one around a leg and trimmed it to make a template for the others. I had it long enough to overlap the seam.

http://pinterest.com/pin/10203536627526810/

I kept the seams flat by stitching little stitches across both overlapping edges in each boot. Then I turned them inside out, sewed on the bases and flipped them back right-side-out. I stitched pompons onto the backs and stitched crisscrossed ribbon onto the fronts as laces.

DIY Pinkie Pie MLP Plushie

The tutu was added into the mix because the ponies had “gala dresses” that seemed to be a big deal. While I couldn’t make Pinkie Pie’s actual dress without candy corn ribbon, I decided to make a quick skirt to turn the cape into a dress. I took a bit of elastic and strips of leftover tulle from my sewing stash, looping the halved strip through themselves to attach them. (A quick search just now brought up the same technique here.)

DIY Pinkie Pie MLP Plushie

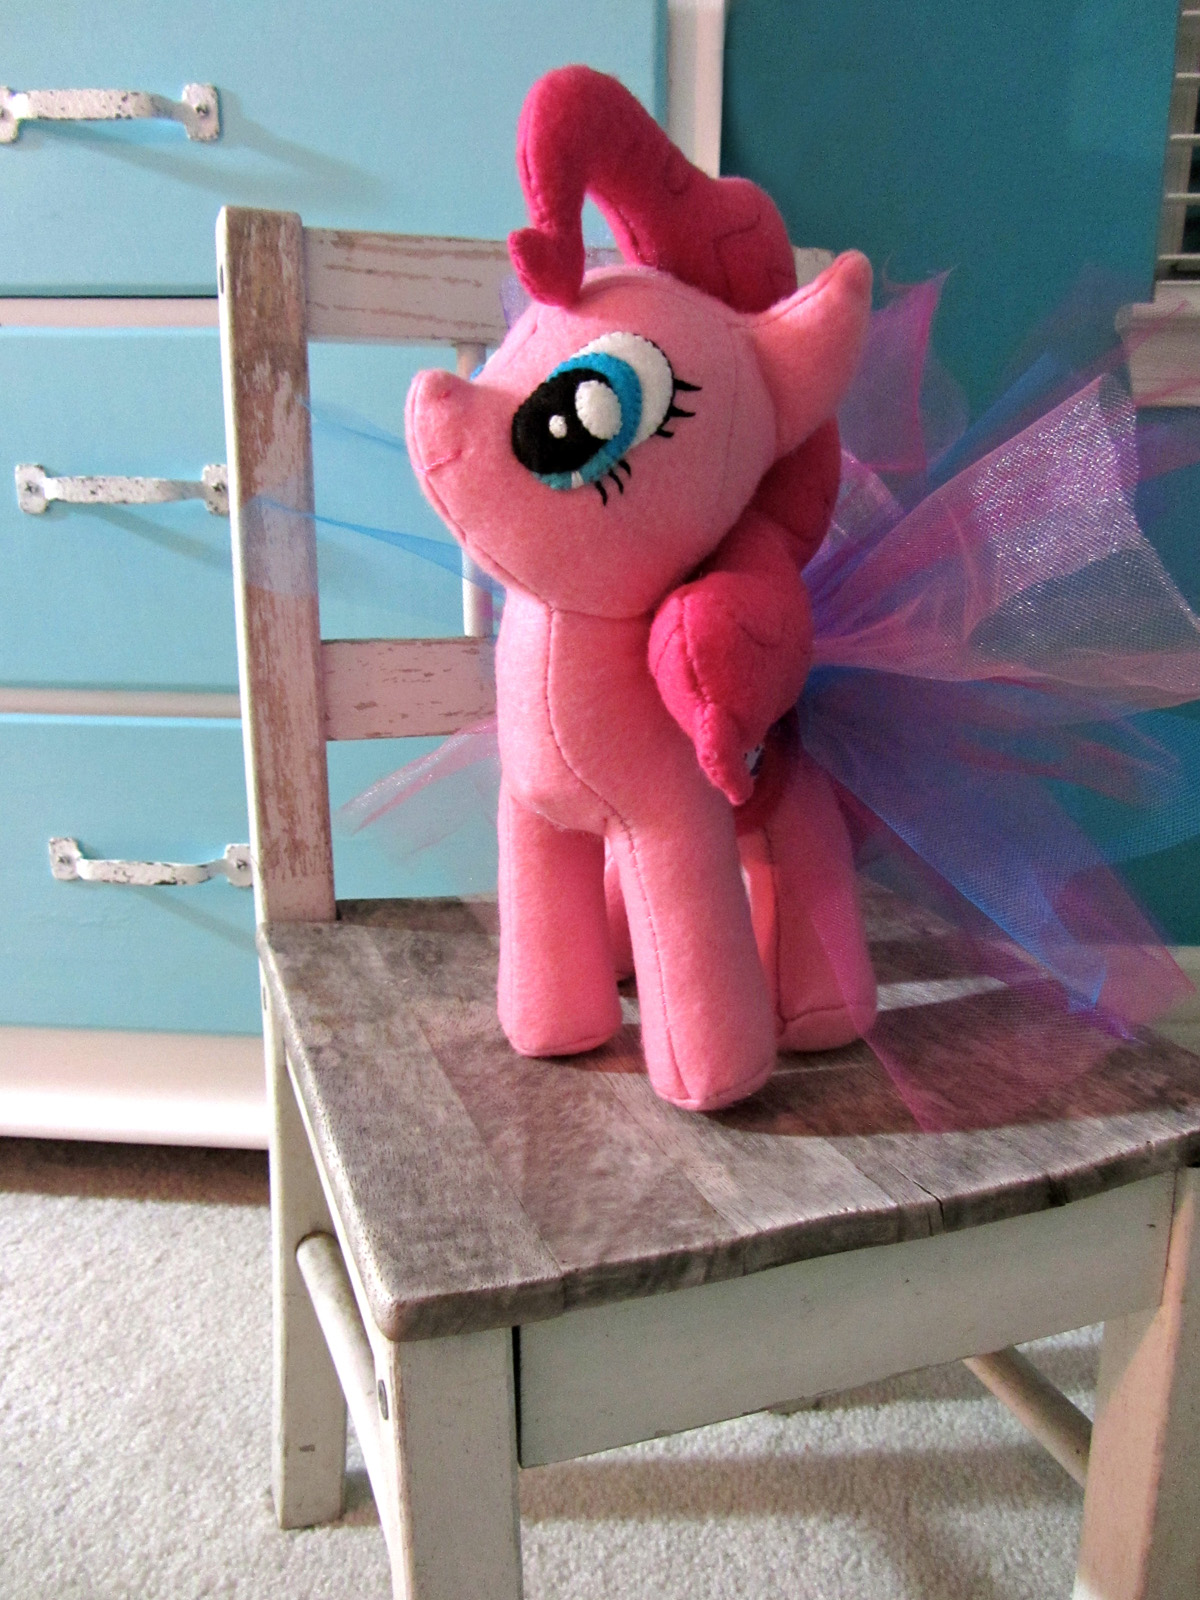
This little chair was $3.75 at the thrift store. Perfect school chair!

I didn’t make the elastic go all the way around her waist like I’d originally planned. Instead, I sewed the elastic and the tops of each tulle strip to a long piece of the darker pink felt. I added a length of cupcake ribbon (Dollar Tree!), sewed another piece of felt to the back as lining, and added more snag-free Velcro to close it. It looks more finished that way.

DIY Pinkie Pie MLP Plushie  DIY Pinkie Pie MLP Plushie

My niece got to open her gift this morning, while my brother’s family was on their way out of town for the holidays (and my grandmother’s funeral).

DIY Pinkie Pie MLP Plushie

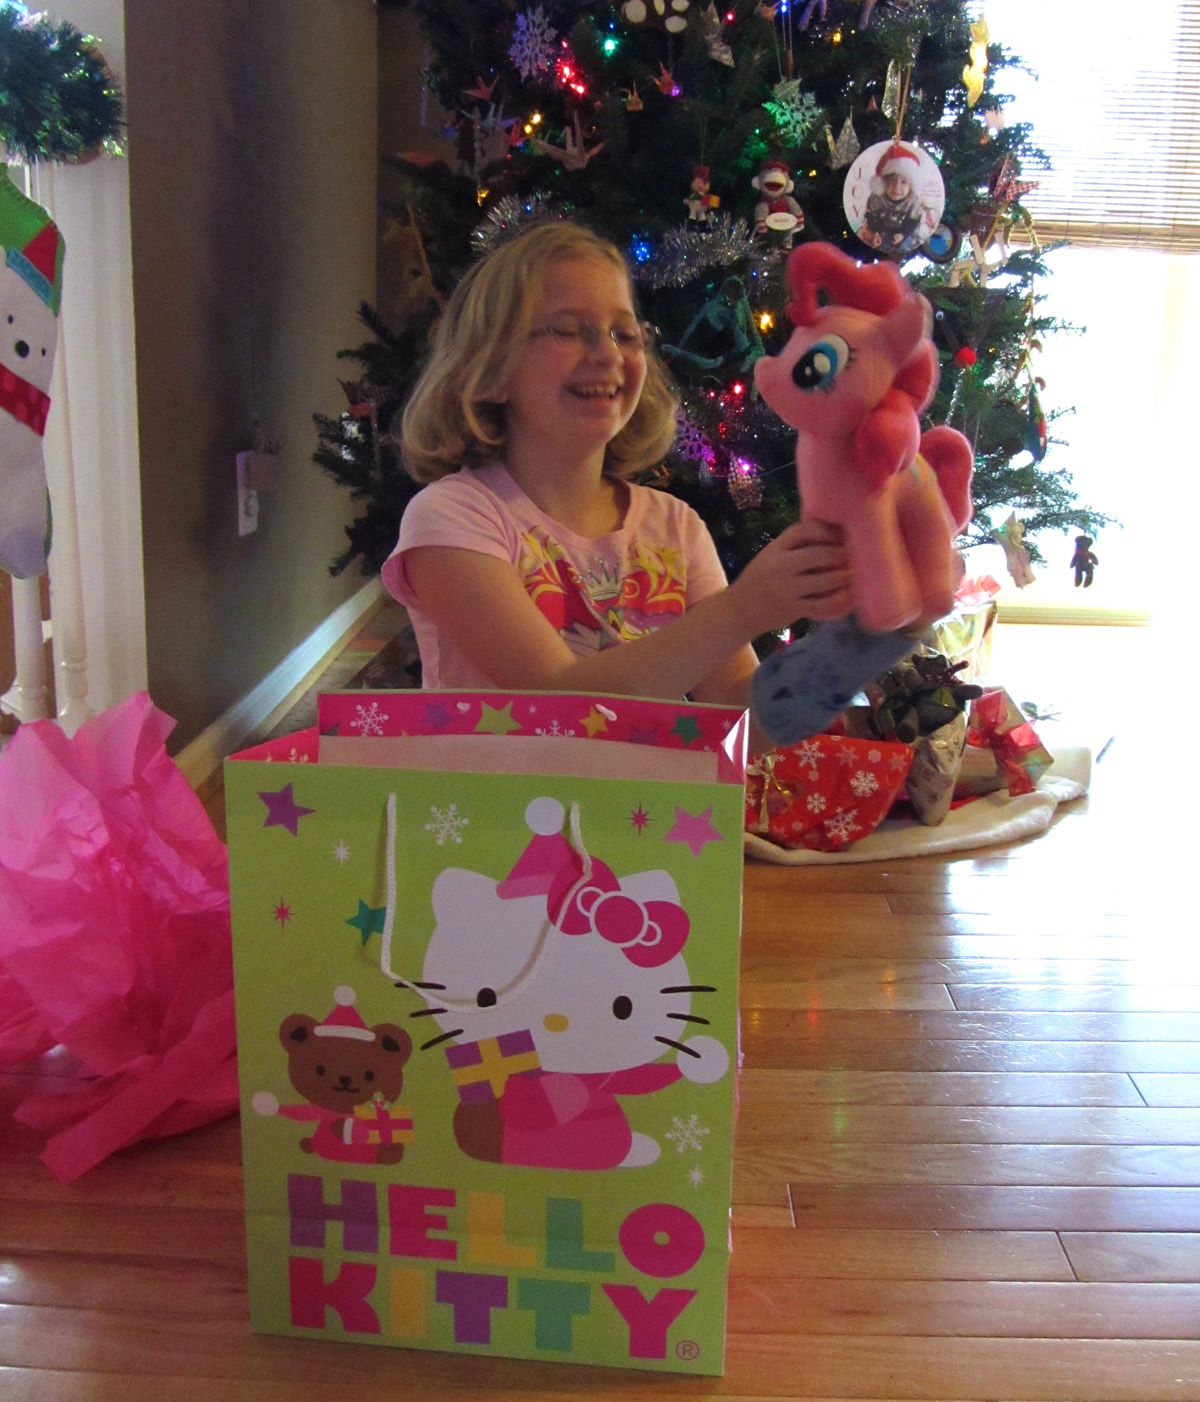
She seemed to really love it. Mission accomplished!

DIY Pinkie Pie MLP Plushie

Five Little Monkeys Quiet Book Page

Jackson’s current favorite song, besides the ABC’s, is “No More Monkeys!” He loves all versions of the song, and he is terribly cute singing along. I *had* to design this page, even though I dreaded sewing 7 monkeys. It was worth it! It turned out very cute and has the added bonus of being a counting page.

Five Little Monkeys Quiet Book Page

I made this page using leftovers from my stash of wool blend felt from American Felt and Craft. I pretty much used whichever colors I had enough of to cut the large floor and bed pieces. But, their felt colors are so rich and pretty and it came out great, scraps or not!

What I Used:

 I started by stitching back stitched numbers onto the 5 pillows and 5 monkey bellies. I used rainbow colors of threads and stitched them freehand. I did the bellies while doing the pillows since I already had the right colors threaded on my needle. I set the bellies aside and stitched the pillows onto the headboard in a random arrangement. I pinned the floor on the page then sewed down the headboard.

Five Little Monkeys Quiet Book Page

Next I sewed the yellow and white bed spread pieces together along the sides and top. I pinned them behind the foot board on the page, then sewed around the foot board. I went back with yellow thread and stitched the sides of the bed spread down to the page. This made a nice big pocket for the little monkeys to sleep in. I added some snaps to the foot board that are used to hold mama and the doctor to the page.

IMG_1261

Monkey Assembly Line: I did all 5 monkeys at once, repeating each step 5 times. First I embroidered their faces: French knot eyes, slanted stitches for nostrils and long stitches for mouths. I then sewed the faces and (already numbered) bellies onto the front body pieces.

The monkeys all have brown hook (rough) Velcro on the front of their left paws (on the right in the above photo) and loop (soft) Velcro on the back of their right paws (on the right in the photo below). This lets them link hands and jump on the bed all together. They can also clasp their own hands over their bellies. I sewed my Velcro on while sewed the front and backs together, but you could do it beforehand. I added a little stuffing to their bellies for dimension.

IMG_1262

For the tails, I cut lengths of pipe cleaner and folded over the ends to hide the sharp bits. I sewed tubed of felt around them then stitched them onto their monkey bottoms.

Phones: I went with smart phones! It was just so much easier to make them super cute. Sorry to all of you who would prefer a land line. I sewed tiny portraits of mama and the doctor onto the black screen pieces. There are pink or white semi circle for the torsos, brown ovals for the heads and a peach heart (without the point) for the face. The only detail I added was a red + for the doctor. I made some thick red and green stitches to act as call buttons. I then sewed the black screen on to the white front phone piece.

Instead of sewing felt onto the back, I cut the phone case out of snag-free Velcro and sewed that on as the backing. This lets the phones stick to the monkey paws but not the snag the page.

Five Little Monkeys Quiet Book Page

Mama: For mama, I sewed her facial features first. She still have French knot eyes, but I added little stitches for lashes. I made her mouth frowning because mama isn’t down with her babies bumping their heads! I stitched her face on and sewed a little ribbon bow on her head.

When sewing her two sides together (with stuffing in her head and belly), I added loop (soft) Velcro to the front of her left paw. You could probably make the nightie a separate piece that comes off. I sewed mine right onto her body, then stuffed her and sewed her limbs up. Her tail is the same as the little monkeys, just longer and sewn to her dress. I added a decorative button the the front and the other half of one of the snaps to her back.

Five Little Monkeys Quiet Book Page

The Doctor: The doctor was done just like mama, but I decorated the front of his scrubs before sewing him together. I stitched his stethoscope on and added a scrap of gray for the bottom part. I also sewed on his red cross. When he was all done, I stitched some silver ribbon around his head and added a silver sequin.

Five Little Monkeys Quiet Book Page  Five Little Monkeys Quiet Book Page  Five Little Monkeys Quiet Book Page Five Little Monkeys Quiet Book Page
Five Little Monkeys Quiet Book Page Five Little Monkeys Quiet Book Page Five Little Monkeys Quiet Book Page

Over all the page was very simple, but having so many monkeys and so little sewing time over the past tow weeks stretched it out a bit. But I love it as much as Jackson does!

IMG_1265 IMG_1266

Jax’s favorite thing to do with the page is to place the monkeys in bed in the right order, then make calls to the doctor on the phone. And he has “No More Monkeys!” permanently in my head right now. I think we need a Christmas music intervention tomorrow!

DIY Holiday Tree Decorations – 3 Tutorials!

I feel like I’ve been waiting forever to get a Christmas tree, though it is only one week into December. Maybe because I started sewing felt ornaments in October? Last night we finally picked out a tree. An hour of living room tree surgery later, Jax and I hung our decorations.


For his first two Christmases, I only used unbreakable ornaments – mostly colorful balls and stars and plastic snowflakes. This year, we skipped the boring balls and mixed handmade ornaments with special family heirlooms. (Though I did keep the fragile glass and crystal ones in the box for another couple of year!)

I adore how the tree turned out! It is full of love and handmade touches. Jax told me it is his “favorite Christmas tree!” and that he loves it. Here are three little tutorials for some of what I created.

DIY Origami Crane Garland

Supplies:
Origami Paper
Beading Needle
Beading Cord

I originally made these origami crane garlands back in January for Jax’s sushi-themed birthday party. A friend had the great idea of reusing them on our Christmas tree. I’d been looking forward to pulling them back out all year!


Start by folding your cranes. I can do this in my sleep, as I used to make hundreds of teeny tiny cranes when I was little. I used three sizes of origami paper, the medium and large were purchase in the craft store, then I bought this 3″ paper for the tiny ones. Using strong thread (I used this) cut to your desired length and a needle, poke your need through the tail and neck of the first bird (for a horizontal garland) or up through the body (for a vertical garland). Tie a knot after each bird and repeat until your garland is the desired length. To make my knots, I made a slip knot, then ran my needle through the loop and pulled it tight.

I made three 6 foot lengths of garland which made them much easier to manage. Those birdies love to tangle up when not in use!

Crochet Candy Cane Garland

Supplies:
Mosaic Yarn in Psychedelic
H Crochet Hook
Pattern
Tacky Glue
Wax Paper
Ironing Board
Pins (rust proof)
Old Paintbrush

I hadn’t crocheted since having Jax, but after pulling out an old crochet hook to try to get a hairball out of the vacuum tube (I know, yuck!) I was itching to get back to it. I’d already had Jax pick out a ball of yarn to make pompoms ornaments with, but decided to do a garland instead. After washing the hook (hah!), I took a look online for easy garland patterns and fell in love with this candy cane one.

You could certainly got with yarn in more traditional Christmas colors, but Jax likes rainbows. Our yarn was Bernat Mosaic Yarn in Psychedelic. I followed the pattern, except that I did 18 chains where it asks for 14. I wanted an extra inch of space between the candy canes. After doing two repetitions I had the pattern memorized, and no longer bothered with the stitch marker. I used the full ball of yarn and the garland was the perfect length for our 6 ft tree.


I worked on crocheting it for 3 evenings, and every night before bed I’d lay out wax paper on my ironing board and wet the completed candy canes with water. I pinned them down flat in their proper shape and then brushed on a 50/50 mixture of white tacky glue and water with an old paint brush. I left them to dry overnight. I liked doing this in batches, as they wouldn’t have all fit on my ironing board at once.

Painting the glue mixture onto one side of the candy canes gave them enough stiffness to hold their shape while still being soft to the touch on the other side. If you really want them sturdy, dunk the whole thing in the mixture.

DIY Cinnamon Ornaments

Supplies:
Cookie Cutters
Cinnamon Powder (4 cups)
Apple Sauce (4 cups)
Drinking Straw
White Glue (half bottle)
Parchment Paper
Baker’s Twine
Puffy Paint

There are many tutorials and recipes for cinnamon ornaments online, but I just did my own thing. They turned out perfect and the house smells great! I ordered my cinnamon in bulk from Amazon. I have a full bag left. My cookie cutters are similar to the ones linked above, but it is a 30 piece set I found at the thrift store. My twine and parchment were ordered from Zulily (some good deals there, but they deliver via donkey – i.e. SO SLOW!)

Pre-heat your oven to 200° F. Mix together the cinnamon and applesauce in a big bowl. Stir in white glue until the dough is a good cookie dough consistency. I used half a 7-ish oz bottle.


Sprinkle cinnamon on your work surface and roll out batches of dough, using cookie cutters to cut out fun shapes. I did an assortment of holiday shapes, then a bunch of dog bones for my friend who is a pet sitter. Using a drinking straw, punch holes for hanging. (The dough goes up into the straw and you end up with a perfect hole. Place your shapes onto parchment lined cookie sheets. I was able to stuff my oven with two large cookie sheets and two mini ones (meant for our toaster oven). If you have more than two racks in your oven, you could do more than that at once.

Jax’s Star

Place the ornaments in the oven and enjoy the smell over the next 3 hours. Flip the ornaments after 1.5 hours so they dry out on both sides. Pull them out and allow them to cool before decorating. I decorated mine with a glittery puffy paint (meant for fabric). We also tested a white puffy paint, but felt it looked too harsh. A mixture of the two was nice, but two much work going over things twice. You could also use actual royal icing, but the ornaments may end up more delicate. Jax enjoyed squeezing out multicolored paints onto his ornaments. When I was decorating, I ended up liking best the ornaments I painted simplistically with delicate lines.

We let our paint dry for a couple hours while we ate dinner, then tied loops of bakers twine for hanging. If you use ribbon, you might need larger holes. The holes shrink a bit as the ornaments bake.

Have you made any of the ornaments featured on Imagine Our Life? Post a photo of your tree to our Facebook page! Jax would love to see it!