Tag Archives: Sewing Projects

The Nine Minute Pencil Bag

The Nine Minute Pencil Bag
My little man is turning 5! He’s very into his Wii and anything Super Mario, so it was easy to pick his party theme. I always like to include a handmade party favor for our guests. This year, I’m making pencil bags! Since I am making 12 of them and my free time has been so limited lately, I had to make them quickly. And so, the Nine Minute Pencil Bag was born!

I used fabric that I custom designed and ordered through Spoonflower.  I made a question box tumble in three colorways: red, green and blue. I ordered one fat quarter of each. I needed a dozen 9″ zippers, so I ended up buying this zipper assortment. It came with a good assortment and only one of them was the wrong size out of 54. I also bought three additional fat quarters in coordinating colors. With 6 fat quarters (3 outer fabric and 3 lining) you can make 12 bags.

The Nine Minute Pencil Bag

What I Used:

  • Two 9″ x  5″ rectangles in my outer fabric
  • Two 9″ x 5″ rectangles in my lining fabric
  • One 9″ zipper
  • Matching thread
  • Iron, sewing machine (with zipper foot) and scissors

The Video:

I don’t talk in this video – turn on CC if you’d like written instructions. And enjoy one of my favorite classical pieces – The Blue Danube!

The Basic Overview:

You start with a “zipper sandwich” – take one rectangle of each of the fabrics and lay then stacked, right sides facing. Place the zipper inside the sandwich facing the outer fabric. Line its edge up with the long side of the fabric on the inside of the sandwich. Sew along the zipper with a zipper foot (moving the zipper pull partway). Flip the two rectangle so their wrong sides are facing and the zipper is sticking out of the sandwich. Make a new sandwich around it, right sides facing in, putting the lining on the lining side and outer fabric on the outer fabric side. Sew the edge with a zipper foot (moving the zipper pull partway).

Open up the rectangles so right sides are out and the zipper is in the center. Iron it smooth, then flip the sides so the linings are together (right sides facing) and the outer fabric pieces are together (right sides facing). Press the zipper/seam towards the lining. Open the zip halfway. Starting on the short side of the lining near the bottom of the zip, carefully sew across the zipper. (Make sure you do not sew over the metal crimp at the base of the zipper. It will break your needle!) Sew all the way around until you get back to your starting side, then stop when you have 3″ left to go. Leave that open for turning.

Clip the tails at both ends of your zipper, then clip all four corners. Flip the bag right side out through the hole, unzipping the zipper the rest of the way when you are able. Make sure you poke all the corners out. With the outer fabric and lining on each side, iron it smooth. Fold in the hems of the lining opening and iron it to crease it. Stitch it closed close to the edge. Push the lining into the bag and iron it inside and out, making sure to iron the fabric away from the zipper.

All done! I’ll be filling ours with Dollar Tree pencils, sharpeners and faux mustaches.

The Nine Minute Pencil Bag
They turned out super fun!

The Nine Minute Pencil Bag
If you make some Nine Minute Pencil Bags, I’d love to see them! Share them on my Facebook page or mention me on Twitter or Instagram ( @iolstephanie ). Enjoy!

Felt Gumball Machine Ornament

I love sewing felt ornaments every year to hang on our tree. This year I picked the theme of sweets! This simple but colorful gumball machine sews up in just one evening but will make a big impact!

Felt Gumball Machine Ornament
I used wool-blend felt and colorful sequins from American Felt and Craft. I chose a color palette that was slightly retro with honeydew, poppy, pink and teal.

Felt Gumball Machine Ornament
What I Used:

Step 1: Layer the honeydew felt dome between the two vinyl dome pieces and sew from A to B with a blanket stitch. Fill each side of the dome with sequins as desired. Sew the top closed.

Felt Gumball Machine Ornament
Step 2:
Sew the curved top to the two poppy cap pieces together with a blanket stitch, then place it over the top of the dome and sew across the cap’s bottom.

Felt Gumball Machine Ornament
Step 3:
Sew a row of red sequins down the side of each poppy machine piece. Sew a pink heart to each side and add sequins. Sew the hatch to the front machine piece and add a silver sequin.

Felt Gumball Machine Ornament
Step 4:
Sew the machine together from C to D with a blanket stitch and fill with stuffing. Stick the dome inside the open end and sew the machine pieces closed.

gumball-ball
Step 5:
Thread a large needle with baker’s twine. Attach the center of the twine to the top of the cap then run the tails through a felt ball or pom. Tie off and enjoy!

gumball-ontree

Gingerbread House Advent Calendar

Last year I had so much fun sewing Jax a Christmas Tree Play Set and 24 Mini Advent Ornaments, but I didn’t have time to make a calendar to put them in. This year I started off my Christmas sewing season by creating a hanging gingerbread house advent calendar.

Gingerbread House Advent Calendar
Thank you to American Felt and Craft for all of the beautiful supplies used in this project!

What I Used:

I started sewing this project before I had the brown background felt, so I began with all the smaller pieces. I will list the tutorial sections in an order that makes sense, but there is definitely some flexibility.

Gingerbread House Advent Calendar   Gingerbread House Advent Calendar

The Roof
I created the advent calendar with the ability to come off the hanger. The roof is a separate piece that sits on top of the hanger like a hat with a hole for the hook. I cut my roof pieces out of 9: x 12″ sheets, so each side is made of two halves sewn together. On the front half, I decorated it with crystal sequins. When sewing the two sides together, I only sewed the tops, leaving a 2″ hole at the center-top for the hanger hook.

Gingerbread House Advent Calendar
The Calendar & Pockets

There is a diagram in the pattern showing how I cut and laid out the calendar body. Once you cut two rectangles that are 31″ x 17″, lay your hanger and the top and trim off the corners, leaving a 0.5″ seam allowance. Set aside one calendar piece to use as the back. (Optional – leave an extra bit at the lower right corner if you want the Christmas tree to extend a bit past the edge. Once the tree is on, you can trim it down. Otherwise, just cut off the extra tree.)

Attach your numbers to the pocket squares. I used adhesive numbers, which saved so much cutting time. If you are cutting them yourself, gluing them on with felt glue will work just fine. On pocket 1 (a rectangle), layer white swirls on top of a red circle to make a peppermint swirl candy. Sew it to the pocket and add red sequins. On pocket 19, sew on the red heart and add some red sequins.

Gingerbread House Advent Calendar

Take your time laying out and pinning all the pockets. I’ve provided measurements for between each row. Unless you have many hours to fill, you probably want to use a sewing machine for all the pockets. I got mine done in under an hour that way. One pocket without a number goes at the center bottom of the calendar. It will be behind the door. (The tree pocket – 23 – is sew separately.)

Snowy Sills
Cut out 8 snowy window sill pieces and sew sequins on them. Using felt glue, tack them on to the bottom of the blue pockets. I glued mine on before sewing on the pockets, but you can do it either way. Sew down the tops of the snow pieces, leaving the bottoms hanging loose.

Gingerbread House Advent Calendar

Fruit Slices
For each fruit slice, tack down the white rind with a light layer of glue (too much and it is hard to sew though) then sew it down. Add matching sequins to the colored parts, then sew them down directly over pockets 3 and 5.

Candy Sticks
For the red and white candy sticks, tack down then sew on the red stripes, added red sequins. Sew them down above pockets 8 and 10. For the pink and red candy sticks, tack down and sew on the thinner red stripes. Using a back stitch, sew a stripe on each side of the red felt stripes. Add a few pink sequins, then sew them down above pockets 18 and 20.

Gingerbread House Advent Calendar

Jelly Beans
I tacked down the jelly beans directly onto the calendar. White sewing them down, I alternated their direction and added matching sequins. Four jelly beans go over pocket 13 and pocket 15.

Gingerbread House Advent Calendar  Gingerbread House Advent Calendar

Door
On the front piece of the door, sew on a green peppermint swirl candy (using the same technique as the red). The number 24 goes below that with room for a pearl button door knob on the right. I added yellow sequins to the door. On the back door piece, I sewing on a piece of hook tape. I sewed it on high enough to be above the pocket on the calendar. On the calendar, I sewed down some loop tape lined up to close the door. I sewed the two sides of the door together starting at the left side of the curved top. When I got around to the straight left side, I stitched both layers down to the calendar to make the hinged side of the door.

Gingerbread House Advent Calendar

Candy Canes
The candy canes are sewn the same way as the red and white candy sticks. I provided a pattern for all of the stripes around the cured part, then one stripe you can repeat down the straight part. I sewed the candy canes down on either side of the door at a slight angle.

Christmas Tree
The tree sticks out a bit past the lower right edge of the calendar. You can either cut your calendar to have a matching bump-out like I did, or trim your tree to fit the corner. Using felt glue I attached my glitter ric rac down and folded the ends behind the tree. It held really well once dry. Once I decided the position of the tree’s pocket, I glued on more ric rac to the pocket square to match what was under it on the tree. I added assorted sequins to the tree and the pocket, stuck the number onto the pocket, then sewed on the pocket and tree by hand. The tip of the tree extends a bit onto pocket 21.

Gingerbread House Advent Calendar

Gumdrops
The stack of gumdrops overlaps the right side of pocket 22. I tacked them down in a tospy turvy pile, sewed them down and added sequins.

Lollipop
The lollipop stick is glued down to the calendar. If you plan to sew it as well, use a light layer of glue. I didn’t bother sewing mine. On the lavender circle, sew a purple sequin to the center. Add sequins in a line making a spiral. (To add sequins in a line, bring your needle up through the felt beside your first sequin and through the hole of sequin 2. Come back down through sequin 1. Repeat, coming up beside sequin 2, through sequin 3 and down through sequin 2. Repeat. The last sequin gets a second stitch to tack it down.]

Gingerbread House Advent CalendarConstruction
When sewing the back on, I used a sewing machine. I sewed the left, bottom and right sides completely, but only sewed halfway up each slope at the top. On either side of where the hanger hook goes, add some hook and loop squares. The snowy roof just slides on top.

Gingerbread House Advent Calendar

All done! I hope you enjoyed this free pattern. You can find the rest of my Christmas projects here. If you make one of my projects, please share a photo! You can find me on Facebook, Twitter, and Instagram.

If you follow me on Facebook but are not getting my post, I apologize! FB is only showing my posts to 10-15% of those of you who have liked the page, and wants me to pay to show it to more. I can’t afford that, but feel terrible that many of you miss out on advanced copies of patterns, sneak peeks and polls for new projects. You can set your account to get notifications when I post (no more than once per day) by clicking the “like” button a second time and setting your notification preferences. Hopefully that will help.

Gingerbread House Advent Calendar

Thank you for all the well wishes for Jax as he recovered from pneumonia. We are finally back to normal here! If you’d like to support this site of send a little surprise to Jax, you can find his wishlist here. We are saving up to surprise him with a Wii U from GameStop.

Sock Penguin Tutorial

Sock Penguin TutorialWhen I found an old pair of rainbow striped socks, I knew I wanted to make a sock animal. I asked Jax what he would like, and wasn’t surprised to hear him request a penguin. They are his favorite animal! I wasn’t sure how a rainbow striped penguin would turn out, but he’s really cute! This works up very quick and easy. It took me about 2 hours of hand sewing to finish.

Sock Penguin TutorialYou could use any size sock, but would need to scale the pattern pieces to match. One knee-high sock is perfect (mine were thigh-high and I had 7″ leftover before the cuff. (See my sock measurements on the pattern as a guide.) I can use two socks if yours are shorter.

Other materials needed are: the pattern, poly fill, felt (white, orange, black and an eye color) and needle/threads.

Sock Penguin TutorialThe tutorial is included in the pattern file, as well as a stitch guide. (The stitch guide is a new feature in my pay patterns. Let me know what you think of this sample!)

If you sew a sock penguin from my tutorial, Jax and I would love to see yours! Show us a picture via our Facebook page, Twitter or Instagram.

Sock Penguin Tutorial

Felt and Sequin Dangle Earrings

Felt and Sequin Dangle Earrings

I keep my sequins in a vintage canning jar beside my sewing area, and all the pretty, sparkly colors have been calling to me recently. I wanted to make a quick project with them, so I combined my love of felt and fun, dangle earrings!

Felt and Sequin Dangle EarringsNo patterns needed for this one – just have fun!

Felt and Sequin Dangle Earrings

What I Used:

Felt and Sequin Dangle Earrings

I started by cutting out shapes in my felt and laying them out with sequins to create a design I enjoyed. I then cut out a second set. Make sure you cut a backing piece for each earring body. Decorate the earring fronts by sewing down the felt shapes and adding sequins and French knots as embellishment.

Felt and Sequin Dangle Earrings

Here is how I made mine:

I cut my base out in a rounded teal diamond shape. I had a honeydew green circle the size of a nickel and a blue-gray square, slightly bigger than a sequin. I laid the pieces out and started by sewing down the center square. With the same thread, I sewed on the center sequin. I then switched thread colors and sewed on 4 contrasting sequins around the circle.

With the same thread color, I added a French knot to the center sequin. Switching thread colors to match the circle, I stitched it down. I then started alternating adding matching sequins and stitching French knots.

Felt and Sequin Dangle Earrings

Repeat everything for the front of the second earring.

I then created a tassel. I cut a length of three colors of floss, cut those in half and then tied then together at the midpoint. I then folded them in half and used one of the thread colors to tie knot loops around the bundle. After my last knot, I ran my needle up through the top of the tassel and let the tail stick out with the others at the top. I trimmed the bottom, then made a second one to match.

With thread matching my background, I stitched the tassels to the backsides of the earrings. I made stitches that were hidden by the sequin on the front. I then began sewing the front and back together for each earring. I paused at the top and sewed on a jump ring. Make sure the rings face the way they need to in order hang the right way from your earring wires.

Finish the earrings by attaching the earring wires. I had fun with the colors and made a bright pink and purple set that is slightly smaller.

Felt and Sequin Dangle Earrings

I really enjoyed making these and may design some more to give as gifts or sell in my Etsy shop. Let me know if you make some! Stop by our Facebook page or share a photo with me on Instagram or Twitter (username @iolstephanie). Be sure to share the project with a friend who sews!

Felt and Sequin Dangle Earrings

Learn and Play with the Learning Laptop

Learn and Play with the Learning Laptop

Quick Links: Purchase this pattern for personal use or commercial use!

A colorful, handmade invitation to learn & play…
The Learning Laptop!

Introducing the newest pattern in the Imagine Our Life Etsy pattern shop.

The Learning Laptop project makes a laptop-style quietbook with multiple activity sheets that pull out of a storage pocket and attach to the screen. The “keyboard” is made of letters attached by hook and loop tape. Activities include: the alphabet, numbers (quantity, addition & subtraction), colors (matching & mixing) and tangrams (two difficulty levels). The keyboard lifts up to reveal storage pockets for all the loose parts and activity pages. This book is perfect for a broad range of ages, but I recommend children under three have adult supervision due to small parts.

Learn and Play with the Learning Laptop   Learn and Play with the Learning Laptop

All the wool blend felt and vinyl in this project was provided by American Felt & Craft. The colors are all so beautiful, and I have a lot of leftovers to create more projects from. You do use quite a bit of hook & loop tape in this project. So much that I ended up not putting it on any of the loose parts beyond the alphabet. I used white Snag-Free Velcro for the screen and keyboard, then gray and black for the case. The only other special supply that is used is an assortment of colorful mini buttons. Mine were 7mm Favorite Findings Basic Mini Buttons in Ocean, Fun, Primary and Clean. I collected mine in craft stores, but I generally can find them online too. I have plenty leftover for other projects.

Learn and Play with the Learning LaptopAlphabet

The first thing you see when you open the Learning Laptop is the alphabet. It isn’t in qwerty, as it is meant to teach alphabetical order. (You would need to scale your letters down a bit to convert it to qwerty, as you’d need 10 instead of 9 on the top row.) The letters can all be pulled off and put back in the correct order, or used to make works on the screen. The basic pattern calls for one of each letter, but you can make extras and store them inside. I’d recommend extras if there are double letters in your child’s name.

Learn and Play with the Learning Laptop

I chose two shades of aqua for my letters, separating the vowels with a darker shade. You can change them to all the same, or perhaps the classic Montessori red and blue combination. I added a little heart to fill in our extra space.

Learn and Play with the Learning LaptopNumbers

There are two sets of number tiles that range 0 through 9. One set has buttons to show the quantity, the other has written numerals. I chose not to match the felt colors between the two sets so that a matching game will be harder for my 4-year-old. A younger child who is just learning number quantities might benefit from having the felt colors correspond.

Learn and Play with the Learning Laptop

Learn and Play with the Learning Laptop
A math page is included in the storage pocket to introduce addition and subtraction. It includes one line for each, with space to have up to two tiles as the answer (for example when using the 1 and 0 to make a 10.)

Learn and Play with the Learning Laptop

Colors

The Learning Laptop has three simple color puzzles. You could create additional pieces and add more button combinations if you wanted to. Included is a page that lets the child either sort the three primary colors into three puzzles, or they can follow the mixing equations to make the complimentary colors.

Learn and Play with the Learning Laptop

The outer pieces are the same primary color on each side. The inner pieces are primary colors (red, yellow and blue) on one side and complementary colors (orange, green and purple) on the other.

Learn and Play with the Learning Laptop

Tangrams

The tangram puzzle are Jax’s favorite! The pattern includes two sheets of full-size puzzles that have guide lines and two pages with smaller color examples of additional puzzles. This gives the child two difficulty levels to work through.

Learn and Play with the Learning Laptop

The tangrams are colorful and fun. Jax started out struggling with the easier puzzles, but after working out how to rotate and flip the pieces, he soon was able to move on to the harder puzzles. Now he is showing interest in creating his own!

Learn and Play with the Learning LaptopEverything tucks away into the storage section to keep it safe, though I help Jax clean up so we know nothing is missing.

Learn and Play with the Learning Laptop

Jax in his Montessori homeschool room. Learn more here.

Jax really adores this laptop quiet book and was so anxious for me to finish it! In honor of the tangrams being his favorite, I created a free pdf file with 12 additional puzzles in matching colors. Download it here.

Learn and Play with the Learning Laptop    Learn and Play with the Learning Laptop

I worked hard to really make the pattern and instructions look beautiful. I’ve included a full tutorial and a brand new stitch guide! As an added bonus, there is a $5 American Felt & Craft coupon to help you purchase beautiful felt!

The Learning Laptop pattern can be purchased for personal use for only $8.00 here. Your purchase helps me towards my goal of making this site my full-time job so I can share so many more projects with you. And, don’t worry! I will be mixing in plenty of free patterns!

Plan to sell the finished product? Purchase a commercial license for $25 and sell as many as you like! You will also be listed on my Authorized Sellers page.

Felt Sandwich Set

Have you caught the felt food bug yet? Felt food is super adorable and quite easy to make. I’ve been dying to design some for Jax, but needed to wait until he was old enough to keep them picked up. We have a golden retriever who would find felt food equally as fun!

featured2

I had so much fun designing and sewing a felt sandwich set for Jax, that I wanted to share the free pattern with you all. This set includes all sorts of goodies for your sandwich shop: breads, proteins, cheeses, veggies and spreads. And don’t forget chips and a cookie!

Felt Sandwich Set

I’ve also been sewing a lot of sliced fruits to go along with the sandwiches. Follow my Play Kitchens & Food Pinterest board for many of the tutorials I followed. I did create some of the fruits on my own. I can share those later if there is interest.

Felt Fruit

What I Used

I used a hodge-podge of felts for this project – whatever I had on hand! Some is wool blend felt from American Felt and Craft, some is cheap craft felt by the yard from Joann’s Fabric and the chip bag is thick 100% wool from the craft store. Here is the pattern I made.

Felt Sandwich Set - Breads

Breads

For the pita pocket, I placed two layers together and sewed them together along the straight edge with a blanket stitch. I repeated this with the last two pieces to have the two sides of the pocket. I placed them together and sewed through all the layers along the curve.

Felt Sandwich Set - BreadsFor the sliced breads, I cut two strips of crust for each slice. Using a blanket stitch, one strip got sewn around the top curve of one bread piece and the other around the square bottom. The strips were trimmed and sewn together at the base of the curves on each side. I then blanket stitched the other side of the bread on, pausing halfway to lightly stuff it with poly-fil.

Felt Sandwich Set - BreadsI used artists’ pastels to add shading to the brown toasted bread. I colored lightly around the edges of each side, then “set” it by getting the colored felt wet and drying it overnight. We haven’t had any rub off yet, but Jax is gentle. I do not recommend doing this if any felt food will be in someone’s mouth! And do be sure your pastels are non-toxic.

The cookie is very simple! I cut little chocolate chips and glued them down with a dab of felt glue. I sewed mine down as well. I then sewed the two sides together with a blanket stitch, pausing halfway to lightly stuff the cookie. (All of the items in my breads section were done with cheap craft felt.)

Felt Sandwich Set - Breads

Spreads

For each of the spreads, I sewed the front and back pieces together. On the guacamole, I also glued then sewed down little scraps of red and green felt before sewing the whole piece.

cheese

Cheeses

I made three kinds of cheese, but you could easily add your favorites. For each of them, I sewed the front and back pieces together. On the pepper jack, I also glued then sewed down little scraps of red and green felt before sewing the whole piece.

Felt Sandwich Set - Veggies

Produce

Being a vegetarian, I wanted lots of tasty, colorful fruits and veggies for Jax’s sandwich set. They take a bit more work but add so much!

For the lettuce, I cut mine out with pinking shears for a zigzag edge. I sewed the two sides together with a running stitch (a dashed line stitch that looks the same on both sides.) I pinched the base together into a tiny dart and stitched it to make the stem. I used a running stitch to add veins.

To make the spinach, I stitched three leaves to one of the base pieces using a back stitch up the center vein of each. I then blanket stitched the front and back together.

Felt Sandwich Set - Veggies

When sewing the avocado, I started by sewing the two sides of the avocado flesh together along the straight edge with the pit hole. I then blanket stitched the back piece on to make a wedge, pausing to fill it with stuffing.

The tomato takes a bit of embroidery time. I laid each side of the tomato down onto one of the inner pieces, then sewed down the holes. Using gold thread, I stitched the seeds with a lazy daisy stitch (Bring your needle up and down at the same spot, but before you pull the loop tight, make a tiny perpendicular stitch at the top to tack it in place.) Once all the seeds were done, I stitched the two sides together with a blanket stitch.

Felt Sandwich Set

For the red onion, I made two rows of dashed running stitch to each white ring. I then sandwiched the purple skin piece between the white rings and blanket stitched it together. The purple will show a bit as though you sliced the onion thinly.

The cucumbers started with seeds that were tacked down with glue, then stitched on. I sewed 3 to each side. I then layered the skin piece between two flesh pieces and blanket stitched it all together, the same as with the onion.

Felt Sandwich Set - Proteins

Proteins

I know olive loaf is pretty yucky in real life, but it sure looks adorable made of felt! Jax like olives, so I thought he would find it fun. I cut whole and partial olives, red square pimentos and random pink scraps. I glued and sewed them down to both pieces of a really lovely pale peachy pink felt, then stitched the two sides together with a blanket stitch. I did the salami the same way as the olive loaf, using pink and white random scraps for the little bits in it.

For the two sandwich meats, I simply sewed the two sides together with a blanket stitch. On the turkey, I used the same pastel technique as the toast to add some shading.

Felt Sandwich Set - Proteins

The fried egg is simple. I stitched the yolk down to one side, pausing to add some stuffing. I then sewed both sides together with a blanket stitch.

To make the bacon, I cut two wiggly pink strips for each side. I glued and sewed them down, then sewed the two sides together.

Felt Sandwich Set - Chips

Chips

I used a very thick 100% wool for my chip bag, so it did not require a double layer of felt. You can double up the same way as with the pita pocket if needed. I also cut my bag on the fold so I didn’t need to sew the bottom. I used back stitch and a french knot to make my chip label. After stitching the lettering onto the label, I stitched the label onto the bag front with a blanket stitch. I then stitched the side of the bag closed into a pocket.

The chips were made by simply blanket stitching two layers of felt together.

There are so many fun combinations you can make with this felt food set – especially if you add some pieces of fruit! Which piece is your favorite?

Felt Sandwich Set

Felt Weather Station Pattern & Free 3-Part Cards

Felt Weather StationLearning about the weather is always fun for kids. It is easy to relate what you learn to what is going on outside the window.

I knew I wanted to create something for Jax to let him explore and learn about different weather conditions. I decided to go with a felt set that can both be used to learn new weather words and to post the daily weather.

bg-left bg-right

This pattern is my very first pay pattern. I hope you find the pricing reasonable! I am really hoping to turn my crafting into a career that lets me both be creative and have time to be the best mama I can be. I will still be offering free patterns. At this point, I expect 50% will be free. I’d love to hear your thoughts!

You can purchase this pattern for $6 in my Etsy shop, Imagine Our Life. If you would like to sell the finished product, you can purchase commercial licensed version for $20. This is a one time fee, and you’d be able to sell as many weather charts as you’d like after purchasing it.

Felt Weather Station Pattern

This pattern included instruction to sew both a felt weather wall chart and a quietbook version. The wall chart is perfect for classrooms, while the quietbook is a fun way to make learning portable. There are 12 adorable weather condition pieces, along with matching labels printed on photo fabric. (You can also print the labels on card stock and laminate them.) There is a slider that can be set to the current temperature. A special pocket allows children to post the current weather conditions.

I worked hard to really make the pattern and instructions look beautiful. I’ve included a full tutorial and a brand new stitch guide! As an added bonus, there is a $5 American Felt & Craft coupon to help you purchase beautiful felt!

Felt Weather Station Pattern

As a free add-on to this felt set, I am providing my matching 3-part cards free for educational use! Click here to download the pdf. The cards include many of the same weather conditions as the felt set, giving you an additional way to teach the new vocabulary.

3-Part Cards - Weather

Montessori MondayTo assemble, print out the cards and cut them out. Glue them to card stock backs, then laminate and trim. I use this laminator. To make laminating a bit easier, you can try adding a dab of glue stick to the cards when you position then in the lamination sleeves. It keeps them from wiggling and overlapping.

If you liked this free homeschool printable and want more homeschool ideas, visit Montessori Monday at Living Montessori Now.


Felt Weather Station Pattern

I hope you enjoy this pattern! I can’t tell how much your support means to me. Big thank yous to all of you who are a part of our Facebook page. You have given me so much inspiration! Please feel free to comment here or on Facebook if you have suggestions for new projects. I’ll also be posting sneak peeks at this week’s free pattern on my Instagram. Come follow along!

Felt Weather Station Pattern

Polar Family Felt Ornament Patterns – Narwhals & Penguins

Polar Family Felt Ornament Patterns – Narwhals & Penguins

Time has been flying by with lots of projects on my plate. I can’t believe it is nearly Christmas! But I finally have the last two polar family felt ornament patterns ready for you to enjoy.

Polar Family Felt Ornament Patterns – Narwhals & Penguins

This year’s theme is Polar Families, inspired by some of the animals Jax and I have been studying in homeschool with our world continent project. There will be four designs: a penguin daddy and chick, a narwhal family, a pair of penguin mates and a polar bear mama and cub. The latter two are featured here.

Polar Family Felt Ornament Patterns – Narwhals & Penguins

What I Used

I am listing all the supplies I’ll use for the 4 ornaments, noting the ones not needed for these two.

Polar Family Felt Ornament Patterns – Narwhals & Penguins  Polar Family Felt Ornament Patterns – Narwhals & Penguins

These beautiful sequins are a new offering of American Felt and Craft!

Polar Family Felt Ornament Patterns – Narwhals & Penguins

Penguin Daddy & Chick

 I cut a rounded strip of white felt for the snowy ground and tacked it down across the bottom of the white background felt with felt glue. After I cut out all my pieces, I tacked them into place as well.  Then I trimmed down the background felt so there was just a small edge around the penguins.

Polar Family Felt Ornament Patterns – Narwhals & Penguins

For the penguins, the heart and the top of the snowy ground, I stitched all the edges down with matching floss. (I use 2 strands.) I stitched crystal sequins randomly onto the snowy ground using 2 stitches each. I also added them to the heart. At the end of the scarf, I made upside-down V stitches as tassels. I made French knot eyes on the chick.

On the white background, I stitched snowflakes: a plus sign shape of four stitches, all stitched towards the center, then four more longer stitches on the diagonal in between.

Polar Family Felt Ornament Patterns – Narwhals & Penguins

I cut a length of red ribbon and a piece of orange whip (coral orange) felt to fit as the ornament’s backing. I stitched all the way around, adding stuffing halfway and catching the ribbon loop in the top. I used a blanket stitch.

Polar Family Felt Ornament Patterns – Narwhals & Penguins

Narwhal Family

I love narwhals! They live up in the Arctic ocean, so I was happy to include them in this polar series. Narwhals are brownish grey, and they turn speckled white with age. I stuck with my color scheme, as they look blue gray under the ocean water. I had intended to use two shades of brown sequins for the adults’ speckles, but I ultimately decided to skip them. I found them distracting. [ You can see what they look like here and decide for yourself. ]

Polar Family Felt Ornament Patterns – Narwhals & Penguins

There aren’t a lot of narwhal pictures out there. I was very inspired by this drawing. Narwhals don’t typically stay in family groups, but I wanted to show all of their forms in this ornament.

I started by tacking everything down to a dolphin teal-gray background with a light layer of felt glue, including a pointed strip I cut out of lemongrass to be the male adult’s tusk. I cut the tusk into two pieces and layered part behind the heart and part in front so that it looks like the heart is pierced. I stitched around all the edges, and added sequins to two of the hearts. The eyes are French knots with little stitches in one corner of each. The tusk was done with diagonal stitches running across it.

Polar Family Felt Ornament Patterns – Narwhals & Penguins

After sewing everything down, I cut around the outside of the ornament to trim it down, then sewed crystal and mermaid sequins on as bubbles. Add as many or as few as you’d like. I overlapped and grouped mine.

I cut a length of red ribbon and a piece of blueprint (blue-gray) felt to fit as the ornament’s backing. I stitched all the way around, adding stuffing halfway and catching the ribbon loop in the top. I used a blanket stitch.

Polar Family Felt Ornament Patterns – Narwhals & Penguins

Are you an Etsy or craft fair seller? Would you like to sell these ornaments, or any other item sewn from an Imagine Our Life pattern? Visit my Etsy shop and contact me for custom commercial licenses. All authorized sellers get featured on the website.

Polar Family Felt Ornament Patterns – Narwhals & Penguins

If you make one of these ornaments, I’d love to see it! Stop by our Facebook page, or mention me @iolstephanie on Instagram or Twitter. (If you are private on Instagram, I’ll have to request to follow you to see it.) Happy Holidays!

Mini Advent Ornaments Set Four

Mini Advent Ornaments Set Four

I can finally mark a major sewing project off my list holiday season! It was one that was chosen by my readers in our Facebook page: a felt Christmas tree play set! I hope you’ve been sewing along with me as I’ve shared the toddler-friendly tree pattern and tutorial and the first, three sets with you. But it’s not too late to join in! These mini ornaments bring a whole lot of holiday cheer and work up fast. Choose a few to stick in someone’s stocking or tie to a present as a gift tag!

Mini Advent Ornaments Set Four

I designed 24 ornaments, and I’ve been giving Jax one to unwrap every day leading up to Christmas. I shared the ornaments in batches of 6. Ornaments 19-24 are: a fireplace, a lamb, a rocking horse, Santa, gifts and a reindeer.

To see all the posts in this series, click here.

Mini Advent Ornaments Set Four

What I Used:

Mini Advent Ornaments Set Four

For all of the ornaments: I cut pieces of baker’s twine, doubled it over and tied a knot in the ends. When stitching the tops of the ornaments together, I made sure the knot of the twine loop was inside. I also made sure to stitch through the knot to secure the loop.

Mini Advent Ornaments Set Four

19. Fireplace

Fore the fireplace, I tacked down with glue the logs and flames to the black fireplace area, then stitched everything down. I stitched the black area to the bottom center of the front of the bricks, then stitched the front mantle on along its bottom. I glued down three stockings, then sewed them down with a sequin on the toe of each. I did a long stitch at the top of each for a cuff, and a single loop of a lazy daisy stitch at the top corner. On the back, I stitched the back mantle on along the bottom, then stitched the front and back together, catching a loop of twine at the top.

Mini Advent Ornaments Set Four

20. Lamb

Oh, this sweet little lamb! She is quite simple, but you can believe me that all those crystal sequins are a labor of love. I started by gluing the heads onto each body piece, then sewing sequins onto the whole thing. (I provided a basic body shape in the pattern, but I found it worked best to trim the body into wooly bumps freehand.) I took the legs and folded them in half, gluing them down then stitching all around. I stitched the body of the sheep together with the twine loop at the top and the legs at the bottom. I stitched the two sides of her face together. I glued the hat brims onto the hat sides, then layered them around her head and sewed them together and onto her head.

Mini Advent Ornaments Set Four

21. Rocking Horse

I started this cute rocking horse by gluing the saddle on, then sewing it. I added two green sequins on each side, then bordered it with French knots. I gave him black French knot eyes. I sewed the two sides of the main and tail together then glued them in between the two finished sides of the horse, as they are too small to pin. I stitched all around the horse catching a twine loop at the top, skipping the ears, but making a little brown stitch in the center of each. Using gold floss, I made an anchor stitch under his chin then looped the floss around his muzzle, then made a French knot on each side. I then loosely looped the floss behind his neck and made an anchor stitch to keep it from pulling out.

Mini Advent Ornaments Set Four

22. Santa

Ho, ho, ho! I had to do Santa! I started him by gluing his beard and mustache onto his face. I stitched them down, then added some crystal sequins to his beard. I made two straight pink stitches for his mouth, a peach stitch for his nose and two blue French knot eyes. I stitched the beard to his red back piece around the outside, the stitched his face and corners of his ‘stash onto one of the hair pieces. Then I sewed the back hair piece to the front. I glued the hat brims on and stitched crystal sequins to the front one while sewing them down. I layered the two hat sides onto his head and sewed them together and onto him. I added a white pompom to the tip of his hat.

Mini Advent Ornaments Set Four

23. Gifts

These three little gifts could be made in any colors. I went with a classic Christmas palette. I stitched each of the two larger gifts separately, then stitched them together, only going through one layer of felt to hide the stitches. The corner of the red gift got the loop of twine. For the two bows, I decorated each loop with a sequin, sewed the two sides together, then stitched them on with some crossed stitches only in the center. On the gold gift, I glued down a strip of red felt as a ribbon and trimmed it to fit. I sewed a trio of sequins on to decorate it. I put the back and front together and started sewing them together with blanket stitch at the bottom, then laying it on the other two gifts and sewing through bother the gold gift and the top layer of felt of the other two while sewing the last three sides. I finished it with a plastic holly embellishment that I stitched on with red thread around the berries.

Mini Advent Ornaments Set Four

24. Reindeer

I started the reindeer by gluing the two layers of each antler together and setting them aside. I made sure to glue them edge-to-edge as I wasn’t sewing them together. I decorated the front of his face with a red sequin nose and brown sequin eyes. I glued then sewed the inner ears to the front ears, then sewed the front ears to their backs. I sewed the face pieces together with the antlers and a loop of twine at the top. I stitched the ears to the front top of the head. On the top of one antler, I made a line of back stitch running down, across and up to the top of the other. I stitched colored sequins along the way, using only one stitched in each so the dangle like holiday lights.

Mini Advent Ornaments Set Four

And now all the ornaments are complete! Which have been your favorites? It is so hard for me to choose, but I’ve really liked the tree truck, the dove and the hot cocoa cup. This project and its patterns are completely free for you to use for personal use. If you’d like to purchase a commercial license, visit my Etsy shop and contact me if you don’t see a current listing for it.

Mini Advent Ornaments Set Four

If you are making a set, I’d love to see your finished ornaments! Tag me on Instagram @iolstephanie (if you are private, I’ll have to request to follow you), mention me on Twitter @iolstephanie or post a picture on our Facebook wall. I love what I’ve seen so far! If you’d like to support my free site in other ways, visit my support page. If you’d like to get my posts the moment they go live in your email inbox, sign up here.

Mini Advent Ornaments Set Four

I’ve been giving Jax his ornaments in little origami boxes (mine use 6″ papers) with printed numbers on top. I have them all in in a Christmas basket and he finds the right one each night. I started out adding candy treats in there as well, but he lost interest so I stopped. He’s really gotten into opening them and asks me all day long if it is time yet.

http://greeneyed.com/2010/12/page/3/

Happy holidays!


Mini Advent Ornaments Set Three

Mini Advent Ornaments Set Three

My large sewing project this holiday season was one that was chosen by my readers in our Facebook page: a felt Christmas tree play set! I hope you’ve been sewing along with me as I’ve shared the toddler-friendly tree pattern and tutorial and the first, two sets with you. But it’s not too late to join in! These mini ornaments bring a whole lot of holiday cheer and work up fast.

Mini Advent Ornaments Set Three

I will be designing 24 ornaments, and giving Jax one to unwrap every day leading up to Christmas. I’ll be sharing the ornaments in batches of 6. I am planning two more sets next week to finish the project. Numbers 13-18 are: a drum, a truck with a tree, a dove, an ice skate, a snow globe and a wreath.

To see all the posts in this series, click here.

Mini Advent Ornaments Set Three

What I Used:

Mini Advent Ornaments Set Three

For all of the ornaments: I cut pieces of baker’s twine, doubled it over and tied a knot in the ends. When stitching the tops of the ornaments together, I made sure the knot of the twine loop was inside. I also made sure to stitch through the knot to secure the loop.

Mini Advent Ornaments Set Three

13. Drum

My husband is a drummer, so we already have a few little drums for Jax. All that aside, this little drum came out much cuter than I expected! I started by gluing down the red and green bands to each side of the drum, the stitched them down. I also added red and green sequins. I stitched the drum heads on, then made rows of gold French knots along their edges. On the front of the drum, I back stitched two drum mallets and used red sequins for the heads. I stitched around the edge of the drum, catching a loop of twine at the top corner.

Mini Advent Ornaments Set Three  Mini Advent Ornaments Set Three

14. Truck with a Tree

We haven’t gotten our Christmas tree yet, but I’m really anxious to! I was inspired by all the cars and trucks taking home their trees, so I designed this truck. It had to be red- Jackson’s favorite color!

To sew the truck, decorate each side the same. Tack down the parts, then sew around the fenders and windows. Stitch green sequins into the cents of each tire. Put the two sides of the truck together, and sew each pair of tires together, going through all the layers on the upper halves. Sew the truck sides together, leaving the truck bed an open pocket and catching a loop of twine in the top of the cab.

For the little tree, I stitched green sequins onto each side. I then tacked the two sides of the truck together and stitched them around the edges. I layered them between the two tree sides, and stitched it all together. The tree can stick into the truck pocket, or come out!

Mini Advent Ornaments Set Three

15. Dove

I am in love with this little dove! To begin, I stitched the outer piece of each wing with stripes of back stitch. At the end of each line, I stitched a crystal sequin. I left the bottoms of the sequins hanging free. I did the same rows of stitches and sequins on the tail of each body piece. I sewed each decorated wing piece to a plain one, then stitched them on along their fronts. I stitched sequin cheeks onto the dove’s face on each side, and added brown satin stitched eyes. I stitched the two sides of the dove together all the way around, catching a loop of twine in her back and the two beak pieces (sewn together) in her face.

To make the olive branch, I rolled the branch felt lengthwise and blanket stitched up its length. I then worked my way back down, stitching leaves on in a staggered pattern. I coated each leaf with felt glue and let them dry to make the sturdier. If you have a younger (or rougher) child, you may need to skip the delicate olive branch. Once the branch was dry, I stitched it to the under side of her beak.

Mini Advent Ornaments Set Three

16. Ice Skate

For this little ice skate, I glued together the two sides of the gray blade using a thicker layer of glue than I’d normally use. I didn’t want stitches taking away from the crisp look of the blade, so I made sure they were thoroughly glued together. I then tacked the tan sole pieces onto either side of the blade and stitched them on along the sides and bottom. I decorated each of the sides of the boot with a crystal sequin and some stitches and French knots. Then I layered the two sides around the sole and blade and stitched them on along the sides and bottom, catching a loop of twine in the upper back corner. I left the top open, like a real skate. I used white floss to stitch zig zags along where the shoelace would be, and stitched on a looped bow. I finished it off with a mini white pompom.

Mini Advent Ornaments Set Three

17. Snow Globe

I have to give credit to American Felt and Craft for the idea of a snow globe ornament. This is my (mini) version!

I started by prepping the two sides of the red base with some stitched on sequins. I then glued the snow and trees to each of the blue globe backgrounds and letting them dry. I stitched each of the trees down, but didn’t stitch the snow as only a bit of the edge was exposed. I thin layered the two pieces back-to-back and sandwiched them between two circles of clear vinyl. Starting at the snow line, I stitched up and around through all the layers, catching a loop of twine at the top. I used a blanket stitch and pulled it firmly. I went all the way around the blue edge and stopped at the other side of the snow line.

I turned the snow globe upside-down, and carefully poured a little crystal glitter in to each side (about a 1/4 teaspoon – whatever fits but doesn’t obscure the view too much). The glitter won’t really move around, so having see-through glitter is key. Keeping it upside down, I sewed that bottom edge closed. I then sewed on the red base.

Mini Advent Ornaments Set Three

18. Wreath

The wreath is quick and easy, but very pretty. On the front, I took a little bow I’d tied in ribbon and stitched it down using tiny stitches around the knot. I then stitched colorful sequins around the ring on both sides. I stitched the fronts and backs together, making sure to catch a loop of twine at the top.

 Mini Advent Ornaments Set Three

Which one is your favorite of this set? What would you like to see next? I have to design 24, and your idea may be one! Stop by Facebook or Twitter, or comment here with your ideas. I have a couple planned that were reader suggestions!

If you are making a set, I’d love to see your finished ornaments! Tag me on Instagram @iolstephanie (if you are private, I’ll have to request to follow you), mention me on Twitter @iolstephanie or post a picture on our Facebook wall. I love what I’ve seen so far!

I have to say a quick happy birthday to my fabulous big (and only) brother! He is so wonderful, and a big reason why I’d love a sibling for Jax (the husband disagrees.) He has been a big help on all of my more technical projects and is very creative himself. Check out his puppetry!

Happy birthday big bro!! Love you! <3


Make the World’s Best Robot Costume!

Make the World's Best Robot Costume!

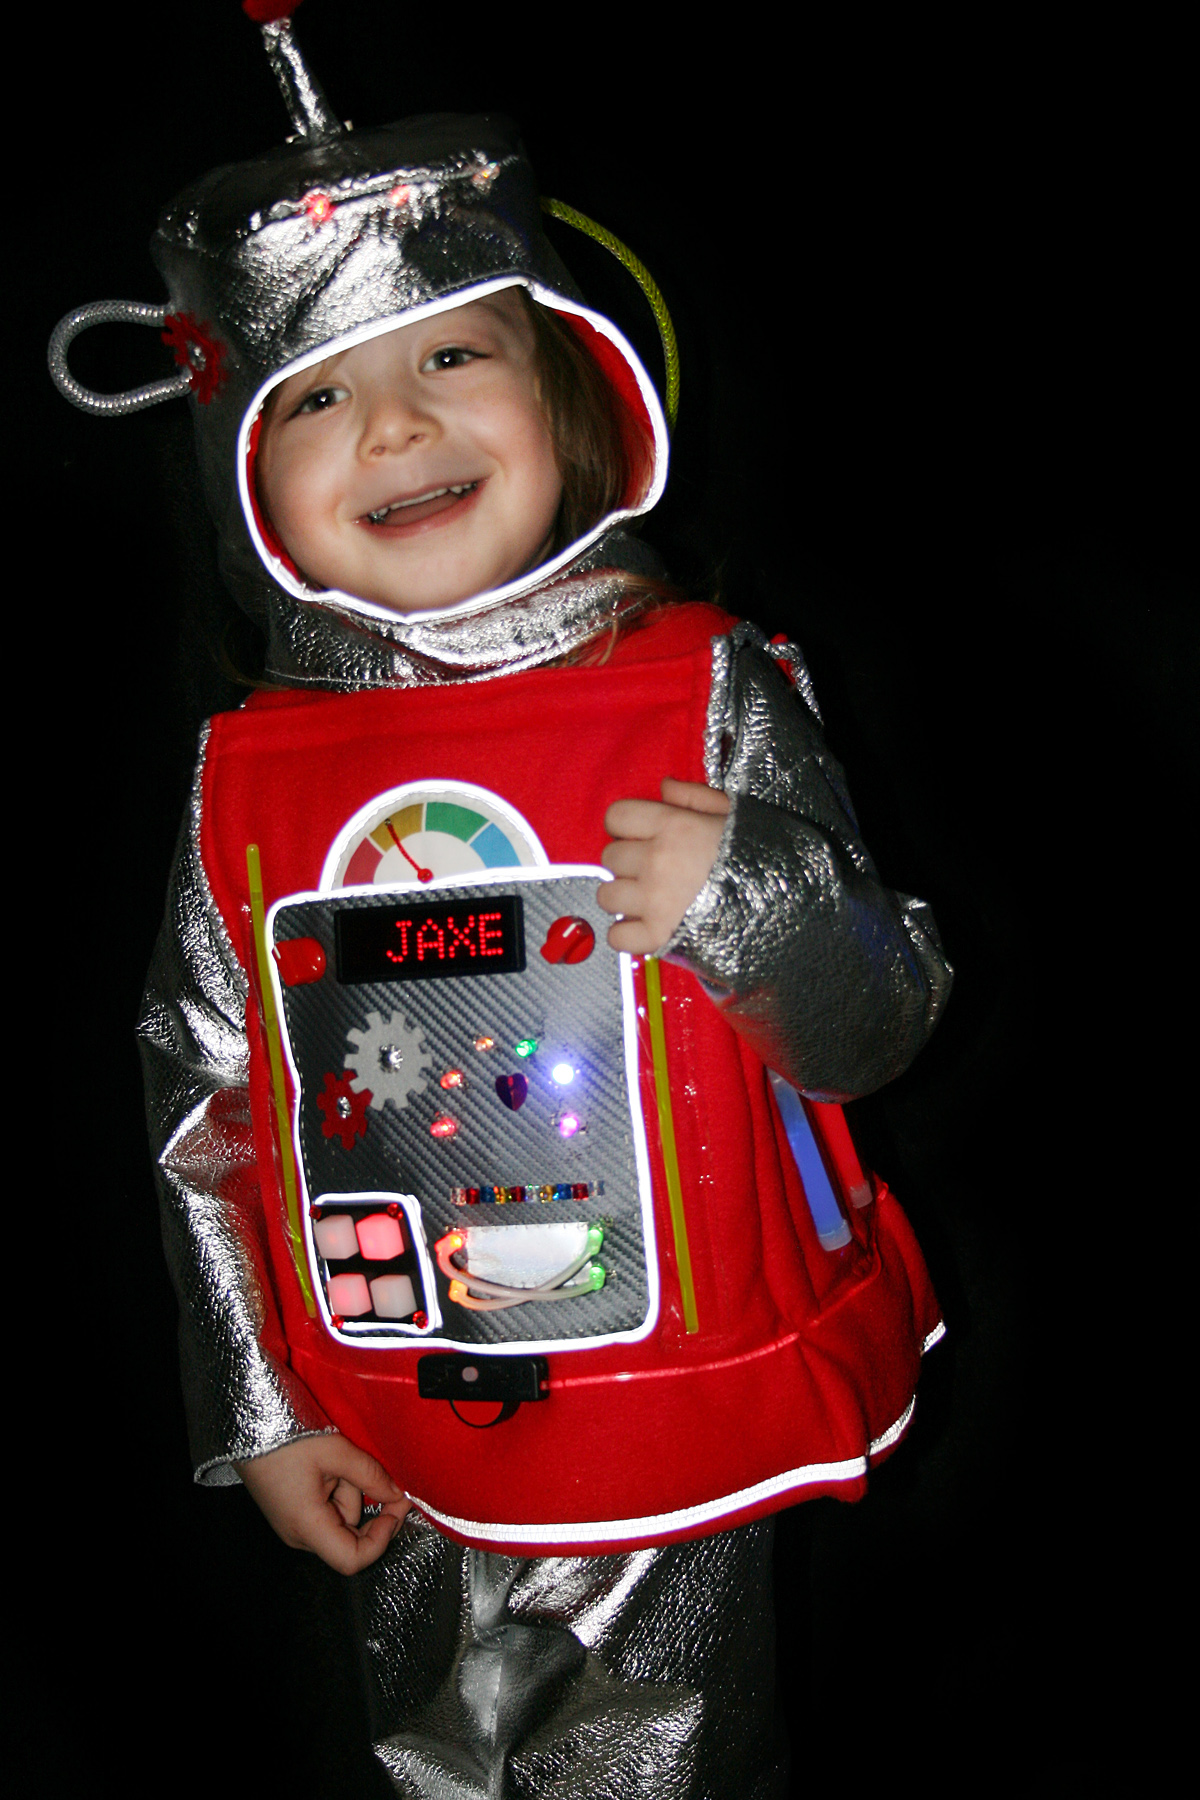
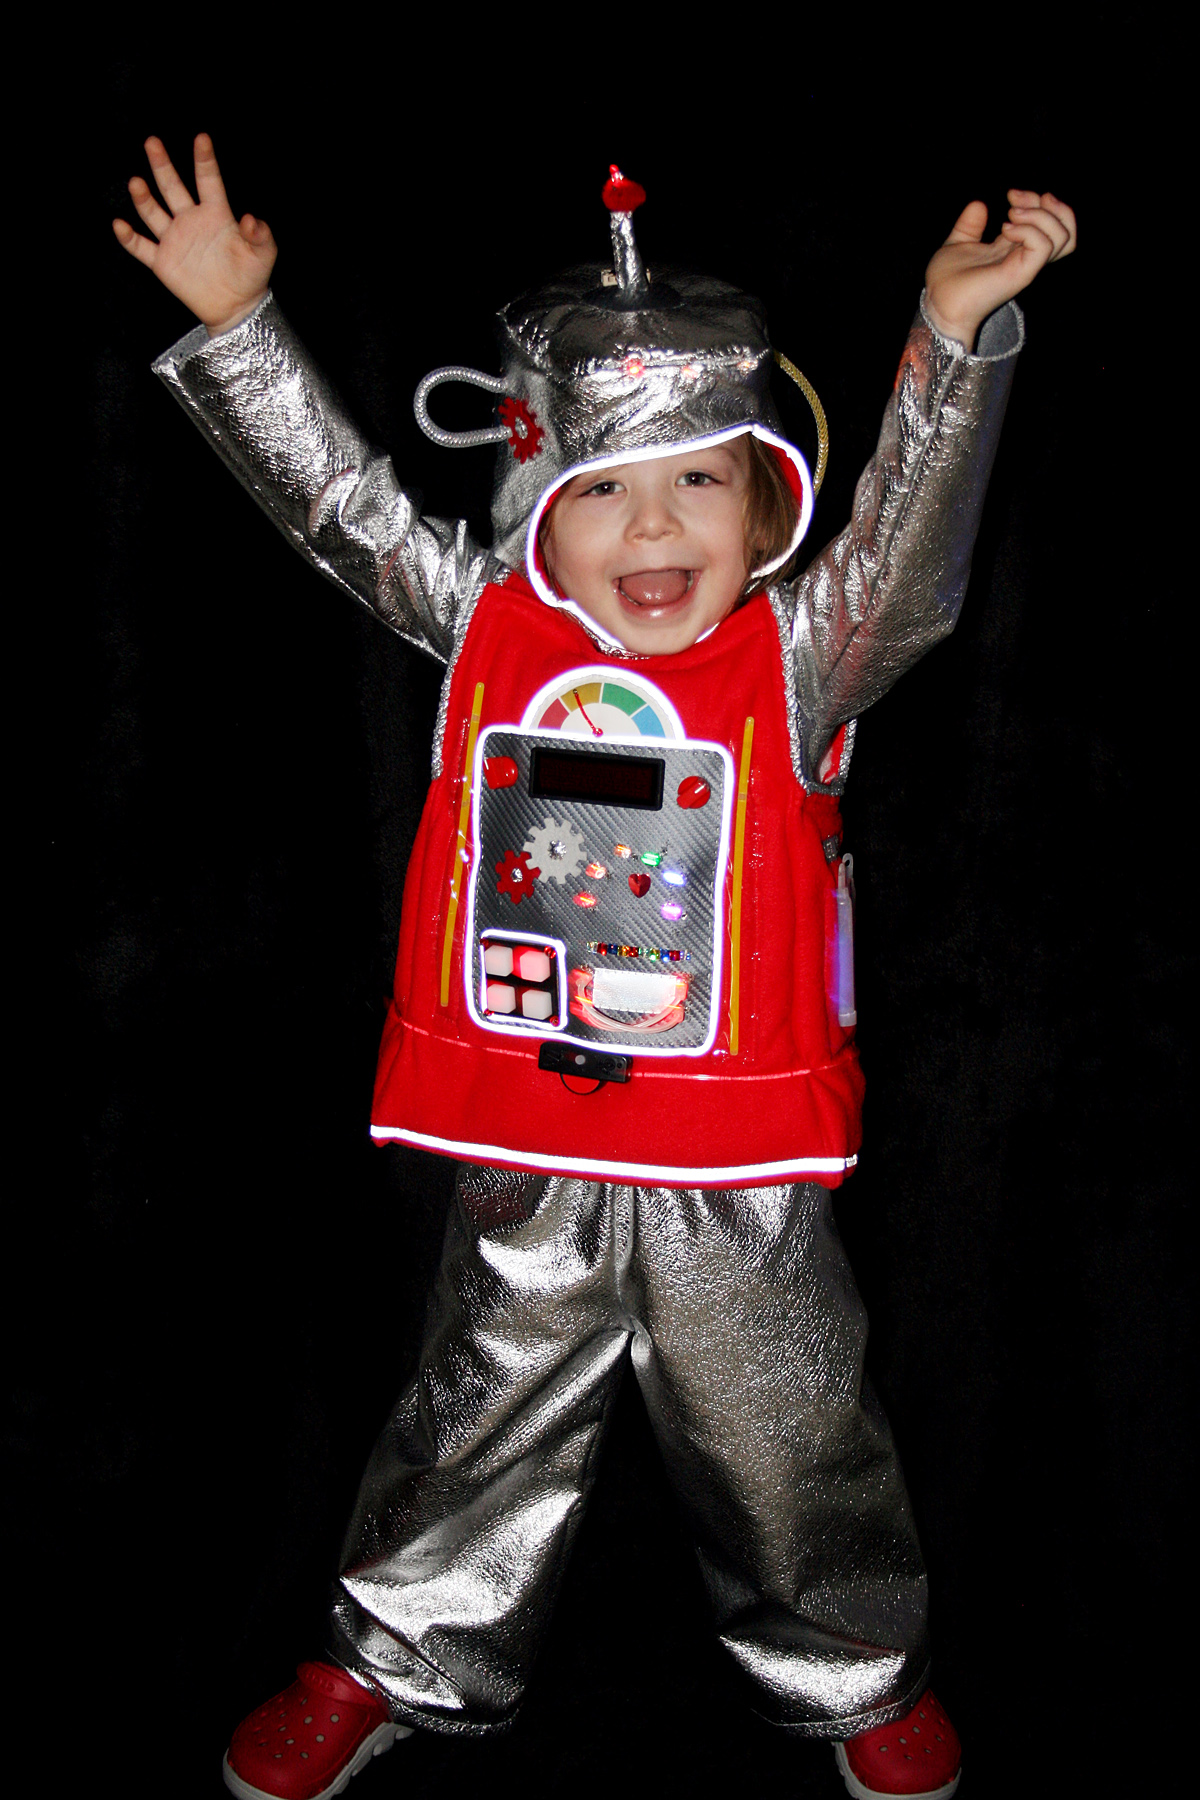
While I’m sure there are more spectacular versions out there, seeing Jax in his homemade LED robot costume rocks my world! I mean, seriously? The cutest! Jax can’t wait for Halloween, and neither can I!

Last year for Halloween, Jax was a train engineer wearing a cardboard and duct tape train I made with dollar store supplies. And it was fab! In fact, Jax loved it so much that it took me 6 months to convince him it was okay to be something new next year. When he chose to be a robot, I did a happy dance! While cardboard robot costumes are great, I wanted to sew this year. And because I love e-textiles so much, I was ready to go all out!

Make the World's Best Robot Costume!

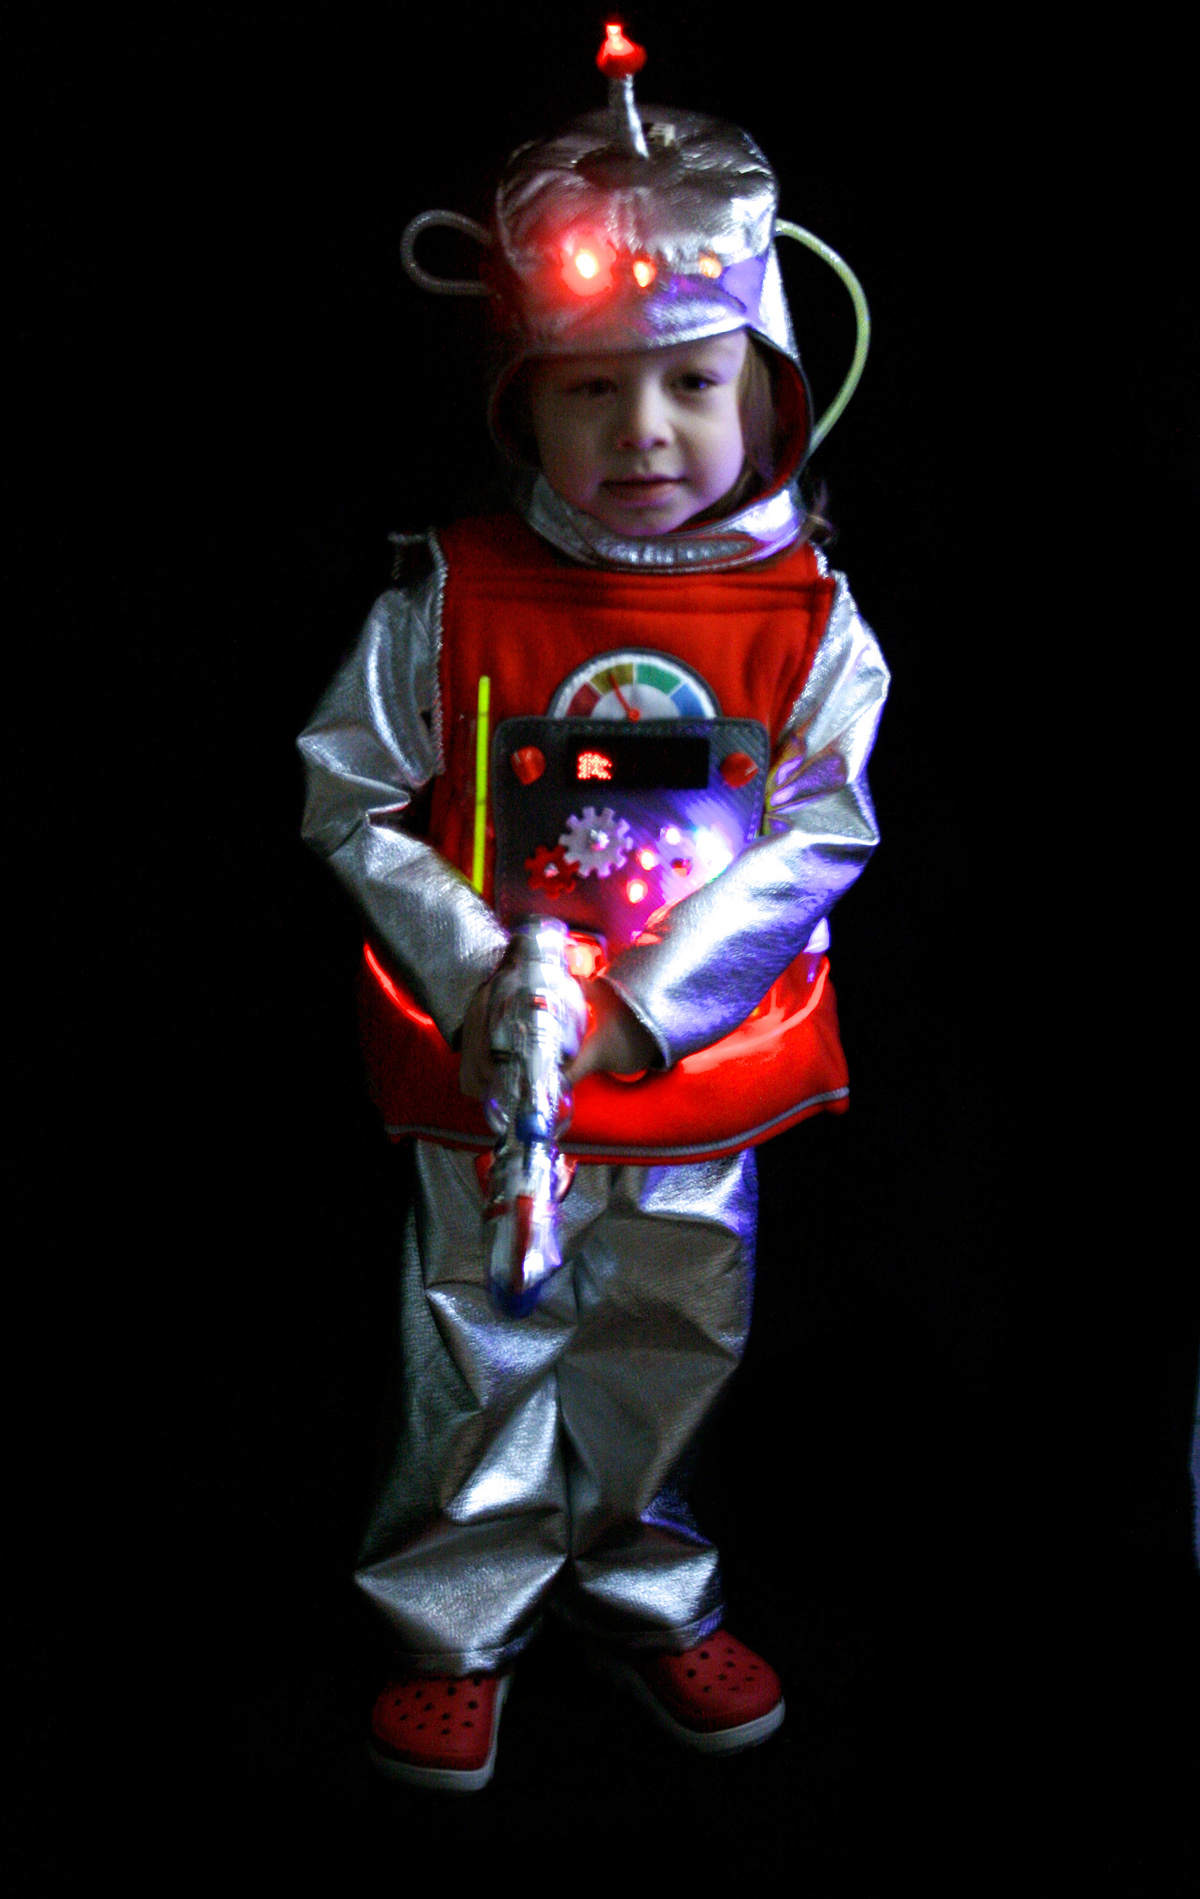
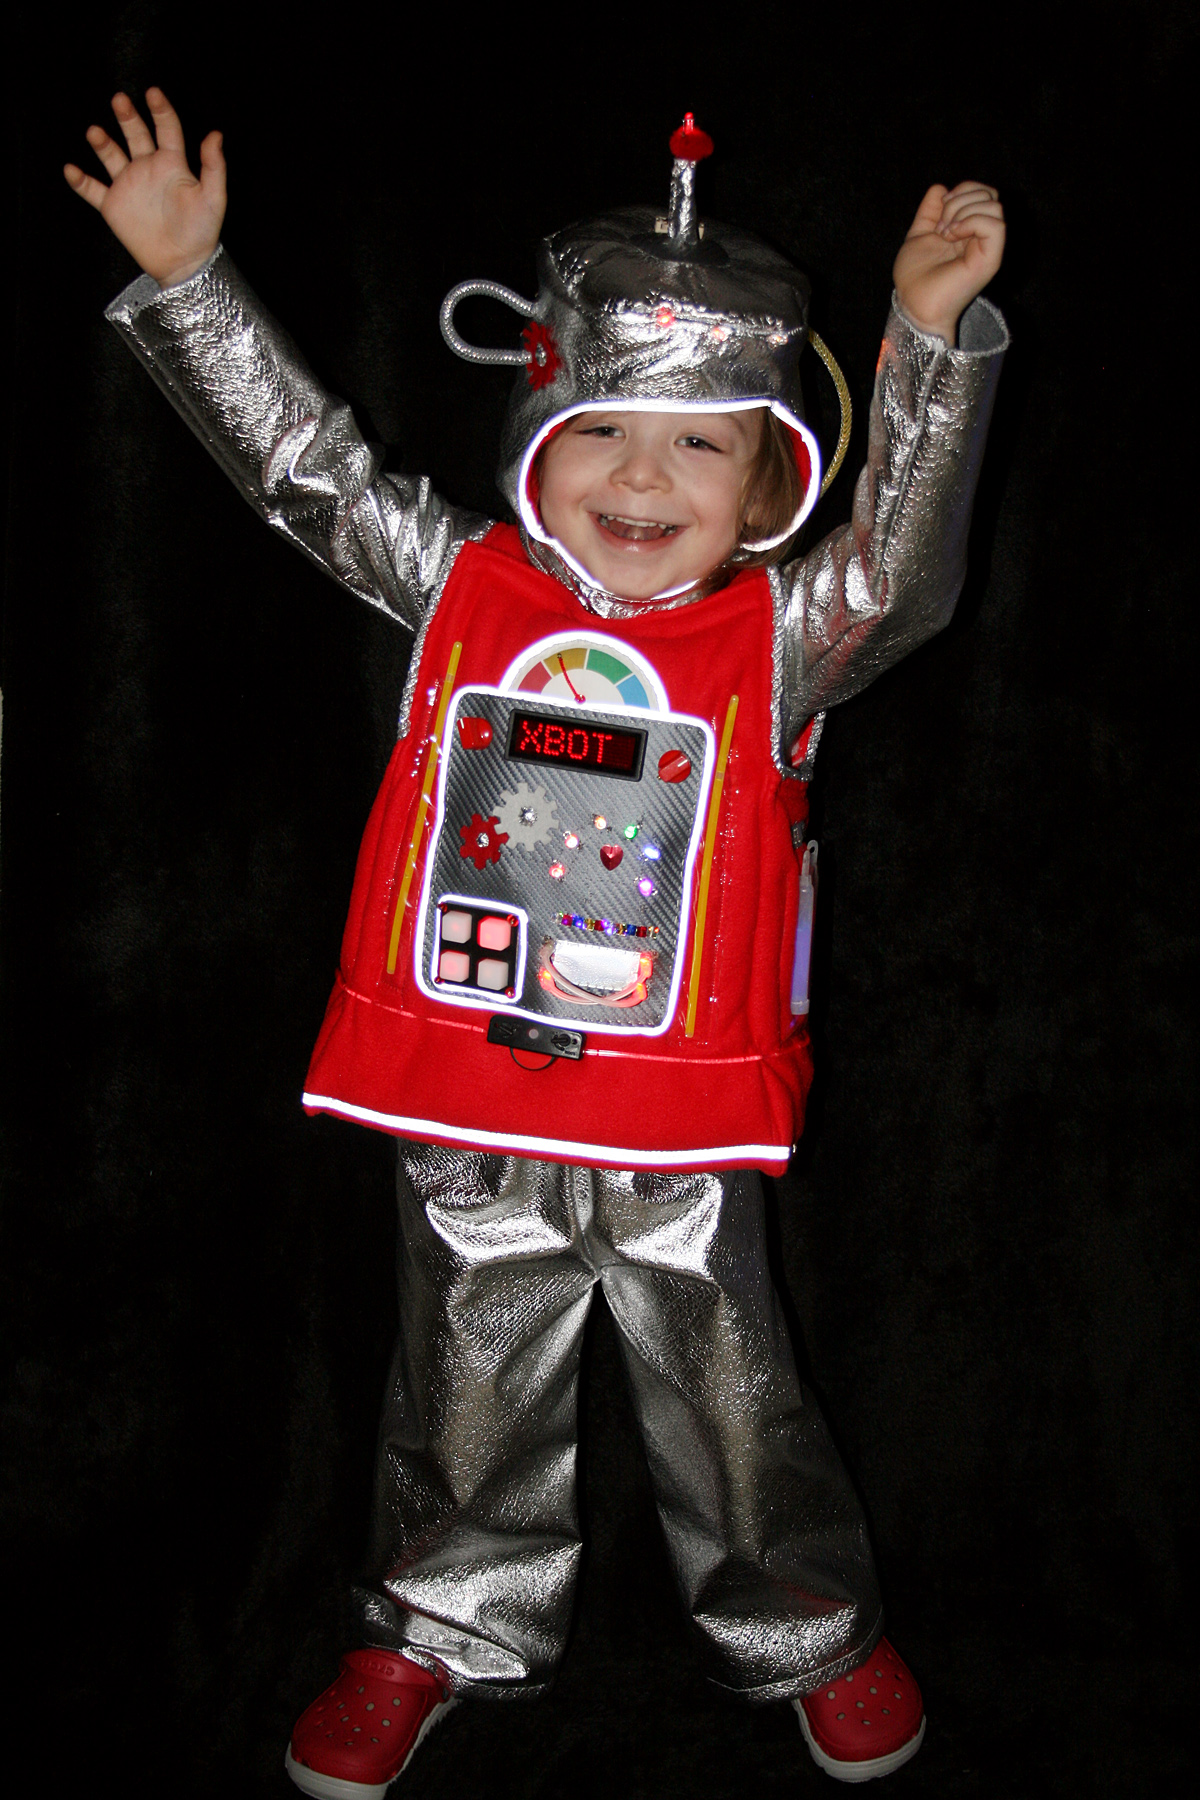
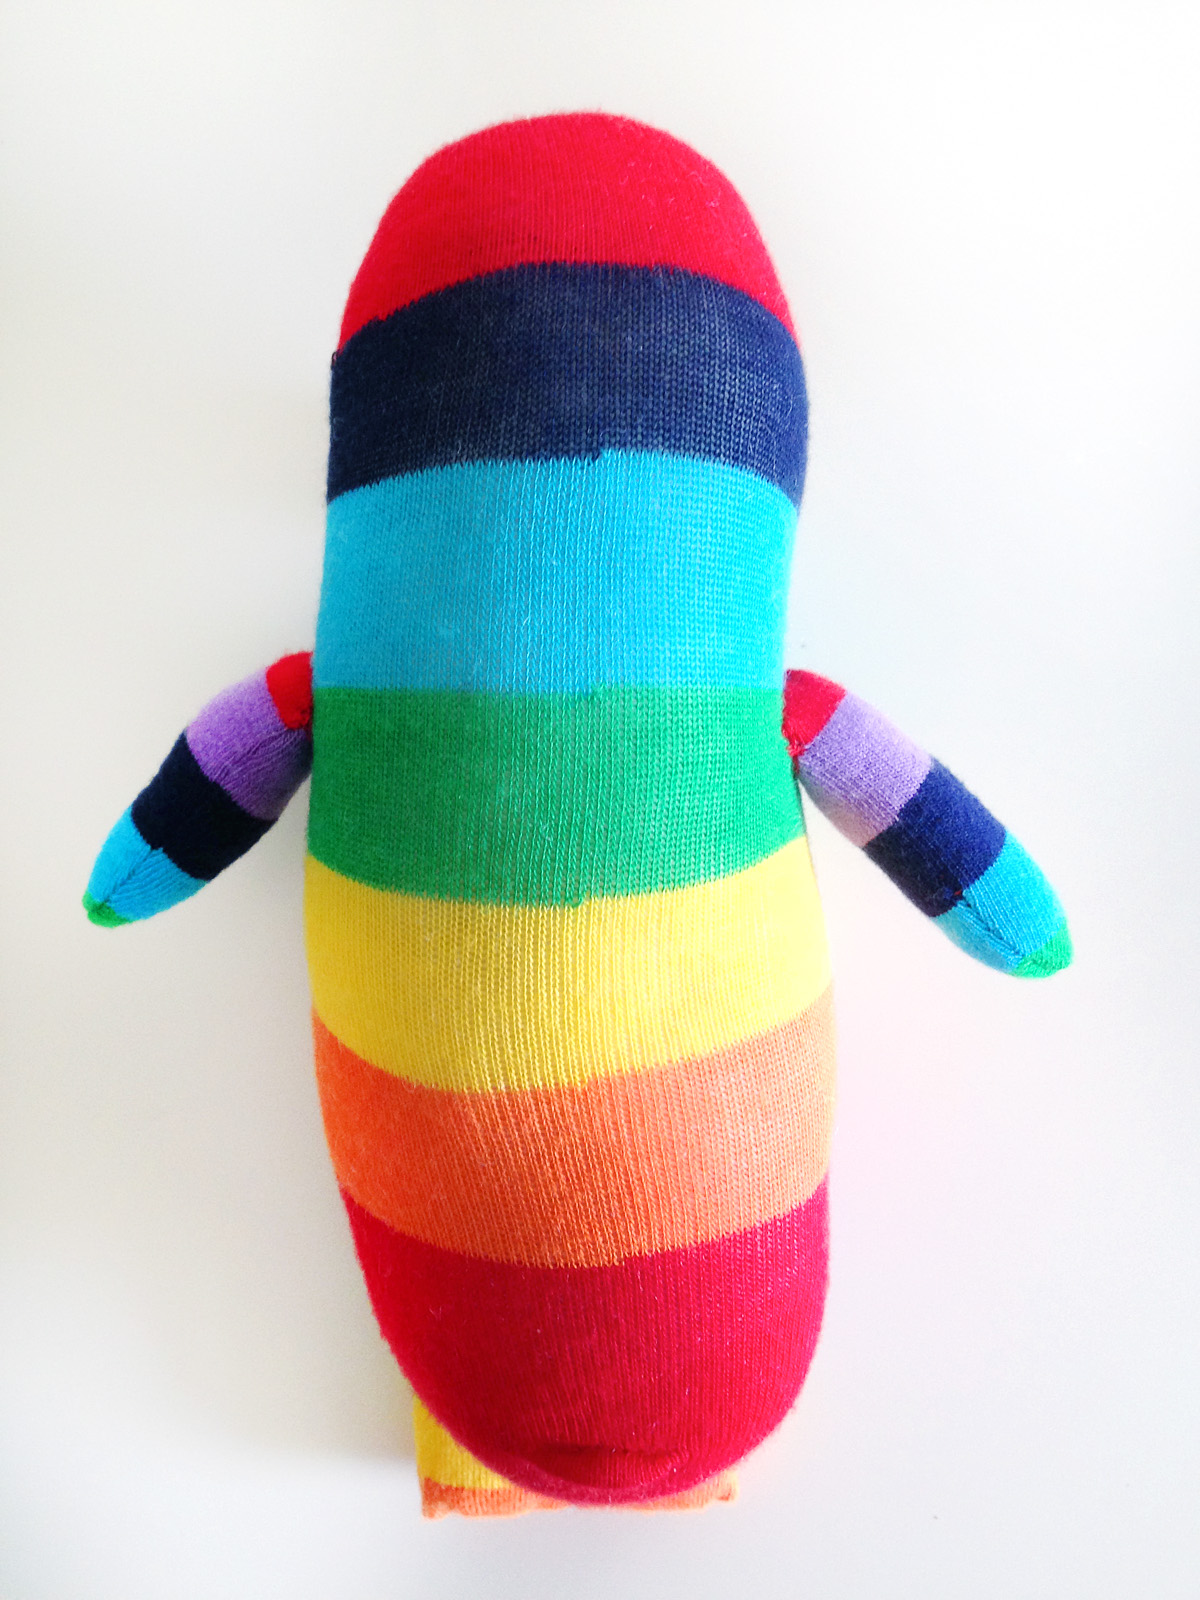
Exhibit A: Jaxbot3000. Cute overload imminent!

I’m going to do my best to explain everything I did to create this costume. I will include the supplies I used in each section, but there will also be a master list sorted by purchase location at the bottom of the post. Fabric yardages and product counts are the totals for what I bought. I do have leftovers of everything but the fleece. Please feel free to contact me with questions. I’m easiest to reach via message on our Facebook page.

Prototype & Prime Directive

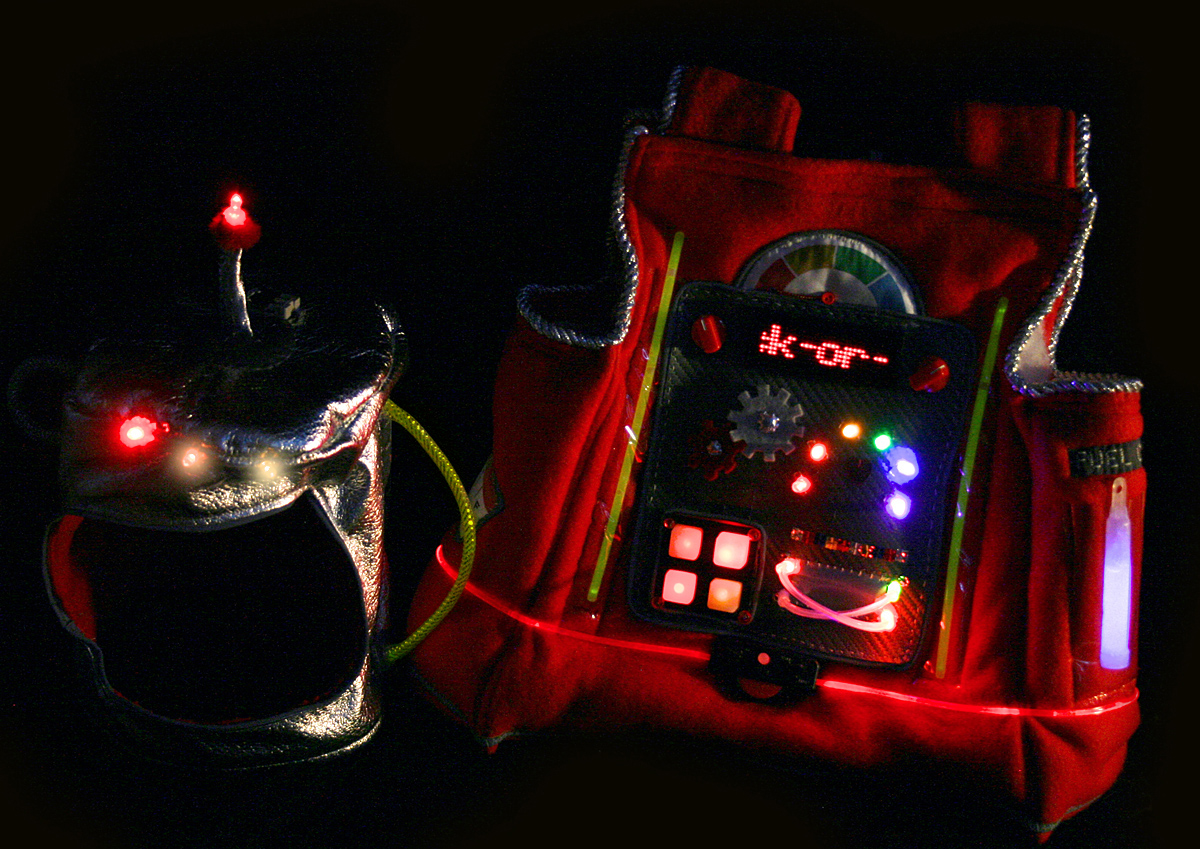
This costume uses a combination of LEDs sewn with conductive thread, ready-made LED components and glow sticks. There is a plain shirt and pants set with a decorated tunic/jumper for the main body that is worn on top.

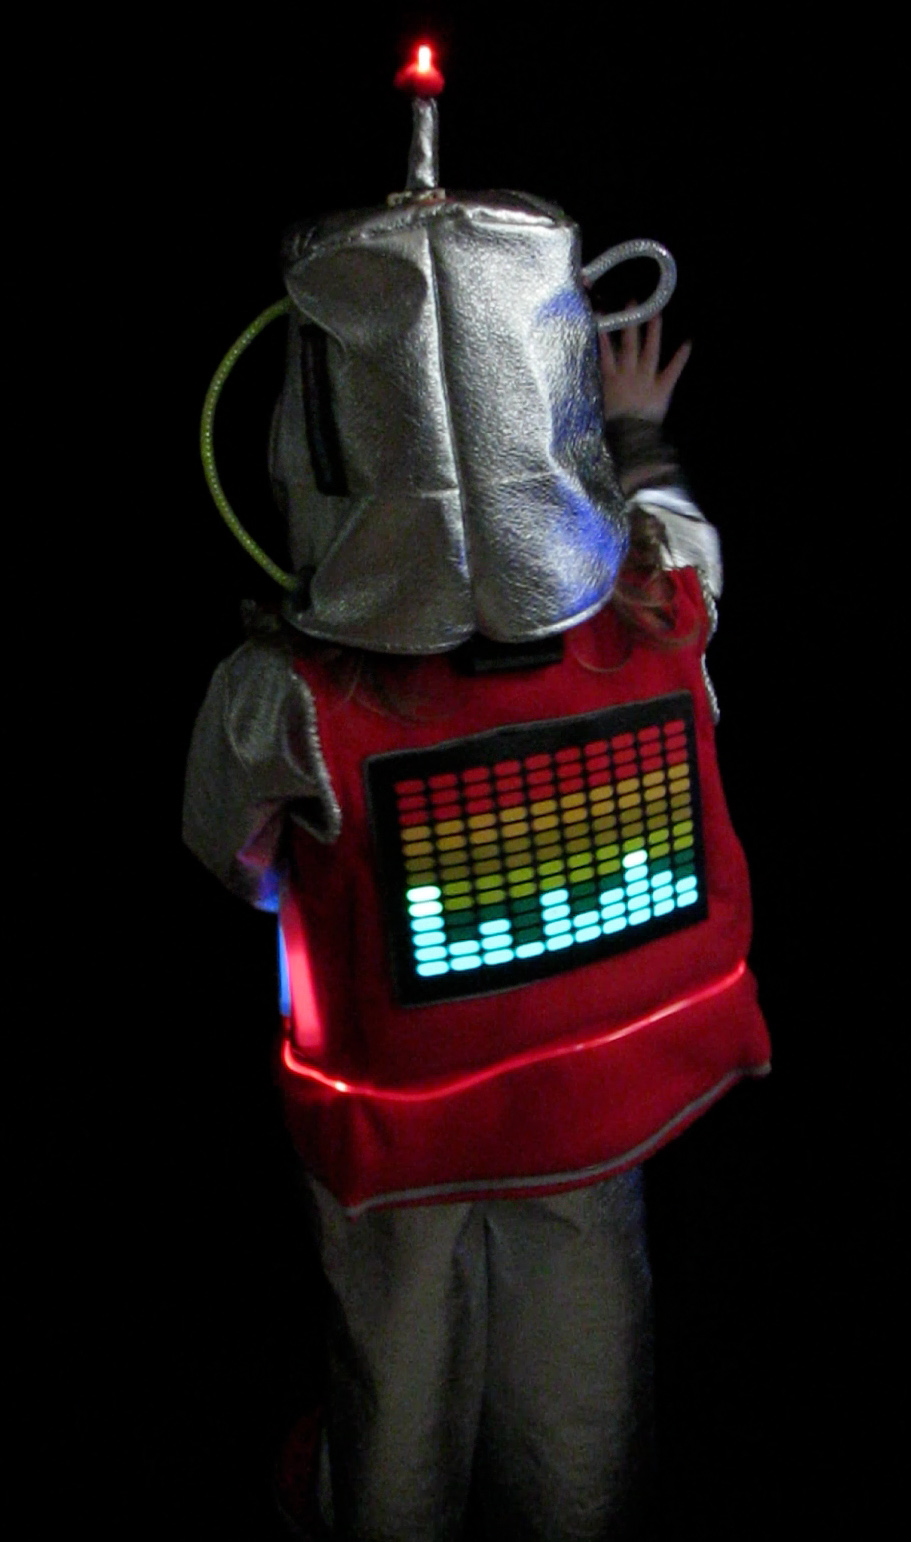
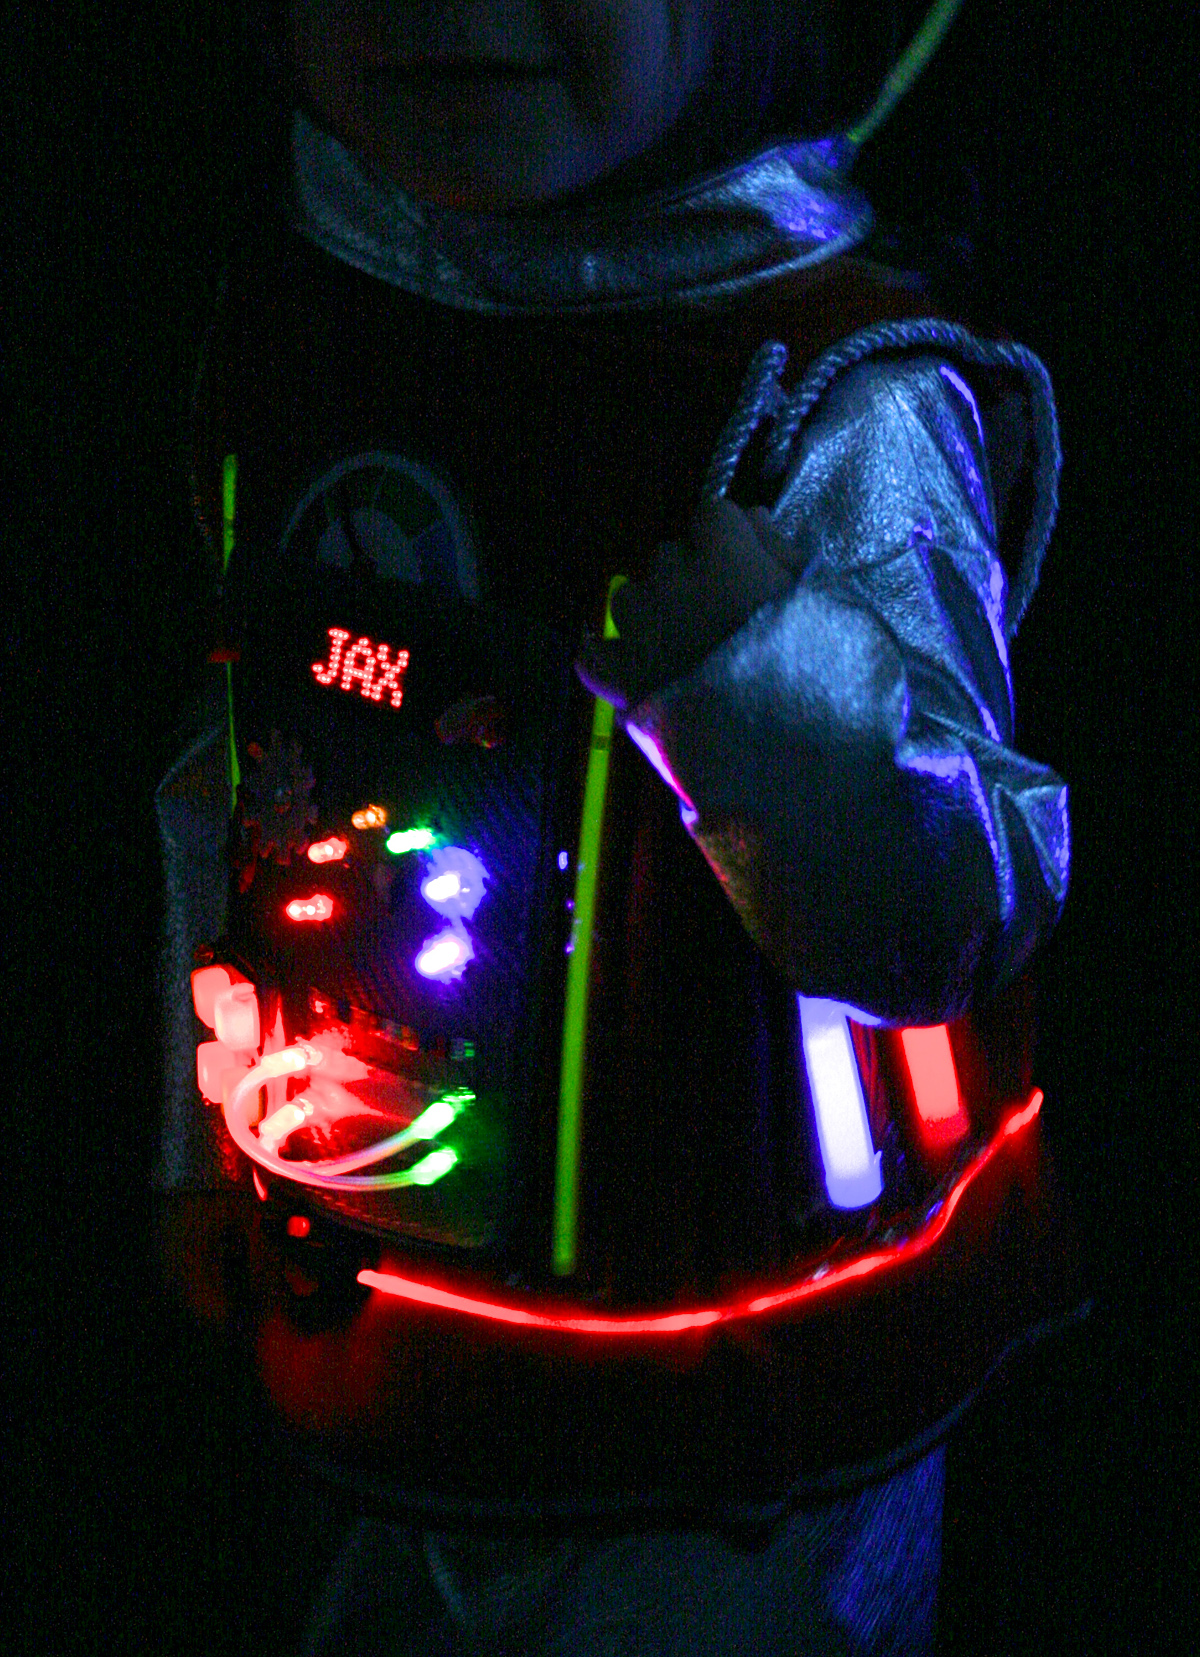
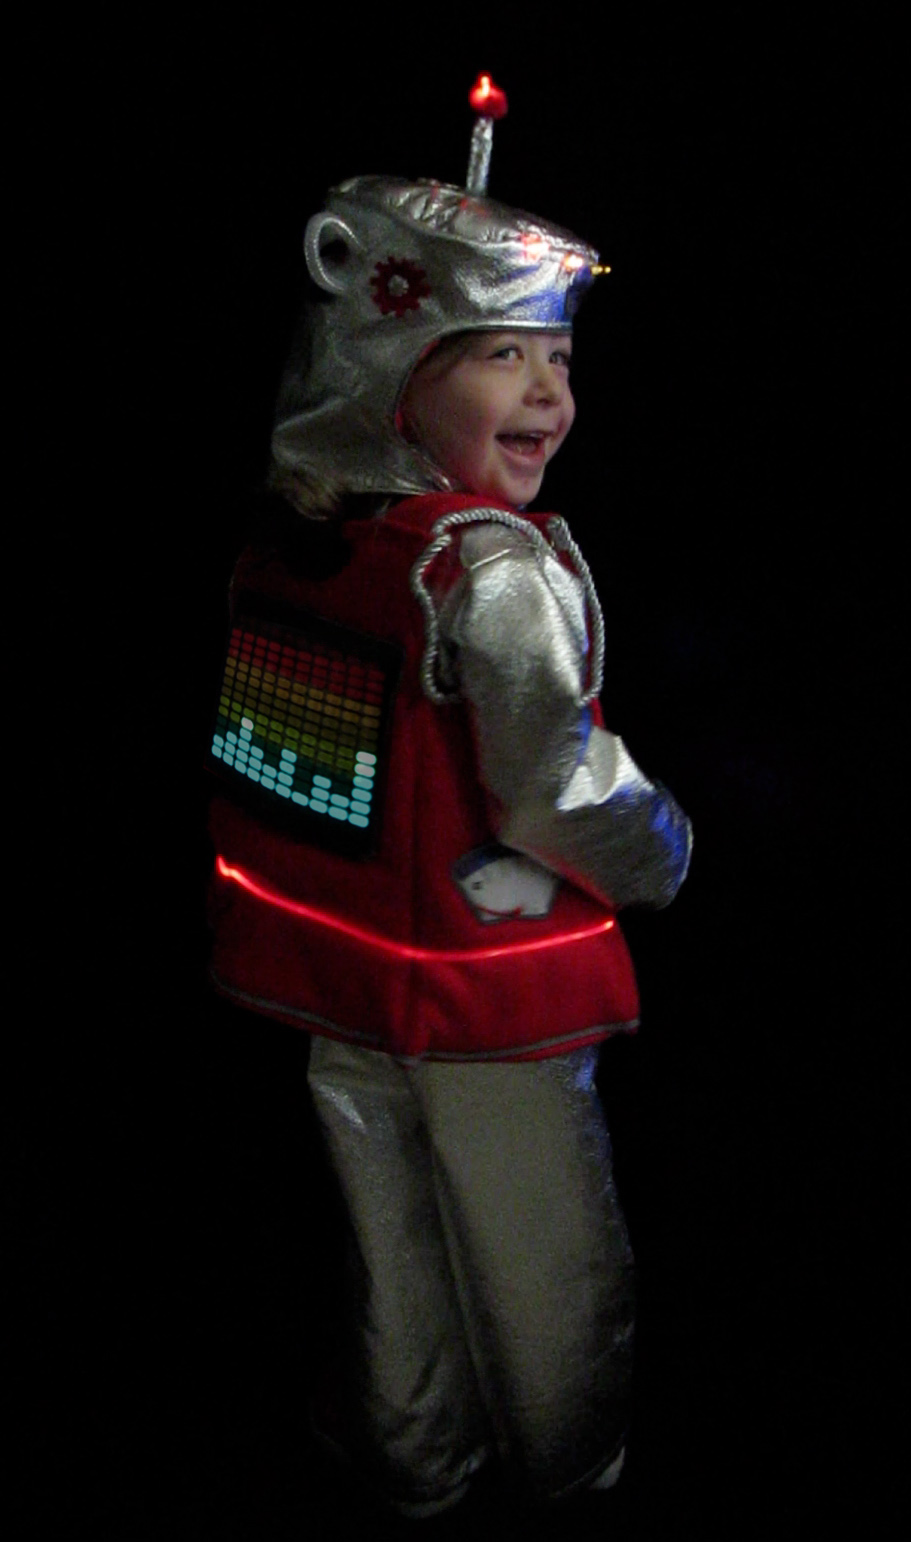
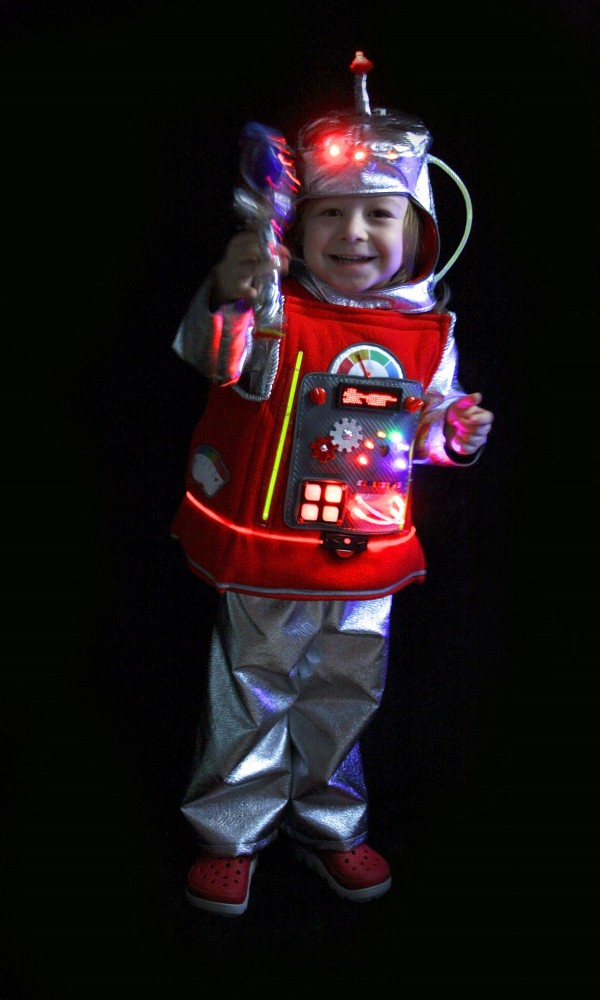
The back of the body includes a sound-activated LED faux-equalizer. The head is a soft helmet-style hat with some decorations and LEDs. In addition, I got Jax a souvenir space laser toy on an outing. It matches the retro styling perfectly.

Manipulator Arms & Dynamic Locomotion Limbs

Supplies: silver pleather (~ 1.5 yd.)

Make the World's Best Robot Costume!
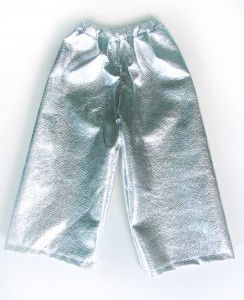
Also known as the arms and legs! For Jax’s costume, I sewed a very basic long sleeve shirt and pants set using a silver metallic pleather. I requested 1 yard and was given about 0.8 yds more for an additional 50% off because it was the end of the bolt.) As it is a non-stretch fabric, I had to keep that in mind while sewing the top.

The pants are very simple, made in an elastic-waist pajama style. You can find many toddler pajama pant patterns online. I cut my own pattern by tracing Jax’s existing pants and adding extra for seam allowances and wiggle room. Simple pants are actually very easy to sew!

For my shirt, I used a toddler long sleeve t-shirt pattern from here. It just happened to be the right size for Jax. Because my fabric is non-stretch, I made a long slit going down from the back neck. You could add a hook and eye closure, but I haven’t bothered so far. Getting the shirt on takes a little shoulder wiggling, but work just fine for us. You might want to wait to finish the slit’s edge until after trying on the shirt. That way you could make it long enough for ease of dressing. If you go with a stretch fabric, then you don’t need to worry about a slit.

Make the World's Best Robot Costume!

Central External Casing Assembly

Supplies: dm red anti pill fleece (~ 0.5 yd.), batting (~ 1 yd., from stash) silver rope trim (unknown, from stash), clear vinyl (scraps), reflective sew-in piping (2 packs), red velcro (6″)

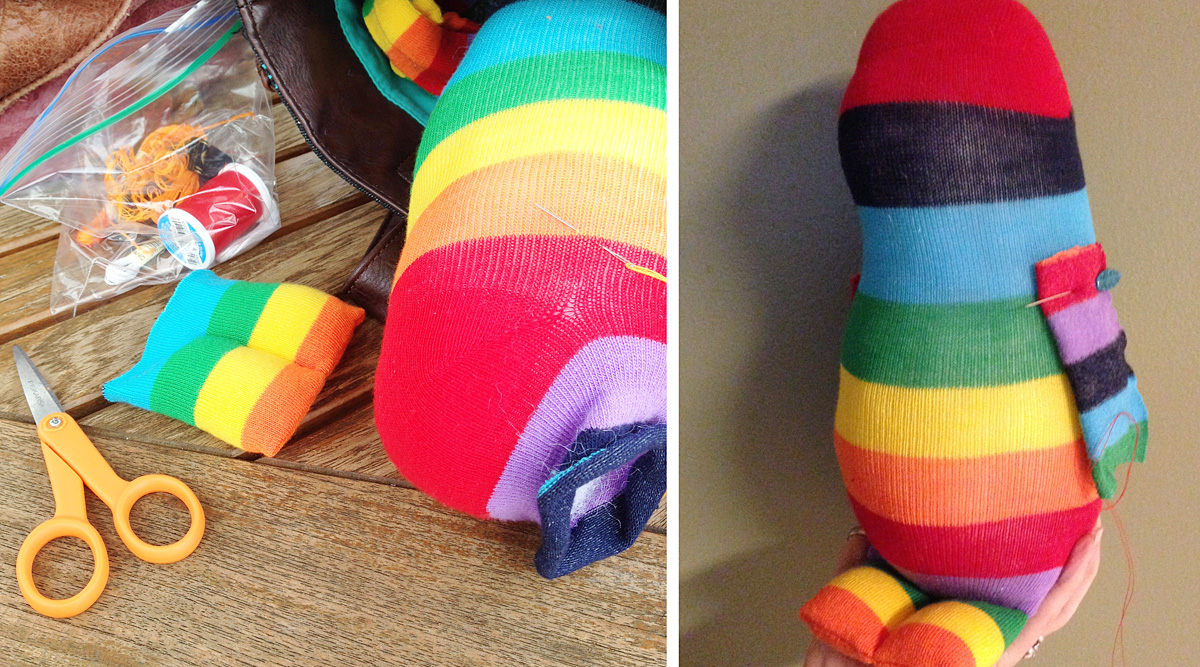
Otherwise know as the main body! I started designing the body by measuring Jax. I knew I wanted it to be boxy, so I took measurements based on where I wanted it to hang. I sketched out my idea and noted the measurements. I designed it to be narrower at the top and slightly a-line at the bottom, but still keeping a very boxy shape. The shoulder straps are double thickness and Velcro to front to make it easy to step into.

Make the World's Best Robot Costume!

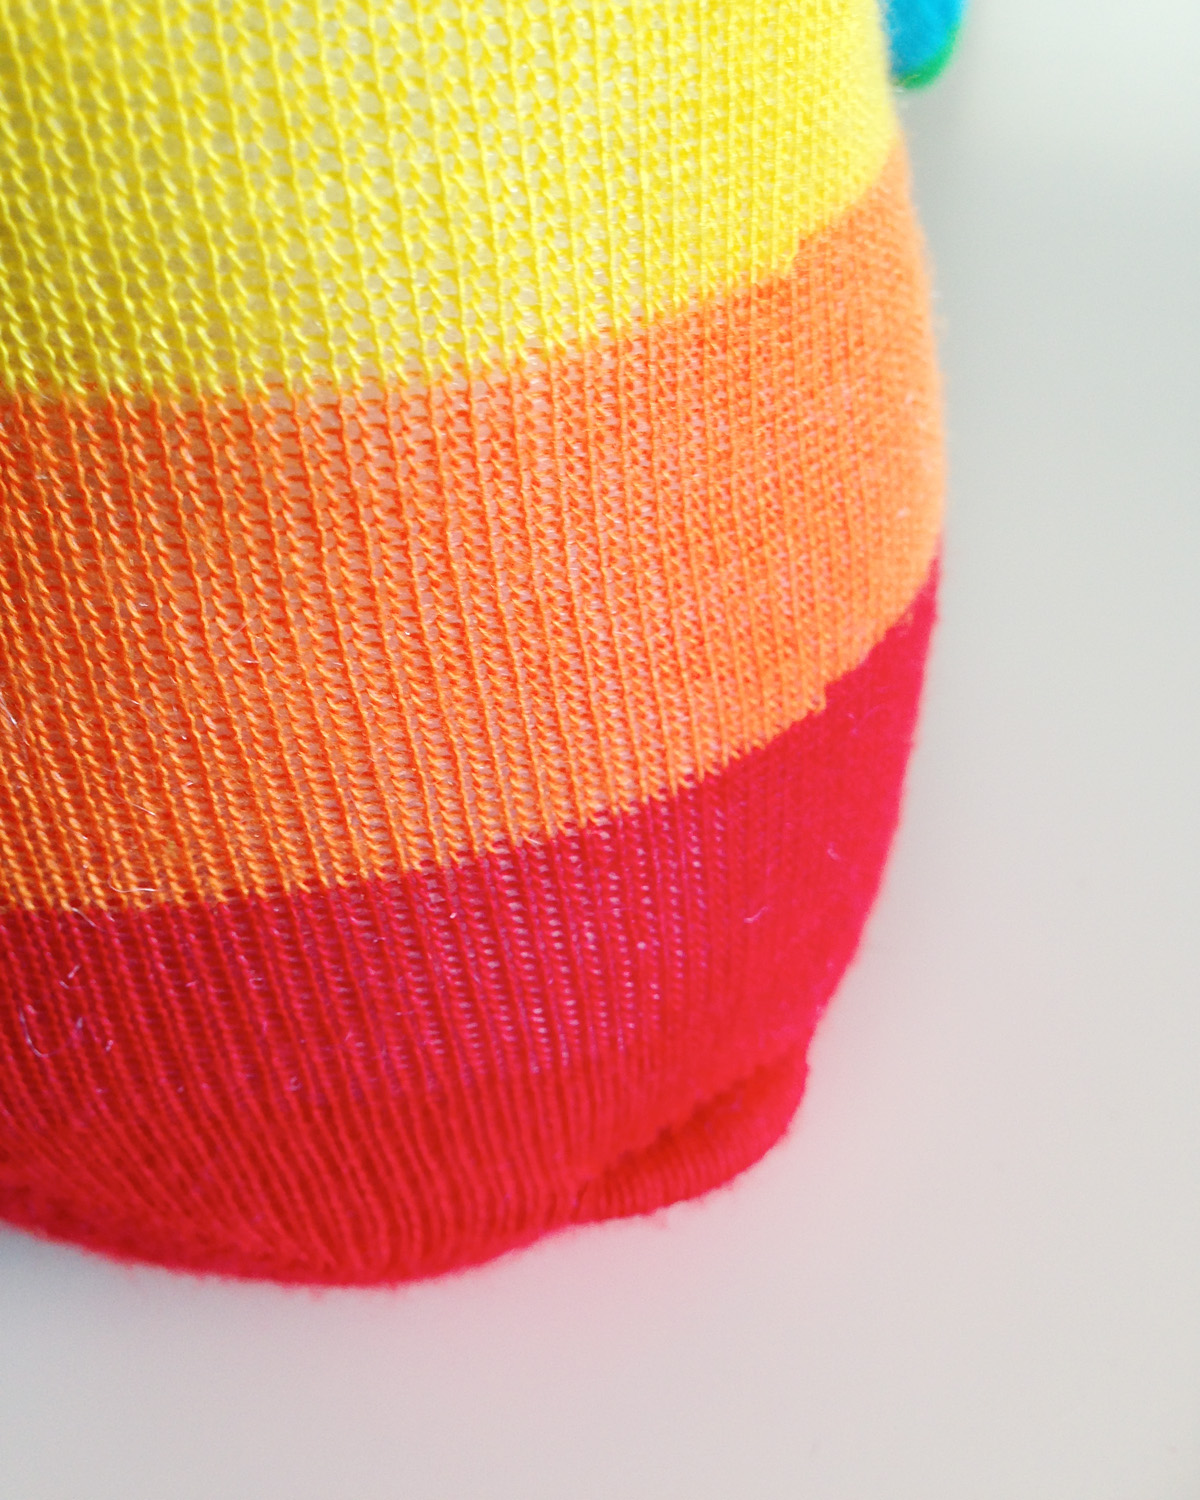
Chest: (This is sewn on my machine.) I cut one layer of fleece and two layers of batting for each of the 4 body pieces. On the top and bottom edges, I cut the batting slightly smaller so I could just fold the fleece in over the batting and hem. I didn’t bother to line the body, as I was saving on fleece and Jax will be wearing the shirt underneath (to spare him from the itchy batting.)

Make the World's Best Robot Costume!

I folded over the tops and bottoms of each section (towards the inside where the batting was) and hemmed them and top stitched to make a double seam. Then, lining up the bottoms, I sewed the four sides together into a rectangular tube. Along the bottom, I attached some of the reflective piping as a trim by folding over the piping seam allowance and zigzag stitching over it. At the top, I sewed two 3″ strips of Velcro, one on each end of the front panel. These are for the straps.

Make the World's Best Robot Costume!

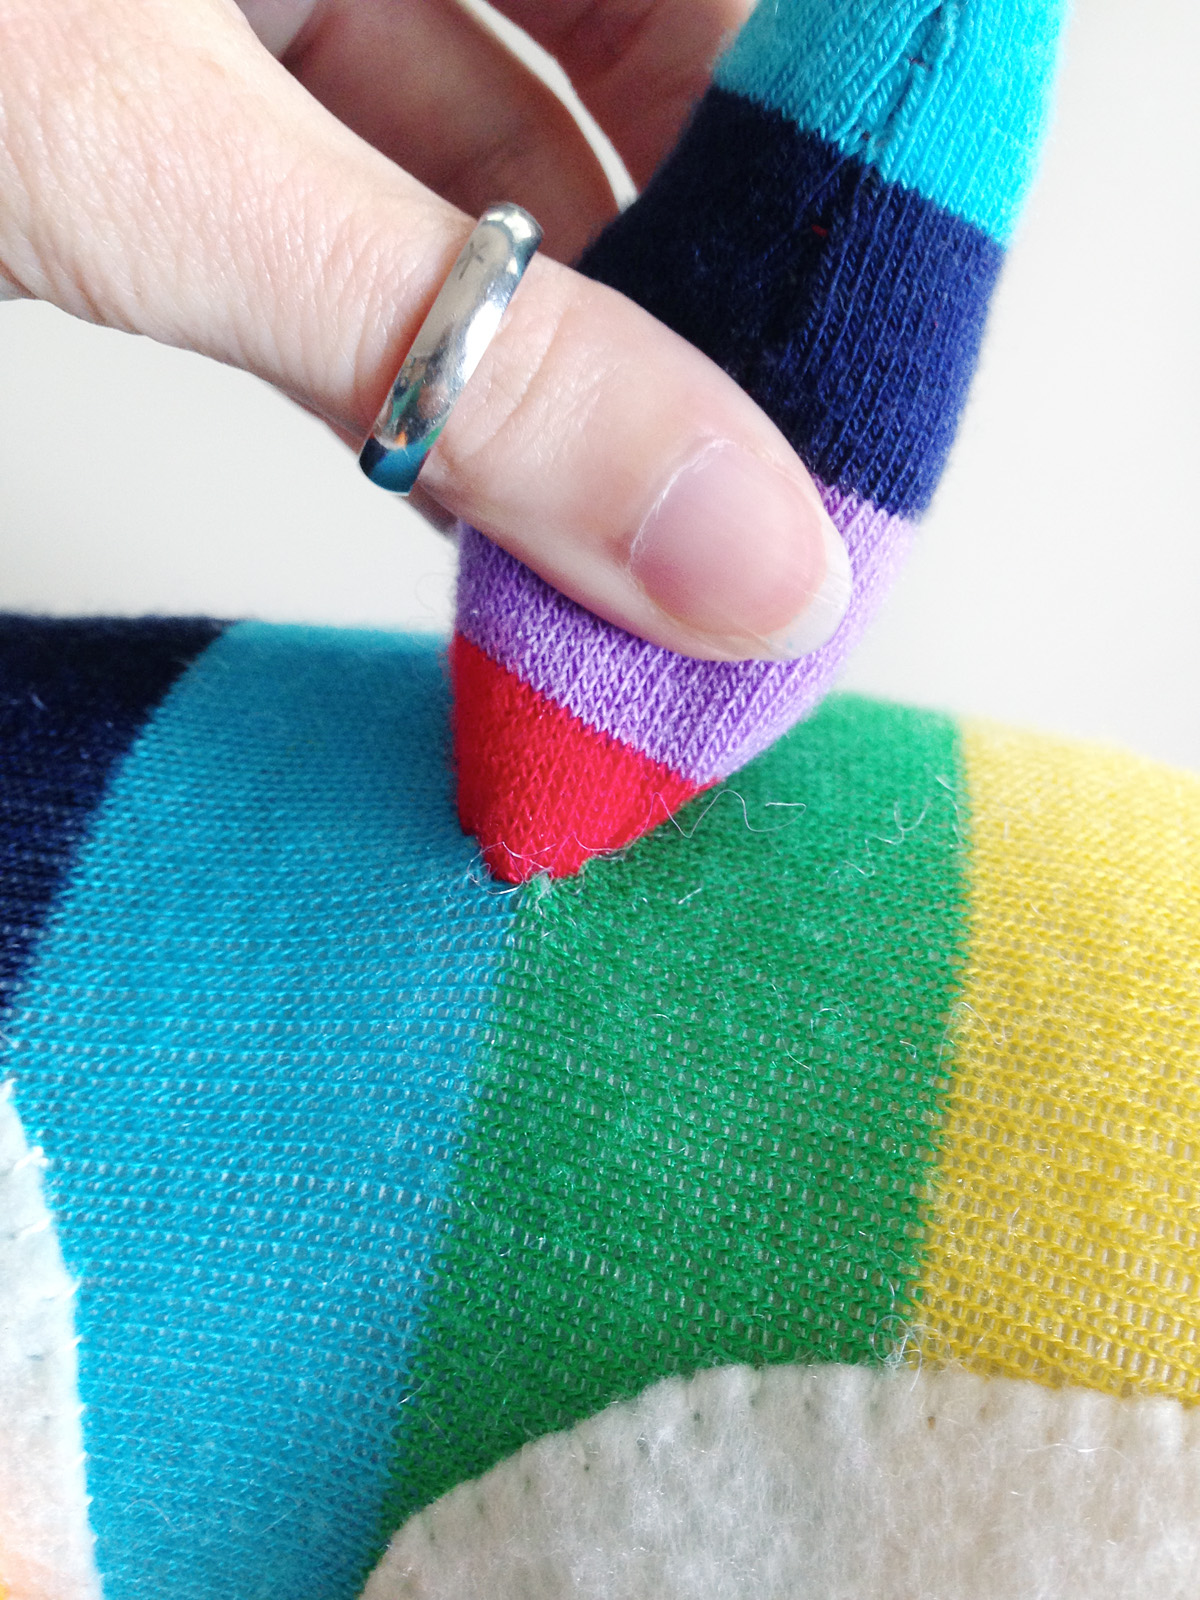
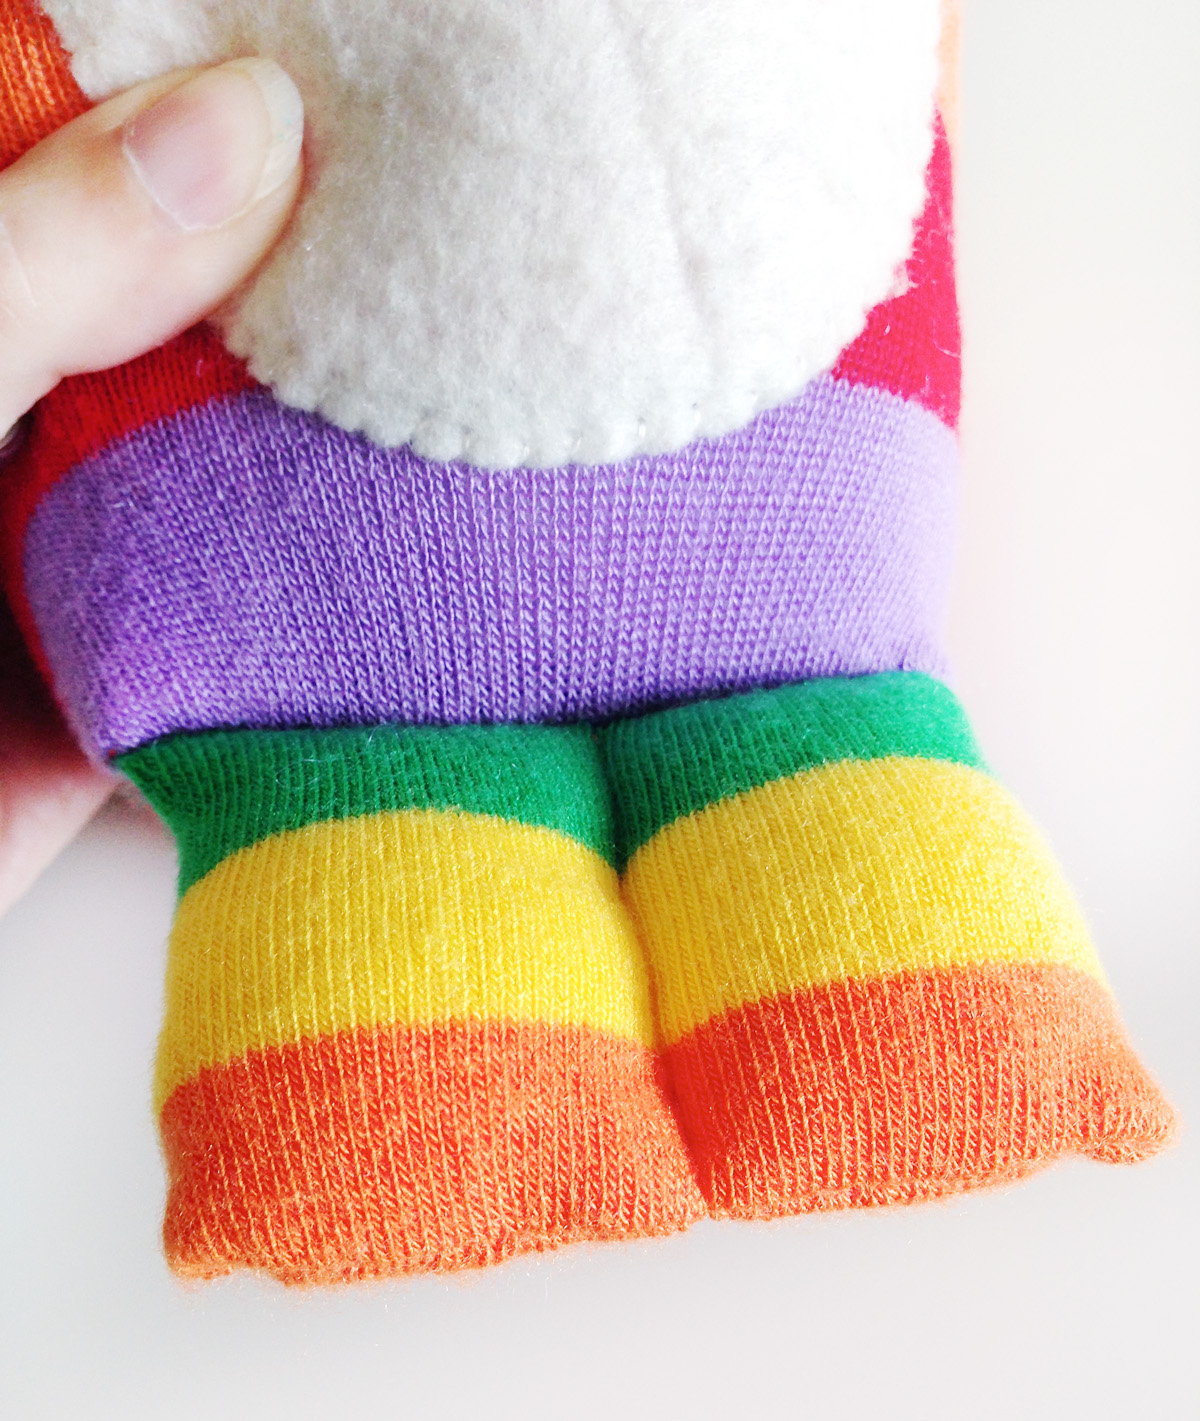
At the sides of the front and back panels, I tried added a double seam along the sides to give the body sharper corners. But what worked better was pinching the seams into corners and hand stitching through all the layers to hold the pinch in place. I did this at the tops and bottoms of each corner.

Make the World's Best Robot Costume!

Straps: (This is sewn on my machine.) For each strap, I cut two pieces of fleece and two pieces of batting. To sew a strap, I laid two pieces of fleece with right sides facing, then added two pieces of fleece on one side. I stitched around both long sides and one short side. I turned it right side out, then top stitched around the three sewn edges, pausing at the top of the strap to add Velcro. I repeated for the other strap. Lining the straps up with the Velcro on the body, I pinned and sewed them in place.

Arm Hole Trim: (This was hand sewn.) I then added silver metallic rope trim from my sewing stash all the way around the arm hole, including the outer edge of each strap. I just folded the ends of the rope towards the inside of the costume and stitched them down.

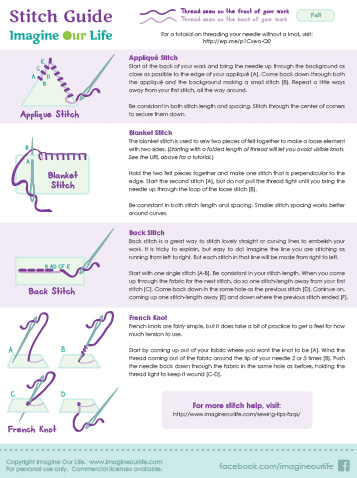
How to: Make LEDs Sewable

I chose to go with regular LEDs (as opposed to ones mounted to sewable boards) for two reasons: they are much cheaper and I love the large, domed look of them. But because they aren’t intended to be sewn, you need to do a little “jewelry making” to prepare them.

Make the World's Best Robot Costume!

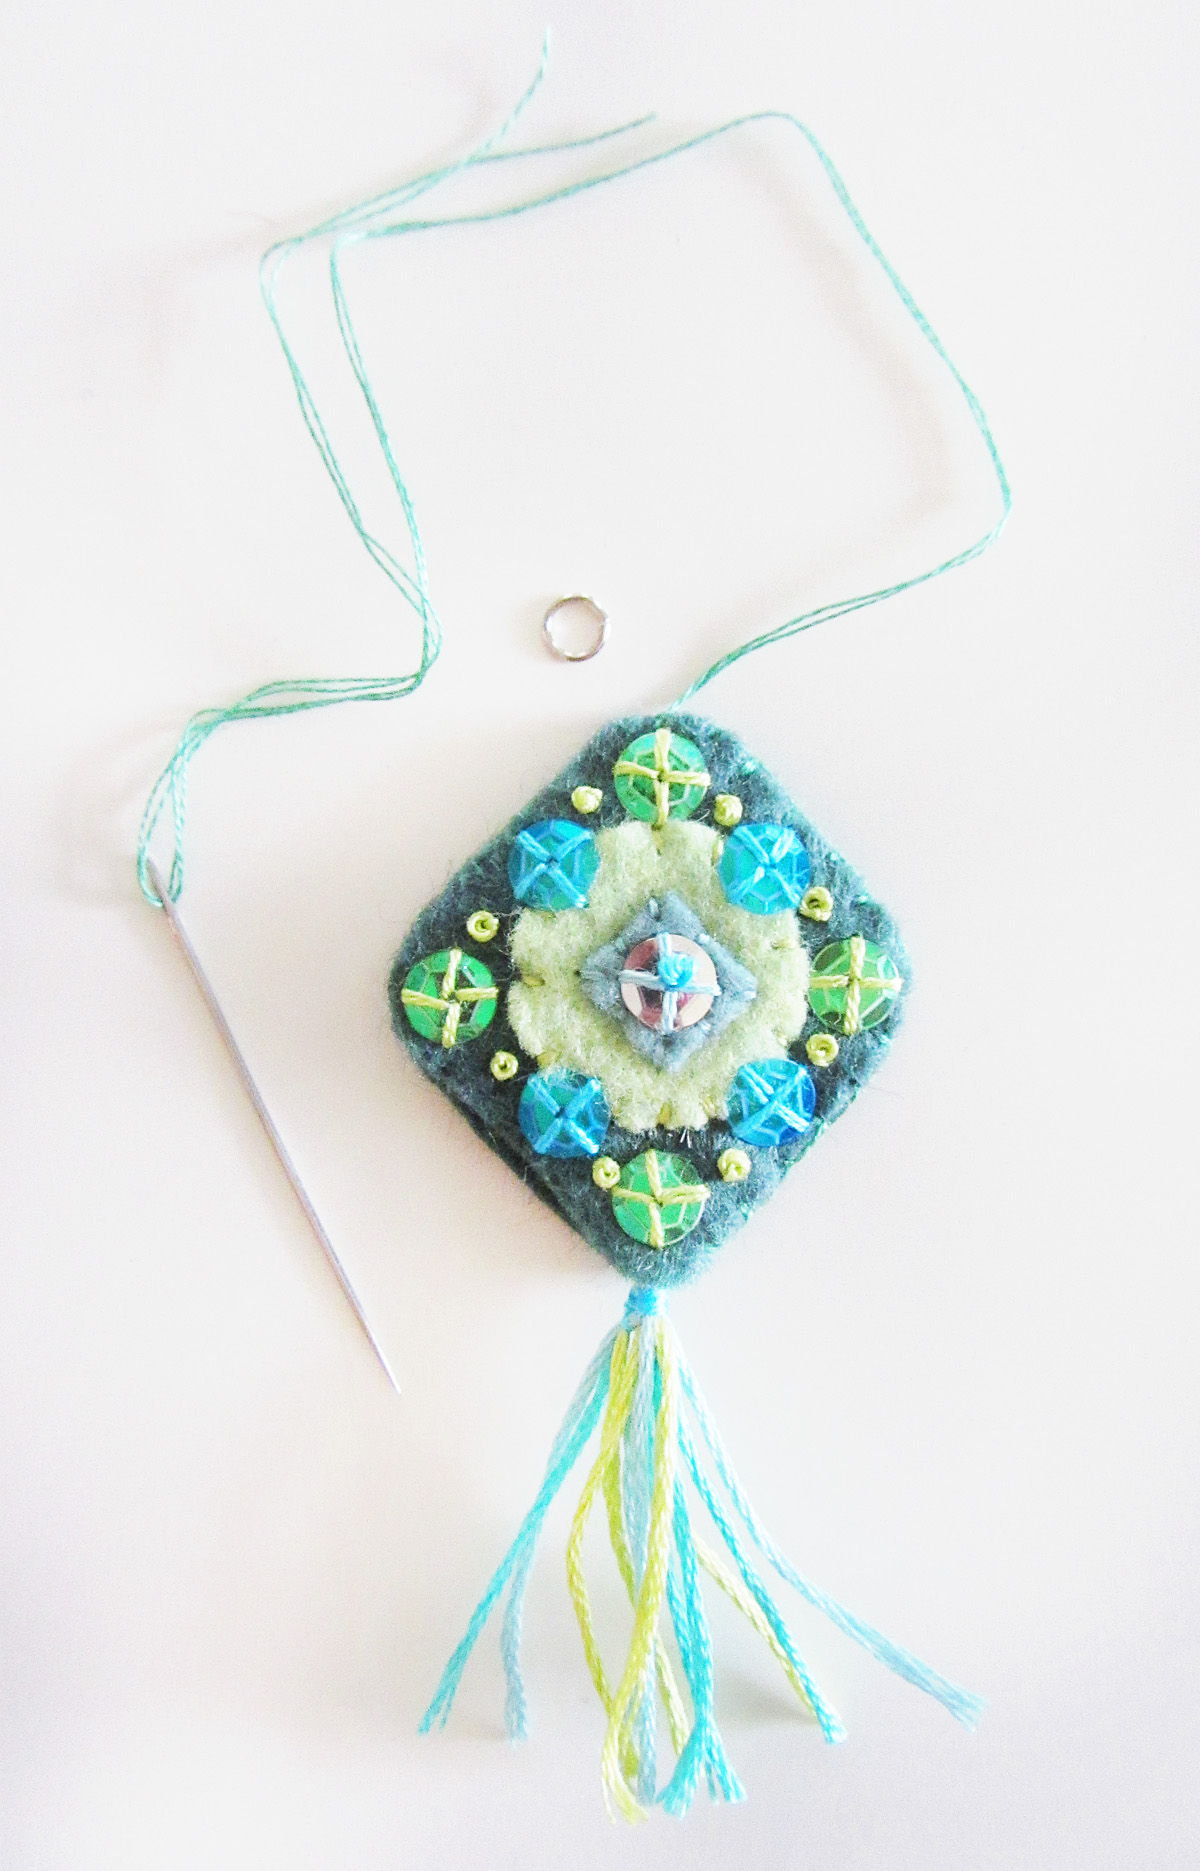
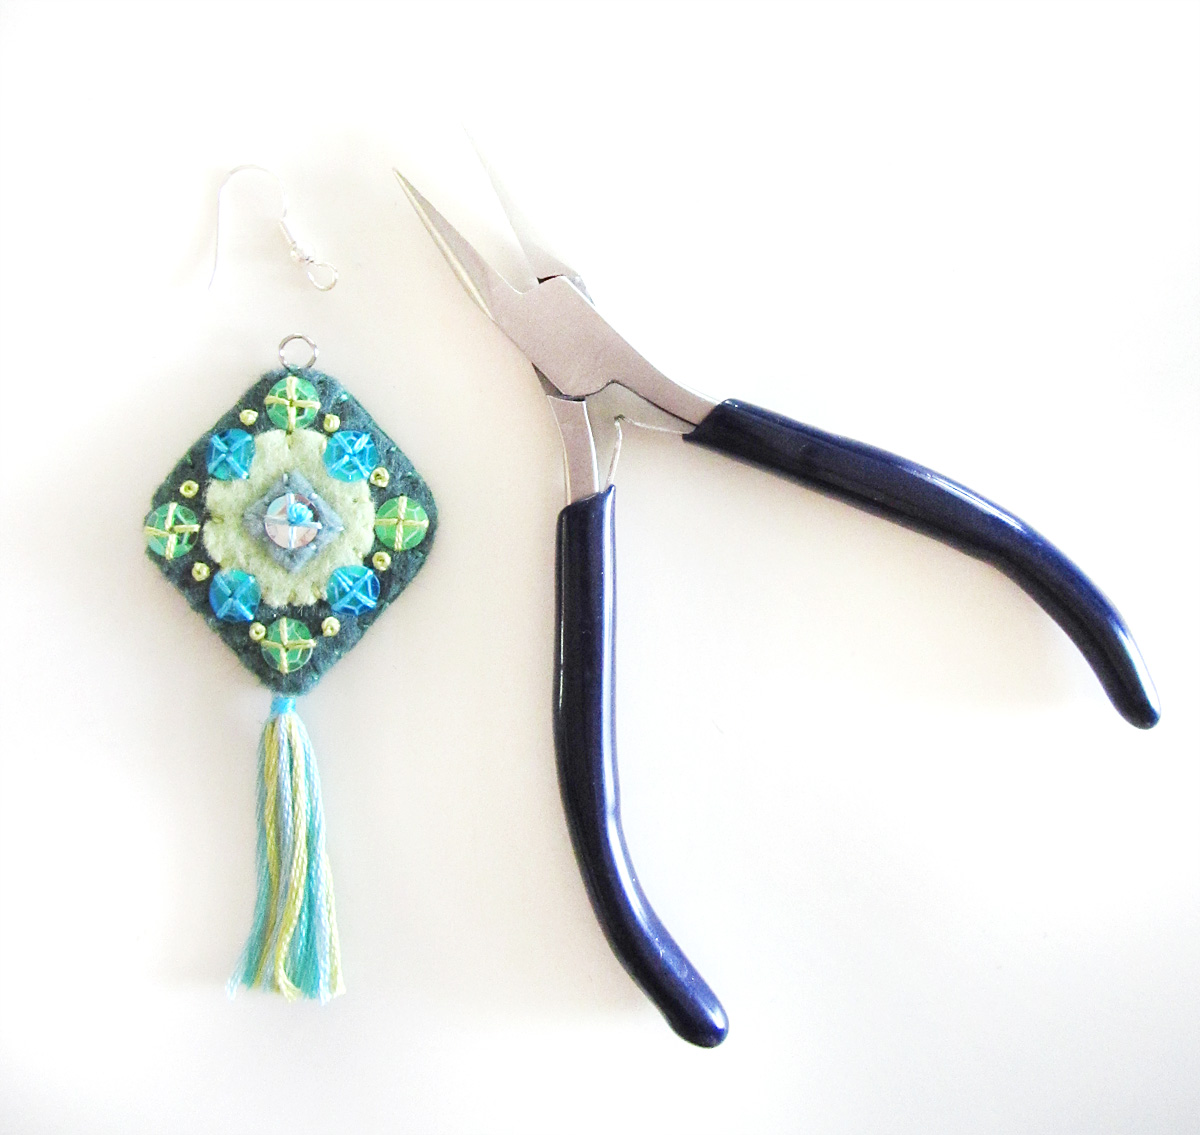
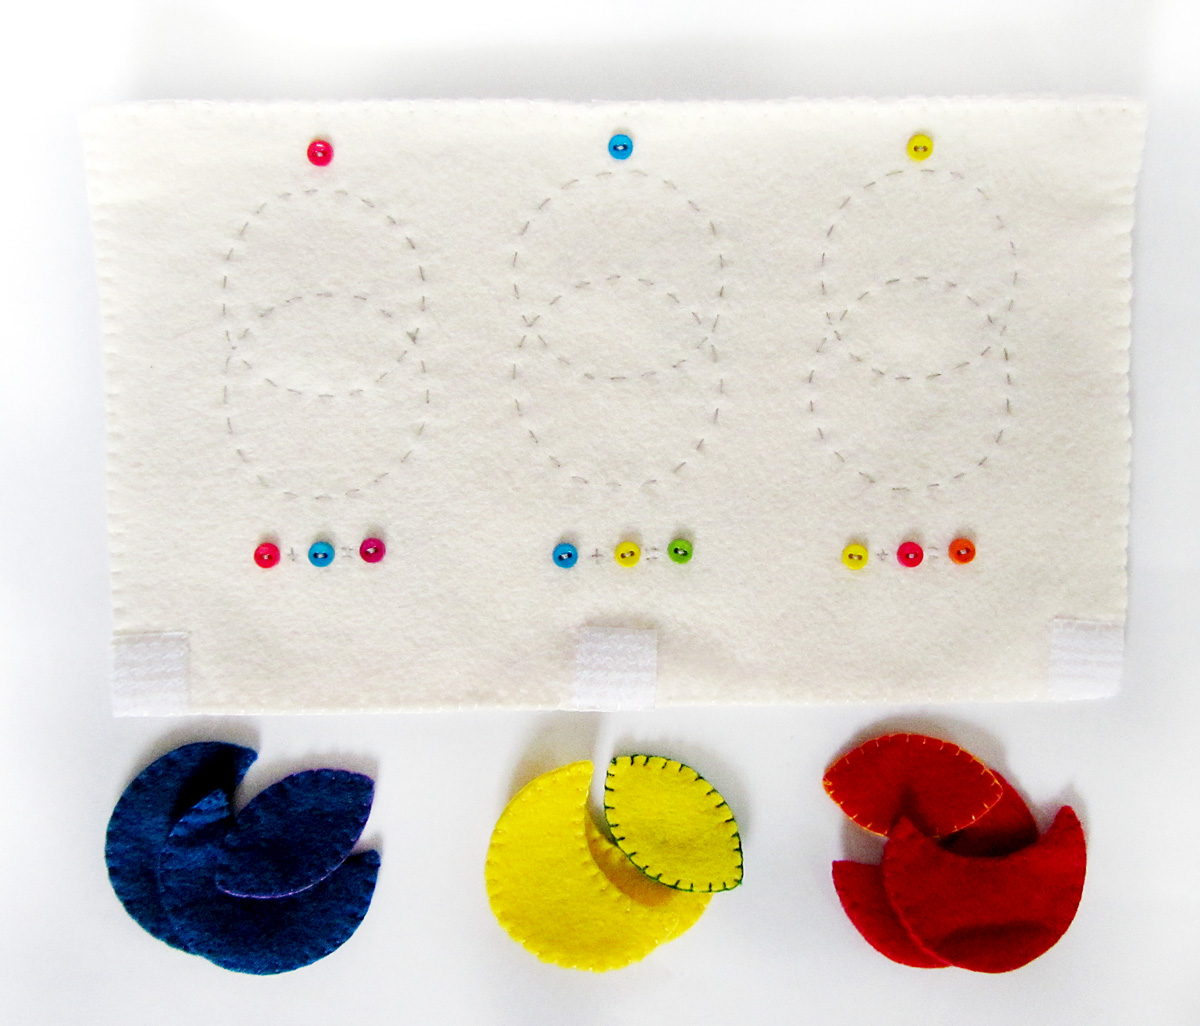
An important note about LEDs: the longer wire is the positive wire! The shorter wire is the negative wire. You have to connect the correct sides to you battery’s two sides, or else your circuit will fail. To keep the sides distinct but still create a way to sew them on, it helps to curl the positive wire into a round coil and the negative side into a square coil. I used two jewelry making pliers to do it. You’ll need to do this for every LED you sew, but it is very quick. Sew the photo tutorial above to learn how to prepare your LEDs for sewing.

If you plan to mount the LEDs with the wires hidden, cut holes in your fabric (use Fray Check if needed on the hole’s edge) and sew the wires to the back side with the LED dome sticking through. I felt my wires went well with the robot look. I did mount my battery holders to the back side for both aesthetics and safety.

How to: Create E-Textile Circuits

Sewing circuits for your LEDs is easy, I promise! Let me show you the basics, so you are able to easily understand my circuit plans. Disclaimer: I am not an electrician! My programmer brother helped me to understand the basics over the course of all my e-textile projects. I’ll be explaining in non-technical terms.

Basic circuit examples.

Basic circuit examples.

Both the battery and your LEDs have positive and negative sides. Both sides need to be correctly connected to work. Take a look at the examples above to get an idea of how LED circuits work. You are basically making a chain going away from the battery. You must have separate lines for the + and – connections, and the cannot touch or you will short your circuit.

Make the World's Best Robot Costume!
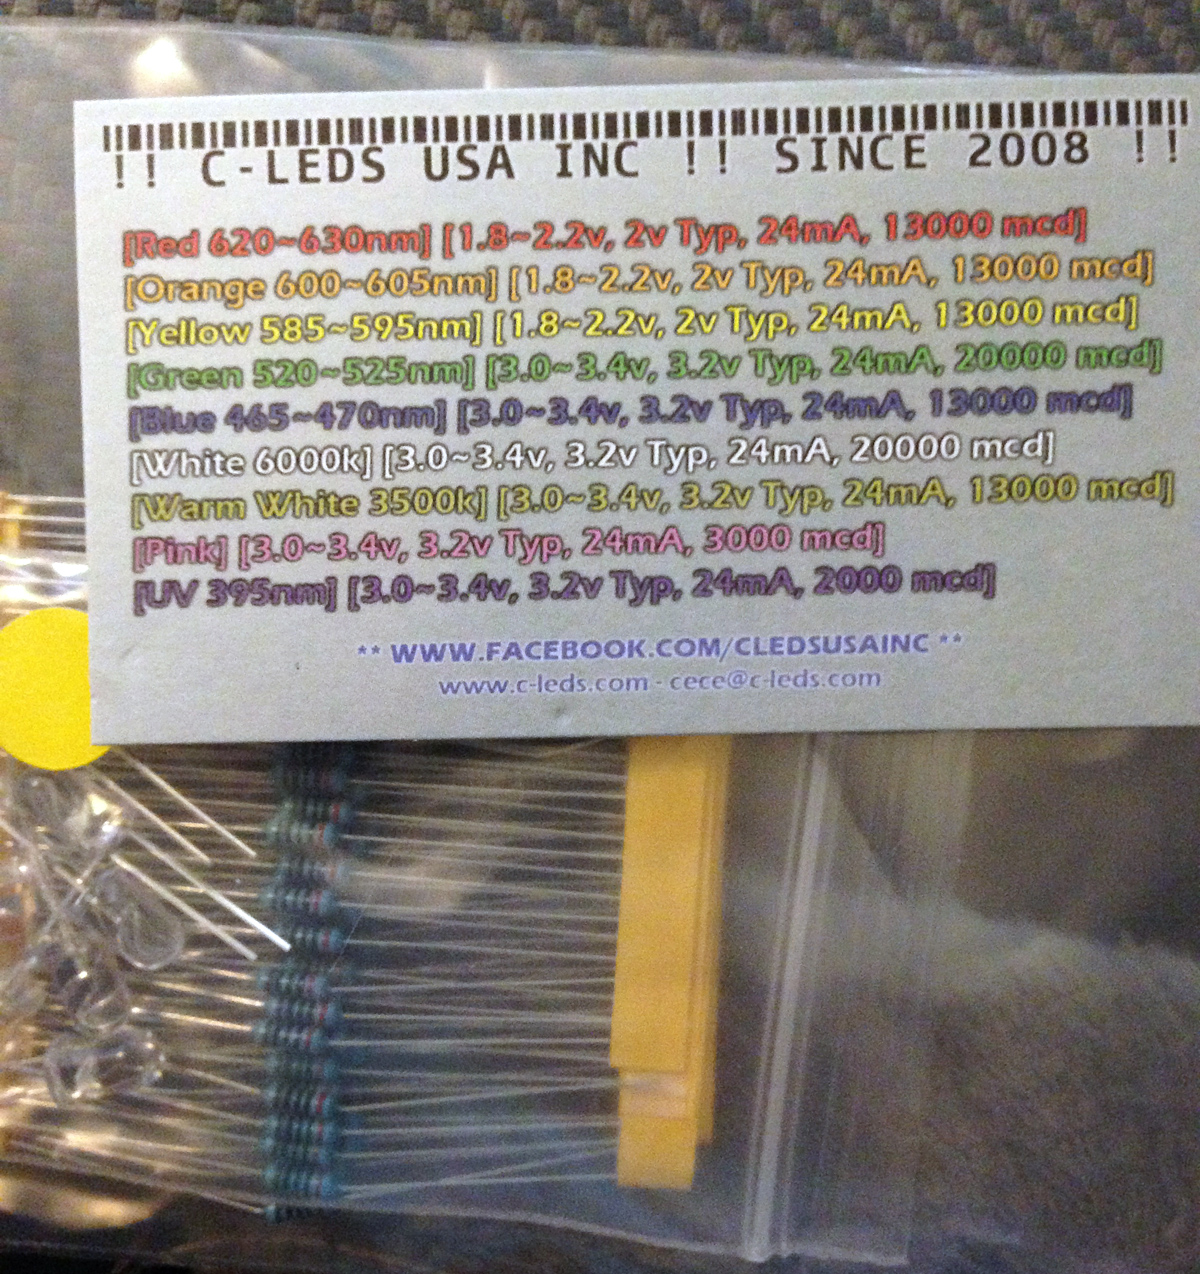
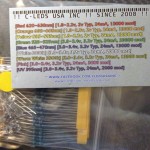
When you are making a simple line of LEDs, you can see how easy it is to sew your circuits. It gets a little trickier when you start arranging the LEDs into different shapes. It helps to sketch out your plan so you can be sure you have a clear path for each line that doesn’t touch or cross. Additionally, you need to consider the voltage your LEDs run on. This is something new I had to learn through experimenting this time! My red, orange and yellow LEDs ran on a lower voltage than my green, blue and pinks. (I’m very glad my LEDs came with a chart that helped me piece together the problem!) While my batteries appropriate for either, if I added a lower voltage LED to a chain with higher ones, the voltage was dropped down to the point where the higher ones turned off. With that in mind, I had to separate out my LEDs based on voltage.

Make the World's Best Robot Costume!Here is my final plan for the LEDs on Jaxbot’s chest panel. My little man loves rainbows, so I made a rainbow. I had to keep the green/blue/pink separate from the other colors. I kept the color-change LEDs separate, then did all the red/orange/yellows together. Notice how each circuit is a chain, even if I had to stitch around the battery holder to get to my first LED.

I started the chest panel by cutting a rectangle of gray vinyl that fit well on the front of the body.
Mine was [6.5″ x 8″]. I rounded the corners.

Make the World's Best Robot Costume!

Color Change Power Tubes

Supplies: circuit plans, LED – 5mm Cycling RGB (slow) x4, Coin Cell Battery Holder – 20mm SewableConductive Thread Bobbin, Light Pipe – White Core (3.5mm, 1′ long), plastic glow bracelet connectors, reflective tape

Special Tools: round nose pliers, jeweller’s pliers, super glue, sand paper

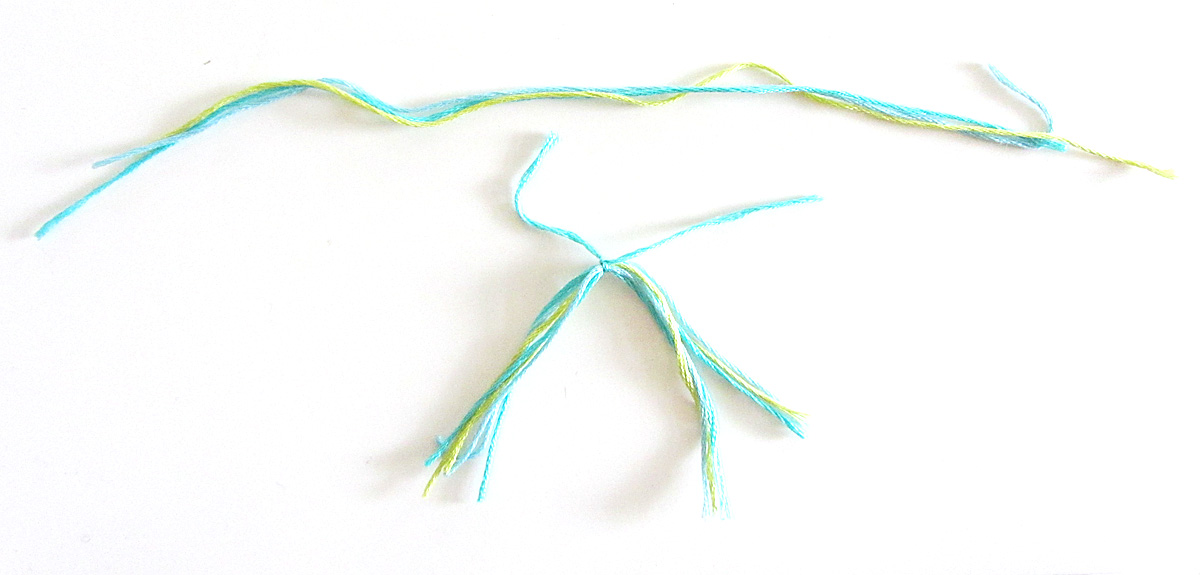
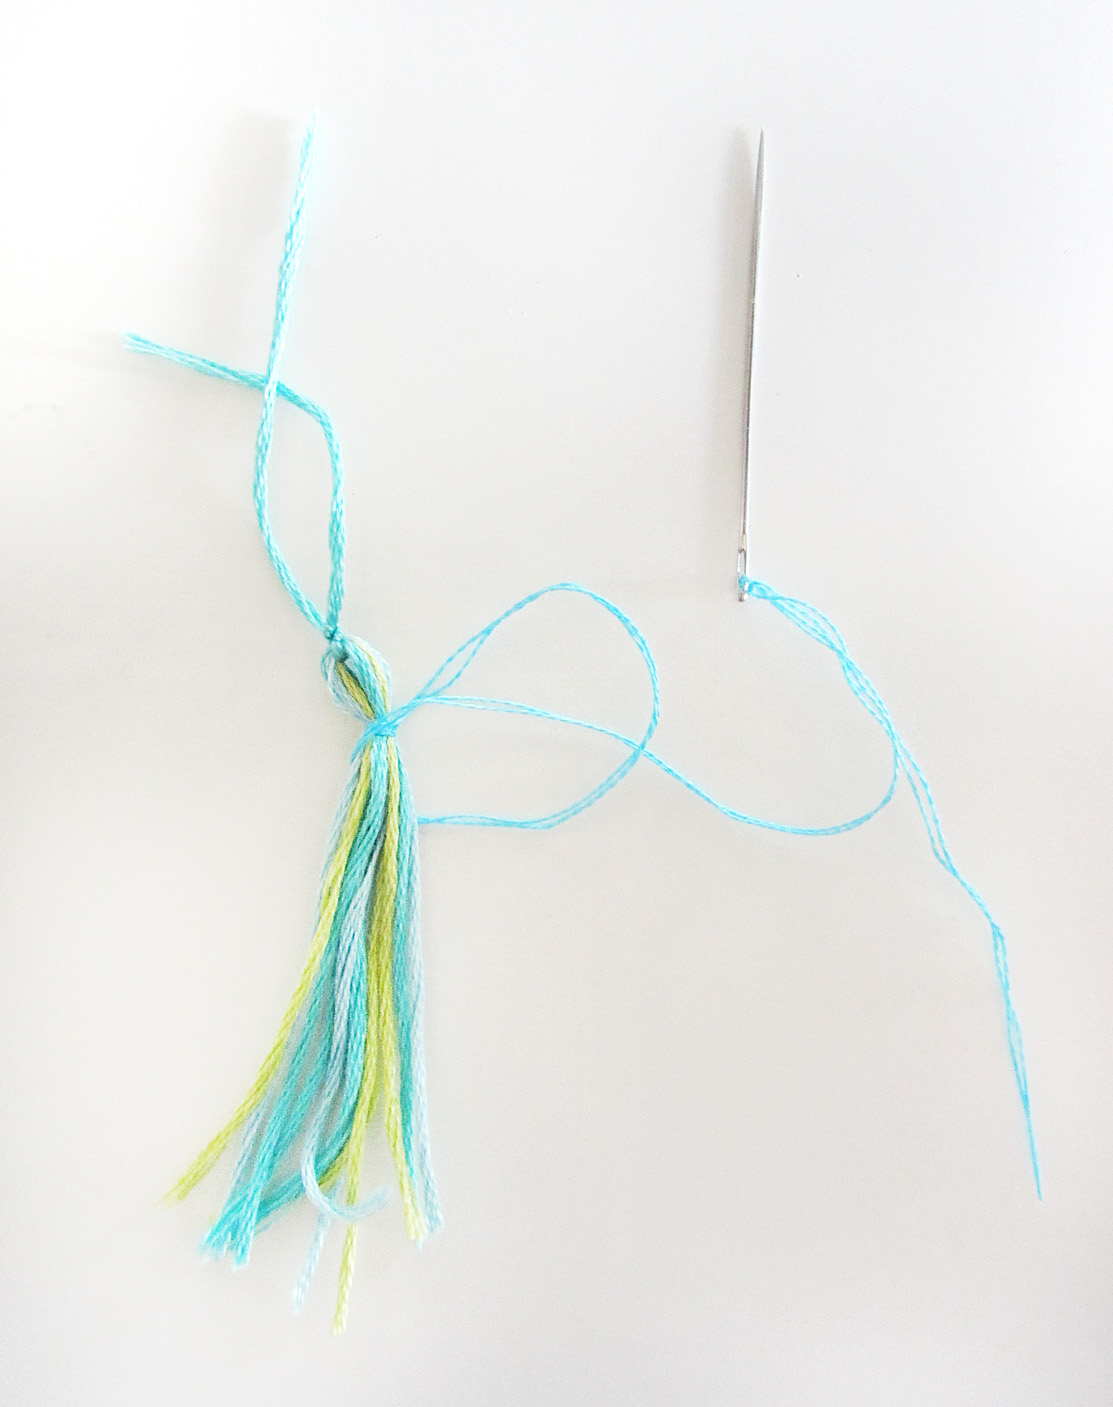
Color Change LEDs with Ropes: (All LED work is hand sewn with conductive thread.) I prepped the 4 “slow change” RGB LEDs for sewing. These are special LEDs from SparkFun that slowly cycle through different colors. When combined with fiber optic light rope (which lights up when LEDs shine into the ends), the effect is super cool!

Make the World's Best Robot Costume!
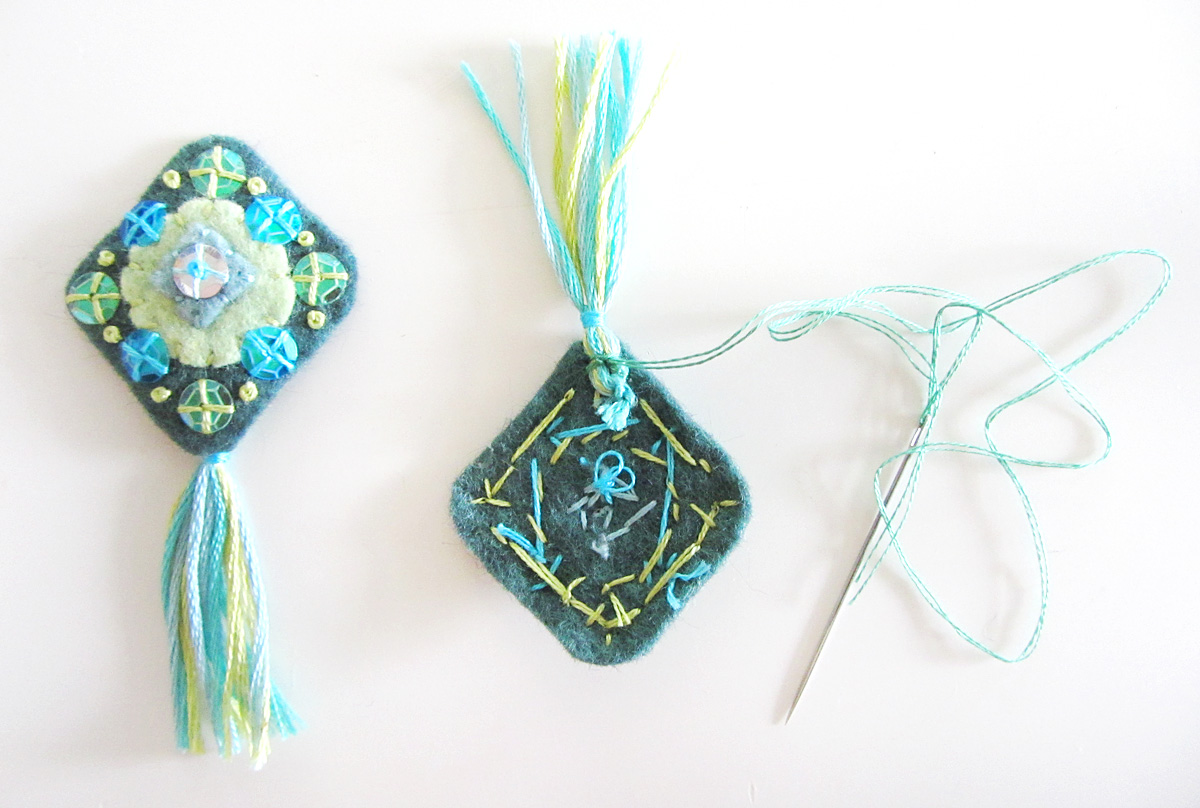
To sew my circuit, I positioned my battery holder in place on the back of my vinyl and taped across the center to hold it. I threaded my needle with conductive thread, knotted the end and made about 5 stitches on the positive side of the holder (you’ll see a plus on it). Following my circuit plan, I stitched the positive line around to the first LED. I flipped to the right side of the vinyl, then stitched several times through the positive loop of the first LED. I then stitched to the next LED and repeated until I had all the LEDs sewn down through their positive loops. I tied off my conductive thread and started a new one. I then repeated the whole process, starting on the negative side of the battery holder and working my way around to each LED, sewing through their negative loops. When both lines are complete, you can pop in a battery to test it. (Note that I had an older version of the circuit plans in these photos, but it is the same.)

 I sewed a strip of reflective tape in between the LEDs for a little extra flash.

Make the World's Best Robot Costume!
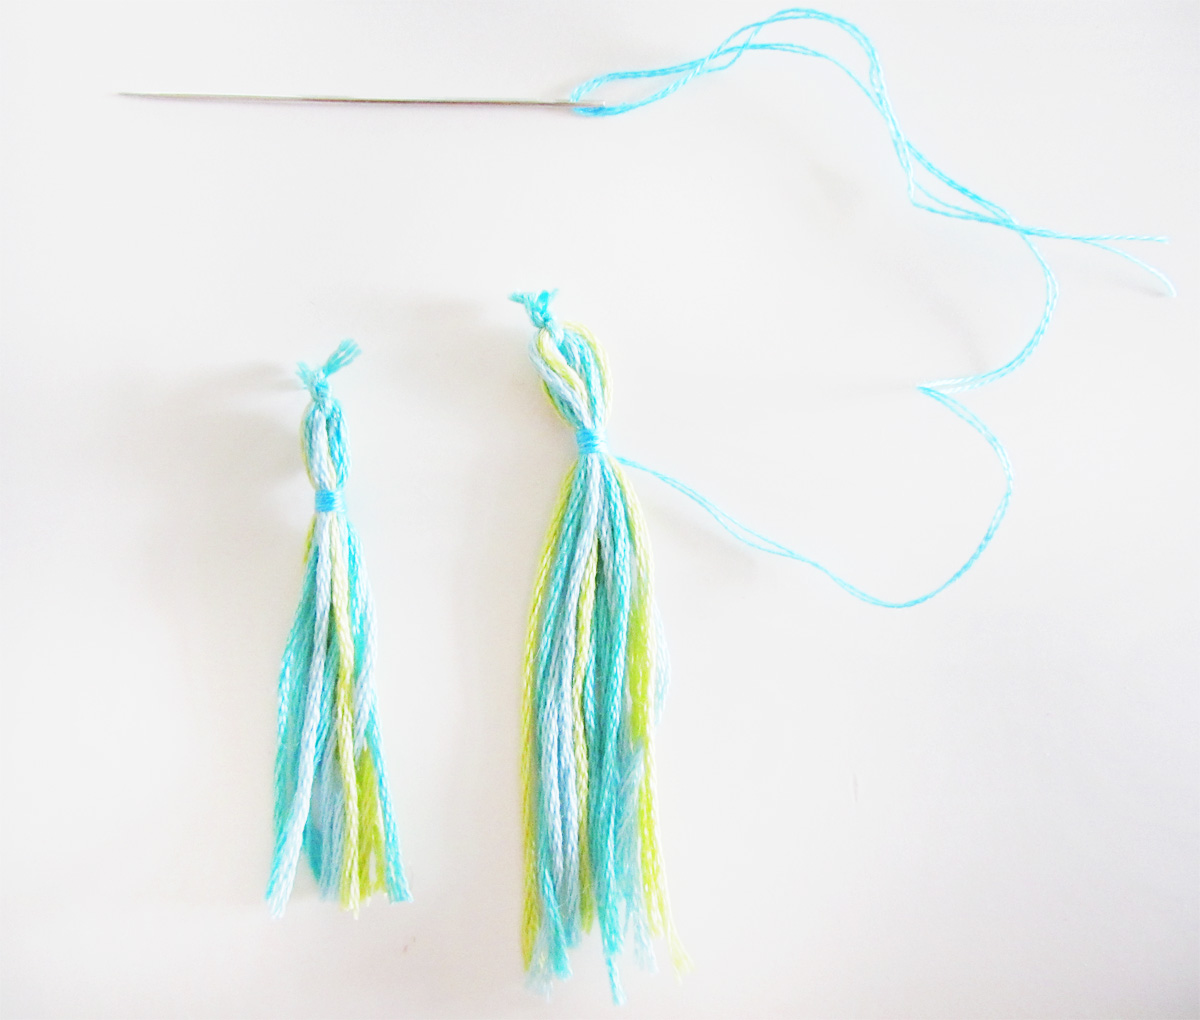
To make the “power tubes” glow, I started by sanding the surface of two lengths of light rope. Sanding the surface causes more light to “leak” out, which makes them look brighter. I cut one of my pieces a little longer than the other using sharp scissors so they could criss-cross. For each tube, I took one of the little drinking-straw-like connectors that come with glow bracelets. The perfectly fit my 5mm LEDs! I used 3mm light rope so it would be more flexible, so I couldn’t just still the rope into the connectors. I took Super Glue and put a pea-sized glob on each end, then stuck them into the connectors. I made sure they were at the angle they’d need to be when on the LEDs. After drying overnight, they were ready to stick onto the LEDs.

Make the World's Best Robot Costume!

Controller Button Pad

Supplies: circuit plans, 5mm Assorted Clear LEDs (8 Colors, Pack of 80), Coin Cell Battery Holder – 20mm SewableConductive Thread BobbinButton Pad 2×2 – LED CompatibleButton Pad 2×2 Top Bezel, 4 jewelry making head pins, 4 beads, reflective sew-in piping

Special Tools: round nose pliers, jeweller’s pliers, super glue, sand paper

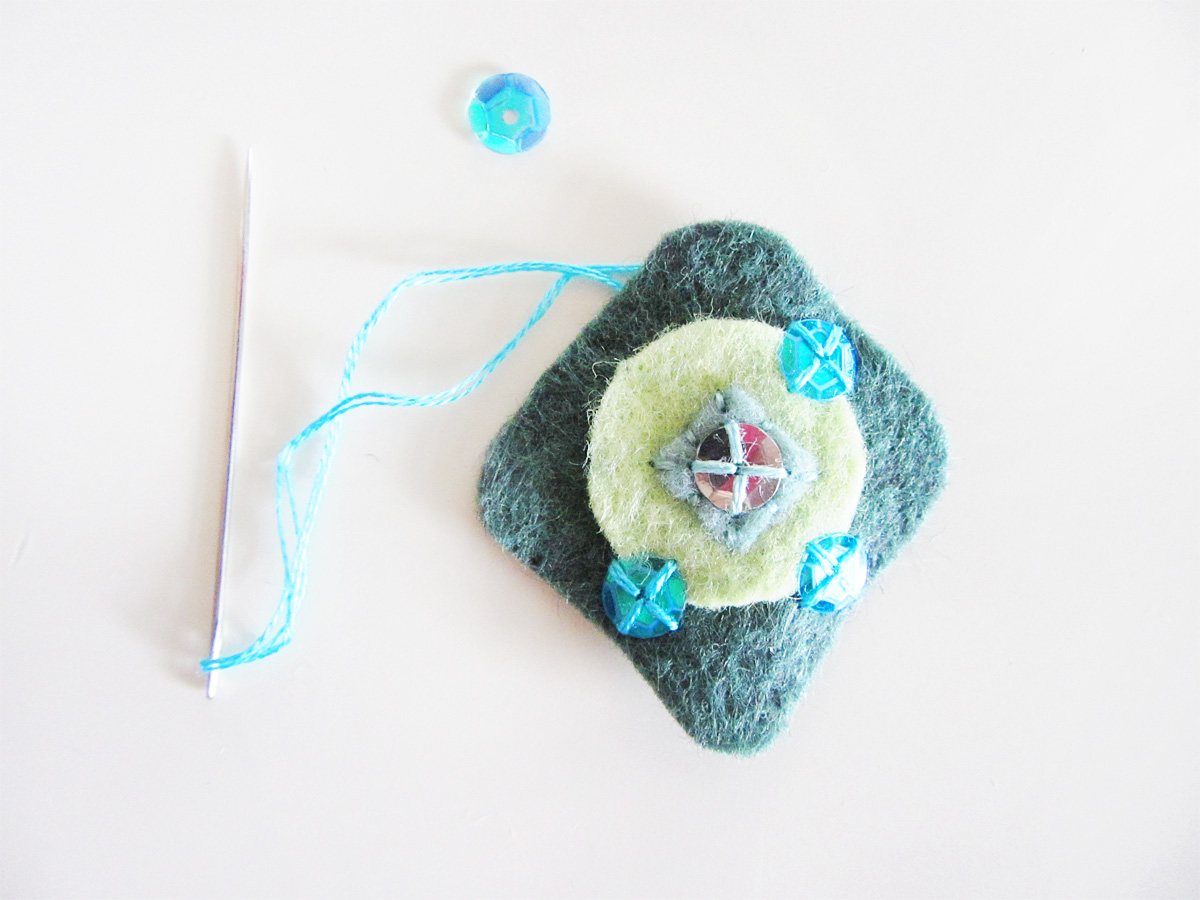
SparkFun sells so many great components to go along with LEDs. The majority are meant for traditional LED use, but I’m crafty – I knew I could adapt them! I absolutely had to have an LED button pad on Jaxbot. The button pads are molded white silicone with domes that go over the LEDs. Then you add the black plastic bezel over top (I skipped the bottom bezel.)

Make the World's Best Robot Costume!

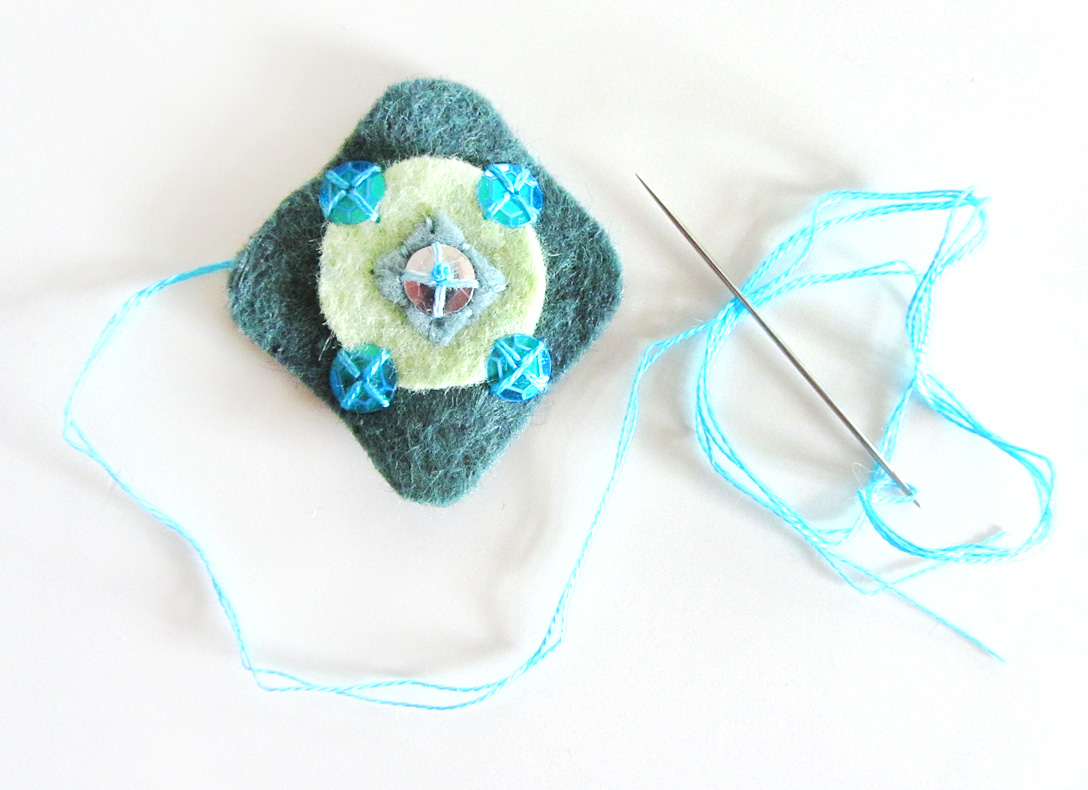
I first sewed the battery holder and LEDs in place according to my plan. This section shares a battery with the first half of the rainbow above, so I needed to stitch down a ways from it. You need to be fairly precise with the the LED placement so they fit into the button pad grid. Using ssss decorated with red beads, I attached the button pad to the vinyl through the 4 corner holes. I used a sew needle to punch a hole for the wire, then used jeweler’s pliers to bend the wires into a coil.

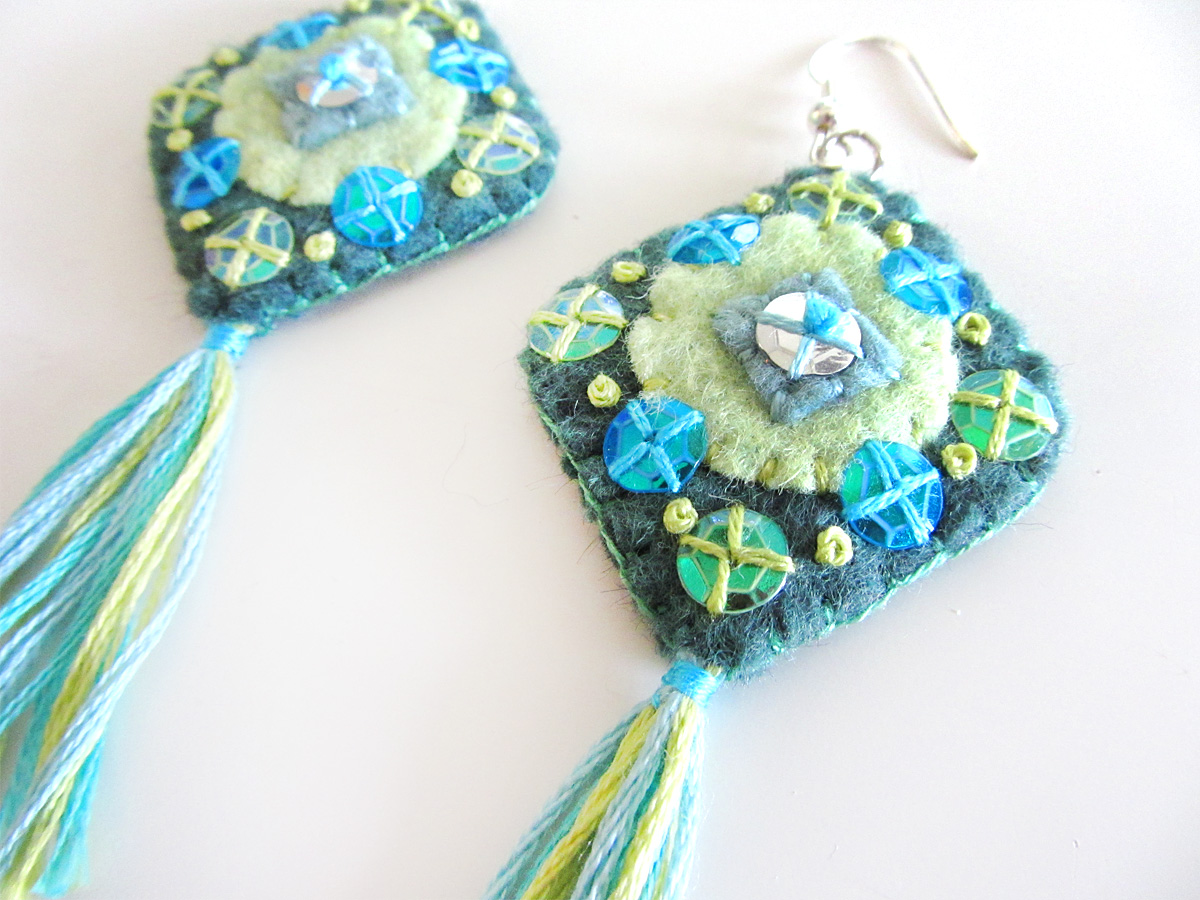
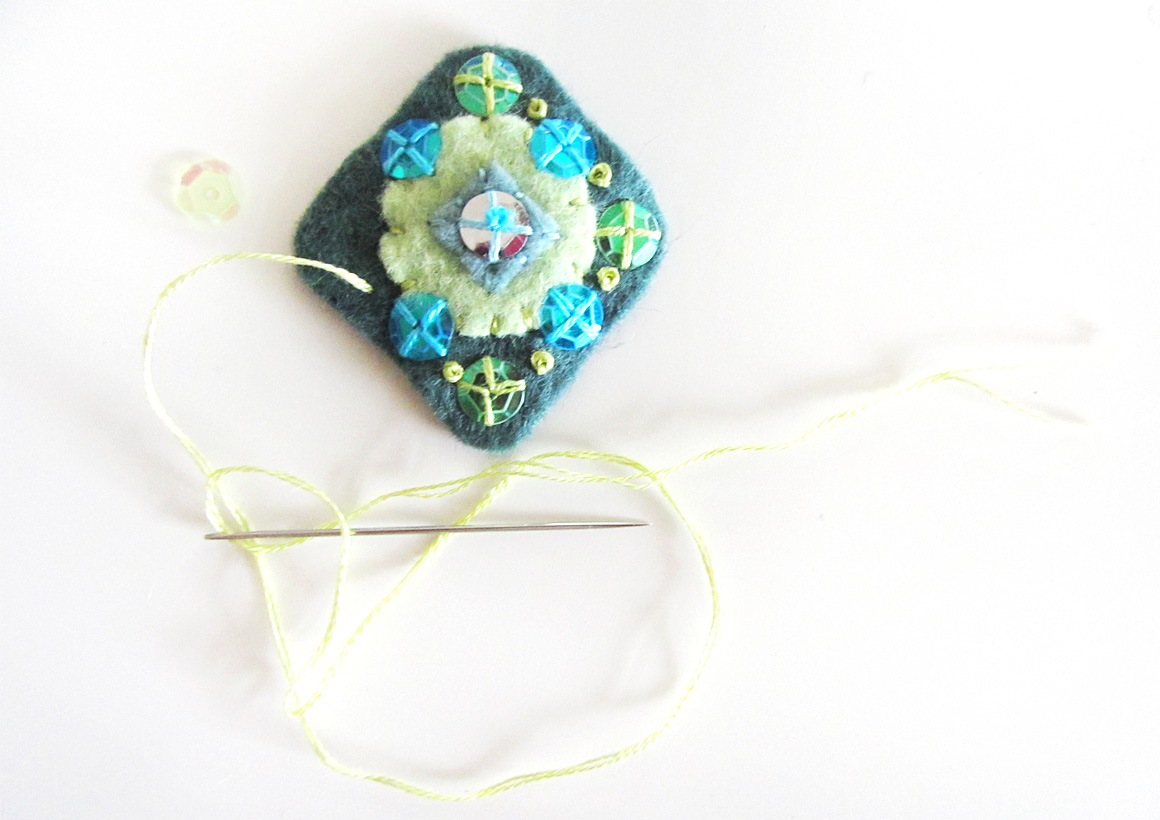
For a more finished look, I sewed some reflective piping around the edge of the button pad, tucking the seam allowance towards the pad to hide it.

Make the World's Best Robot Costume!

Rainbow Central Processing Unit

Supplies: circuit plans, 5mm Assorted Clear LEDs (8 Colors, Pack of 80), Coin Cell Battery Holder – 20mm SewableConductive Thread Bobbin, large heart sequin, nail polish

I had to include a rainbow since I had the right colors. Jax loves them! (There is an LED in the set that seems like it is violet. It is actually ultraviolet – think blacklight – and not as bright as the others. I used the pink instead.)

When sewing the LED circuits for the rainbow, you have to do them in two parts. The red, orange and yellow LEDs will become a second chain coming off of the button pad’s battery. You then need to start a new battery holder and LED chain for the green, blue and pink LEDs.

Make the World's Best Robot Costume!

Circuits are sewn, but ow, that green is bright!!

One thing you might notice if you scroll back up and look at the LED chart, is that the green’s millicandela (mcd) is higher than most of the others. The mcd is a measurement of the LED’s intensity. Woo, that green is painfully bright! I tried various things with the circuits, such as adding a resistor, but ultimately I called on my craftiness again.

Make the World's Best Robot Costume!

I grabbed to dark gray nail polish I’d just bought and coated the top 1/3 of the green LED with it. I thought for sure it would dim it too much, but it was perfect! (The LED set I got comes with 10 of each color, so it was easy to do some testing to see what worked. I started with a sheer glitter polish, but the very dark one was what I needed.)

Make the World's Best Robot Costume!

I sewed a large heart sequin (from the thrift store) under the rainbow.

Here is my circuit plan overlaid on top of a photo of my circuits. You can tell where my LEDs are by the thick clumps of stitching. You can also see the attachment points of the two knobs, which I will explain next.

Make the World's Best Robot Costume!

Volume Control and Power Level Adjustment Knobs

Supplies: Red Knob – 15x19mm (2), shank-back buttons (2), wire scraps

Special Tools: round nose pliers, super glue

The knobs I chose are red and smaller that you might guess. But they are adorable and just the right scale for Jaxbot. They also come in black. They are intended to be placed onto a post that has a screw hole in the side, so you can screw the knob on and the whole this rotates. I had to be crafty to get mine attached but still able to turn.

Make the World's Best Robot Costume!

I ended up digging through my button jar to find two shank-back buttons that were slightly smaller than the indent in the back of the knobs. I used super glue to attach them and let them dry overnight. Using sharp scissors, I cut a hole in my vinyl. Then I used a scrap of wire to hold them in place on the back side.

Communications Center

Supplies: scrolling LED name badge

I’m all about simple and inexpensive when possible. There was no way I’d be able to figure out programing my own LED display (though SparkFun certainly sells what you’d need!) I knew that LED name badges existed, so I started searching Amazon. When I found one for $10 from the same seller I was getting my LED equalizer (I’ll tell you about that soon!), I decided to try it despite the 1 star review. I always read product reviews, but that one’s only complaint was that it was hard to figure out.

Make the World's Best Robot Costume!

I was expecting instructions in broken English and a unit that took 2 weeks to figure out. I seriously understood it in a minute. Read my Amazon review at the link above for more details. This badge is held on by a magnet panel. I placed it between the knobs.

Details and Attachment

Supplies: printables, photo fabric, gray felt, red felt, silver pleather scraps, square sequins, reflective sew-in piping, wire scraps, seed beads, tiny red button

Special Tools: round nose pliers

Make the World's Best Robot Costume!

I added some details to the chest panel next: a row of square sequins; some felt gears with silver pleather circles sewn in the centers. Then I hand stitched some reflective piping around the whole edge. Using my sewing machine, I sewed two tall, skinny clear vinyl pockets for glow bracelets, leaving enough room for the control panel to be in the middle.

Make the World's Best Robot Costume!

Final placement of the panel and Dial. Everything in the dark. Everything in a flash/headlights.

Make the World's Best Robot Costume!I printed out the printables onto photo fabric then cut out the front dial with a 0.5″ seam allowance. I added a layer of white felt behind the photo fabric before folding back the seam allowance. This gives it dimension and keeps you from seeing the folds through the fabric. I folded under the allowance and pinned the dial in place with a strip of reflective piping along the curve. I hand stitched along the curve to sew it to the chest.

I then laid the control panel in place at the bottom of the dial, and hand stitched along its piping on the top edge to attach it to the chest as a big flap. You need to be able to get to the back side of the panel to insert batteries, so I added 4 sew-on snaps to hold it in place (bottom corners and one on each side.)

Make the World's Best Robot Costume!

To make the dial’s needle, I made a loop at the end of a piece of wire, then loaded it up with red seed beads. When it was nearly long enough, I made another loop to hold the beads in place. I then placed it on the dial and sewed a button on, making my stitches all go through the bottom loop of the dial needle. This lets the needle turn. You may want to curve it in towards the chest a bit so it doesn’t flop down.

Midpoint Illumination Band

Supplies: LED shoelaces (only used one of them)

Also known as the glow belt! When I saw LED shoelaces in Target’s Dollar Spot, I grabbed a pair in red. I wasn’t sure what I would do with them, but they are basically a cheaper version of fiber optic light rope. If you can’t find them at Target, amazon has similar items.

I turned one of the shoelaces into a belt. It was just the right size! I just had to find the point on the A-line shirt that it was a perfect fit. Then I made little stitches around the tubing to hold it in place. The little power unit is not actually attached to the shirt. It is held in place by the tubes, but you can also pop it off to change the battery.

Audio Input Visualizer

Supplies: LED sound-activated equalizer panel, black elastic scrap, red fleece scrap

I definitely wanted the back of Jaxbot to light up, but I didn’t want to have to wire LEDs on both sides. I knew I’d seen sound-activated LED t-shirts before, so I did some hunting. It turns out, you can purchase the LED panels separately from the shirts for $7! It does need you need music or noise to have the panel light up. I plan to load my phone up with robotic songs and keep a custom Jaxbot soundtrack going as we trick-or-treat. Loud voices can trigger it as well.

Make the World's Best Robot Costume!

There isn’t a lot you need to do to the panel. You do need to make sure you plug it in correctly. The plug isn’t labeled and if you do it upside-down it with light up oddly. It comes with sticky Velcro (ugh, always annoying!) that you can press in place. I found it didn’t stick that great, so I spent an uncomfortable hour stitching mine down with an old needle. I threw the needle out afterwards, as it was all sticky. You may want to ditch their Velcro and use the sew-on kind (loop side). I added some black felt scraps to fill in the corners of the panel area, then surrounded it with reflective piping.

Make the World's Best Robot Costume!

I cut a slit in the tunic and fed the cord through. I basted a scrap of fleece inside so I could keep the excess cord neat and out of Jax’s way. I clipped the sensor unit to the back collar and added some elastic to keep it from flopping.

Fuel Cells

Supplies: printables, glow braid, clear vinyl, glow tubes (red and blue)

Make the World's Best Robot Costume!

To decorate one side panel of the body, I machine sewed a clear vinyl pocket with a divider in the center. I made the two sections large enough to hold standard glow stick tubes. I took the “fuel cell” printable and stitched over the letters with glow-in-the-dark braid.

Make the World's Best Robot Costume!

You could leave your printout as-is, but I was running out of yellow ink and mine printed too dark. I stitched the label in place above the pockets. When we put the costume on, I activate two glow tubes to act as our fuel cells!

Make the World's Best Robot Costume!

Fuel Gauge

Supplies: printables, photo fabric, reflective sew-in piping, white felt, wire scraps, seed beads, tiny red button

Special Tools: round nose pliers

This gauge is made the same way as the one above the control panel, except you add the reflective piping all the way around. I added a layer of white felt behind the photo fabric before folding back the seam allowance. Then I sewed it down with reflective piping, beaded a gauge needle and sewing it on with a button.

Make the World's Best Robot Costume!

Head Encasement Unit

Supplies: printables, dm red anti pill fleece (~ 0.5 yd.), silver pleather (~ 1.5 yd.), batting (~ 1 yd., from stash), gray textured vinyl scraps, mesh tubing, red pompom, large circle sequins (2), reflective sew-in piping (2 packs), photo fabric, red felt, gray felt, pipe cleaner, glow bracelet, sew-on snaps (4), 5mm Assorted Clear LEDs (8 Colors, Pack of 80), Coin Cell Battery Holder – 20mm SewableConductive Thread Bobbin, helmet circuit plans

Make the World's Best Robot Costume!

That’s the helmet! I didn’t use a pattern for this. I took basic measurements of how long and wide the top of Jax’s head is, then cut a rounded-corner rectangle slightly larger than that. I cut 1 layer of silver pleather, 2 layers of batting and 1 layer of red fleece. I zigzag stitched all the way around the layers.

Make the World's Best Robot Costume!

I then used a sewing measuring tape to measure the circumference of the of the helmet top (add 1″ for seam allowance) and the height of the distance from the top of Jax’s head to his shoulders (add 1″ for seam allowance) I cut this long rectangle out of 1 layer of silver pleather and 1 layer of red fleece. With right sides facing, I sewed along one of the long sides. I turned it the right way and top stitched along the hem. I then sewed it into a tube, making the fleece the inside, and then sewed the tube to the helmet top.

Make the World's Best Robot Costume!

I cut my face hole afterwards. I used the same rounded rectangle as the top of his helmet. Try making the shape out of paper and holding it up to your child’s face first. Once I cut it, I carefully folded in both layers of the hole’s edge, layering reflective piping between them. I machine sewed it in place, but hand sewing might be easier. It was slow and awkward, and I had to go back and hand stitch some places.

On the right side of the helmet, I sewed two large round sequins, A loop of mesh tubing and a red felt gear with a silver pleather center.

Make the World's Best Robot Costume!

On the left side of the helmet, I sewed down the dark gauge with the edges folded under. I didn’t line that one. I cut a length of mesh tubing long enough for a glow bracelet and sewed the top end to the helmet.

Make the World's Best Robot Costume!

I cut two squares of gray felt and cut a hole in the center, large enough for a glow stick to fit through. Then I cut a strip of felt to be a cover over the hole and sewed all around the edges to hole it together. I sewed the other end of the mesh tubing to the top of the felt square (the side without the cover) and sewed four snaps to the bottom. I figured out where I wanted the tube to be positioned and sewed down the other half of the 4 snaps. You’ll have to sacrifice a glow bracelet to get the positioning just right, so be sure you have an extra.

To make the antennae, I folded a pipe cleaner in half and sewed a casing of silver pleather around it. at the top, I sewed on a pompom. I cut out a circle of gray vinyl and made a hole in the center for the antennae. I put the antennae through the hole, sewed the end to the center of the helmet and then sewed down the vinyl circle.

Make the World's Best Robot Costume!

Helmet Circuitry: The helmet circuitry is hard to draw because at one point the lines go up either side of the antennae to an LED sitting on the pompom. Take a close at both the helmet circuit plans and the perspective view above.

I’ll try to explain best I can. I placed the battery holder just outside the gray circle towards the back of the helmet. I sewed the positive side of the holder down with several stitches, then stitched a line out and over to the antennae. On the back side of the antennae, I sewed a line of stitching up to the pompom. Make sure you only go through that side of the pleather so the folded pipe cleaner acts as a barrier between the circuits on each side of the antennae. I brought the positive thread up through the pom pom about 1/3 of the way in from the far side of it and made a few stitches. You can’t stitch super securely on a pom pom, so I tied off and put some Fray check on the stitching. I started another conductive thread and connected it to the positive line at the base of the antennae. I stitched around to the front in an arc and the straight out to the front of the helmet. I stitched through the round positive coil of the orange LED then stitched over to the yellow and did the same. I then stitched back to the orange over top of the stitches I’d just made. It’s fine because it is the same circuit. I continued my stitched out to the red LED, stitching through its round positive coil and tying off.

I started the negative line by stitching several times in the negative side of the battery holder. I stitched out in an arch to the front side of the base of the antennae, making sure to stop before reaching the positive line. I stitched up the antennae along the front side the same way as the positive line, this time attaching the negative side of the LED. I started a new conductive thread and linked it to the negative line at the front base of the antennae. I stitched out parallel to the positive line and then went around the outside of the LEDs as shown, sewing in each of their square negative coils.

I hope that made sense!

And now you should have…

The World’s Best Robot Costume!

Make the World's Best Robot Costume!

Final Shopping List

Joann’s Fabric

Amazon.com

SparkFun.com

American Felt & Craft

Target

Dollar Store

  • yellow glow bracelets (3)
  • glow tubes (red and blue)

Unknown/Already Owned

  • silver rope trim (unknown, from stash)
  • jewelry making pliers (round and flat)
  • large heart sequin
  • large circle sequins (2)
  • red pompom
  • pipe cleaner
  • shank-back buttons
  • black elastic scrap
  • red seed beads
  • tiny red buttons (2)
  • jewelry making head pins (4) and wire (2 scraps)
  • glow braid

What do you think of Jaxbot 3000? Do you think you are up for the challenge of sewing your own? I’d love to see photos of your little one’s home made costume. Stop by my Facebook page and post a photo to our wall, or tag me in an Instagram photo @iolstephanie.
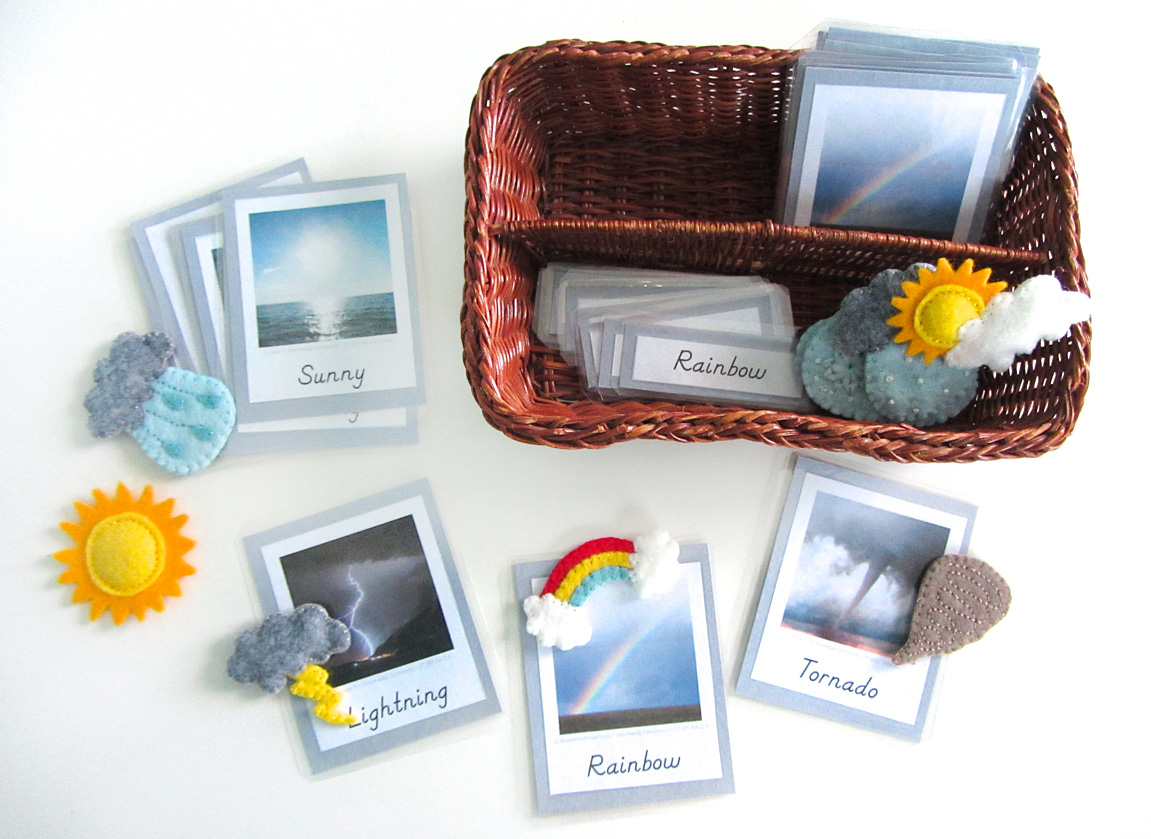
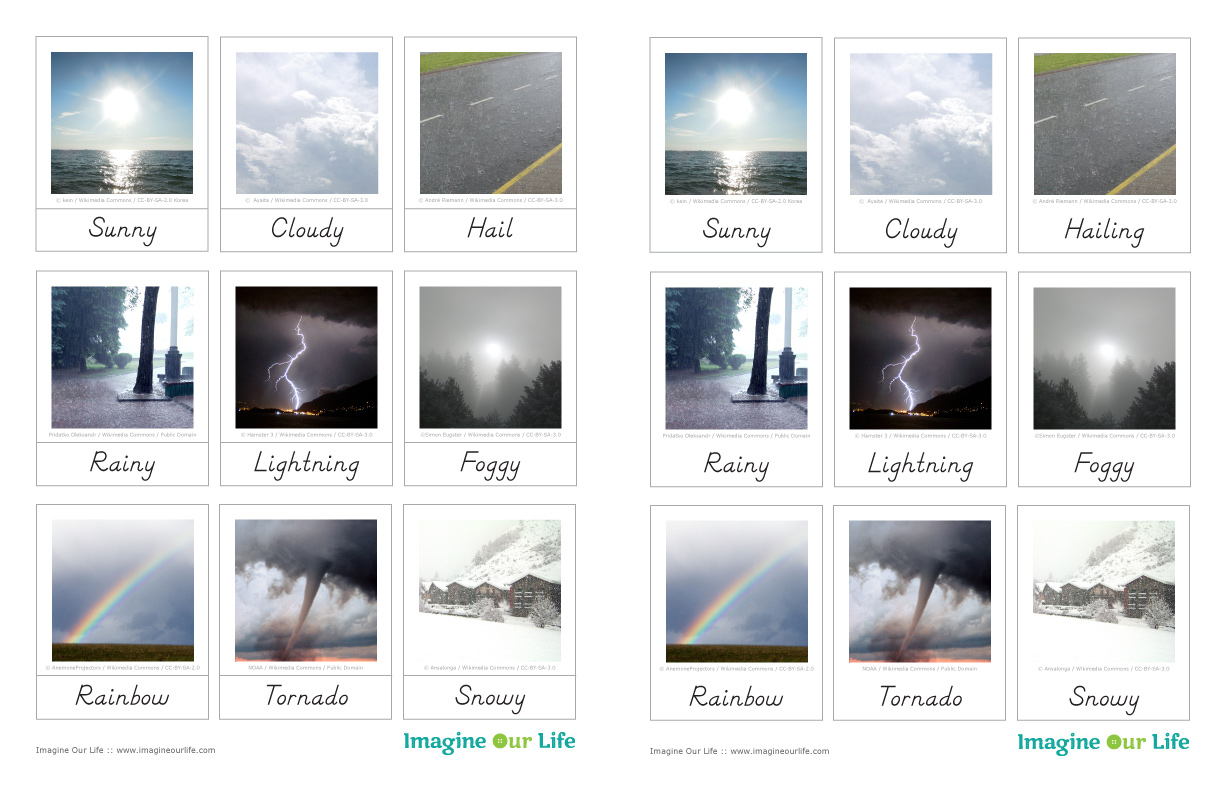
Make the World's Best Robot Costume!