Marie-Claire is a momma of twin boys, a graphic designer, the owner of SO Awesome, and the creator of Children’s Wallet Cards. You’ll remember her from our post and giveaway last September. Her wallet cards have so many uses and fit well into your Montessori and homeschool supplies.
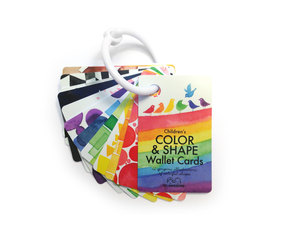
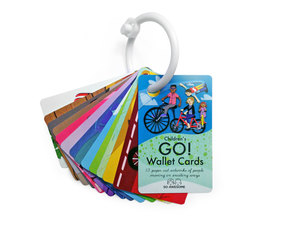
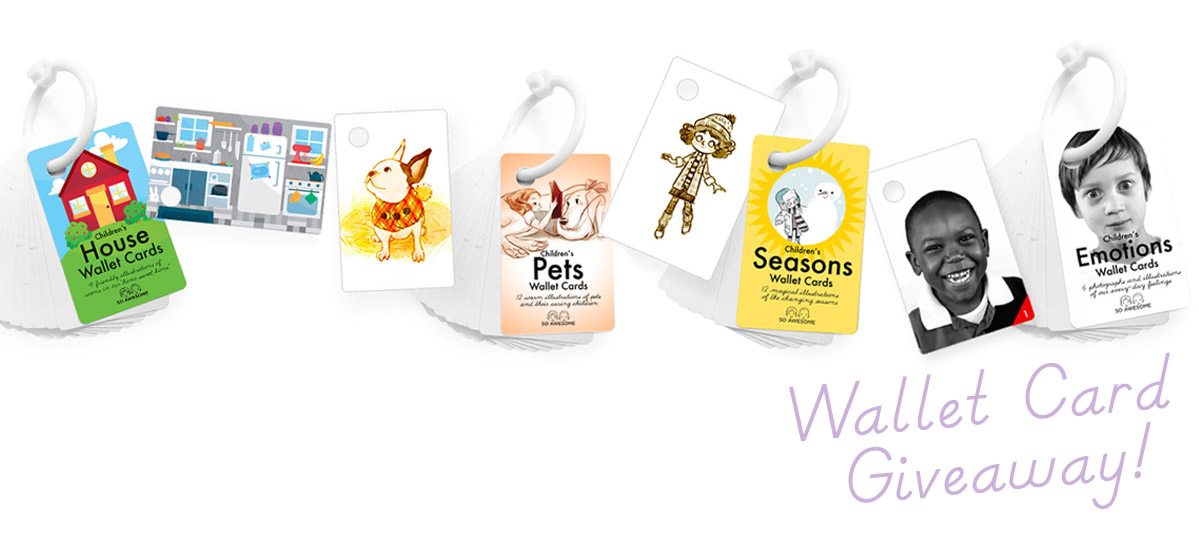
She’s at it again seeking micro-funding from moms and homeschoolers like you on Kickstarter. She has four new sets in development, Emotions, Seasons, House and Pets.
Funding pledges start at just $1. Kickstarter is all-or-nothing funding for creative products, supporting new projects is quick and easy. The campaign is open until April 29, 11 am EST.
So Awesome’s alphabet deck from their previous Kickstarter campaign.
Giveaway
SO Awesome has generously offered a $100 store credit to the winner of this random giveaway. To enter, visit SO Awesome’s Kickstarter page, then leave a comment here letting us know what your favorite new deck is. Then use the Rafflecopter widget below to let us know you’ve commented (email address or Facebook required). There are bonus entries available to anyone who enters. The lucky winner will be randomly chosen on April 29, 2015.
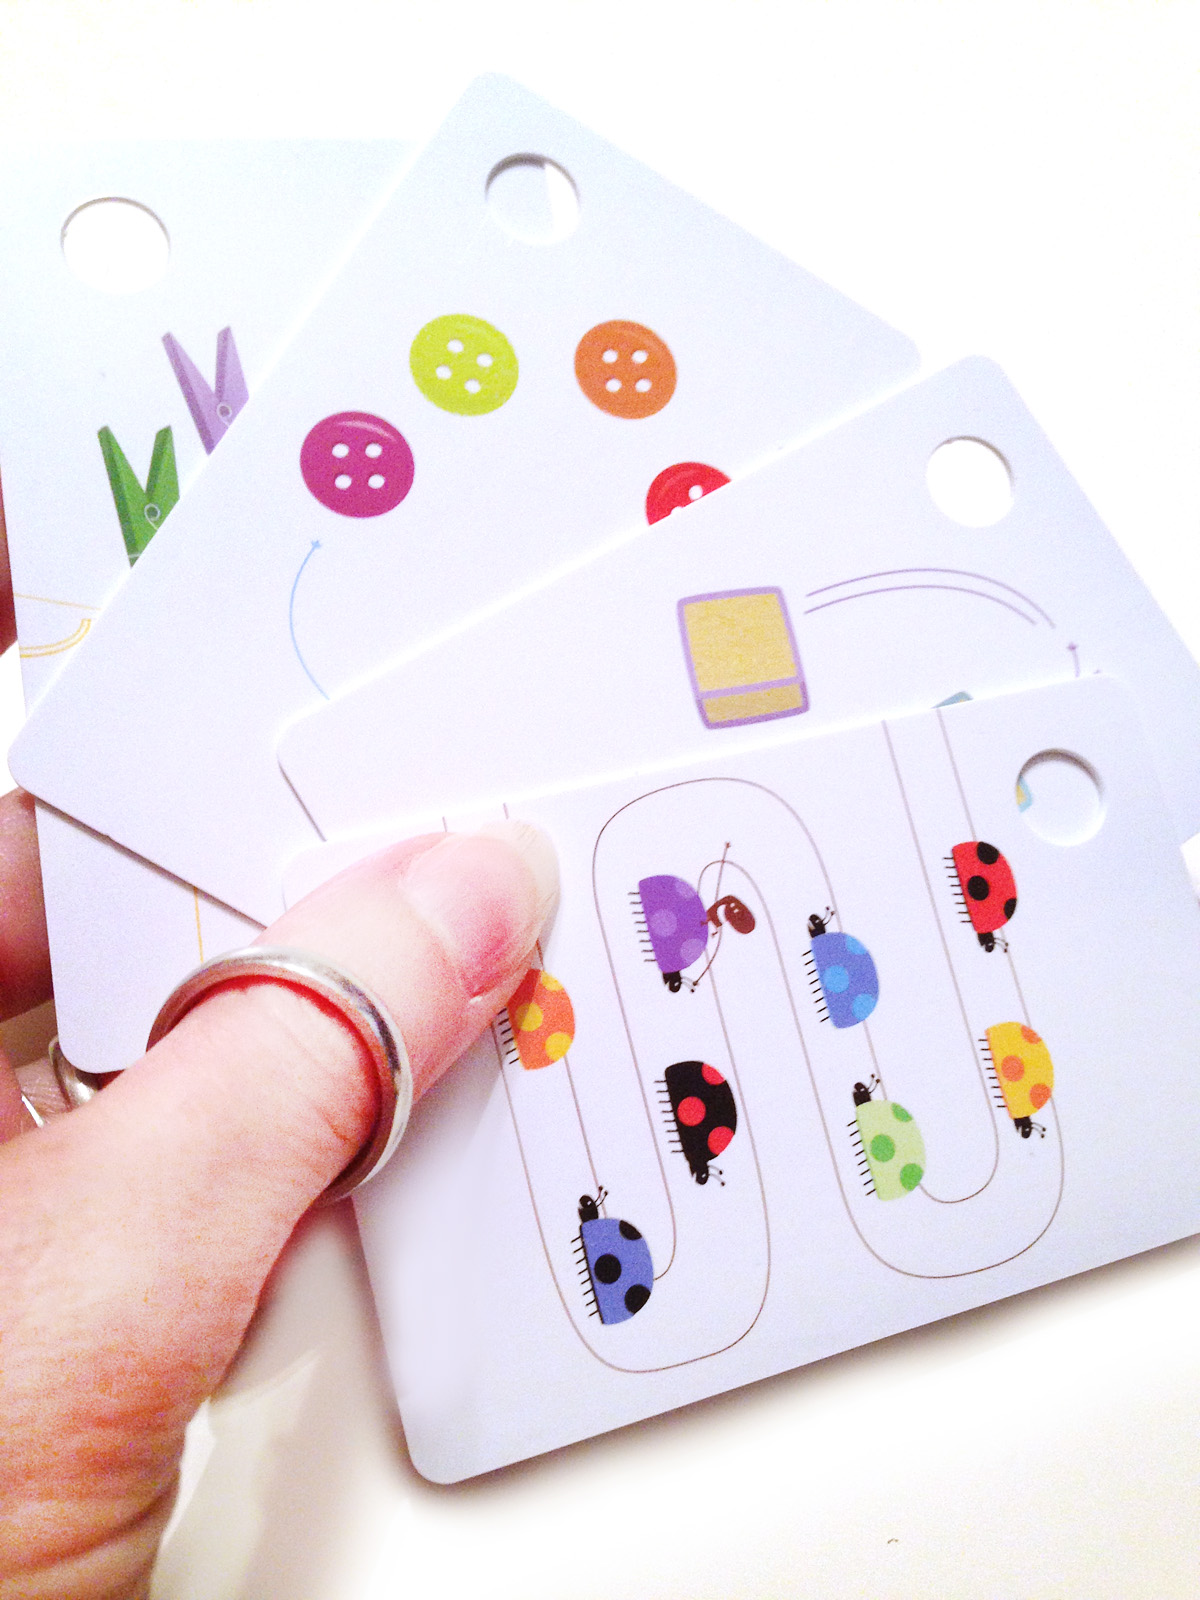
SO Awesome offers gorgeous, educational, non-toxic, extremely durable card sets designed for how kids play and work. Montessori-inspired. Made in the USA. Their cards are perfect to engage children in carseats, strollers, shopping carts, and long airplane rides.
Graphic Designer and mother Marie-Claire Camp created the durable, non-toxic card sets for her twin boys. Using the crowdsource-funding site Kickstarter, Marie-Claire produced five sets of cards and an companion iOS app.
When Marie-Claire of SO Awesome reached out to us about trying out a few of her wallet card sets, Jax was so excited! He’s been enjoying their free iOS wallet app for some time, and immediately recognized their colorful, modern style.
My love of all things Montessori is well known, but what you may not know is that I am a graphic designer and have a BA in studio art. Combine beautiful art with Montessori-inspired educational materials and I’m in heaven! SO Awesome teams up with talented illustrators to create their card sets, so each one is a treasure.
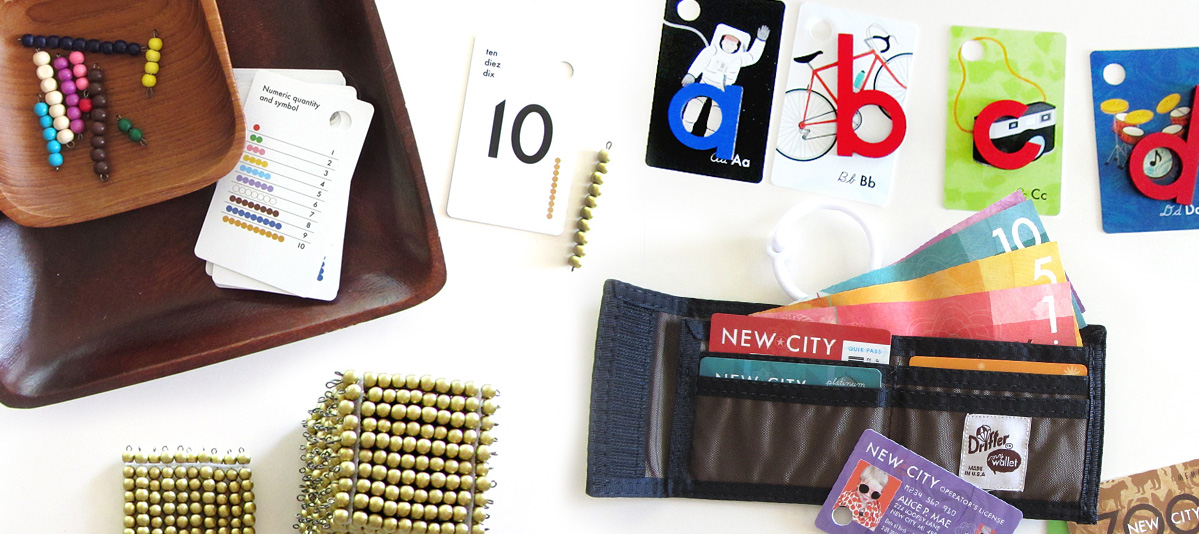
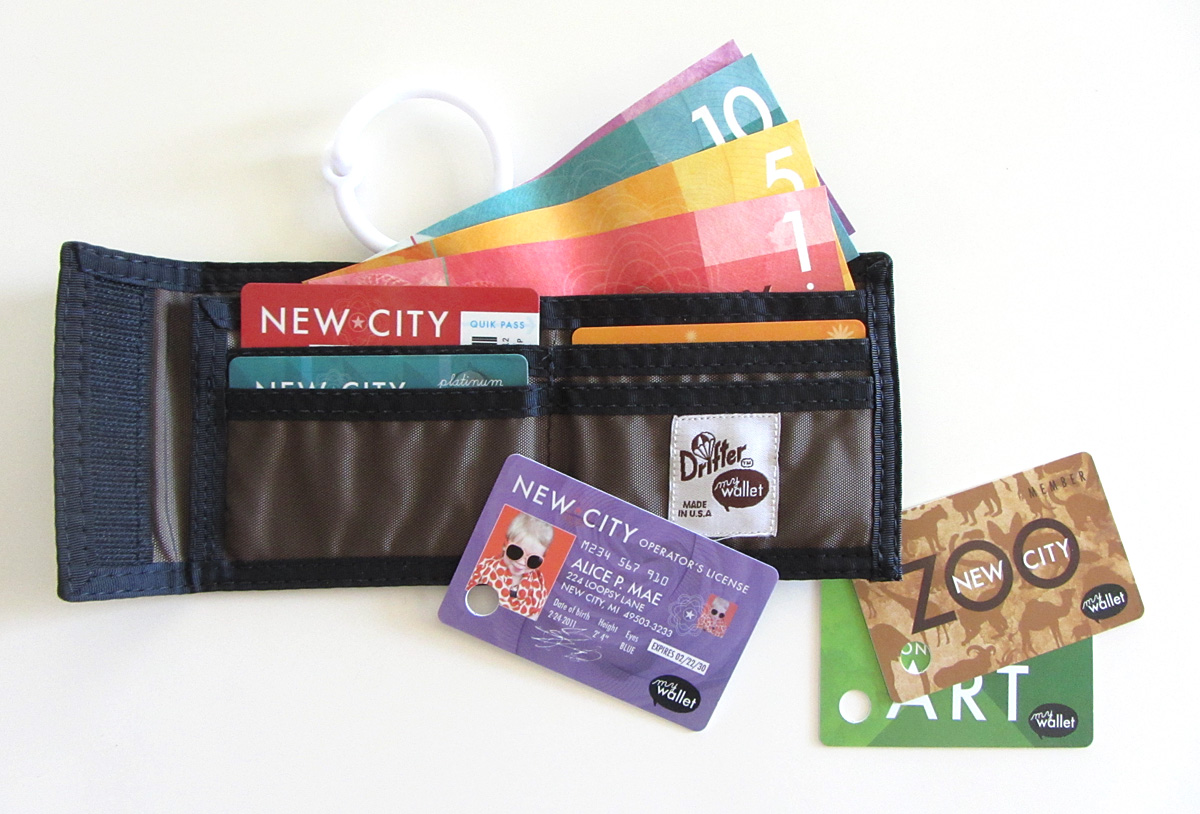
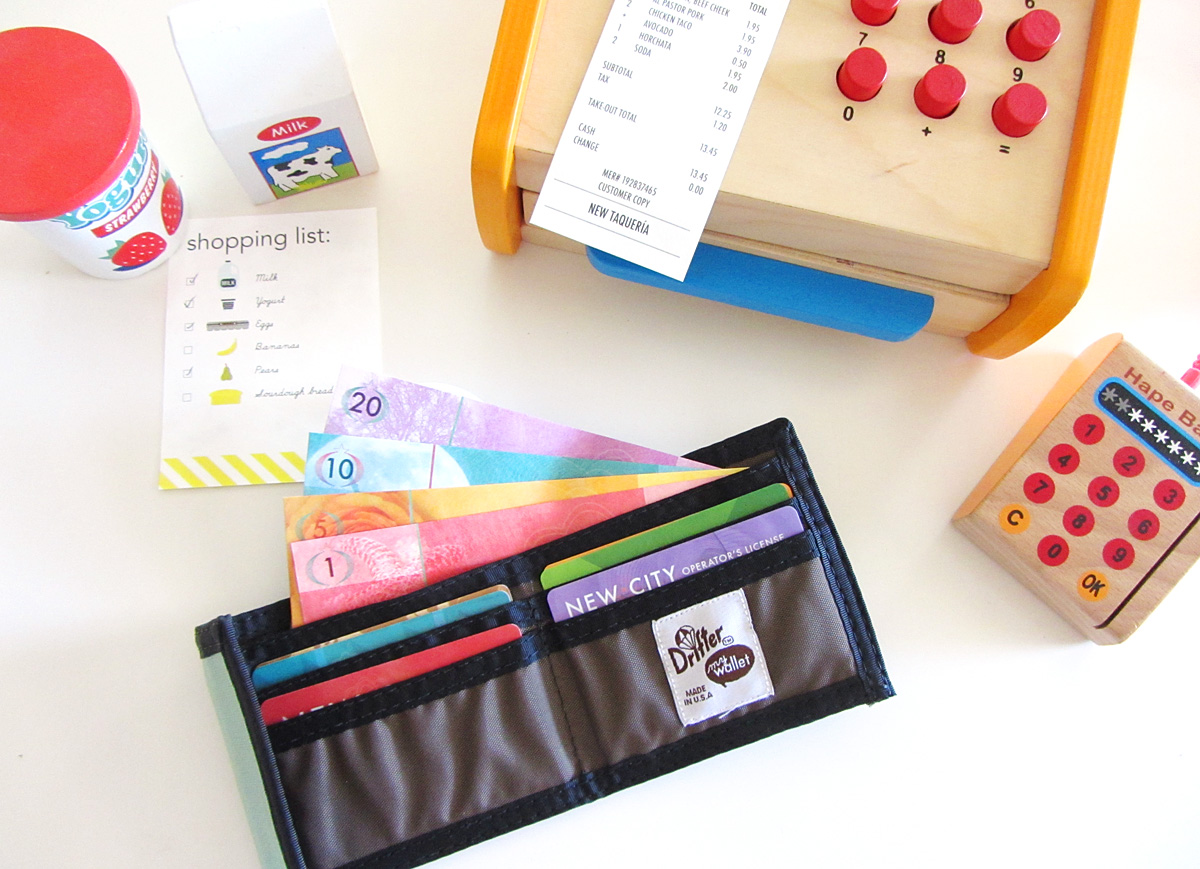
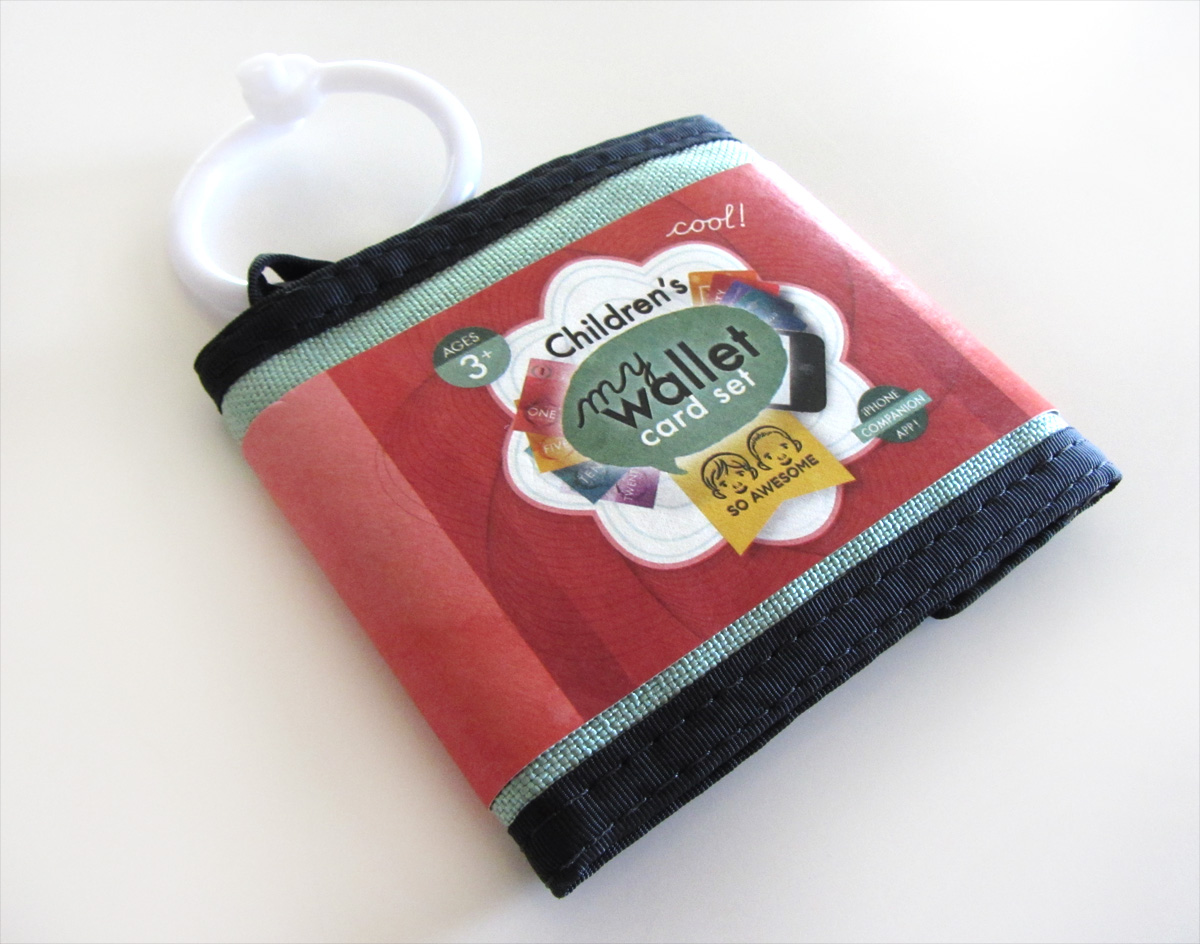
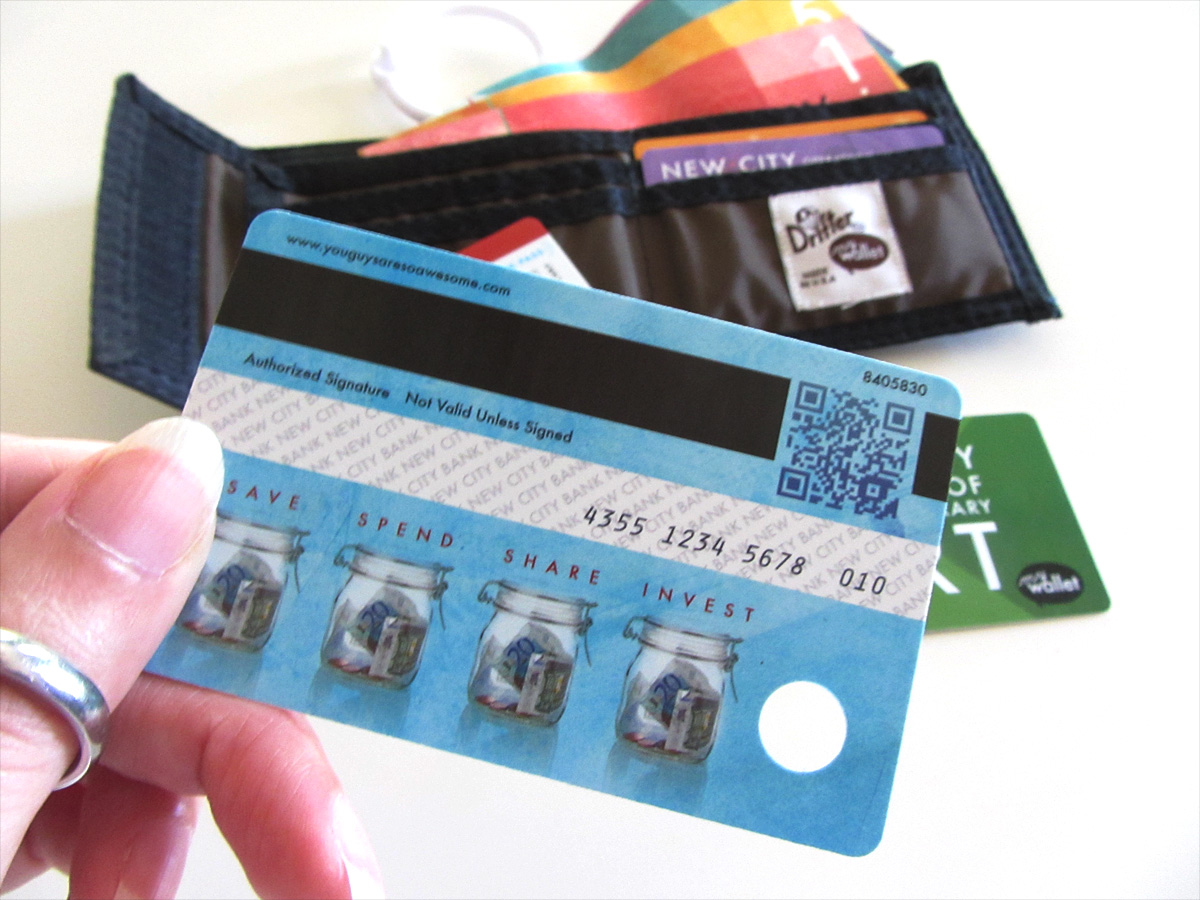
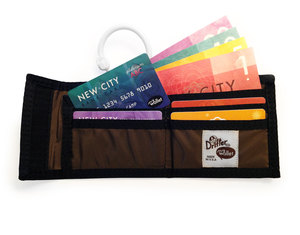
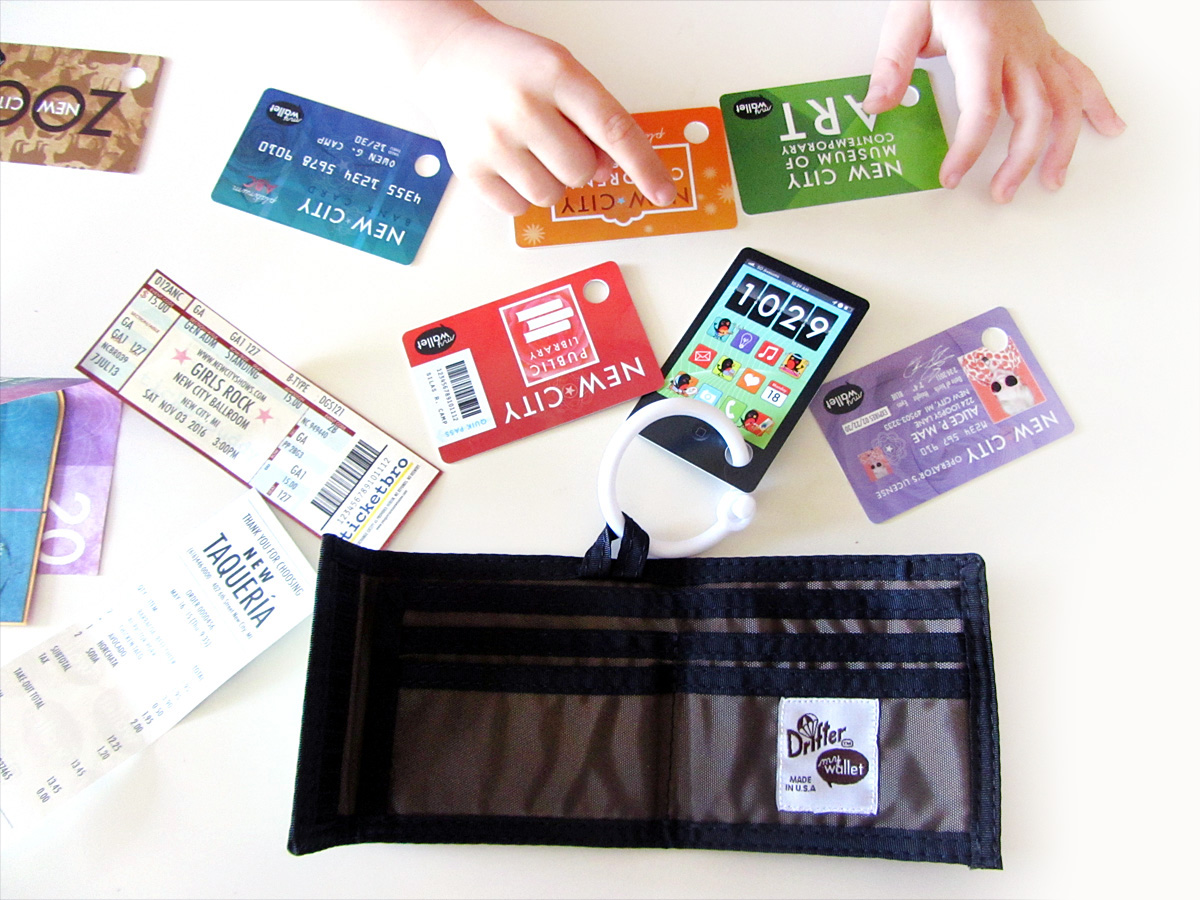
My Wallet Card Set
If you come over to our house for a playdate, one of the first things Jax will ask you to play is “store”. We have a beautiful wooden store set, and Jax is finally old enough to have play money. This wallet play set is a perfect addition to our role playing and pretend play.
The wallet comes with play money, membership and bank cards – even a license! (To see what is included, click here.) At the moment, we are playing with this at home, but how great would it be to toss in your bag to bring along for a toddler to take apart – instead of YOUR wallet?
The cards all have reverse sides to explore and realistic details. If I could add anything, it would be a personalized license with Jax’s name and photo. But perhaps that would be a fun DIY project for us to do together.
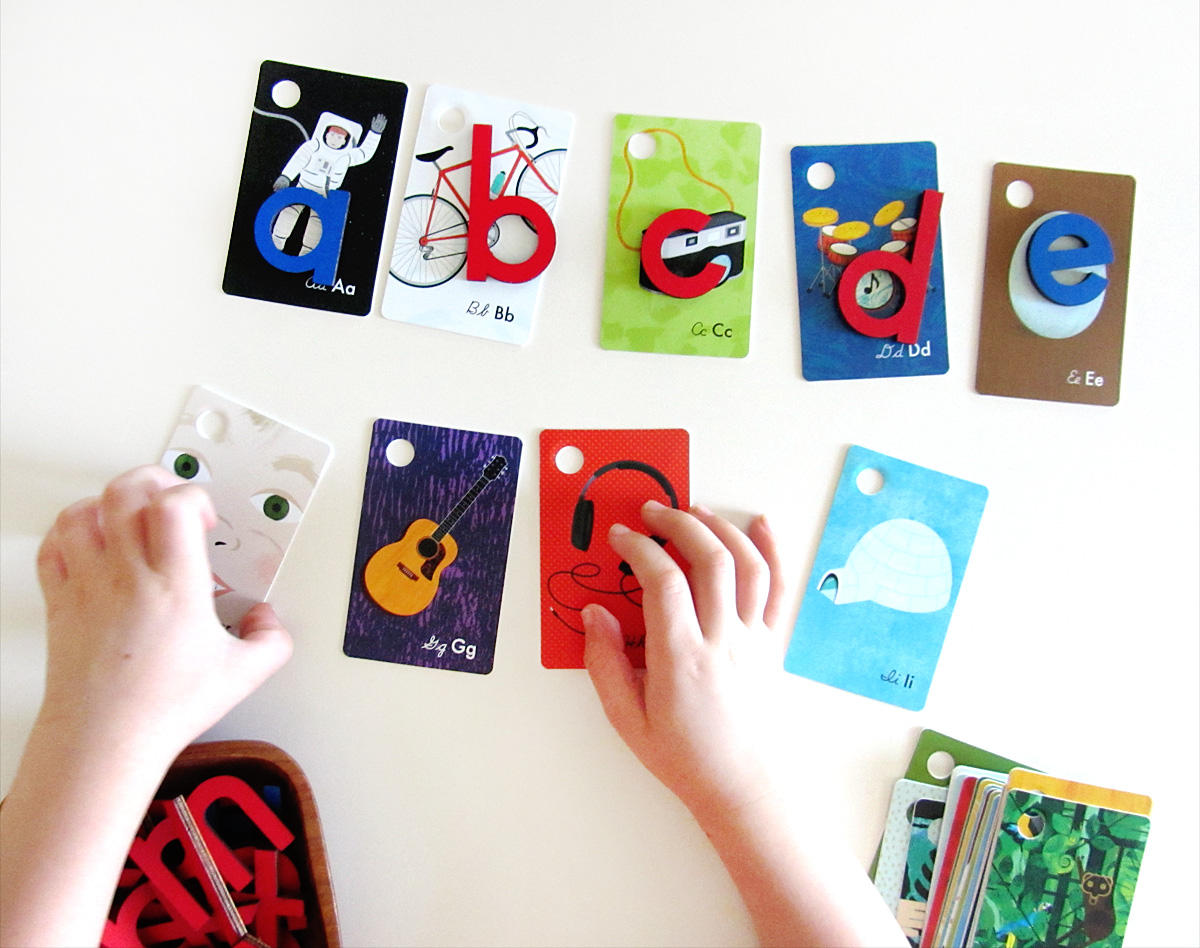
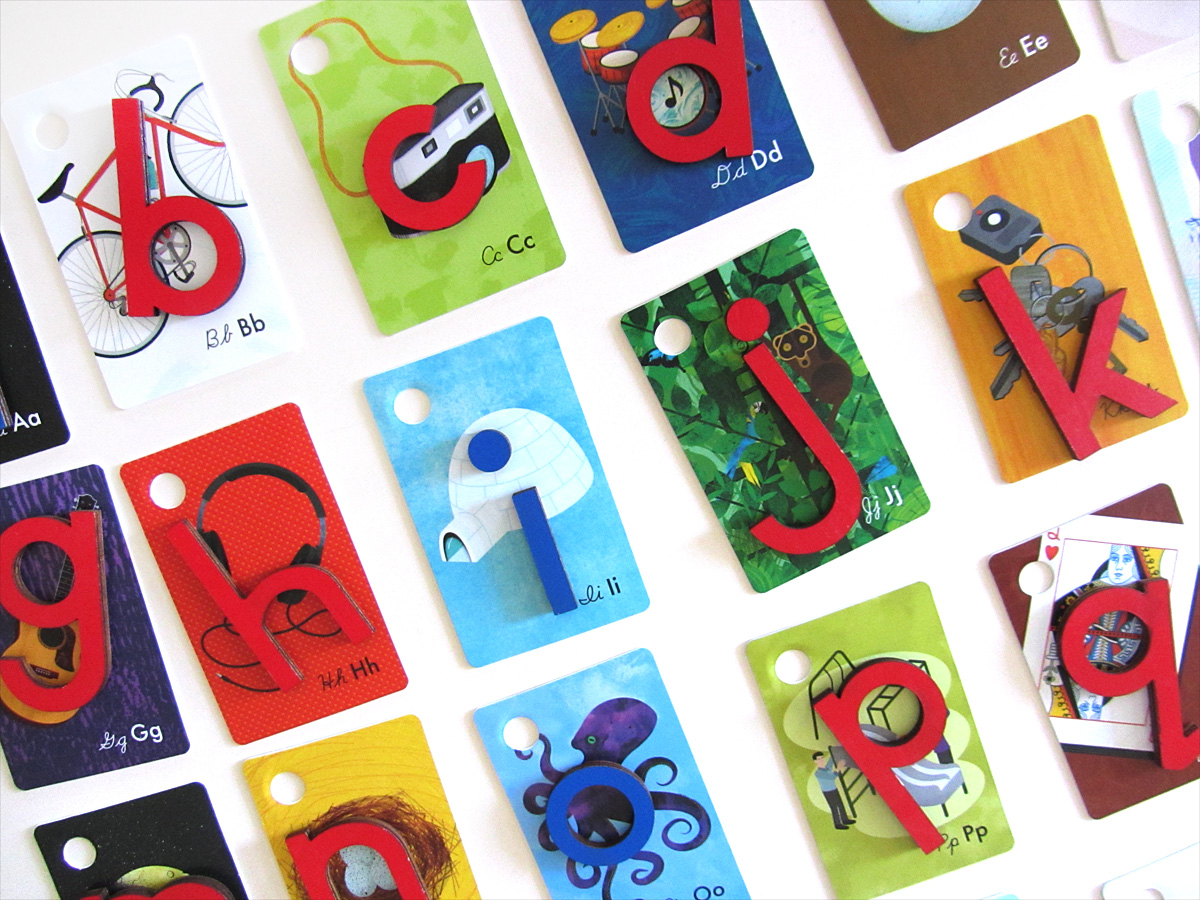
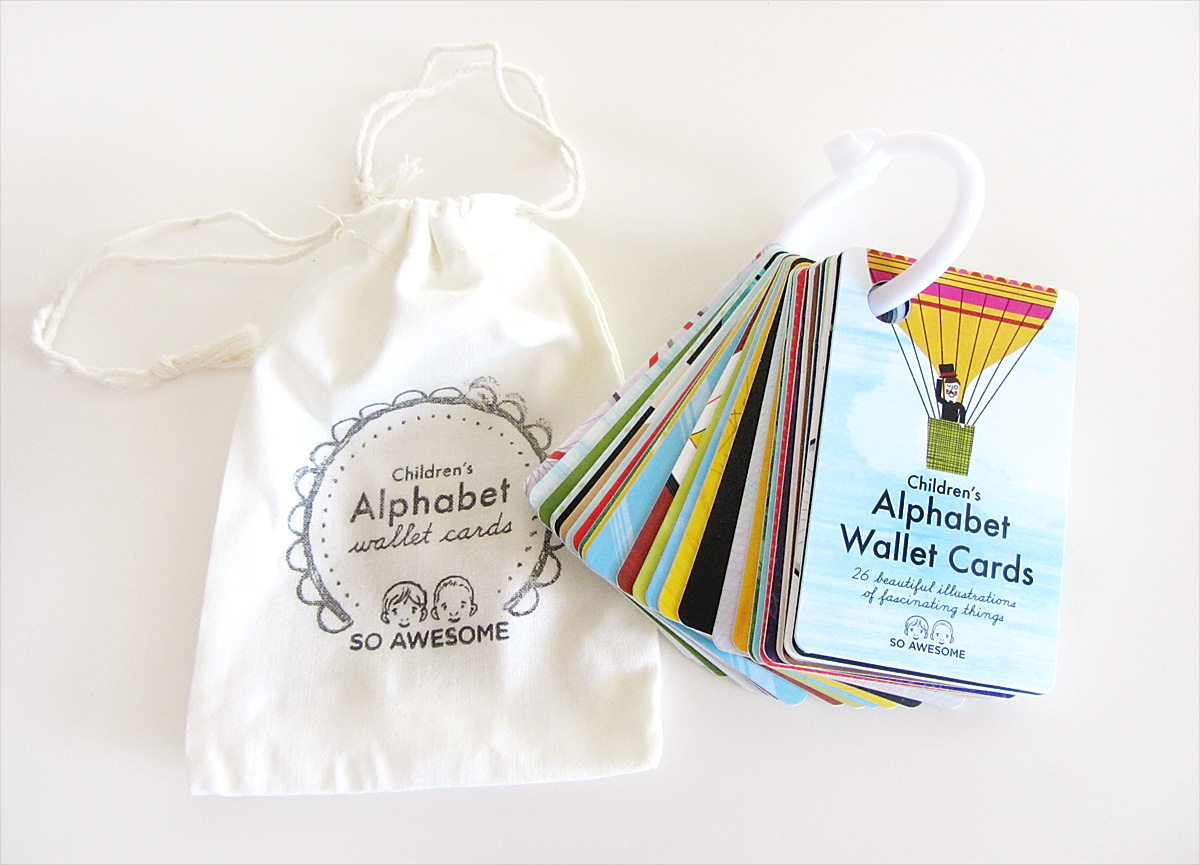
Alphabet Card Set
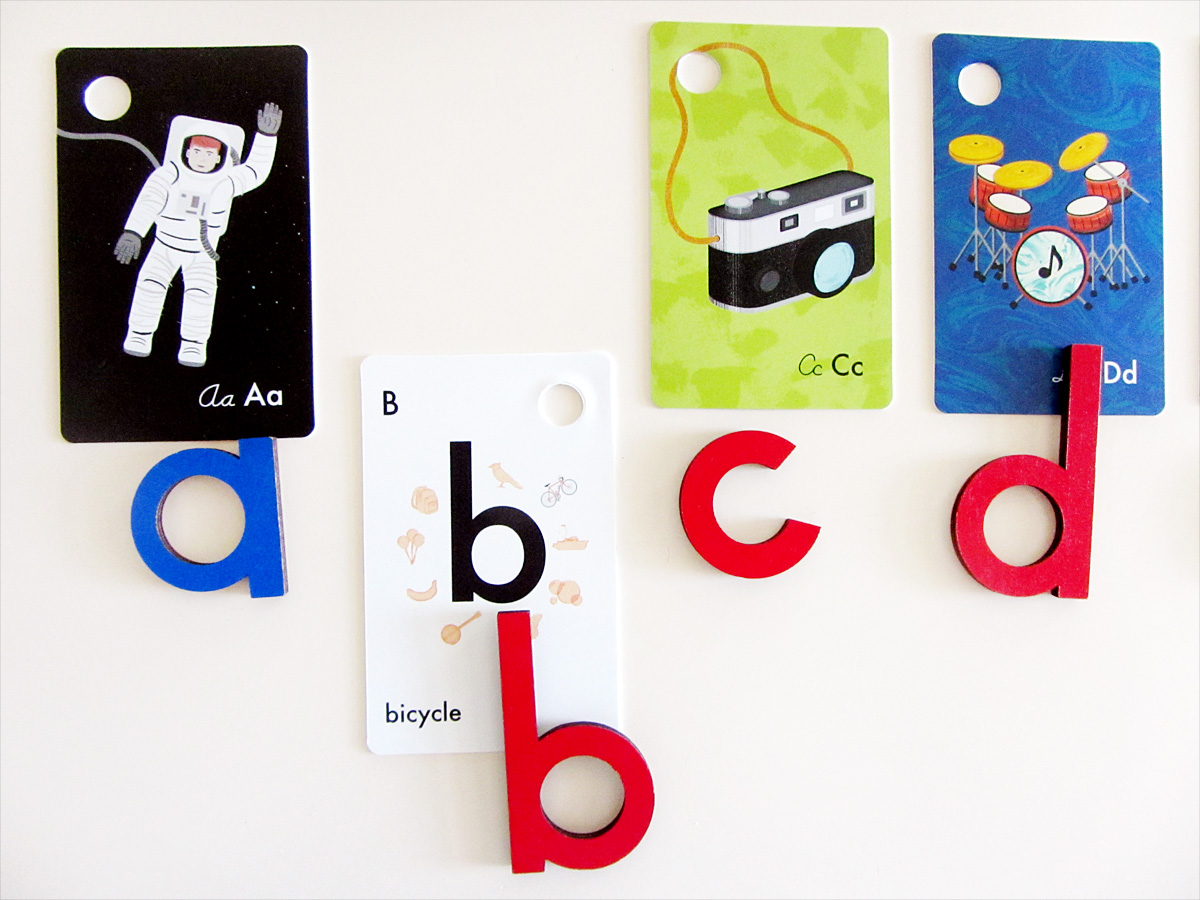
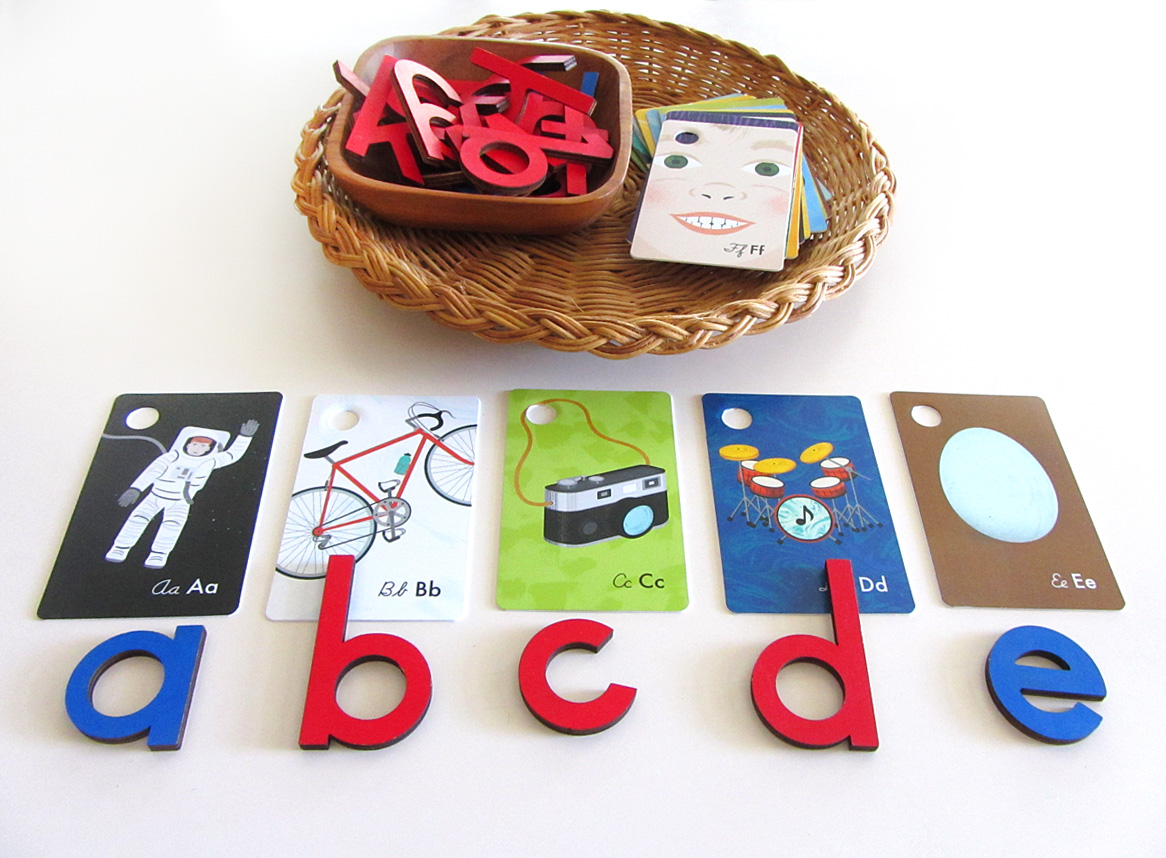
Jax was really drawn to the colorful set of alphabet cards. One side features gorgeous illustrations, the other has a large lowercase letter, the word that was illustrated and pictures of other words that begin with the letter.
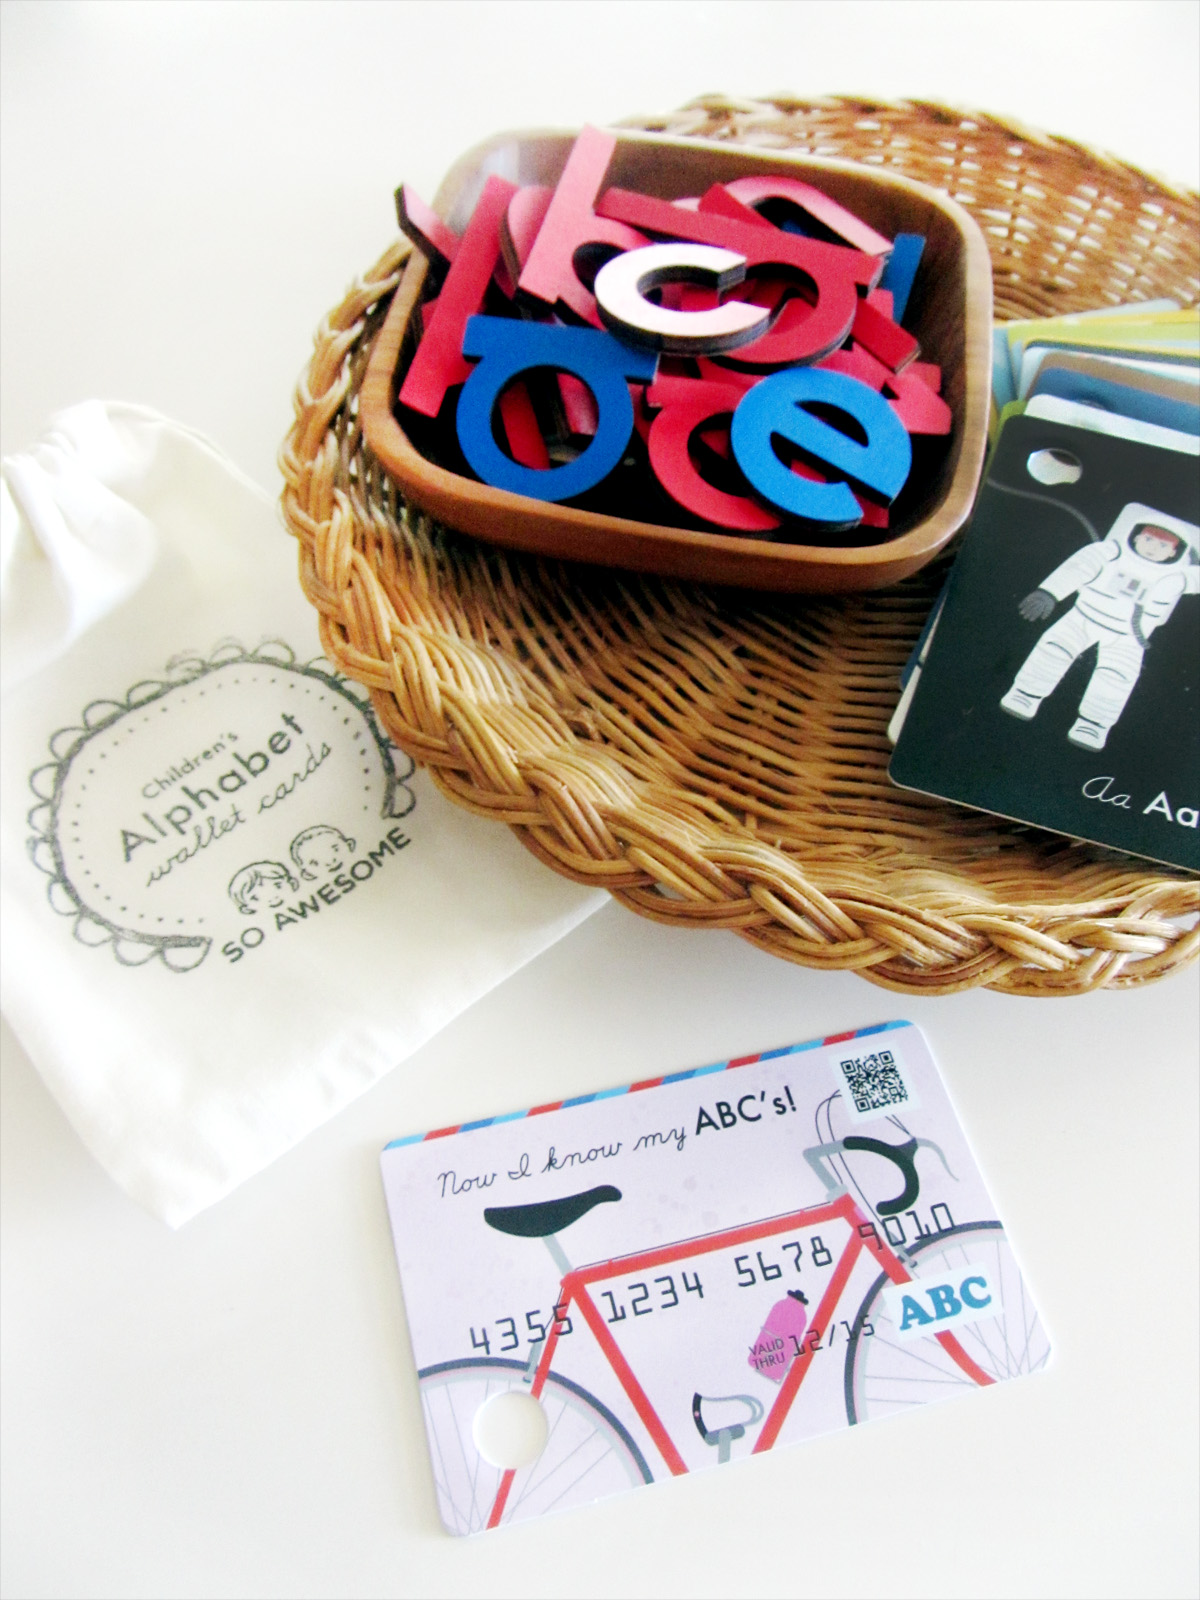
These cards would be great on a stroller or card seat for younger toddlers. The removable ring is an easy way to store the cards together and bring them on the go without losing any. (But if you do, they offer single replacement cards!)
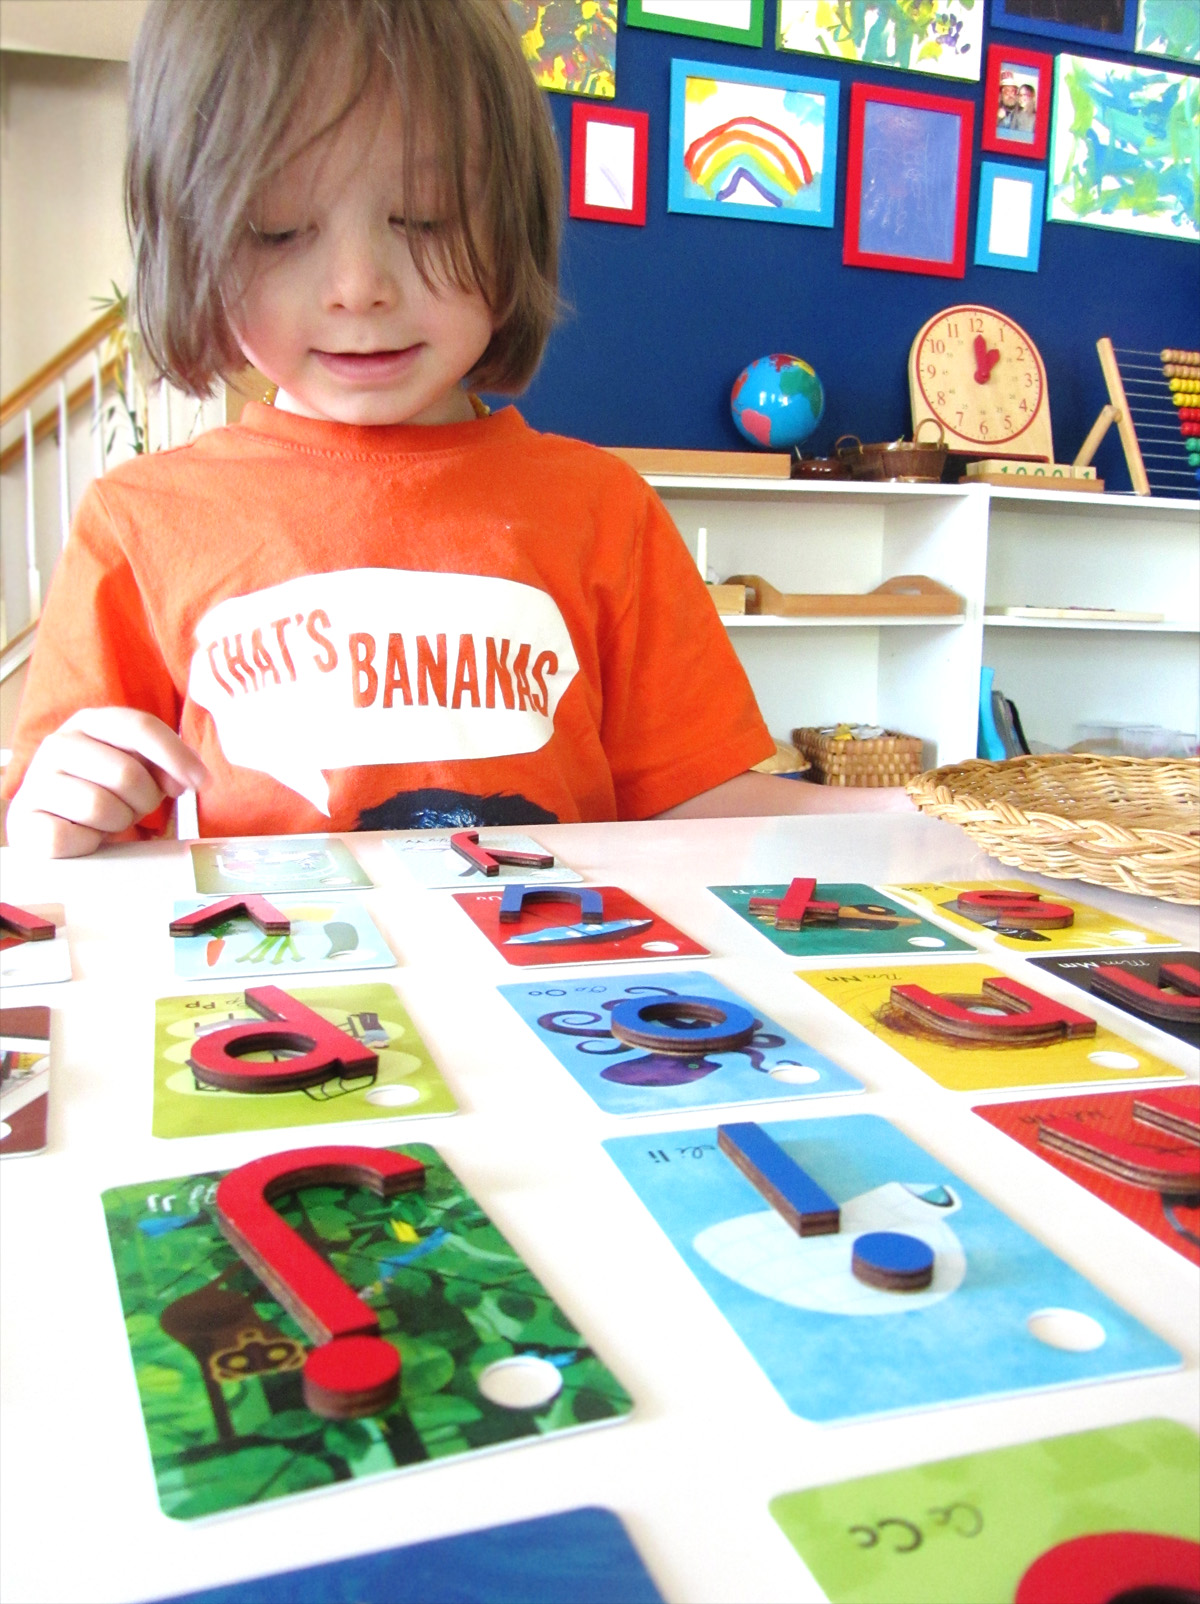
We have been pairing the cards with out Montessori movable alphabet to make a fun matching game. I put one of every letter in a bowl and Jax matches them up with the correct card.
I asked Jax which card was his favorite. He said he liked them all, but P for Playground was his favorite!
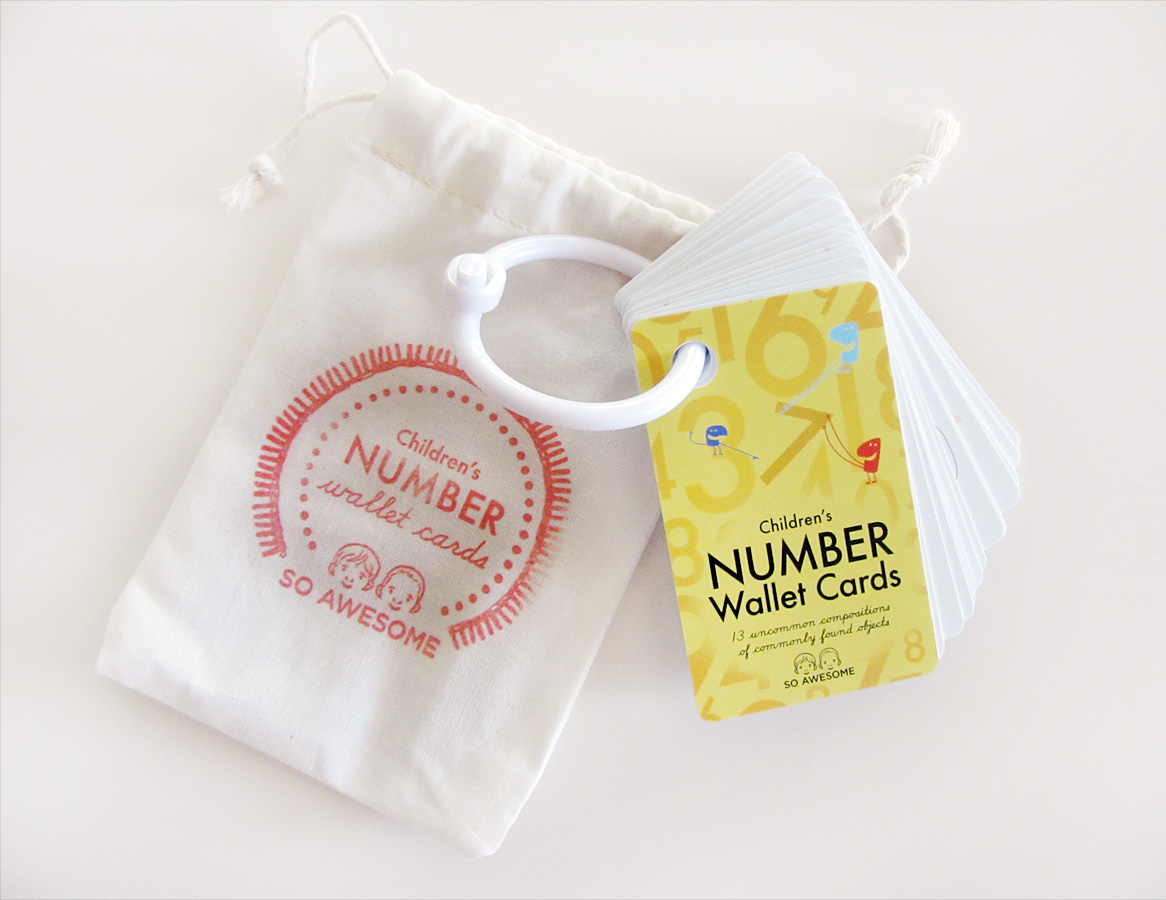
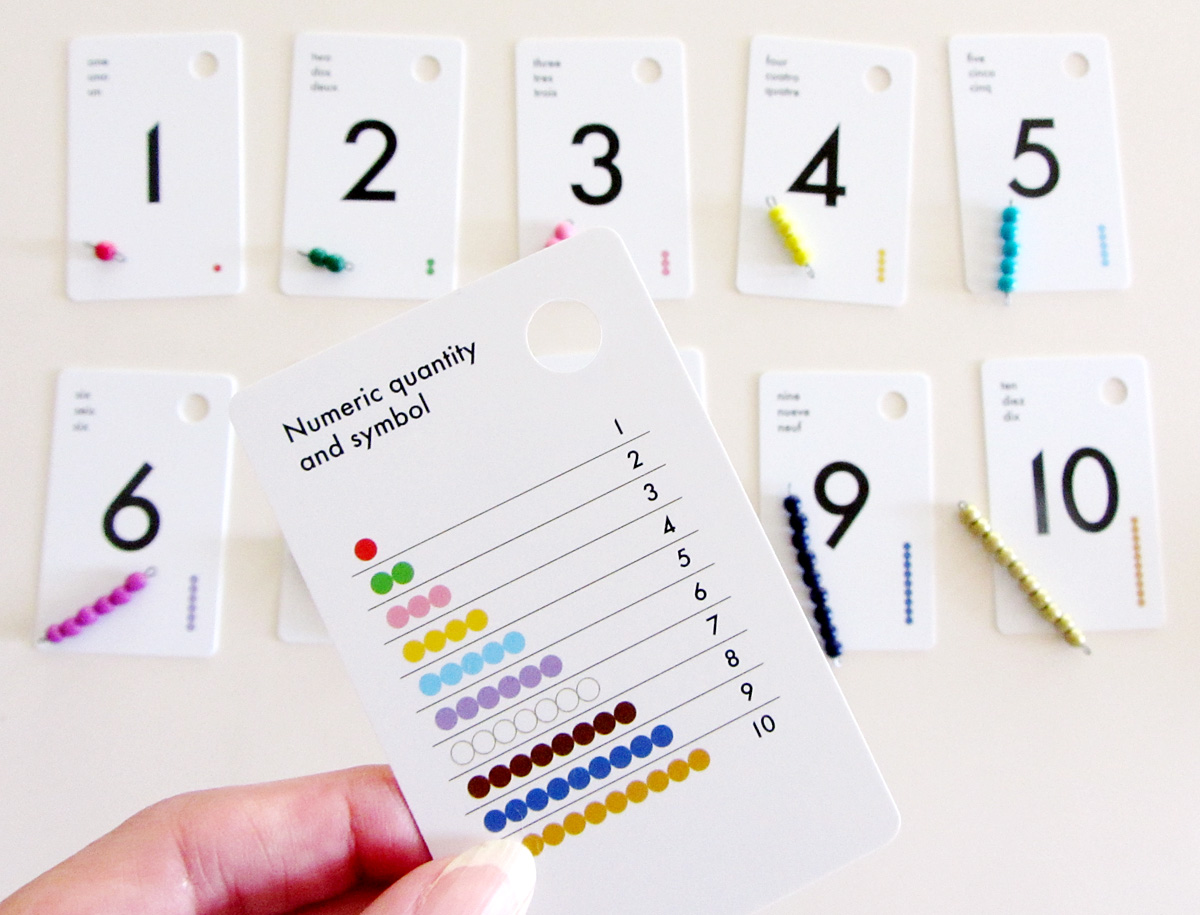
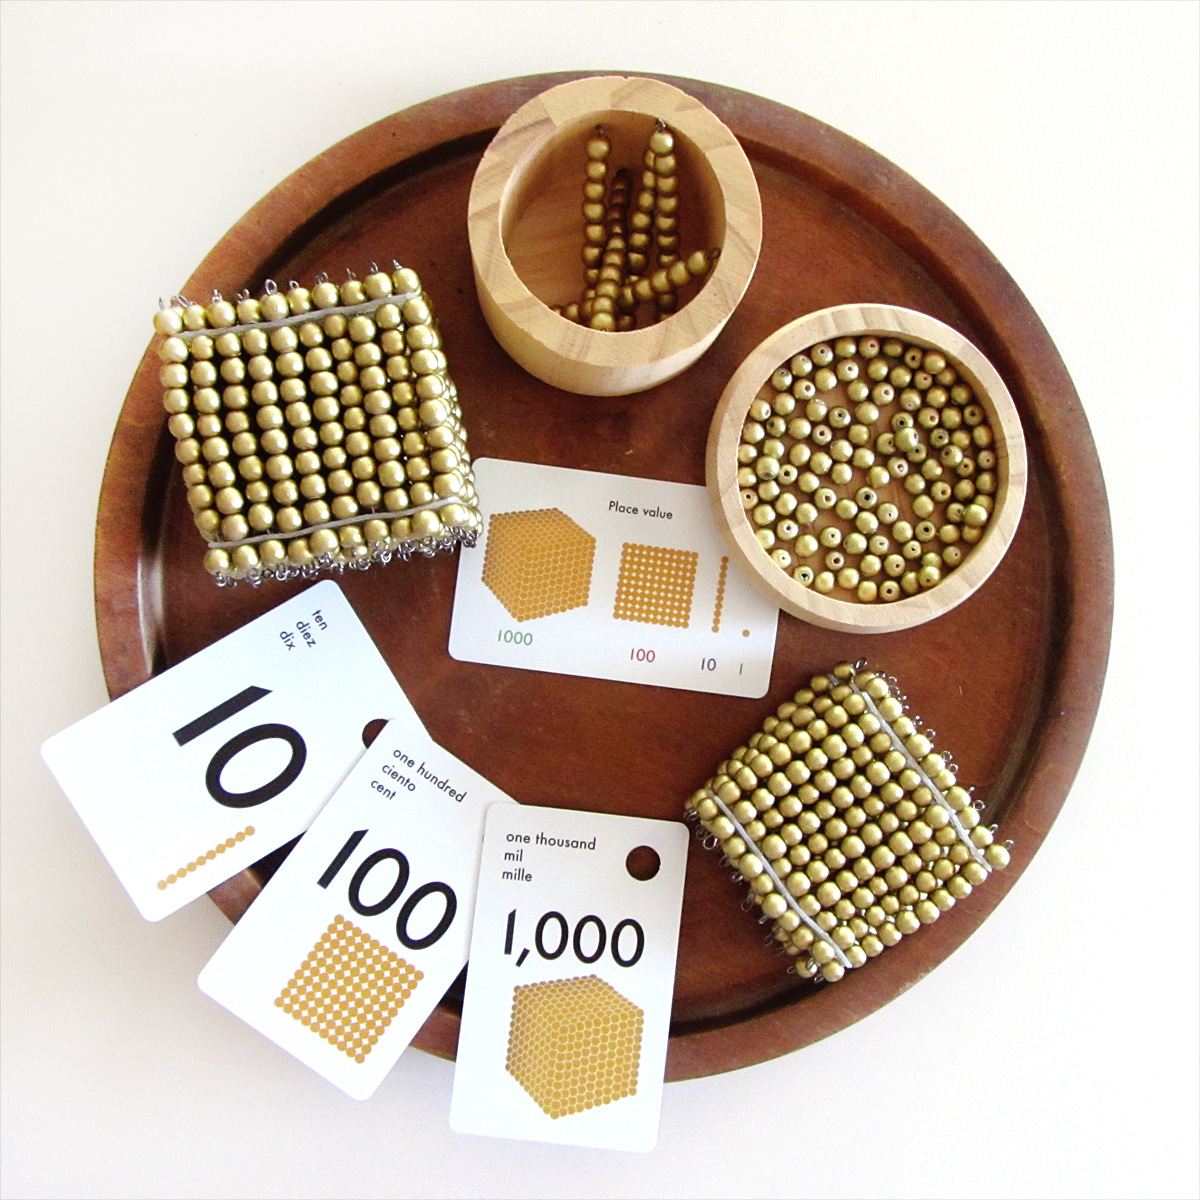
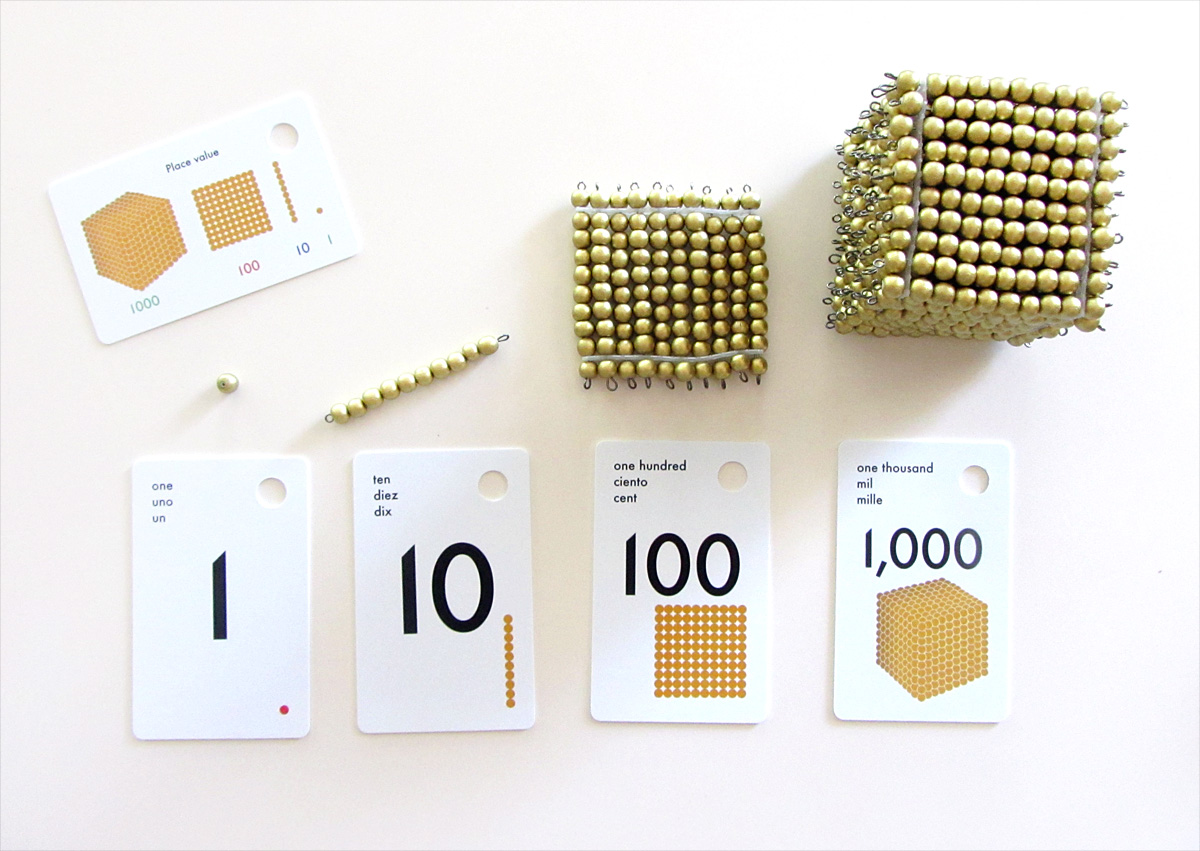
Number Card Set
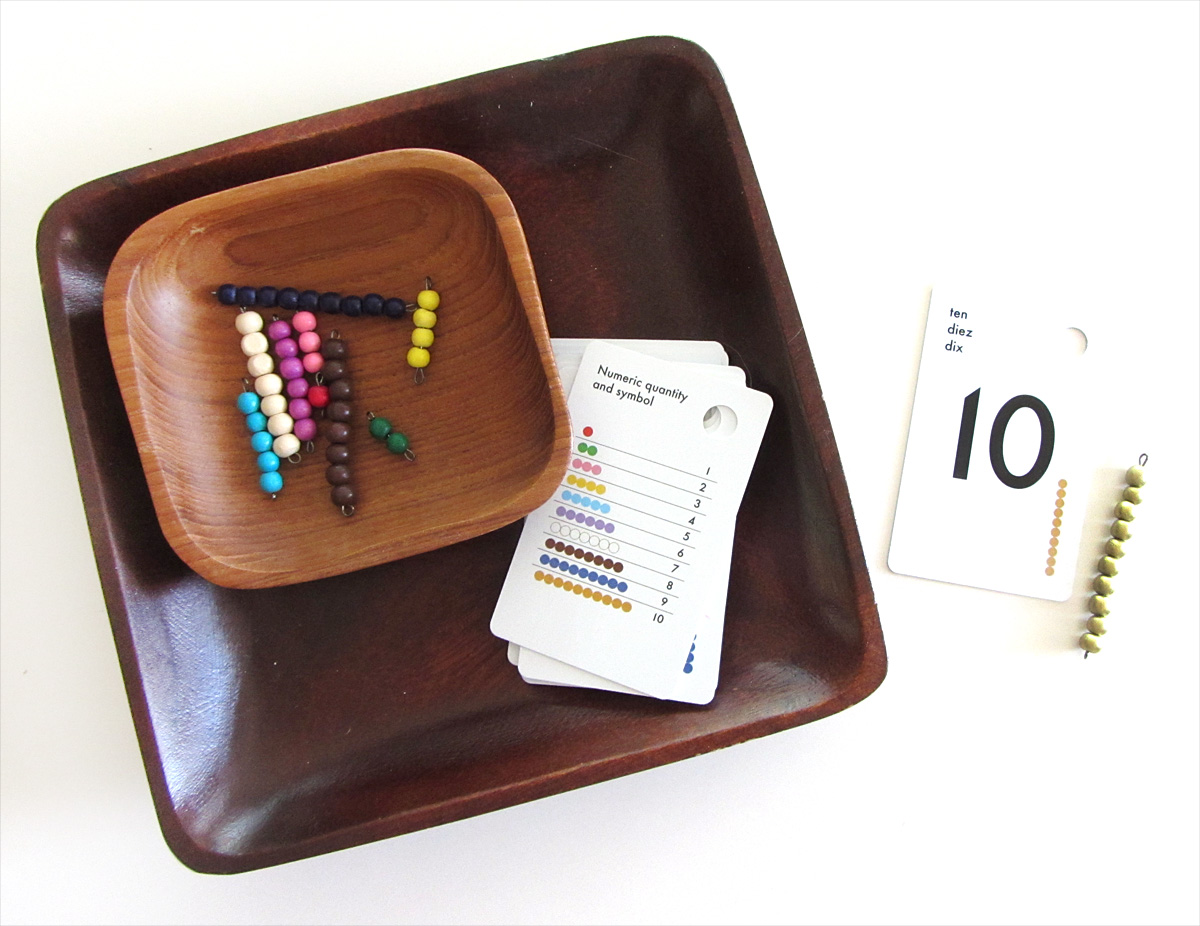
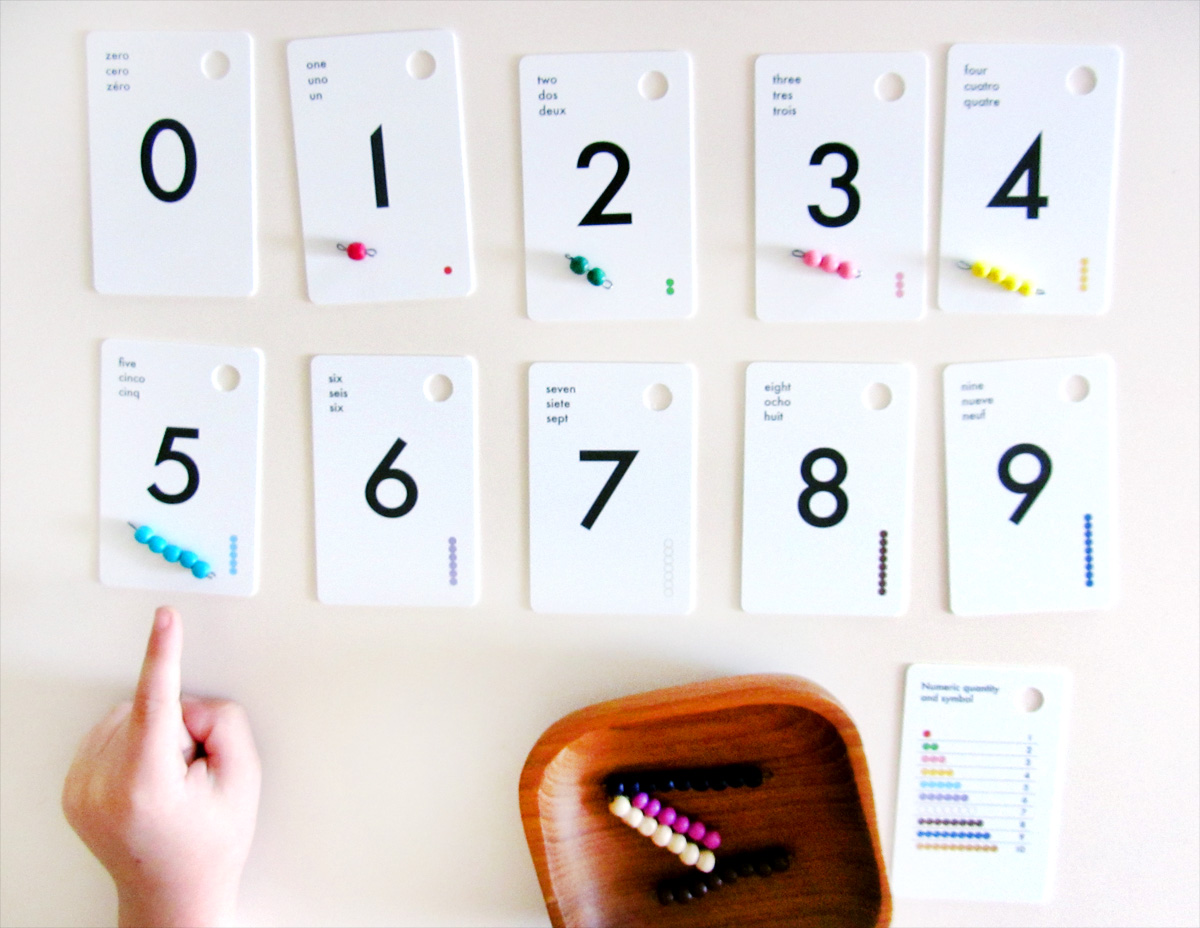
The numbers card set features whimsical illustrations depicting quantity on one side and the number and corresponding Montessori beads on the other. The title card has a picture of the Montessori bead stair. Another card features the different base ten quantities in the golden bead materials.
I’ve been working on DIY Montessori bead materials as a long-term project, so these cards fit in so well with our works! Click here to learn how I made my bead set and grab my free printables.
Jax has always enjoys how colorful the bead stair is, so he was drawn to the small tray I set up with the number cards 0 – 9.
I made another small tray with the 1, 10, 100 and 1,000 cards to reinforce the golden bead materials he’s begun using. It is a quick activity, but it is always good to match physical objects to pictures and writing.
SO Awesome provides a handful of free printable resources and suggested activities as companions to their card sets. You can check them out here.
SO Awesome has generously offered a $45 store credit to the winner of this random giveaway. To enter, visit SO Awesome, then leave a comment here letting us know what your favorite product is. Then use the Rafflecopter widget below to let us know you’ve commented (email address or Facebook required). There are bonus entries available to anyone who enters. The lucky winner will be randomly chosen on Wednesday, September 10th.
SO Awesome offers gorgeous, educational, non-toxic, extremely durable card sets designed for how kids play and work. Montessori-inspired. Made in the USA. Their cards are perfect to engage children in carseats, strollers, shopping carts, and long airplane rides.
Graphic Designer and mother Marie-Claire Camp created the durable, non-toxic card sets for her twin boys. Using the crowdsource-funding site Kickstarter, Marie-Claire produced five sets of cards and an companion iOS app.
Jax and I will be starting a music unit in homeschool this fall, so when I came across this Musical Instruments TOOB by Safari LTD I had to get them!
Our family has always had a great love of music. My brother and I were both “band geeks” throughout our school years. (Though I find nothing geeky about music!) I played the oboe, and still have mine. I was also in the marching band, playing cymbals in the drum line. I married a DJ and we’ve surrounded Jax with music since before he was born. He adores dancing and singing. Anything we can put in a song he learns faster. I hope that providing him with a solid base of knowledge in music fundamentals now will help cultivate a lifelong love.
Disclosure: I purchased this Safari Ltd TOOB on my own, but Safari Ltd kindly is providing the winner of this giveaway with a Musical Instruments TOOB. All opinions expressed are my own.
Musical instruments are beautiful to look at! They definitely capture a child’s attention. And combined with learning about the sounds that they make, you have a learning opportunity that is all fun!
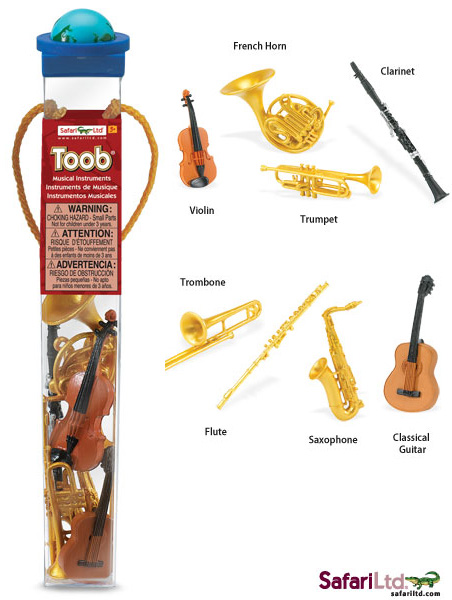
The Safari Ltd Musical Instruments TOOB contains: Trombone, Flute, Saxophone, Classical Guitar, French Horn, Clarinet, and Trumpet. Strike up the band!
Safari Ltd TOOBS are collections of individually hand painted miniature replicas featuring vibrant colors, fine, professional sculpting, and accurate detail. They are available in dozens of themes, and each set comes in a reusable acetate tube that snaps open and closed for easy storage. The tube also has a spinning globe on its cap. TOOBS are perfect for educational projects, traveling, collecting, and imaginative play.
Safari Ltd® is a family-owned, educational toy company whose mission is to teach children the importance of nature and its conservation through the joy of play. With more than 1,000 hand-painted products ranging from mythical creatures to famous landmarks, learning meets fun with Safari Ltd.
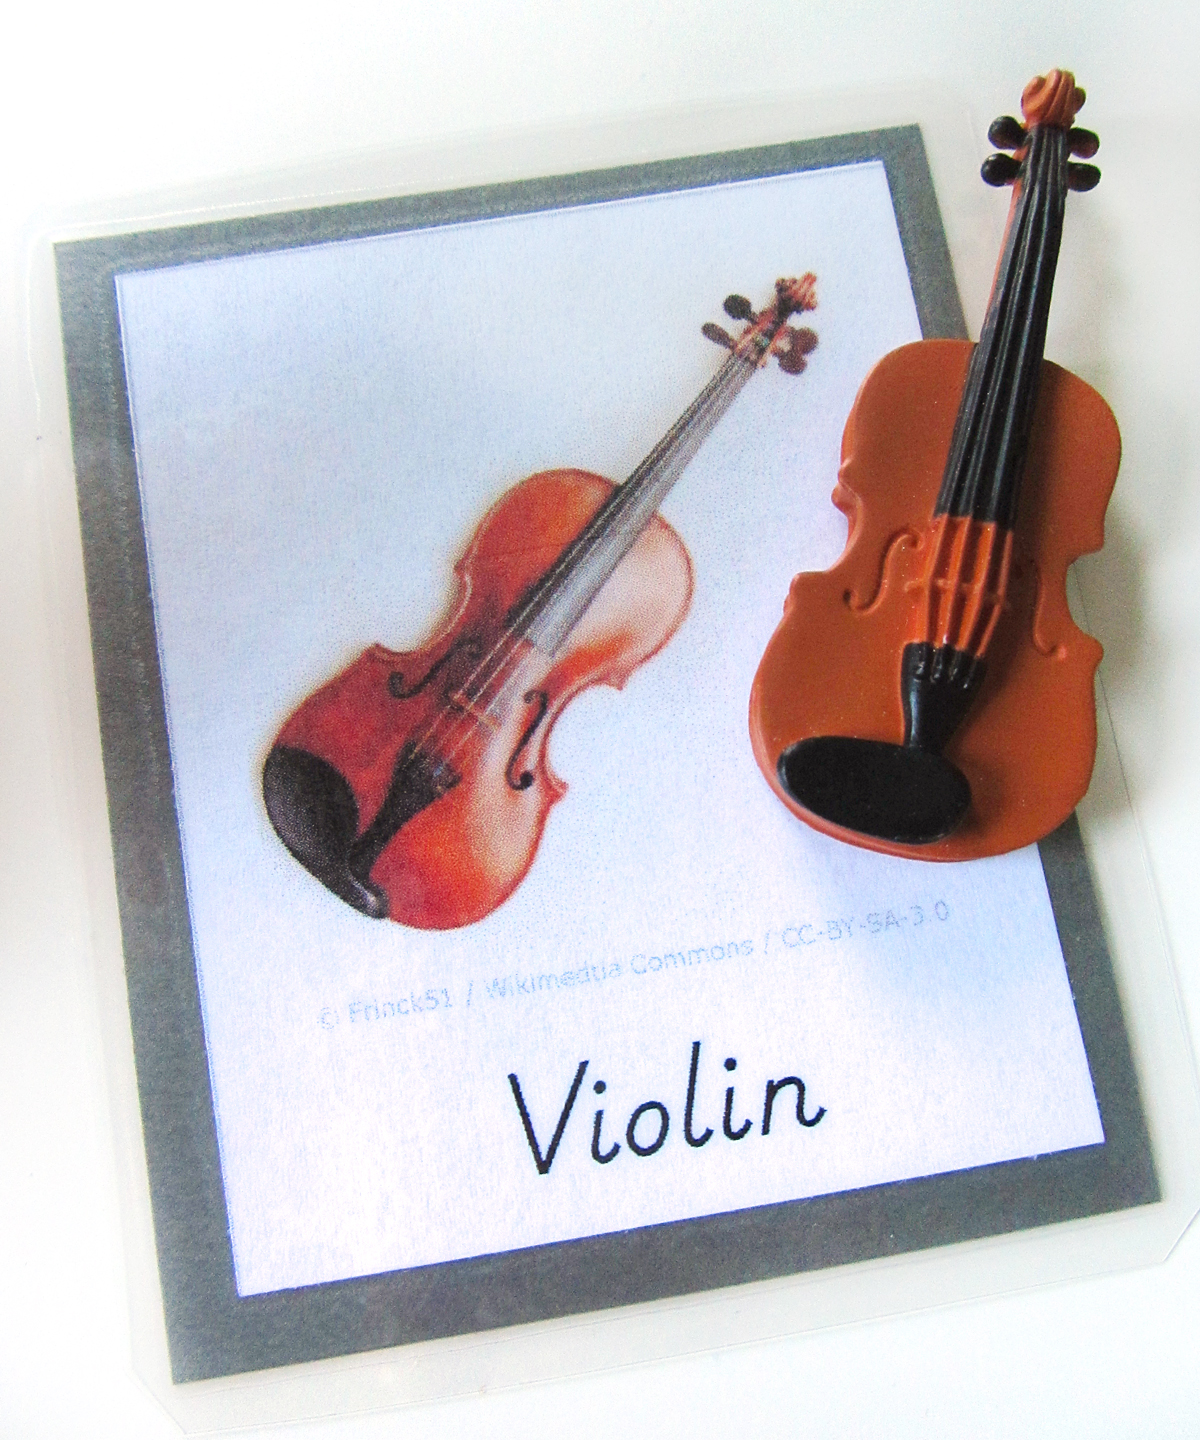
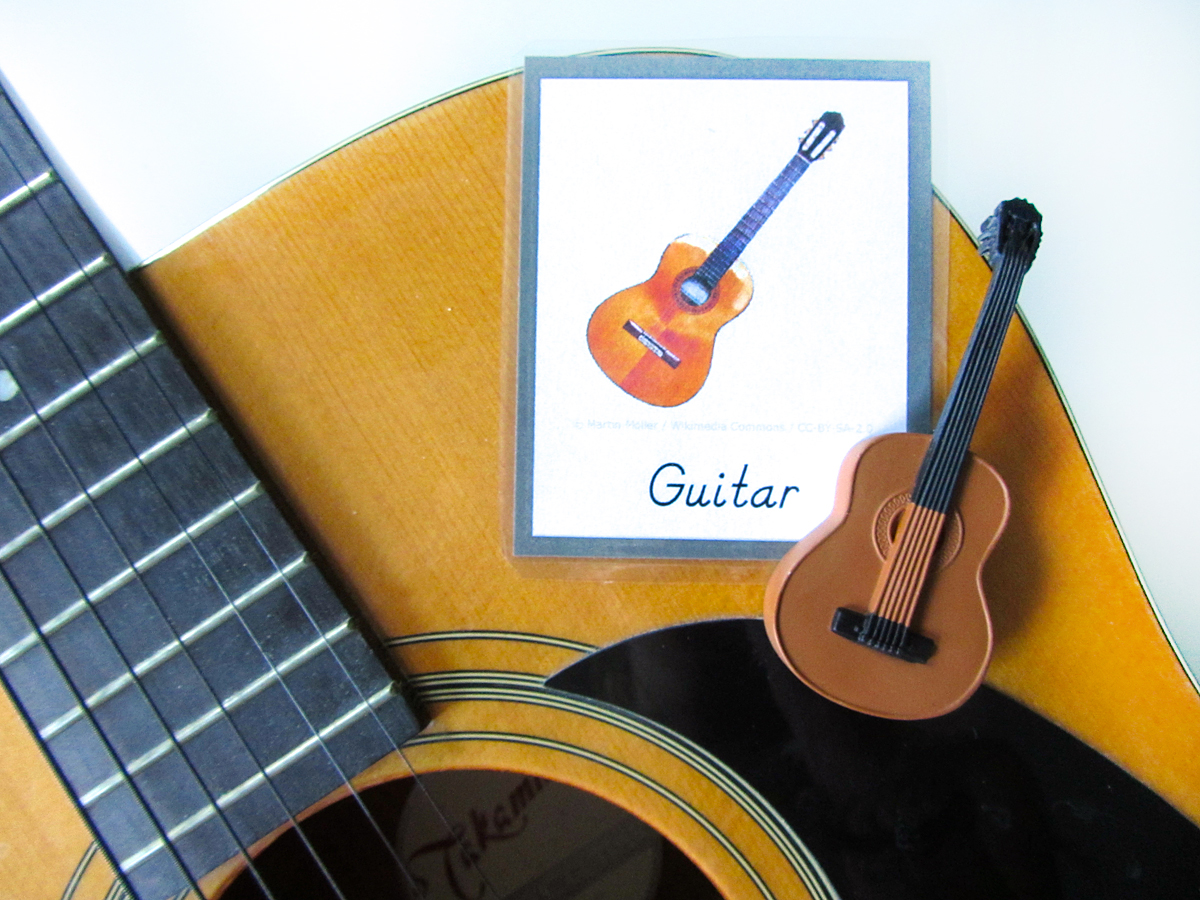
Montessori Musical Instruments 3-Part Cards
In the Montessori method, 3-part cards are an essential tool that can follow your child through multiple levels of development. They can be used in any subject to aid in adding vocabulary, learning to sort/classify, reading practice and so much more. Three-part cards are made up of two photos – one with a label, one without – as well as a separate label. Younger children start with the labeled card to help them learn the vocabulary. One of the best ways to use them is with small objects that match the photos. Older kids can work with the unlabeled card, matching the correct words or writing their own.
I have created a set of free musical instrument 3-part cards to correspond with Safari Ltd’s Musical Instruments TOOB. Because I had room for one more card on my printout, I included an oboe. I used an oboe necklace charm (and my real oboe!) for matching. You could set that card aside when doing object matching.
Click here to download my free pdf file to create your own. To make mine, I cut them out, glued them to charcoal gray card stock (this is simply a color I chose to assign to all my future music collateral) then laminated them. It makes them shiny and strong. I really love my laminator – as everyone told me I would!
Bookmark this page to come back to when you are studying instruments with your child.
Musical Instruments TOOB Giveaway
1 lucky winner from the US will win the Safari Ltd Musical Instrument TOOB (ARV $12). If you a a follower of Safari Ltd on Facebook, Twitter, Pinterest, YouTube or Google+, they will throw in a bonus prize!
Who is Eligible:
This giveaway is open to anyone 18 and older living in the US. Safari Ltd. will pay for shipping the prize to you.
To be eligible, leave a mandatory blog comment below telling me why you’d like to win the Safari Ltd Musical Instruments TOOB. After you’ve commented, be sure to click “enter” on the Rafflecopter form to open up the additional entry options. Enter as many ways as you’d like, once you’ve completed the mandatory blog comment. If you are already a follower of Safari Ltd or Imagine Our Life, you can still enter via that option by verifying your username!
If you need help with Rafflecopter here is a link for a quick tutorial video. At times, the Rafflecopter form can take a minute to load on the page.
The giveaway closes 12:00 am EST on Tuesday, September 3.
Congrats to our random winner, Mae P.!
Good luck!
Here is a Pinterest-ready image for you! Find me on Pinterest @imagineourlife. Find Safari Ltd on Pinterest @safariltd.
This post is linked up to Montessori Mondays. Please pay it a visit for lots of great Montessori and homeschool ideas!
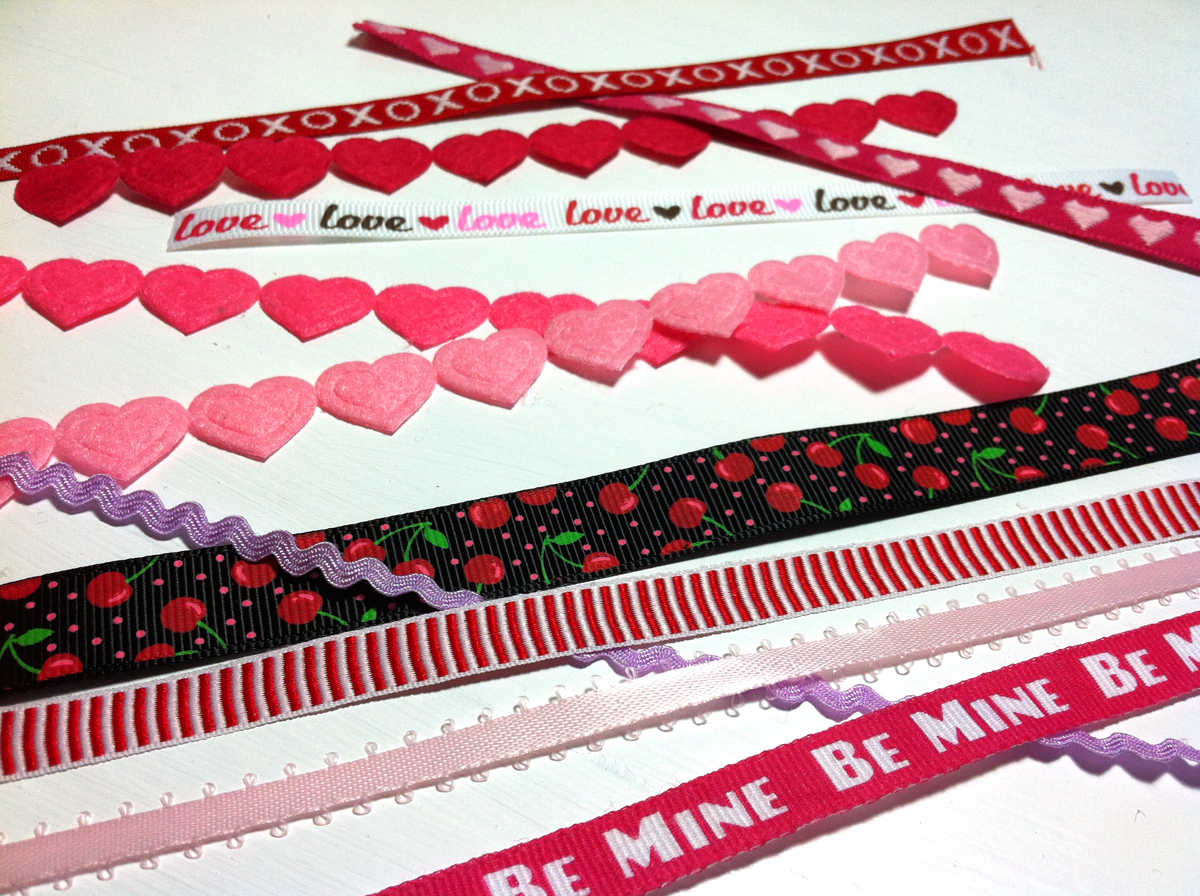
Do you like ribbon? I might have a little bit of a ribbon problem… If it weren’t for my budget limitations, I would have every ribbon possible!
This is a month of love for me – my sweet guy was born on February 5th! Valentine’s Day swoops in right after that.
I’d been thinking of doing a little giveaway when the Facebook page gets to 2,000 likes. We’re almost there! But, I have so many sweet ribbons left over from my Valentine play set that I wanted to share them with you now that it is February.
Interested?
The winner of this giveaway will receive 11 assorted bits of ribbon, 7″ – 8″ long each.
Just leave a comment here on this post. I’d love to hear your favorite thing about Valentine’s Day – a special tradition, special memory… Please make sure I have a way to contact you if you win. I’ll pick one random winner on Monday 02/04/13 at 1pm. Entries will be accepted up until then.
No purchase necessary. Void where prohibited. Winner will need to provide me a mailing address. All that stuff…
The winner (chosen via Random.org) is Amy C. who said:
I love Valentine’s Day because I love chocolate and candy hearts! I also love thinking about and doing things for the people I love. I am almost done making my third quiet book and have recently discovered your website so I now know what patterns I will use for my next project! My son was also born on February 5th and so was my baby brother (who is no longer a baby, of course!) I would love to make your cute Valentine set for a group of toddlers that I know and love!
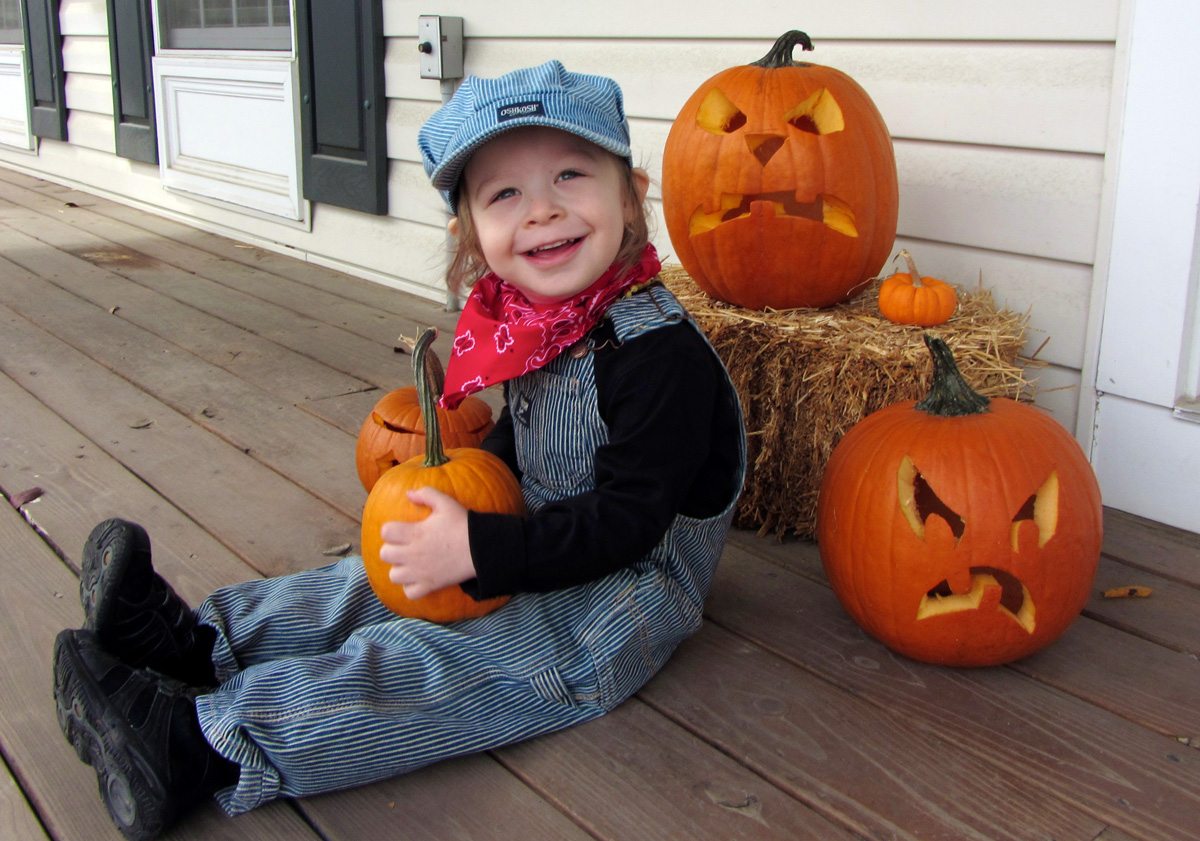
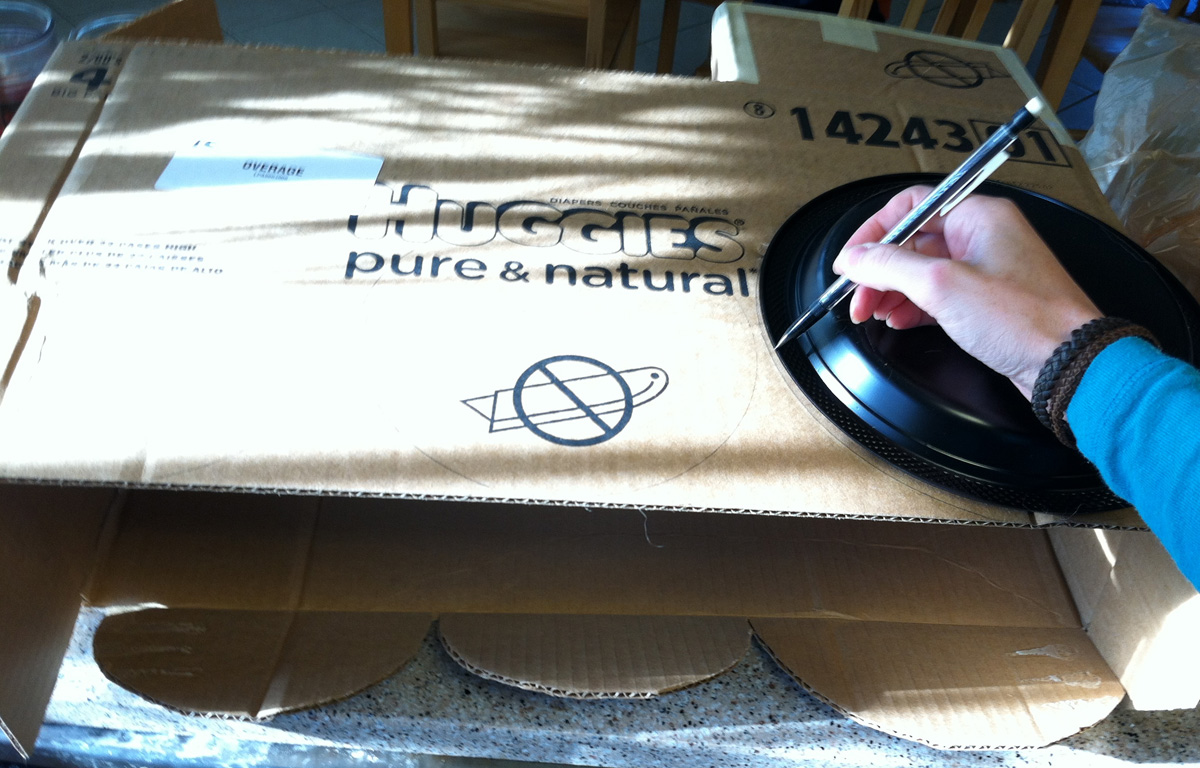
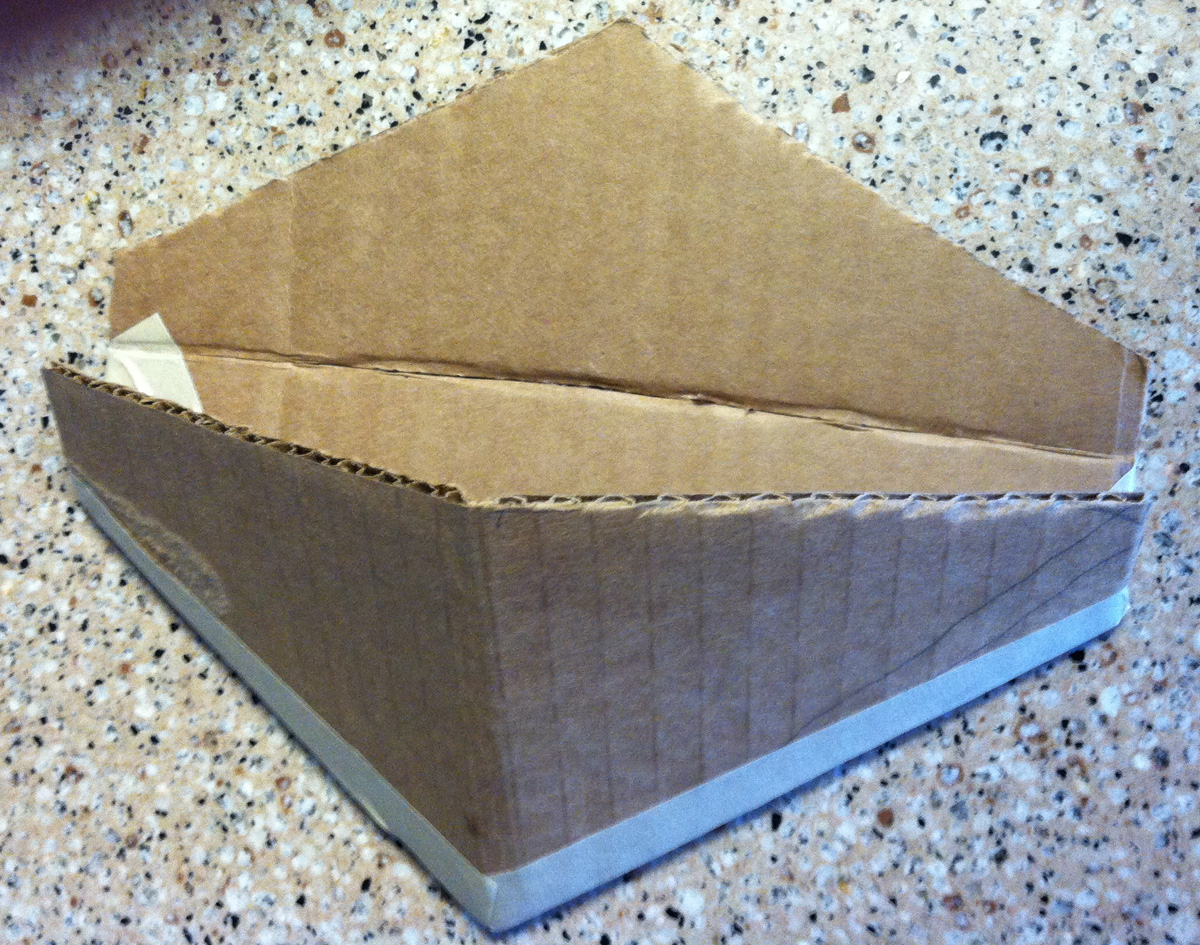
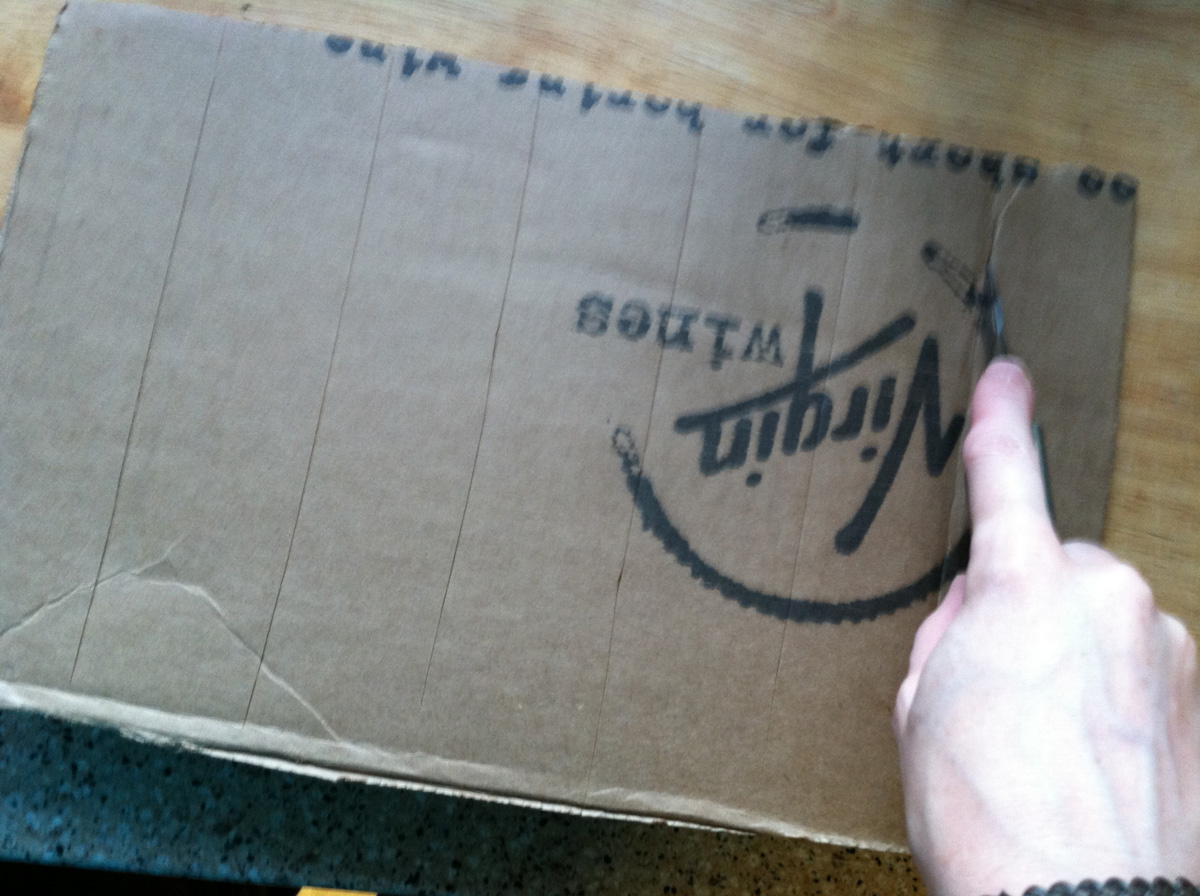
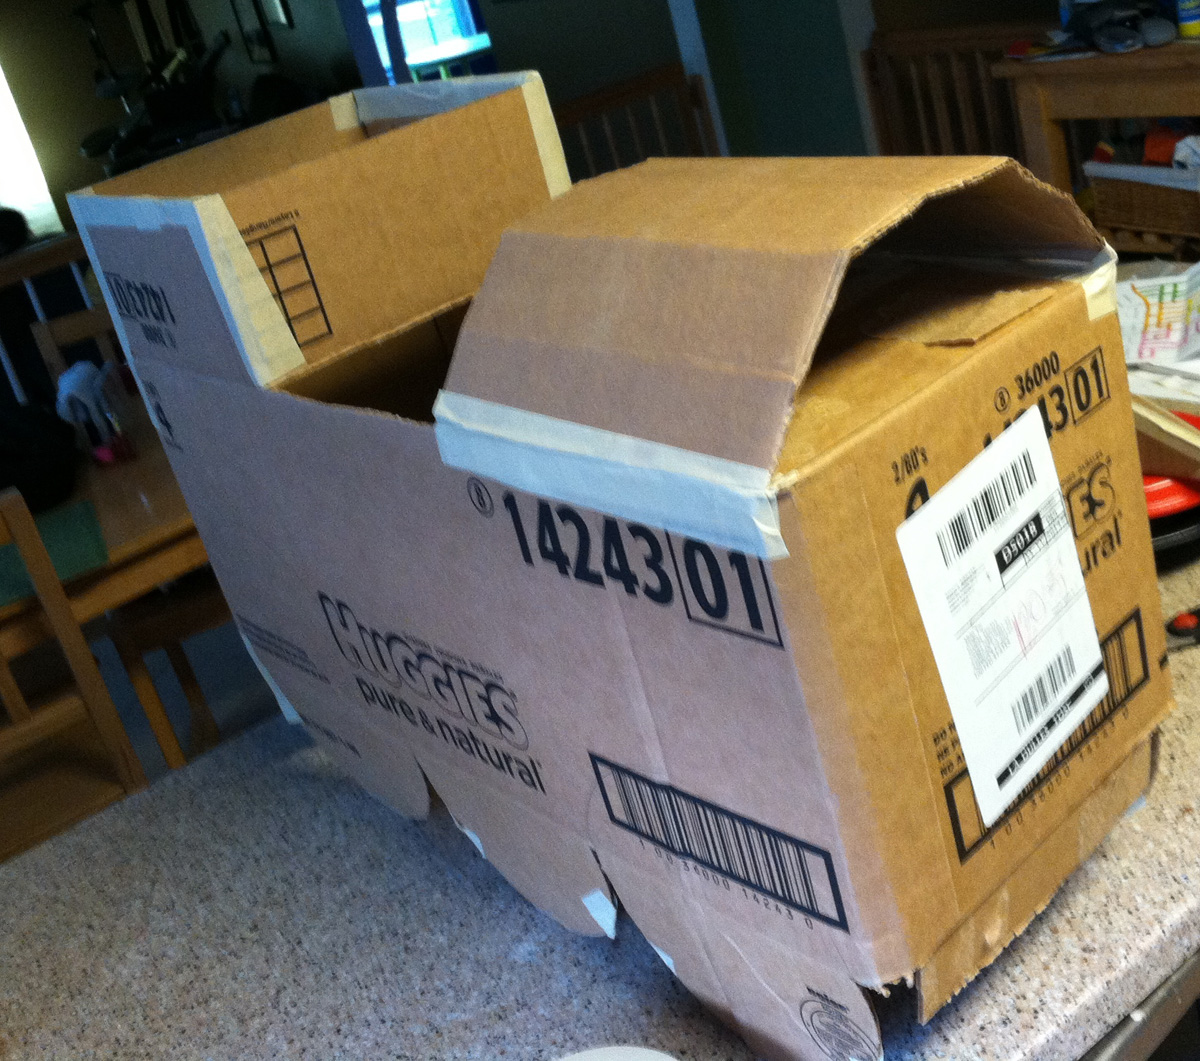
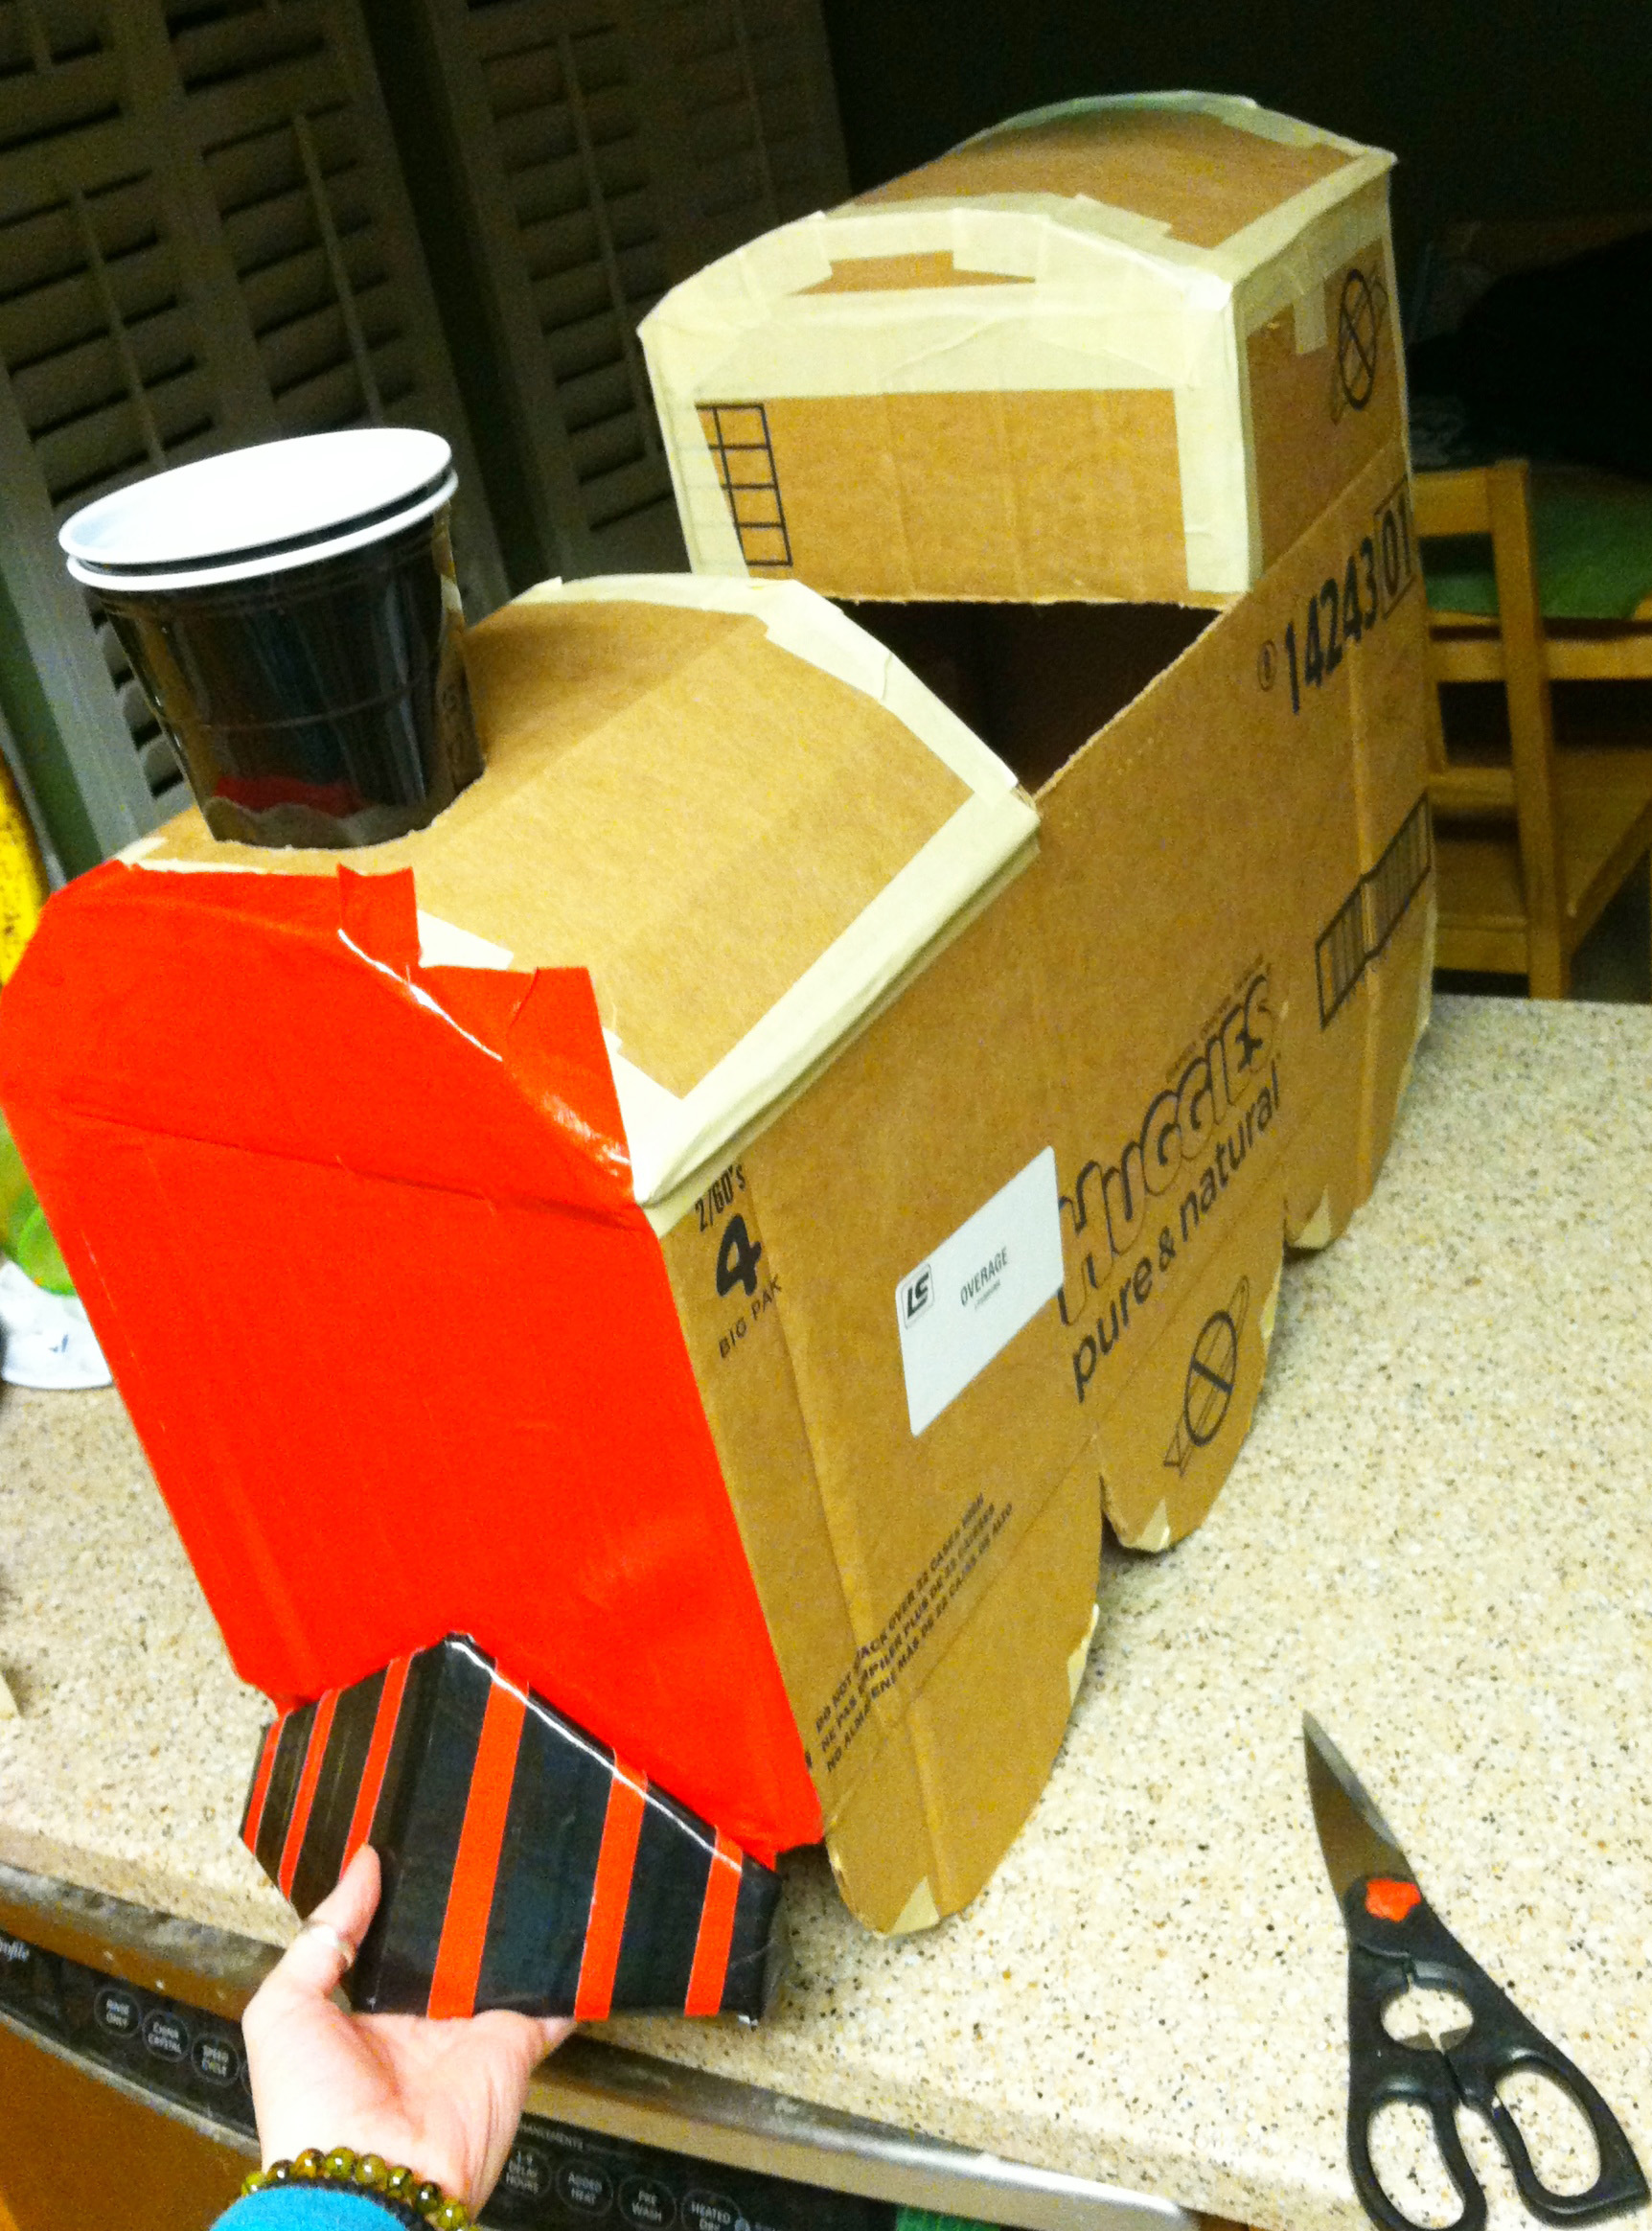
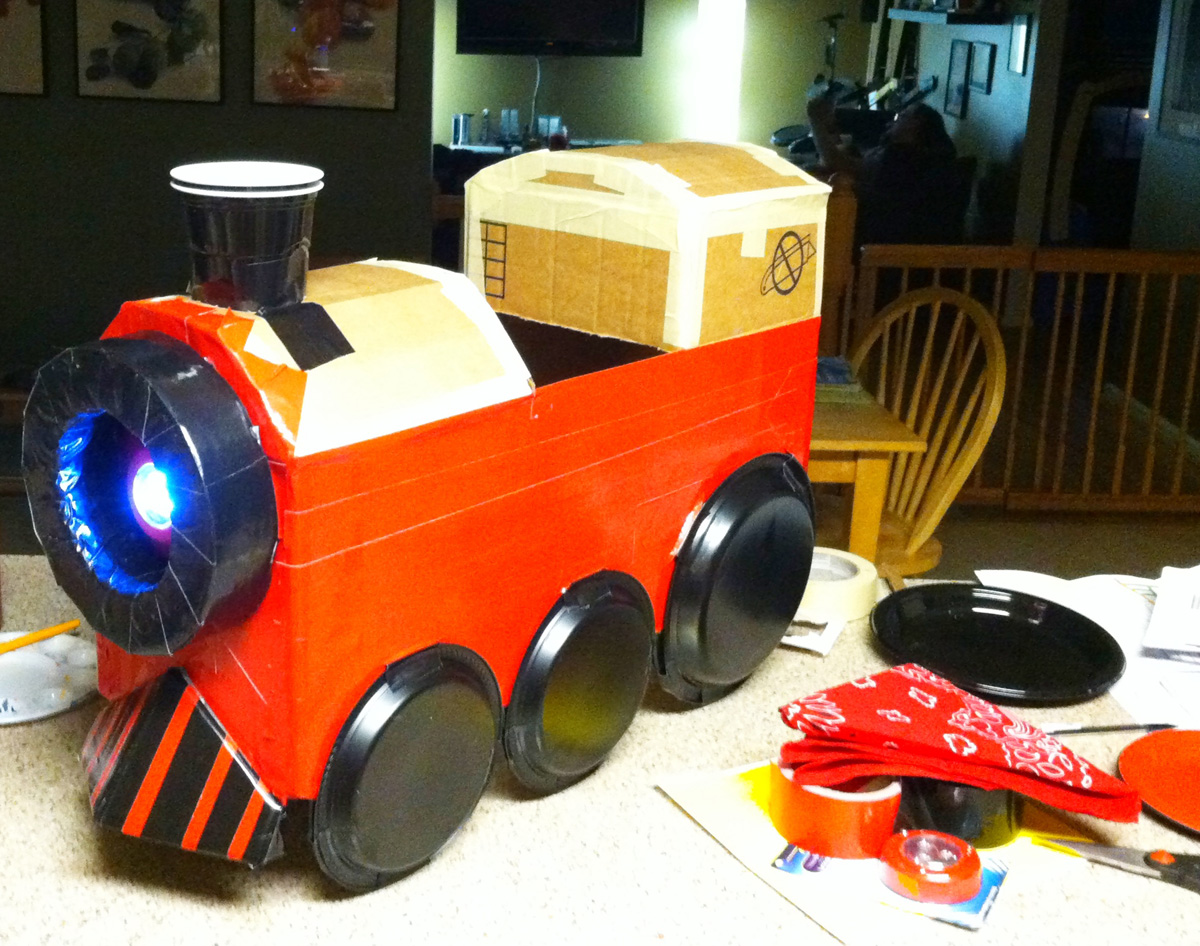
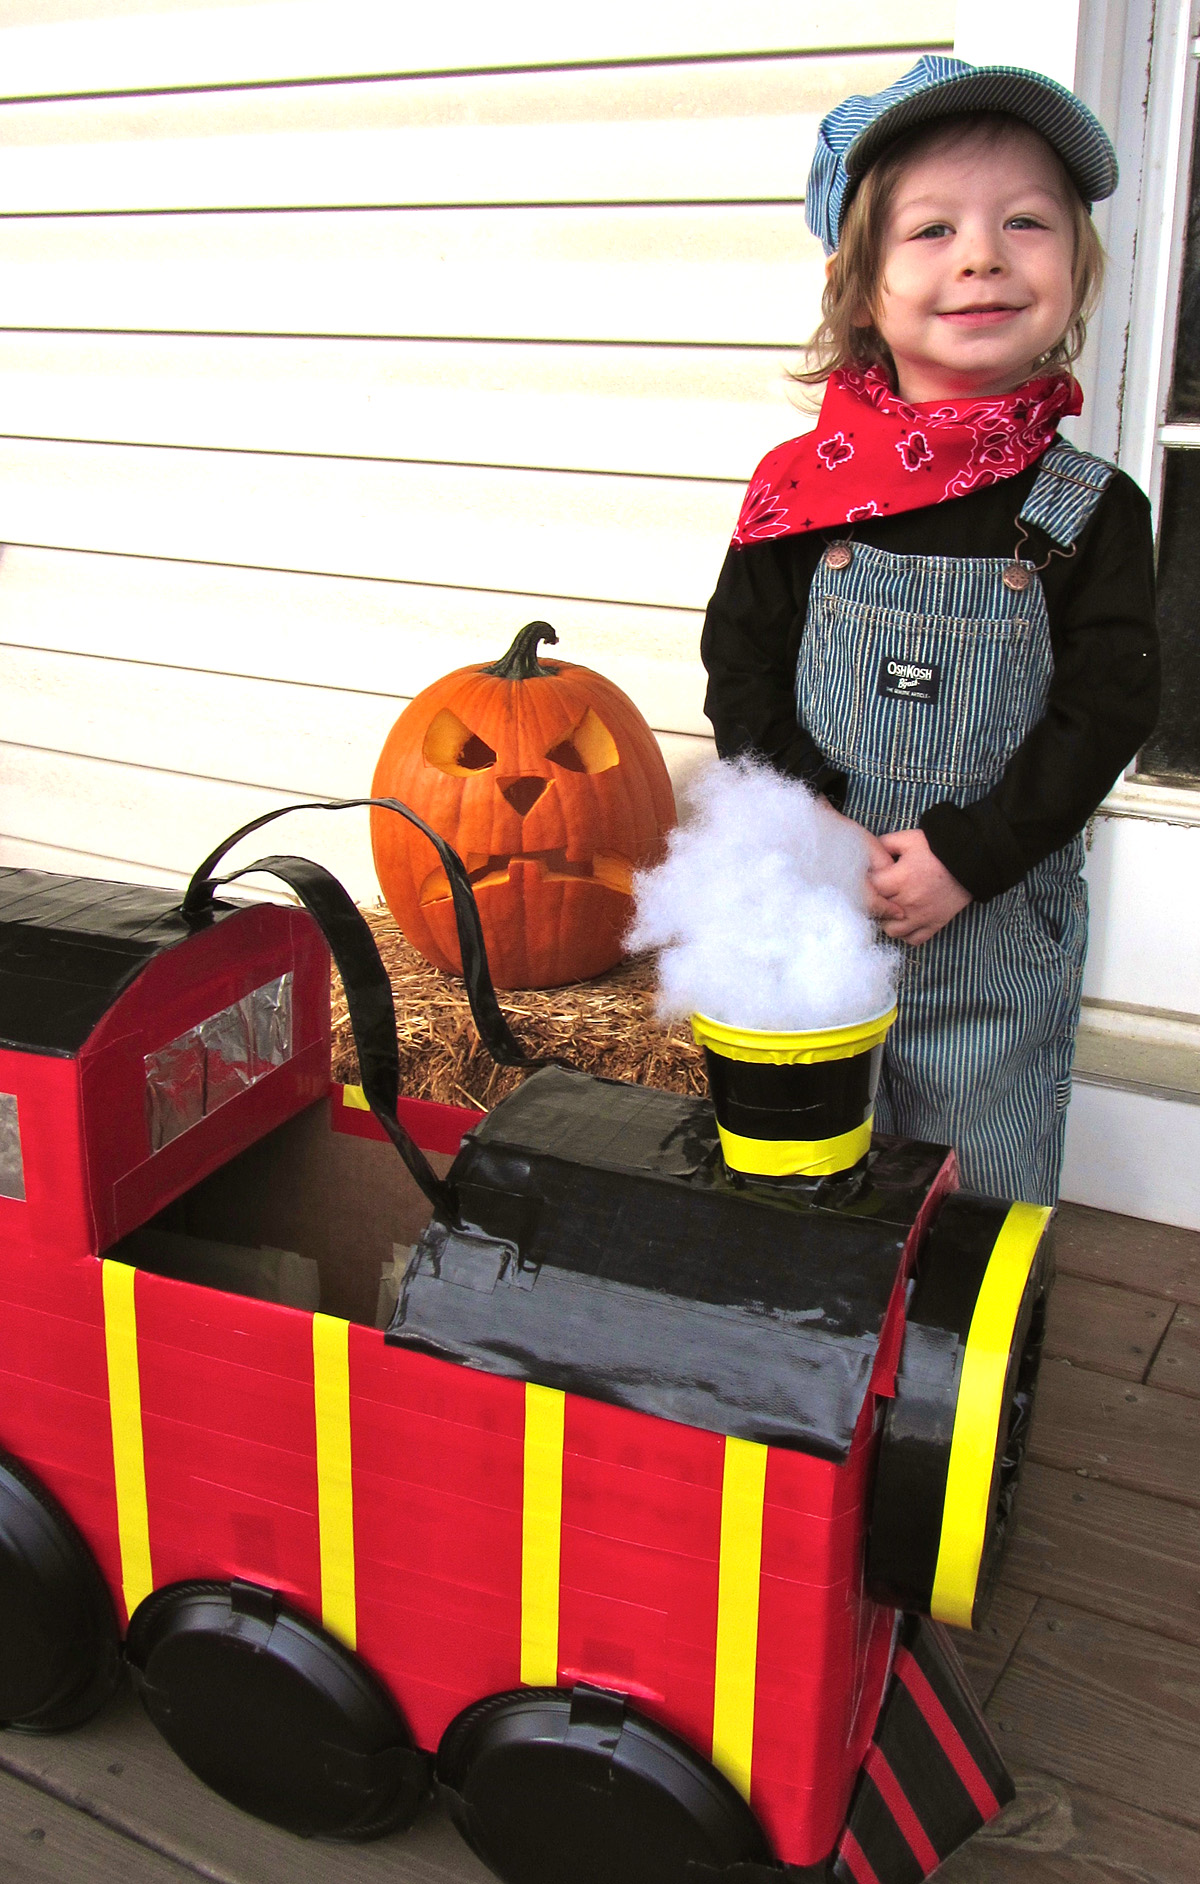
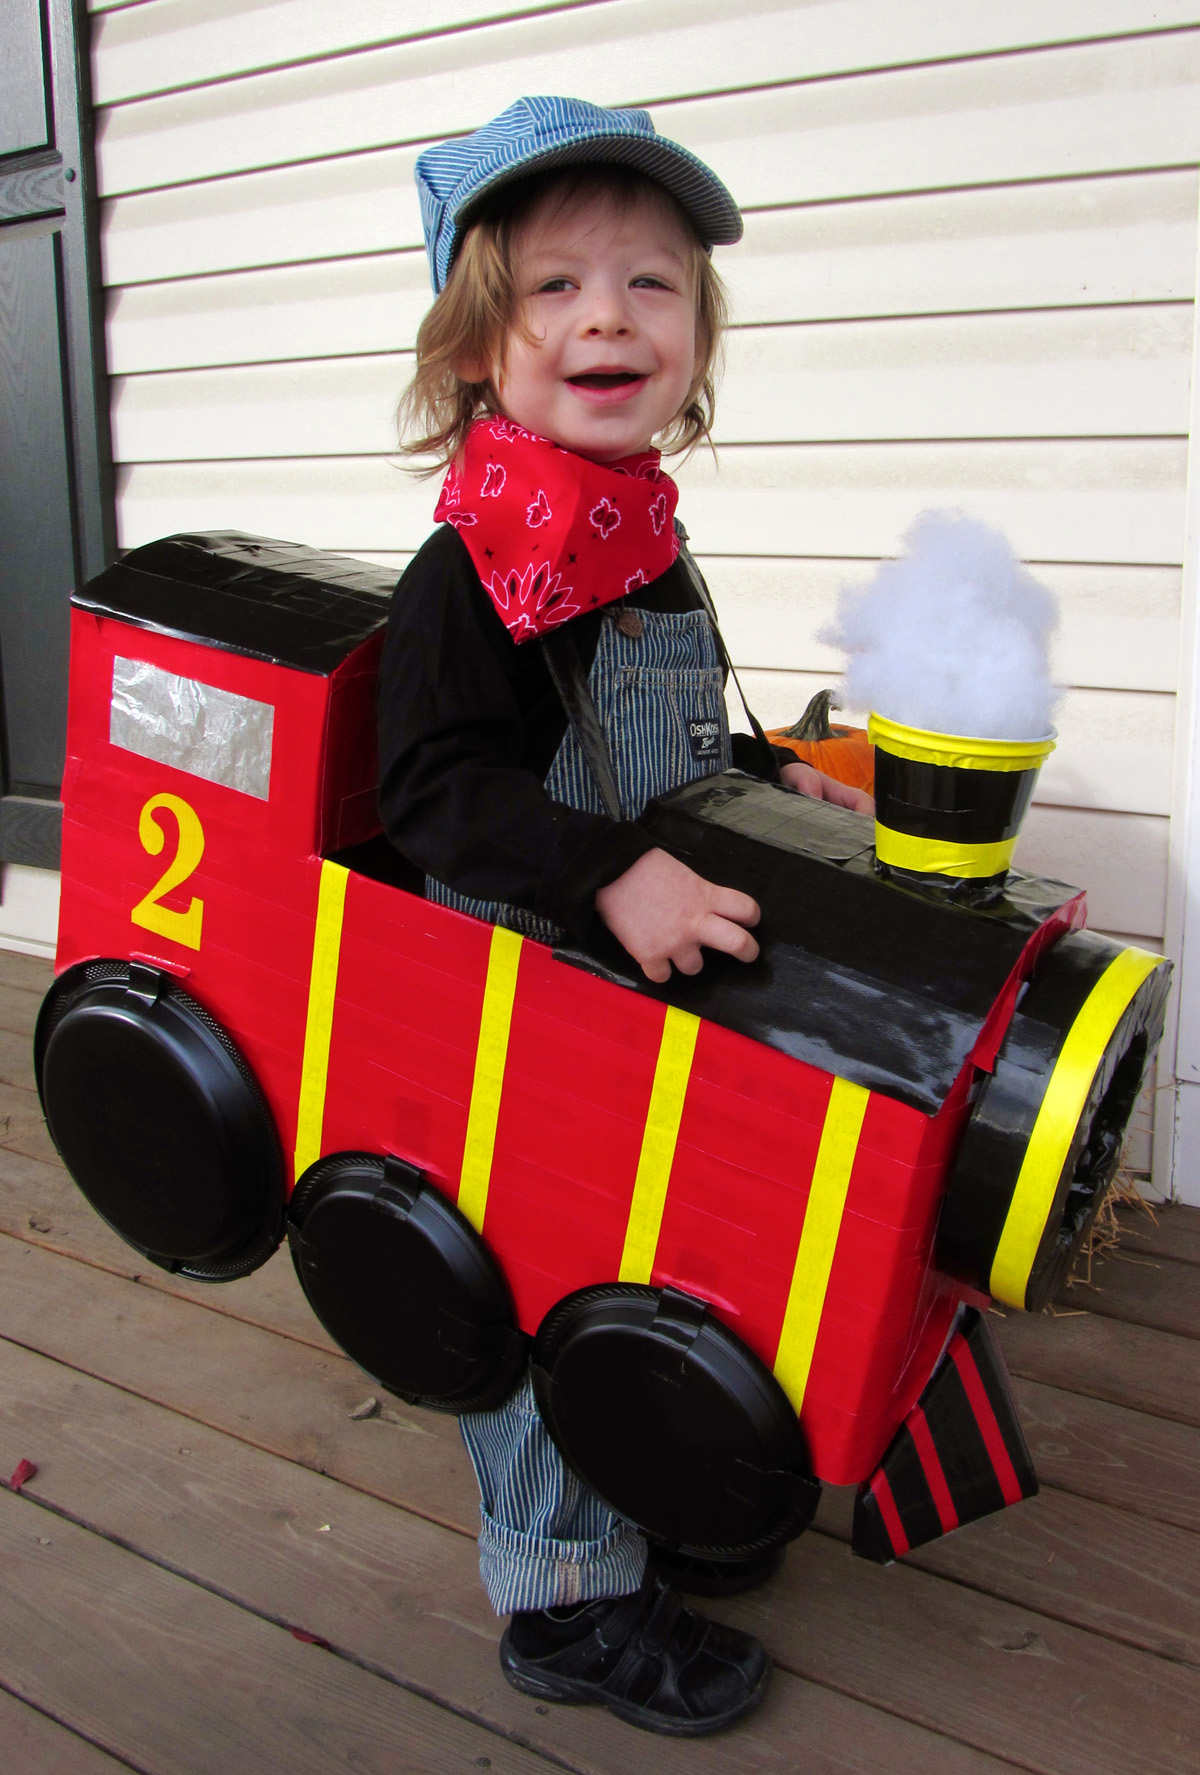
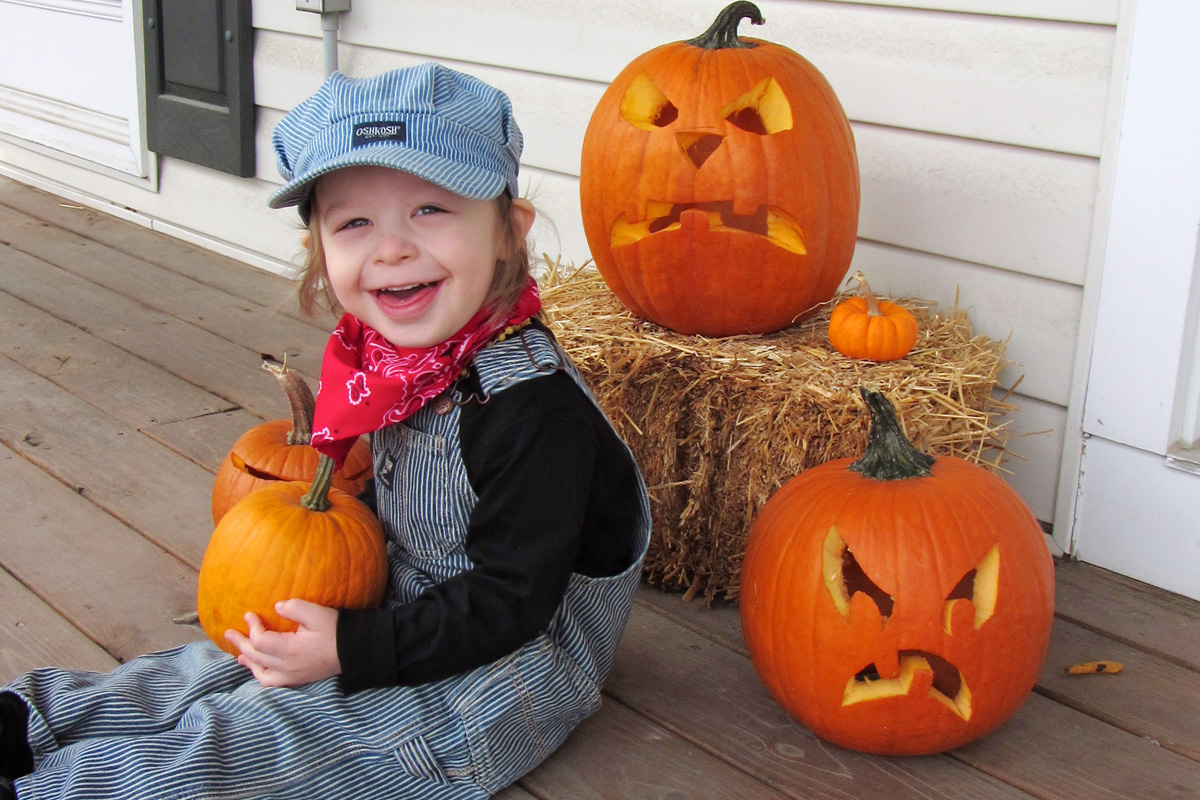
Happy Halloween from Jax & I! My little man decided he wanted to be a “choo choo” this year. He has since learned that he is actually an “engineer”. I love how his costume came together! And it was very cheap to do.
His clothes were: Osh Kosh overall bought when they went on sale for $10, an H&M tee for $5, thrift store Stride Rite shoes for $2, thrift store Osh Kosh hat for $1, and a craft store bandanna for $2.
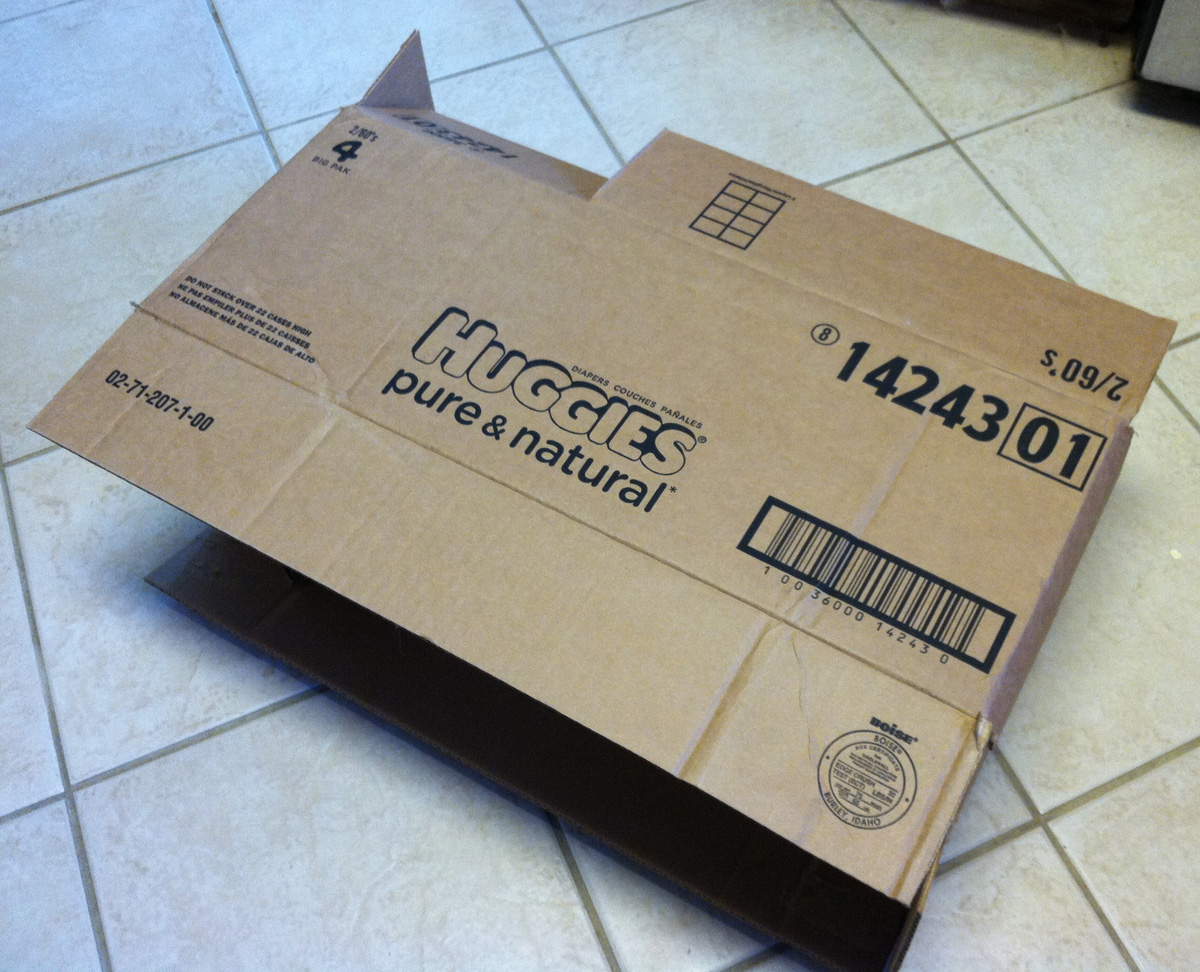
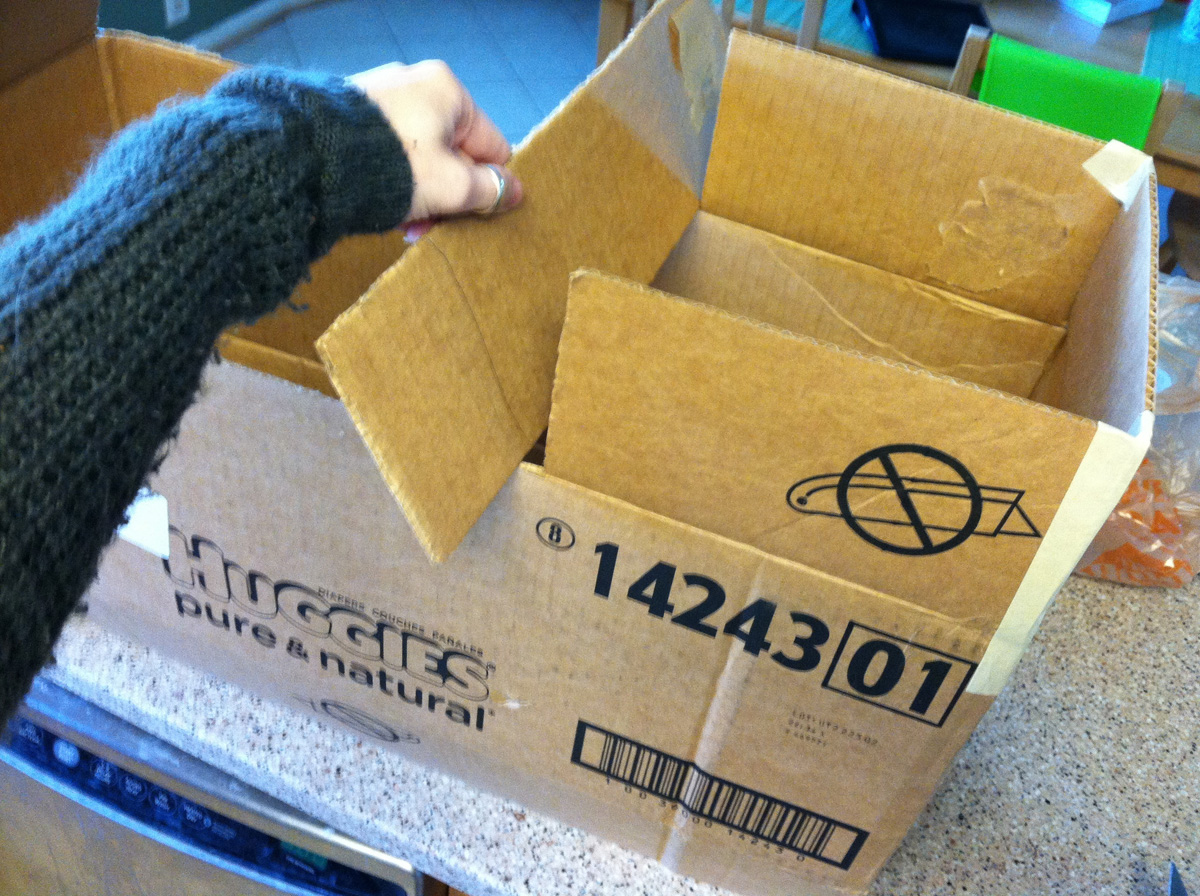
To make the train, I used: a cardboard diaper box and other bits of cardboard, red and black duct tape, a sheet of yellow duct tape, yellow thin plastic tape, leftover black party plates, a dollar store floral foam ring, dollar store red LED push light, aluminum foil (windows), leftover black party cup, the straps off a black dollar store reusable shopping tote and some polyfill stuffing.
I took a few photos as I worked on the train. If you want to make one of your own and have any questions, just ask!
And now for the winners of the SparkFun $50 Gift Certificate Giveaway!
Lisa who said “I have to admit I just stumbled upon your blog while searching for quiet book page ideas and I am so impressed! I find myself excited to get up in the morning and play with my kids and these fun books, instead of staying in bed and just letting them watch T.V. I have a great network of crafty moms who will be so excited about this too! I can’t wait to show them how fun and easy it is. The gift certificate is such a great idea! Thank you for all the inspiration.”
Sarah J. who said “Love this page! I really want to do a page like this for my son.”
Hazel who said “wow.. such creative touch with the LEDs.. the possibilities are endless in a quiet book – christmas trees, dollhouse.. candles on birthday cakes..”
Congratulations to our randomly chosen winners! Thank you to all who entered! Lisa, Sarah and Hazel, you can email me to claim you prize, or wait from an email from me with the gift code sometime tomorrow.
I’m so excited to be working with e-textiles again! (The robot page was my first effort.) Quiet books and LEDs can really be a perfect pairing. I really like to include a lot of interaction into my page designs, and what better to add than working lights?
This is a very simple e-sewing project – a perfect one to start with if you want to get the hang of it. And better yet? SparkFun has provided me with 3 $50 gift certificates so you can load up on supplies and create some LED projects of your own! Head to the bottom of the post to enter.
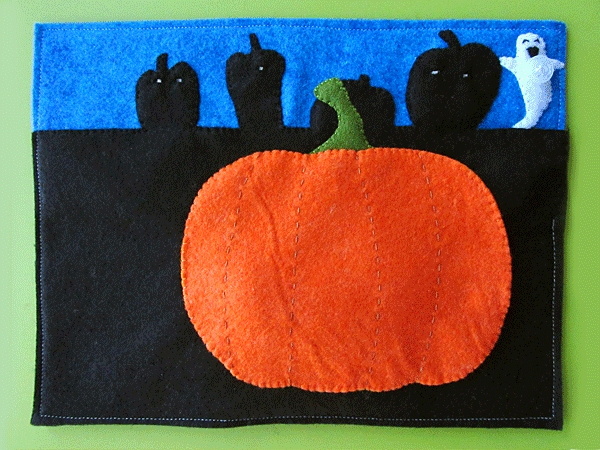
If you aren’t feeling up to the LEDs. this page works great without them. The main activity is a create-your-own jack-o-lantern face with pieces that hide inside the pumpkin.
This is the first in a series of pages I am doing for all 4 seasons. I’ll be doing one regular page and one holiday page for each season.
The beautiful felt for this page is provided by American Felt and Craft. See that beautiful aqua blue with swirls of cobalt it it? When I received samples of their newest colors, I HAD to change my background for this page to Pool Party. It is the perfect twilight sky color. It reminds me of when the sun has just barely set on Halloween night and you go out on the porch to light the candles in your jack-o-lanterns. Perfect. AF&C is having a giveaway on their Facebook page. Hurry and check it out!
Start by cutting everything out. Lay the pumpkin silhouettes at the top of a full black sheet of felt and cut away the negative space above them. (See photos.) Pin it on to the blue background, leaving the top loose so you can flip it down if you are adding the wiring and LEDs.
E-Sewing: Start by basting your battery holder in place as shown under the black felt near the edge of your page. Thread your needle with conductive thread and tie a knot in the end. 1. Come up through the top + (positive) hole and make several strong stitches through it. Using the white ghost shape as a guide, do a running stitch up to where the button will be (so that the stitches will hide under the ghost.) Stitch several times through the button board as shown. Tie off your thread with a knot, making sure the tail is short and can’t touch other threads.2. Start a new conductive thread and make several stitches through the other hole of the button board. Stitch a running stitch over to the + hole of the first LED and make several stitches in the hole. Continue the + (positive) thread as shown until you’ve gone through all the + holes in a chain. Tie off with a knot and trim the tail.3. Start a new conductive thread and make several stitch in the top – (negative) hole of the battery holder. Running stitch over to the negative hole of the first LED and make several stitches. Continue the – (negative) thread as shown until you’ve gone through all the + holes in a chain. Tie off with a knot and trim the tail. 4. Insert a battery into the holder and test the button.
Pumpkin Silhouettes: Lay the black pumpkin shapes down over the LEDs and press the button to see where they are. Cut tiny rectangles for the LEDs to shine through. Stitch around the holes to fortify them, and stitch the short sides of the hole down to the page so the holes don’t move out of place. Stitch around all the pumpkins, but leave the straight section between the far right pumpkin and the edge of the page unstitched.
Cut a square of felt to be the lining of the little flap you left unstitched over the battery holder. Add half of snap to the edge of the page (leave room for the edge seam) and add the other half to the lining. Sew the lining in using a blanket stitch on the two exposed edges and baste along the other two. (I basted by making long stitches on the inside of the flap and tiny stitches on the visible side.)
Ghost Button: Sew a scrap of black felt on to be your ghost’s mouth. I made mine a happy ghost. For his eyes, I made curved stitches. Find a white button with a convex back (so that the back curves out like the bottom of a bowl.) Test placing the button on top of the LilyPad button board and pressing lightly. If it turns on the lights, you have a winner. Sew the button in place on the ghost so it lines up with the button board, then sew around the ghost to secure him the the page.
Pumpkin: Sew the stem down to the page. I didn’t bother sewing the base of the stem, as it gets hidden under the pumpkin. Take your orange pumpkin piece and sew a running stitch to indicate all the folds in its shape. I used an orange-brown thread. Sew some yellow hook & loop tape to the inner yellow pumpkin piece (see the pocket photo below.) Pin the two layers together and sew a blanket stitch along the outside of the far right segment of pumpkin. (You’ll be sewing the opening of the pocket. Mine went from the bottom of the far-right fold line to the top of it. Pin the pieces to the page and sew around the rest attaching it to the page as a pocket. Sew some black hook & loop tape down to the page so it lines up with the yellow.
Jack-O-Lantern Pieces: For each jack-o-lantern piece, I sewed the yellow shape down to some black felt using a running stitch. Cut out around the shape so that the black is a bit wider than the yellow. Cut another piece of black felt to match and sew it on as a backing.
Jax adores this page and really loves making different emotions with the face shapes. He spent a whole bedtime routine the first night saying “He’s mad!!” and laughing hysterically over his memory of the smile turned upside down. You could add shapes of your own. There is plenty of room in the pocket!
The Good Stuff
I’m excited to announce a really great giveaway! I reached out to SparkFun recently because I think e-textiles are a really great match for quiet books. My next page will be very interactive and provide feedback to the child while they play. SparkFun has generously offered up three $50 gift certificates to their online store. (You will need to have at least $50 pre-tax and pre-shipping in your cart for the code to work.)
To enter, leave a comment on the blog post below. Make sure you include your email address in the right field so I can contact you if you win.
The Boring Stuff: NO PURCHASE NECESSARY. Sweepstake is open to those age 18 and older. Entries must be received between 12:01am 10/24/2012 and 12:01 10/31/2012. Three (3) winners will be chosen on 10/31/2012 and will each win one (1) $50 code for sparkfun.com. The codes require that you have at least $50 pre-tax and pre-shipping in your cart to work. International shipping charges and fees may apply. See the SparkFun website for details. The number of eligible entries received determines the odds of winning. If a potential winner forfeits or does not claim the prize, the prize will be re-awarded, at the sweepstake host’s sole discretion. All prizes will be awarded. Neither Imagine Our Life, prize sponsor SparkFun nor their affiliates will have any liability whatsoever for any injuries, losses or damages of any kind caused by any prize or resulting from acceptance, possession, use and/or misuse of any prize or participation in this promotion. Acceptance of a prize shall be construed as the winners’ consent to having their first name and last initial posted on the sponsor’s site following the contest duration. VOID WHERE PROHIBITED BY LAW.
Good luck! If you sew this page, with or without the LEDs, please send a photo or post it on the Facebook page. I’d love to see it!
This page is sponsored by American Felt and Craft, who provided the felt and crinkle material. When AF&C reached out to me about providing felt for some of my designs, I knew it was meant to be… The next page I had planned to make was a camping one, and the gorgeous earthy colors available in wool blend felt were so perfect for it. And crinkle fabric to make my camp fire crackle? Yes, please! Read more about American Felt and Craft here. Read more about my thoughts on wool blend felt here.)
.
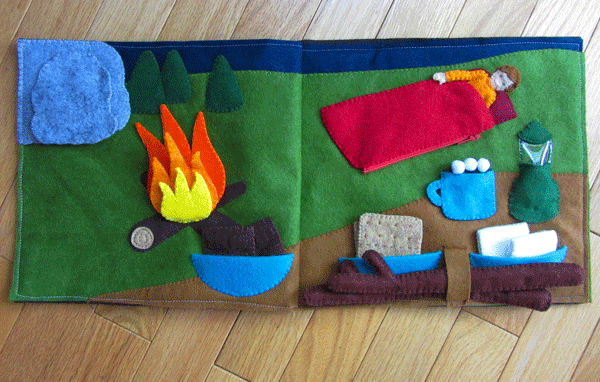
Let’s Go Camping!
This page is a lot of fun to play with! There is a zipper on the sleeping bag – something Jax needs to practice. Inside is a little bendable mini-Jax to play with! There is a cave hiding a cute baby bear, a lantern that lights up when you press on it, hot cocoa with marshmallows, a crackling camp fire and all the fixings to make s’mores.
The Background:I started with two sheets of cilantro felt and cut them away at the top to make the hills. You need to make sure the two sides line up where they will be sewn together at the center seam. I placed strips of wild blueberry felt behind the cilantro to make the night sky. I sewed the hills to the sky. I then sewed the table pieces to each page, making sure they lined up where the center page seam will be as well. I sewed the three pine trees down before starting on the cave.
The Cave: I sewed the cave interior down in the corner of the page, then sewed down the cave front, leaving the arch of the cave entrance open (see above photo.) I made the cave door by sewing the two door pieces together, then sewed it down into a flap along the top.
The Baby Bear: I first sewed the two sides of each far leg together, then pinned them between the two sides of the main bear body. I sewed a French knot eye with a little stitch in the corner on each side of the bear’s face. I stitched the bear together around the outside, then satin stitched his nose.
The Sleeping Bag: I pinned down the sleeping bag interior piece on top of one side of the upside-down zipper, folding the extra zipper tape under. I stitched along the edge of the felt, securing that side of the zipper. I then sandwiched the two outer sleeping bag pieces around the other side of the zipper (as shown above) and sewed along the zipper. To finish the sleeping bag, I sewed the two outer pieces together where the above photo is marked yellow, then sewed the outer pieces to the interior pieces (and the actual page) where the photo is marked green.
The Child: I made my child a mini Jax. I’ve included a drawing of girl hair in my pattern. I started by making an armature out of pipe cleaners. See the below photos for how I did mine. I laid the pipe cleaners on top of the pattern as I made it to be sure it would fit. (when working with the pipe cleaners, always fold over the ends so there aren’t any sharp pokies to hurt your little one!)
I started sewing the felt with his head. I embroidered his face (French knot eyes, a small stitch for the nose and a back stitch smile) then sewed the front and back head pieces on to the armature. I then sewed the front and back hair pieces on and added some stitches to show the hair. I sewed the hands on, then sewed the pajamas on. I added back stitching to the neck and chest.
The Camp Fire: For each of the three camp fire flames, I pinned the pattern piece on to two pieces of felt layered around a bit of the crinkle fabric, then cut through all 3 layers. Then I sewed around the outside of each. I sewed the two logs down to the page in an X, and sewed on the log ends with back stitched circles. I layered the flames together and sewed them to the logs along the bottom. The crinkle material gives the flames enough stability that the camp fire can stick up when the page is laid flat.
The Lantern: The body of the lantern is drawn to wrap around the LED light I bought. You’ll have to modify it if you use a different light. The light is a keychain, so I pulled off both metal rings that came on it. I started by sewing the bottom of the lantern glass to the lantern body. Then I laid the light in place on the page and sewed the lantern body down over it on the left and right sides (so that the bulb of the LED sticks up into the window.) Leave the bottom open, but sew a snap on to hold the light in. This way, you can get it out to change the battery. I sewed the top of the lantern on, then finished it by back stitching the sides of the glass.
The S’mores:
Marshmallows: I folded my square of felt into quarters, then stitched it into a tube as shown in the photo above. I sewed the inner tube, sewed the outer tube, then around the bottom edge to sew the two tubes together. You could cut your felt in half first then sew one tube inside the other.
Graham Crackers: The crackers are stitched on both sides with a dashed line down the center, then little + stitches to make the “holes”. I then stitched the two sides together. I made two, but you could make 4 if you prefer.
Chocolate: The tops of the chocolate had 4 rectangles sewn on before I stitched the front and back together.
The Bowls: I simply sewed the folded bowl shapes and sewed them to the page along the curves.
The Sticks: The sticks each have a pipe cleaner insider them. I folded the extra length back at the top, then out to make the branch. I folded the extra bit of branch back to the main stick and twisted it the secure it. I then sewed the felt over the pipe cleaners. I added a loop of felt to the table to hold the sticks.
The Hot Cocoa: I started by sewing three mini pom poms to the hot cocoa. Make sure they are on there good and secure! That’s the first thing Jax tried to pull off! I sewed the top of the hot cocoa to the mug back. I stitched the handle together, then layered it between the front and back of the mug as I sewed them together. I added a snap to hold the mug on the table.
Jax is having a great time with this page. I think his favorite item is the hot cocoa and marshmallows. He loves the mini Jax, but can’t work the zipper yet. It will be good practice for him.
The Giveaway! I am super excited to announce that we’ve teamed up with AF&C to host a giveaway featuring many of the supplies needed to complete this page! One winner will receive the felt and crinkle material needed for the camping page, plus a mini LED light and a piece of clear vinyl for the lantern from my stash.
PLUS, two more winners will each receive a mini LED light.
Our little blog is 1 year old this month! While I’ve been making websites since 1997 and blogging since 1998, it wasn’t until I had my little Jax that I decided to create a separate blog for all things crafty, creative and kid-friendly in our lives. It actually took a few months before I started to work on making the site because I needed a name.
When inspiration struck, it was due to two of my favorite songs: Imagine, by John Lennon and Across the Universe by The Beatles.
Images of broken light which dance before me like a million eyes,
they call me on and on across the universe.
To celebrate our 1 year “blog-iversary”, I am giving away a kit to make our farmer’s market quiet book page. This is not a completed page, but the supplies to create your own.
Included:
felt (winner decides if the pieces are pre-cut and ready to sew or not)
wooden tags (winner decides if the vegetables are painted on or not)
Velcro (the green Velcro will be cut into the needed shapes if the felt is cut)
ribbon & ric-rac
yellow seed beads
embroidery thread
needles (hand-sewing and beading)
(I do not have any more of the seed packet beads I added to my page, and they are no longer sold. These will not be included in the kit.)
How to enter:
To enter, leave a comment in the blog comment form below. Make sure you fill in your email address where it asks so I can contact you if you win.
For a bonus second entry, retweet the following tweet first, then tell me you did (include your twitter name) in your blog comment.
Do you like the sweet ribbon I used on my ice cream parlor quiet book page?
I think it was a perfect addition to the ice cream parlor awning. I have extra, so I am giving away two 37″ lengths of this cute ribbon to two lucky readers. The ribbon is 3/8″ wide, white with lavender and peach. It says “Ice Cream” and has little hearts.
To enter, leave a comment below. Please include an email address so I can contact you if you win. Winners will be chosen Tuesday, March 20th at noon.
Winners will be getting a code via email from me soon! If you didn’t win, you can still get these apps on sale for a limited time. Grab them now in the iTunes store while they are $0.99!
We will be reviewing the many iPad apps Jax has been trying out recently. The iPad is great for car rides and waiting in restaurants. I stick mostly to educational and pretend-play when choosing apps for him.
We are giving away one of each of these iPad apps! See below for details!
We have had AlphaTots and TallyTots on our iPad for quite a while now. I was really excited when I found then because Jax was just starting to get into letters and numbers. When Spinlight Studio contacted me to try their other apps, TableTots and Swapsies, Jax and I were happy to oblige!
TableTots
Don’t purchase TableTots thinking you are buying an educational game – you’ll be disappointed! Think of it as an educational tool. Imagine buying a bunch of learning placemats and all the shapes, letters, numbers, coins and more that go with them (with the added bonus of no little pieces to clean up!) That’s TableTots!
Jax just turned 2, so some might say he is too young for a teaching tool like this. But he adores letters and numbers and I am teaching him every day while he is so enthusiastic. Because he is so young, I do let him free-play with the app more often than when I quiz him with it. He chooses the board and the pieces, and I’ll ask him to find a letter or count the coins. He loves the dominoes and it has become one of his new favorite words. This app is helping me teach him to count objects and associate quantity with the numbers he has already learned to recognize. Later on we can move on to simple math, spelling and learning about money. But, even just with free-play, he learns so much because the objects all say what they are when he touches them.
What would I change? My biggest gripe is there is no multi-touch. This is an app a parent/teacher and child play together, yet only one of us can move an object on the screen at a time. I also don’t like how the pieces are randomly tossed on top of each board, covering up the writing. It makes it hard for Jax to understand that he should sort objects into their correct places.
It would be nice if there were color names. There is a screen that give you a circle of every color to lay out in a color wheel, but when you touch each one, it just says “Circle!” There is a “peek-a-boo” curtain that can be dragged across the screen that I don’t really understand, but that can be turned off.
I think TableTots would be a great buy for anyone who does preschool learning with their child, whether informally or as a part of home schooling. This is an app that parents and children play together, and it is always great when you can combine learning, technology and time spent with your child!
AlphaTots & TallyTots AlphaTots is a great interactive alphabet game. I give this app a lot of credit for Jax learning his ABC’s so quickly. What sets it apart from similar apps is that each letter is represented by an action, not an object, so you don’t have the same old “xylophones” and yo-yos”. Instead, you “x-ray” some presents and “yank” on a cord to fill and empty a tub of water.
TallyTots is very similar, but deals with the numbers 1 – 20. Jax has learned all those numbers, though he has trouble counting on his own past 13 just yet. This app has unique activities for each number as well. Jax loves to build sandwiches, feed flies to the frog and look at tiny cupcakes under a magnifying glass.
When you choose a letter, They tell you its name and the sounds it makes, then you are presented with an activity. When you complete the activity, you can move on to the next letter. You can also switch to a different letter by pressing an holding one of the letter tabs until the meter fills up. This is a great feature because it prevents clumsy hands from bumping a tab and switching letters accidentally. It doesn’t stop Jax from navigating the app. He quickly figured out how to do it.
What would I change? Not much – just the stability of both apps. We have very few problems with our iPad 1, but AlphaTots and TallyTots are our number 1 crashes. Jax learned to say “sorry” because they were crashing so often and that is what I’d always say to him. AlphaTots likes to crash most spectacularly: it freezes on the loading screen for a minute or two, then the whole iPad reboots. Yikes! The frequency of crashes tends to change whenever they update the apps, and it seems like it is happening a lot less often right now.
Crashing troubles aside, I would definitely recommend these apps for toddlers! With so many activities per app, Jax never gets bored. He picked up on his letters and numbers so quickly and takes pride in getting them correct. I think Jax’s favorite feature of both games are the songs. He loves to hum along and dance around.
Swapsies
I’d seen Swapsies in the iTunes App Store before but had passed it over. I just didn’t think Jax would be that into it. And, so far, he isn’t. We have a sticker book game with a page of both boy and girl dolls that he enjoys dressing – especially putting glasses on them! This app is different. It isn’t free-play, but matching. I think it’s a great idea, but Jax hasn’t really latched on to it yet.
You have your choice of a few boys and girls and buttons for three items of clothing: hats, tops, and bottoms. The clothes are all typical “what I want to be when I grow up” outfits. Police officer, astronaut, train engineer, etc… While gender neutral, they all tend to be masculine.
To play, you drag an item to the boy or girl and if you complete the outfit, a little button appears to play a reward sound. Jax thinks the sounds are funny, but they haven’t been enough incentive for him to match the outfits himself.
What would I change? The interface is a bit awkward. The clothing choices are presented in three round buttons which make Jax think he should press to choose them, not drag them to the body. This quickly frustrates him and makes him lose interest. I think if there was more of a celebration when a match is made, he might better understand the goal of the game. Perhaps a gallery of all the completed outfits with a word/audio telling what they are. Jax just doesn’t instinctively know what a mail carrier or “rancher” wears.
As with all apps I get that Jax isn’t into, it will stay on the iPad just in case he likes it later. This has happened more often than not! I don’t think we would have bought this one, but it could be fun for a child who is into what they want to be when they grow up.
The graphics on all of Spinlight’s games are cute, crisp and colorful! I love when my son’s favorite games are pretty to look at, in addition to being educational. Their apps are available in both the Apple App Store and the Android Market for Android devices. They are currently on sale for 99 cents each!
Here is a video of Jax playing Alpha and TallyTots, plus a clip of Swapsies:
Would you like to win one of these great apps?
Jax & I have four free app codes to give away (one for each app) to four lucky winners. To enter, leave a comment on this entry. Four random winners will be chosen at noon on Monday, February 13th. Each winner will receive a code good for one of the above apps (my choice, as I only have one of each.) Good luck!
Full Disclosure: We purchased AlphaTots and TallyTots ourselves. Spinlight Studio provided us with free copies of TableTots and Swapsies to review and a copy of each to give away. This review is my own, honest opinion.
If you have a toddler or preschool app you’d like Jax and I to review, please contact me with details. We have an iPad 1 and an iPhone 4.

 SO Awesome offers gorgeous, educational, non-toxic, extremely durable card sets designed for how kids play and work. Montessori-inspired. Made in the USA. Their cards are perfect to engage children in carseats, strollers, shopping carts, and long airplane rides.