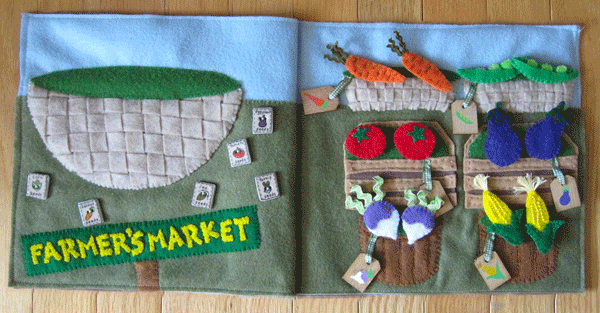
At last, I have another quiet book pattern for you! I got a little bit carried away on the details of this one, as I did everything but the veggies while on vacation at the beach. Feel free to simplify things wherever you need to.
Someone on the Facebook page suggested I do a farmer’s market page, and I loved the idea! I thought it was a great way to feature vegetables. Jax recently fell in love with this classic Sesame Street song from a sing-along DVD we got at the thrift store, so was is perfect timing.
This page features sorting and matching. I also added some seed packet buttons I found at the thrift store. (I’d originally planned to make potatoes, but when I realized all but one of my veggies matched the buttons, I switched to a super cute turnip!) They have the veggie names so Jax can read them when he gets older. Right now he just tells me the letters he sees. The seed buttons are no longer sold, though I did see some on Etsy.
All of the bins and baskets have green Velcro (the soft loop side) for the green inside part. I used Babyville hook & loop tape I bought at Joann’s fabric store. I didn’t use the hook side. I find that the hook side of Velcro ruins felt when you pull it off. Instead, I used snag-free Velcro on the back of my veggies. While they don’t stick quite as strong to the loop unless you press down, they do zero damage to the page or the other veggies!
What I used:The pattern, background felt in sky blue and olive green, felt (in natural, tan, 2 browns, red, orange, yellow, 4 greens, purple, violet and white), thin green gingham ribbon, tiny olive green ric-rac, varigated green ric-rac, seed packet buttons and wood tags (that I painted to have the matching veggie shown.)
Background, Sign & Large Basket: I pinned olive green down to my sky blue background. Once all the baskets were sewn down, I went back and sewed down the exposed edges of the olive green. For the sign, I sewed down all the yellow letters to the green backing, then outlined them with a back stitch in dark brown. For the large basket, I cut scrap strips of natural felt and wove them together a little larger than the basket shape. I pinned it together and trimmed the woven strips to fit, then sewed it all down to the page. I cut the green Velcro (loop side) into the basket top shape and sewed it down.
Vegetable Bins & Baskets: For the top baskets I cut three shapes for each. One was the base, one was cut into horizontal strips and one cut into vertical strips. I woven and sewed down the baskets the same way I did the large one. When I sewed them to the page, I let them puff up a bit to give a rounded shape. The tops are green loop Velcro.
For the middle bins, I laid down the tan backing piece, then the brown inner shadow piece, then the Velcro top piece and then finally three tan wood slats and pinned everything down. I used 2 French knots at each end of the wood slats, then did a running stitch across the top and bottoms. I did more running stitch around the top of the bin’s backing, then sewed down the Velcro.
For the bottom barrels I sewed down the barrel and the Velcro. I did a back stitch following the curve of the Velcro to make the lip of the barrel. I did a stem stitch to make the barrel’s slats. A back stitch would work well too.
I used plain wooden tags that I painted with craft acrylics as labels, sewing them on with loops of ribbon. If you have printable fabric, you could make tags that way to avoid painting.
Carrots: I decorated both sides with long, horizontal stitches in an orange-brown thread and sewed snag-free Velcro to one side. I sewed the two sides together with bits of tiny ric-rac sticking out of the top. I got my ric-rac at the craft store in the $1 trim bin.
Peapods: I sewed 3 peas down to one of the larger pod pieces and sewed snag-free Velcro to the other. I laid the smaller pod piece on top and sewed all three layers together around the edges. The top piece will become a little pocket.
Tomatoes: I sewed the green bits down to the fronts and snag-free Velcro to the backs before sewed them together.
Eggplants: I sewed snag-free Velcro to the backs of each eggplant, then sewed the purple pieces together. I layered the green tops around them and sewed them together as well.
Turnips: I sewed the violet tops to the white shapes then sewed snag-free to the backs. I sewed the front sand backs together with loops of variegated ric-rac sticking out of the top. That was also from the $1 trim bin.
Corn Cobs: I decorated my corn cobs with yellow seed beads. If your child will be playing with it unsupervised, I’d suggest skipping that step. For the corn silk, I tied a little bunch of cream-colored embroidery floss with a knot at the end. When I sewed the two sides of the corn ears together, I put the knot between them with the tassel stitching out of the top. I made sure to make a few stitches through the knot. I layered the green leaves over the bottoms of the ears and sewed them on. I sewed my snag-free Velcro on last, making sure to only go through the back layer.
For the seed packet buttons, I just sewed them on randomly by the big basket like they were laying out on the farmer’s market table.
I love this page! And I really love that all the little pieces use Velcro but don’t stick to each other or cause pulls in the felt. Jax knew just what to do when he sat down with the page. He knows all the veggies except the turnip. We’re working on that one!
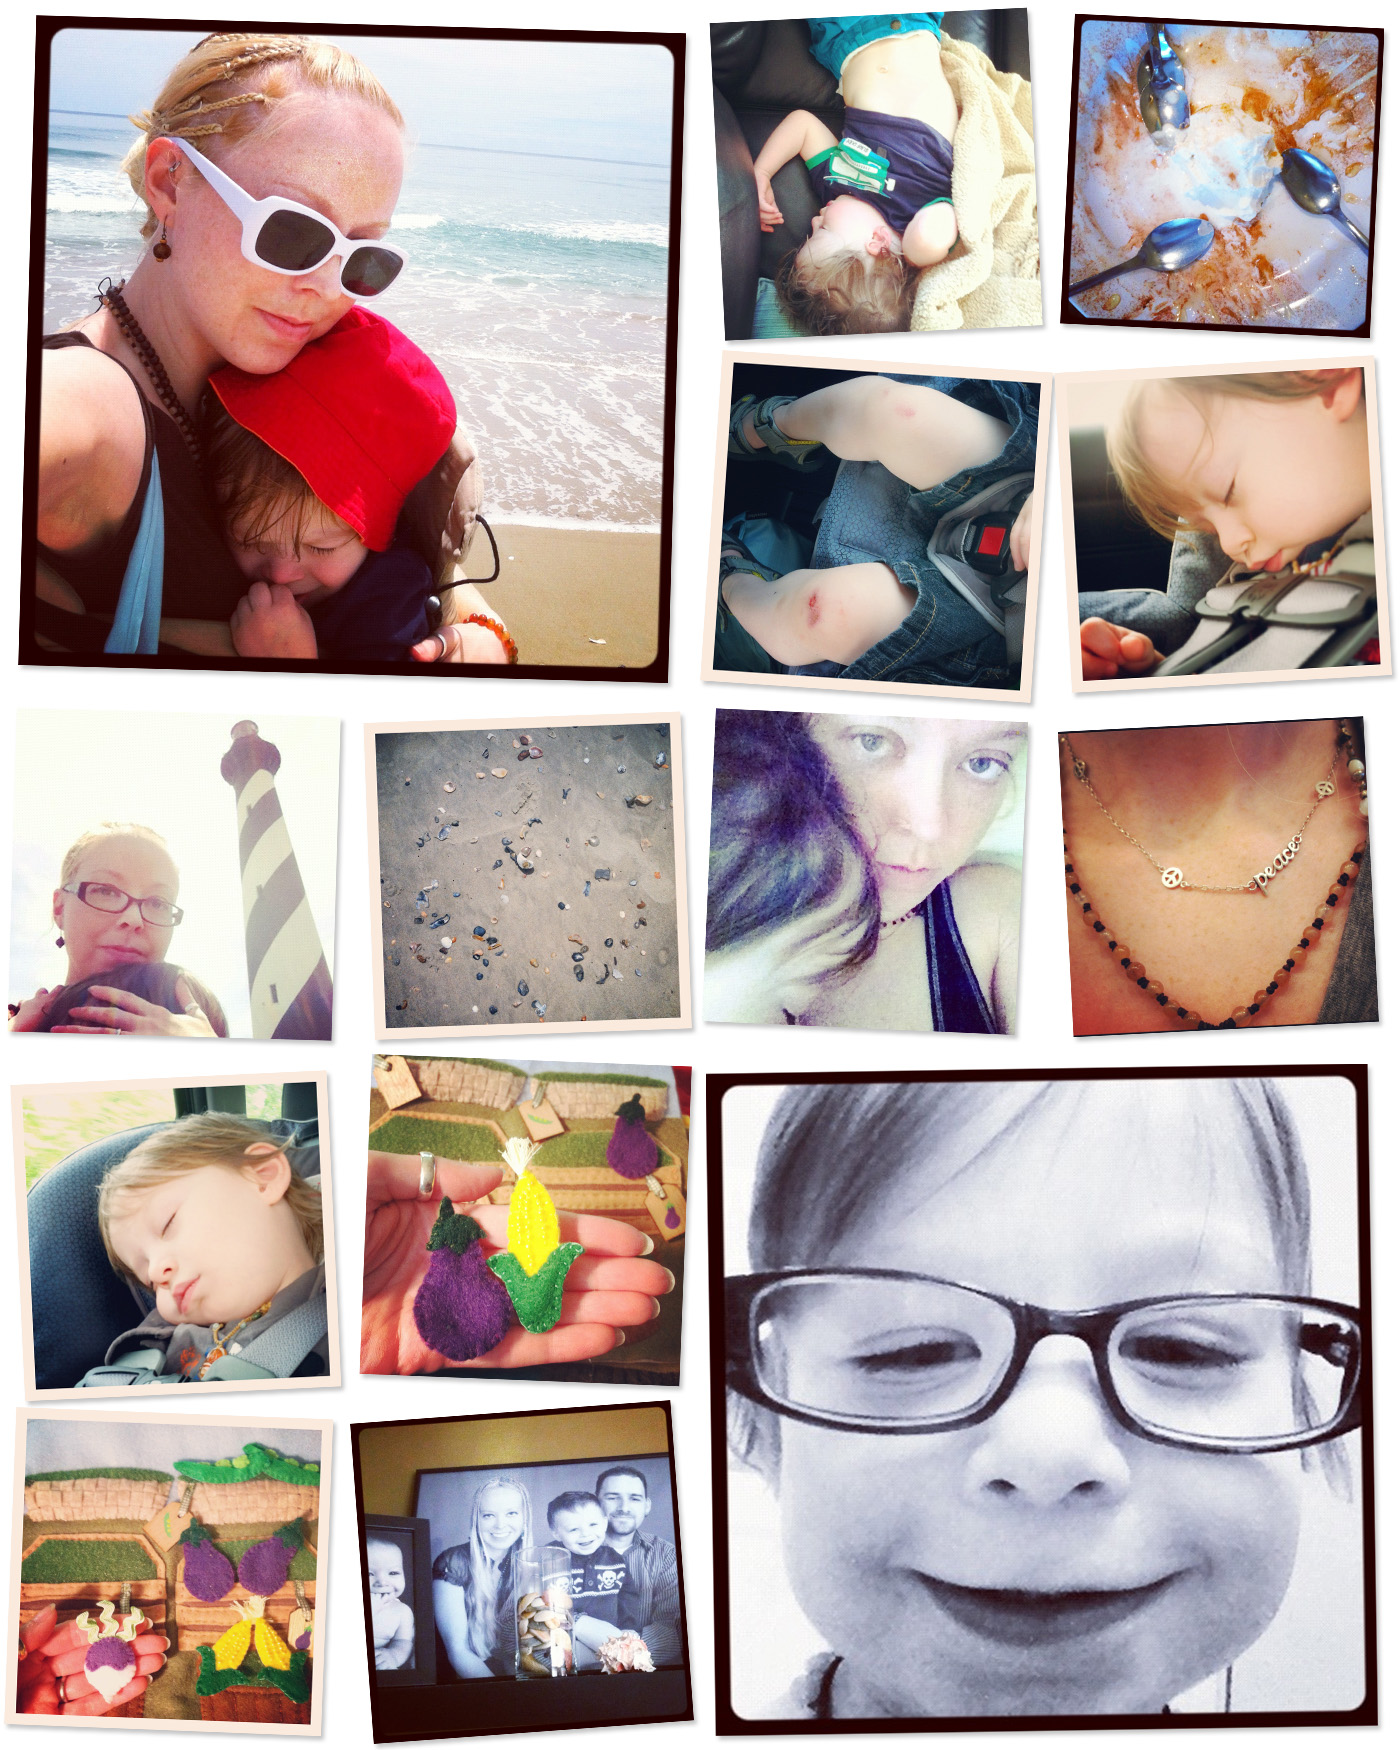
Finally downloaded the last 177 photos I’ve taken recently with my iPhone, so now I’m caught up with my Instagram collages! One of them is the week before our trip, and the rest are from the beach.
This week I’m working, unpacking and preparing for a huge community yard sale this weekend. I really don’t like sorting and pricing everything, but it has to be done! Do you you price items for your yard sales ahead of time, or do you wait until people ask?
I recently asked a question on the Facebook page about how much people would be willing to spend on one of my completed quiet book pages. I get email inquiries, but they take SO much time to sew. My time makes me more money if I do graphic design work. But, I’d love to switch some of my work hours over to crafting, so perhaps I can sell some patterns. Others have suggested kits or pre-cut felt, mass-producing one or two pages per month to sell and small, themed books/patterns. What do you think?
I will be featuring some hand sewing basics here for those of you who are new to it. If you have a special request, please let me know!
Embroidery Floss
When I sew with felt, I almost always use 2 strands of embroidery floss. Embroidery floss comes in 6-ply – 6 strands put together. I generally use DMC or Anchor, but sometimes buy bulk packs of cheaper stuff. The brand name floss tangles a lot less. It comes in a skein – an elongated coil that is banded at the top and bottom with paper rings. You can just pull on one of the tails to get the length of thread you need, but the skein will most likely get messy. I recommend buying paper bobbins and winding your new skeins around them. Write the color number on the side and pop them in a craft box for storage.
Threading the Needle & Getting Started
Let’s get started! Cut off twice the length of thread you want to work with. I usually cut about 4 feet that will end up 2 feet once folded. Separate out one of the six strands of floss and hold one tight to it. Use your other hand to slide the other 5 strands in a bunch down the length. Make sure the bunch doesn’t start to get too tight and tangle. A little wiggle here and there will keep it from tightening. When you have your single strand, fold it in half so the ends meet. (You can set aside the rest of the thread to use a little later, or wind it around the bobbin for storage if you won’t need that color again for a while.)
Now, thread your needle, with the two ends going through the needle eye together. I like to get the ends of the thread damp then pinch them between my thumb and forefinger, with just a couple mm sticking out. Then I slide the hole of the needle down onto the thread, wiggling back and forth slightly. Trim the ends of the thread first with sharp scissors if they are at all frayed. (I use these.) Pull the ends through the needle for a few inches. You should have a loop at the end of your thread.
Ready to stitch? I’ll be doing a back stitch, so my first stitch will be a simple straight one. Come up through the back of your felt, but don’t pull the thread all the way through. Come back down to make your stitch, then pass your needle through the loop at the end of the thread. Gently pull it tight to secure your thread. Quick, easy and no knot!
Back Stitch
A back stitch will give you a nice straight line of dashed stitches with no space in between them. Start with your first stitch already done. Come up through your felt from back to front at the spot you want your stitch to end. (So if each stitch is 3 mm long, come up 3 mm from the last stitch.) Go back down through your felt in the same spot your first stitch ended. Your two stitches will be sharing the same hole in your felt where they meet.
Continue on the same way – come up where you want each stitch to end, then go back down through the previous stitch’s hole.
Here is what the front looks like:
And here is the back:
Tying off the Thread
There are many ways to tie off your thread – use whatever works best for the situation. This is what I tend to do most often to keep the back of my work neat.
On the back of your work, run the needle through one of the stitches, but don’t pull it all the way though. Pass the needle through the loop your thread makes then pull tight into a knot. Go back through the stitch the opposite way and repeat making the knot. I don’t like cut my thread close to the knots, so I run my needle through several stitches before snipping it.
Yesterday we made the 6 hour drive home from our week in the Outer Banks of North Carolina. It’s good to be home, but I miss the ocean and pool already!
We go to the beach in the beginning of May every year. This year, I was expecting a whole lot of fun with my little 2 year old. Last year he enjoyed the pool, but we were just carrying him around int he water. He had enjoyed the beach, but fell asleep in our tent after very little sand play. I had big visions of all the fun beach and pool time we’d have this year… And I couldn’t have been more wrong!
Turns out, Jax is old enough now to be afraid. He was scared of the pool and wouldn’t go in. We eventually convinced him to play beside the pool with water squirters and a bucket. He thought that was great and started asking to go back to the “pool beach” constantly. I was a little sad he wouldn’t go in, though. We specifically chose a heated pool and it was heavenly.
As for the beach… If Jax could sum up his opinion of it in one word, it would be “dirty!” As soon as we arrived, we all headed down to the beach for a walk. He freaked out immediately and demanded to “Go home! Go inside!” I had to take him in to calm down while everyone else walked. It was quite windy that day, so I assumed that was the problem. On a warm, calm day, we took him out again. We had set up a beach tent and blanket. He spent the majority of his short time out there standing in the tent crying about going home and the dirty sand. We tried very hard to show him how fun building sand castles was. He did make one trip to pick out sticks to put on top of our castle, but then wanted to be held and cleaned off. I took him back in before he got too stressed out. I made sure to have beach time throughout the rest of the trip, but not nearly the amount I’m used to. I stuck to carrying him in our Beco.
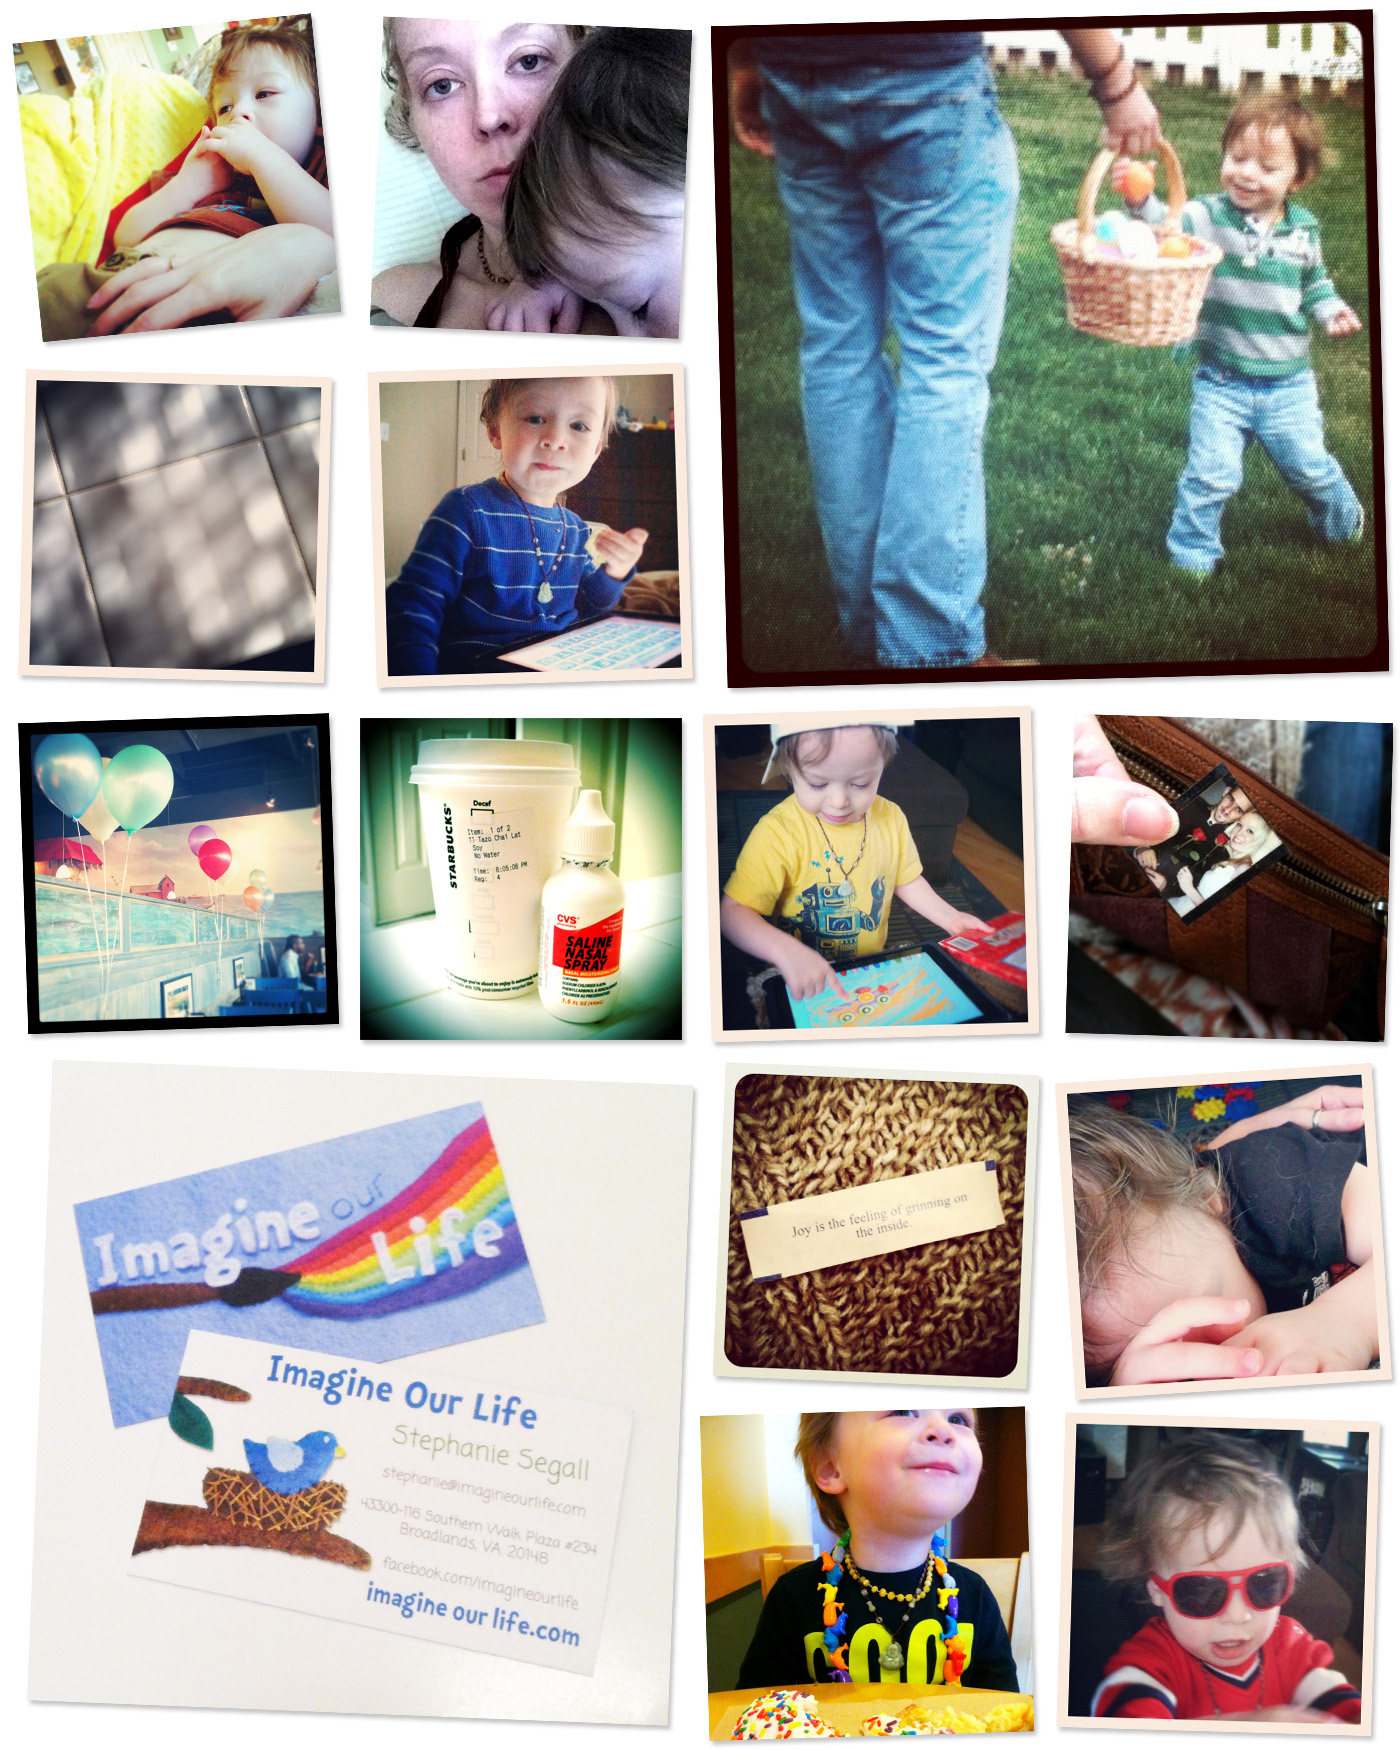
Towards the end of the trip, Jax woke up around 10pm beside me with a horrible choking cough and made it hard to breathe. By the next day he had a cold, which is now full blown. It made the drive home pretty uncomfortable for him, but we made it through!
We didn’t bring many toys to the beach house. I brought him for soft blocks that were lightweight to pack and all of my recent quiet book pages. What were his favorite pages? The Cooking Breakfast page (with the food from the Starbucks page as well) and Ice Cream Parlor were his absolute favorites. He loved “cooking” and egg sandwich and bringing it to us saying, “Mama, it’s a nice sandwich!” He names all the ice cream flavors and told me the rainbow flavor was mango.
I’ve been working on my next page – a farmer’s market with vegetables! The background is 98% done and I’m working on the cute felt veggies. You can follow my progress on the Facebook page. When I’m done, I’ll be starting a cupcake oven.
“It’s a rainy, sunny day. The rainbow‘s here to play!”
Jax loves color and he really loves rainbows! It was inevitable that a rainbow page had to happen. It took a while for me to decide what exactly to do. My first thought was a rainbow stacker that comes out of a cloudy pocket. But, I’d need to make each ring 2 sheets of felt thick for strength… 6 x 2 = Way too thick for a quiet book page!! So I changed plans and made a rainbow puzzle.
The base of the puzzle is a ring. When you store it in the cloud pocket it looks like a rainbow. Along one section is a row of snaps. There are rainbow color puzzle pieces that snap on. Jax is not good with snaps yet, so this is good practice for him. (If you use Velcro, I recommend this snag-free version that won’t catch on your felt!) The puzzle pieces have pipe cleaners in them so they become playthings themselves.
What I used:The pattern, sky blue background felt, felt (in white, red, orange, yellow, green, blue and purple), 6 snaps, several pipe cleaners and thread to match. I also made a little rainbow necklace as a little surprise inside one of the cloud pockets. I used pony beads from the thrift store.
Cloud Pockets: Sew the across the top of the two layers of felt on each cloud. I used sky blue thread. Pin the pockets onto your background felt and sew the sides and bottom down. I used a machine to go through all the layers quickly and neatly.
Puzzle Base: First sew half of a snap to each ring. (To find your snap placement, stack all the rings and mark a dot where you want it.) Pin the orange ring to one of the red rings and sew them together along the outside of the orange. Pin the yellow on top and sew it down the same way. Continue through the all the colors. Pin the red backing on to the back side and sew it together around the outside. Carefully trim the inner circle if needed to even it up. Using purple thread, sew through all the layers around the inner hole.
Puzzle Pieces: For each puzzle piece I prepared a length of pipe cleaner with the ends folded in twice to hide the pointy wire end. (You could also duct tape around the folder end to be extra careful.) I sewed the other half of the snaps to one side of each backing and free-hand stitched the color names to the fronts. Sew the fronts and backs together, inserting the pipe cleaners when they are halfway sewn.
I hope you enjoy this page! Please stop by the Facebook page and share your creation if you make it. You could change it up to be a ROY G BIV rainbow if you prefer.
Jax adores it! And, maybe it will save me from having to draw him eleventy billion rainbows a day… But, probably not!
I’m still playing catch-up after my month of sickness. Two colds and a stomach virus! Good riddance, April! Now I just have to make it through a crazy insane week and we’ll have our beach vacation!
I’m currently working on a rainbow page for Jax’s quiet book. It’s taken some though and revisions, but last night in bed I finally got it figured out by sketching ideas on the iPad. I should get it done in the next few days. I also sketched out a cupcake page idea. My next page’s pattern is already drawn and printed – a vegetable farmer’s market! I’m excited to work on it during vacation. I’m also going to draw the pattern for the cupcake page before the trip, just in case I finish the veggies fast. Sneak peaks will be in the Facebook page, as usual.
Do you have any great quiet book pages you are proud of that you’d like to show off? I’d love to feature others’ pages here occasionally. If you’d like to be featured, email me your photos (or links to your photos), your name and any notes you’d like to add about them, and a link to your website (if applicable).
Since I haven’t posted my Instagram photos in a while, I have a ton of them! Do you use Instagram? You can follow me at username “iolstephanie”.
We eat out more than most families – I’m vegetarian and my husband is not. It can be hard to cook meals that satisfy us both. It can be easier (and often cheaper) for us to each pick out what we want in a restaurant instead of us having to cook two dinners at home.
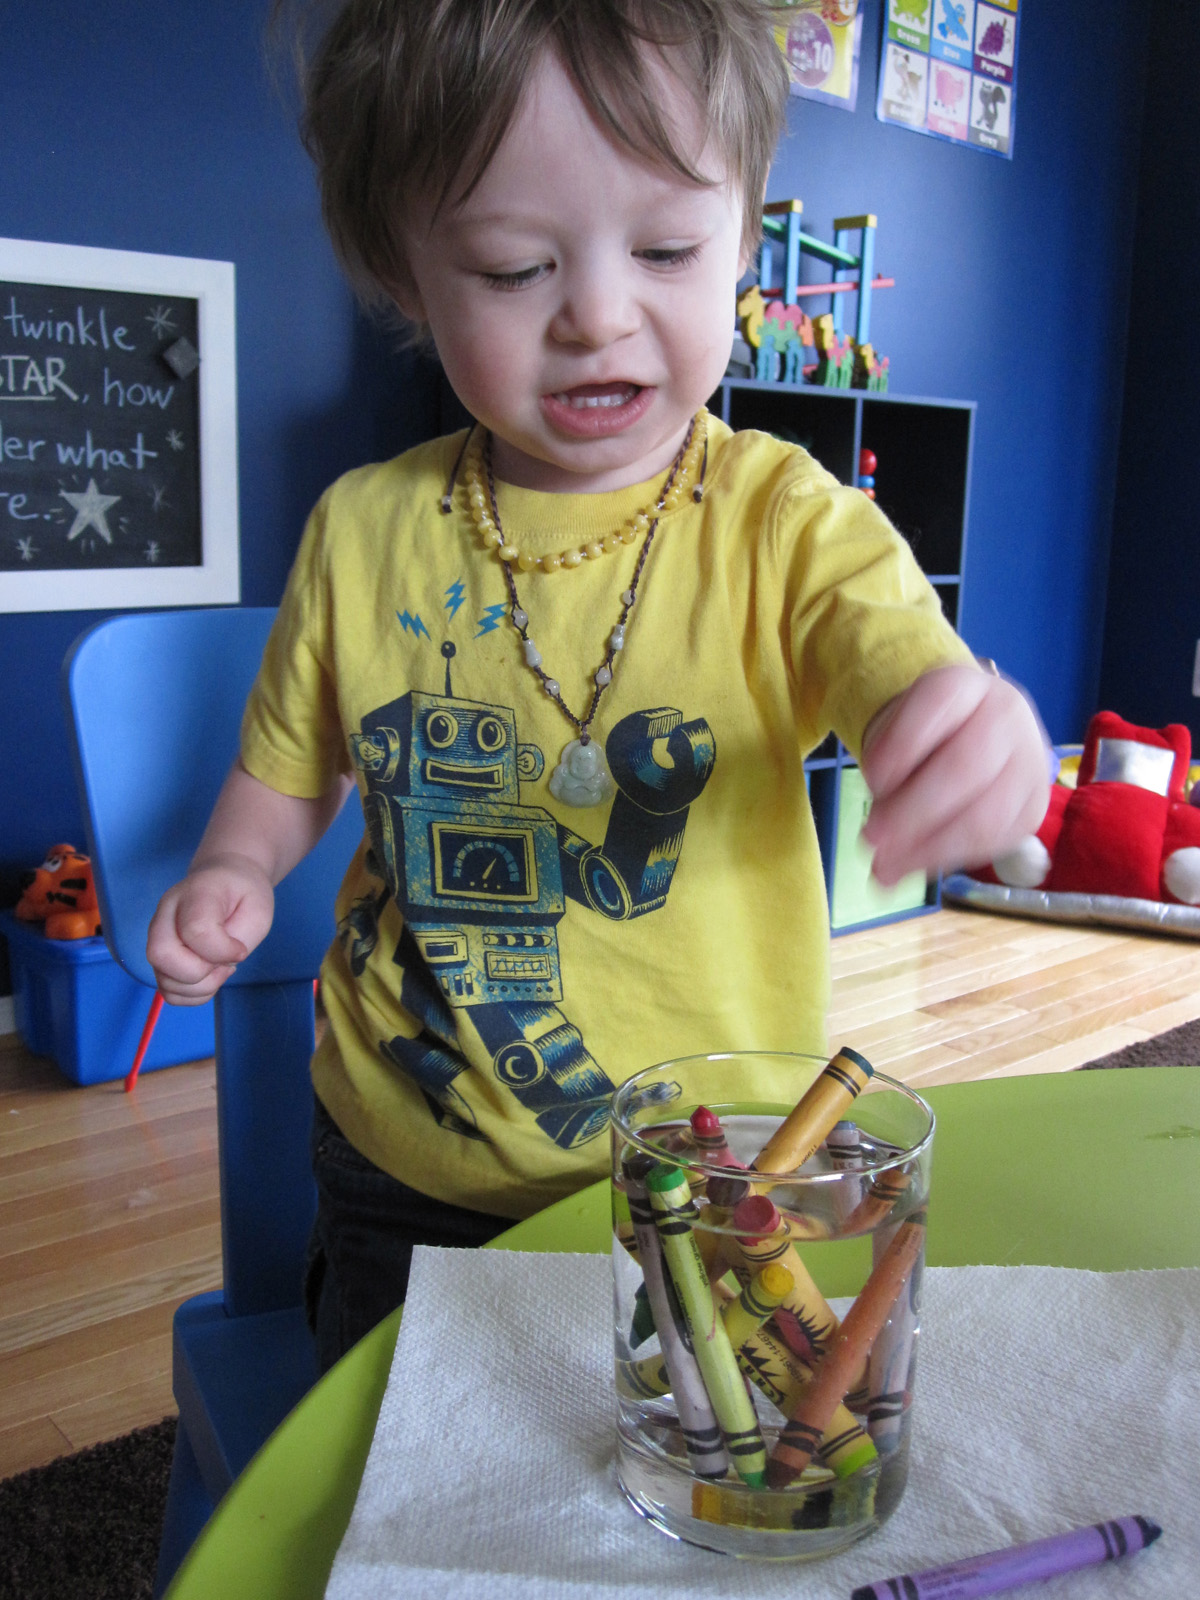
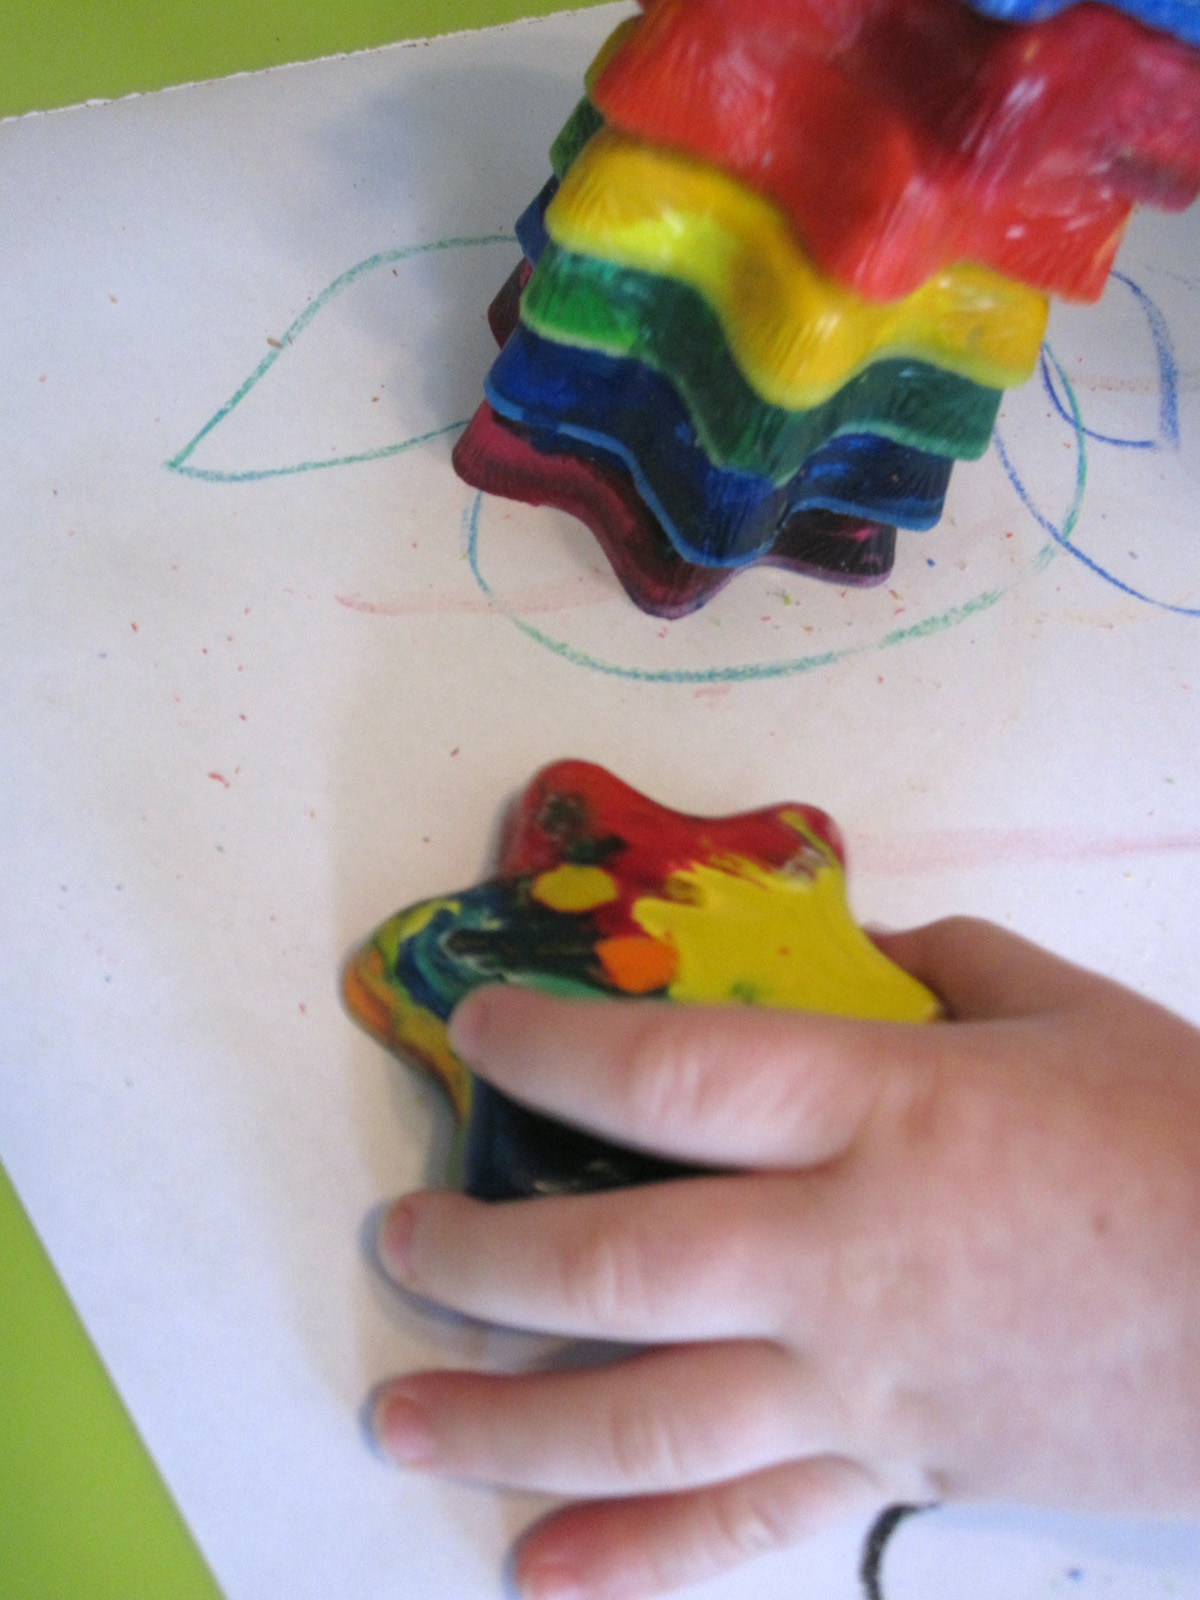
One side effect to eating out with a toddler is I end up with a lot of kids’ menu crayons in my purse. I’ve been collecting them in a baggy for some time (as well as broken ones from home and party leftovers) and was finally ready to create something new with them.
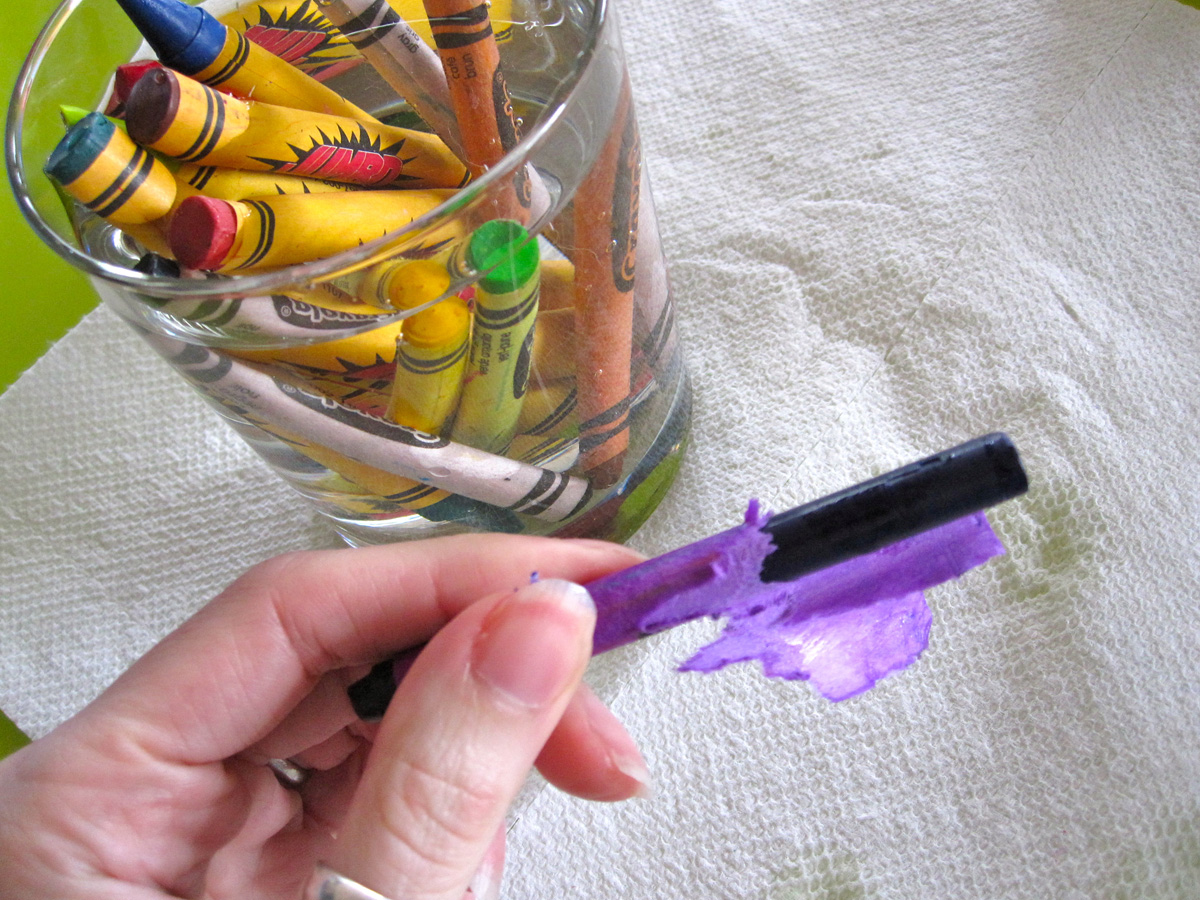
There are plenty of recycled crayon tutorials online, though we just winged it. I heated the oven to 275° F and sat down at lunch time to rip the wrappers off. Ugh! Easier said than done! I ended up dropping the crayons into a glass of warm water. After a little soak, 90% of then peeled right off. Some of them were difficult to peel regardless of what I did. I think the baggy got left in the car at one point.
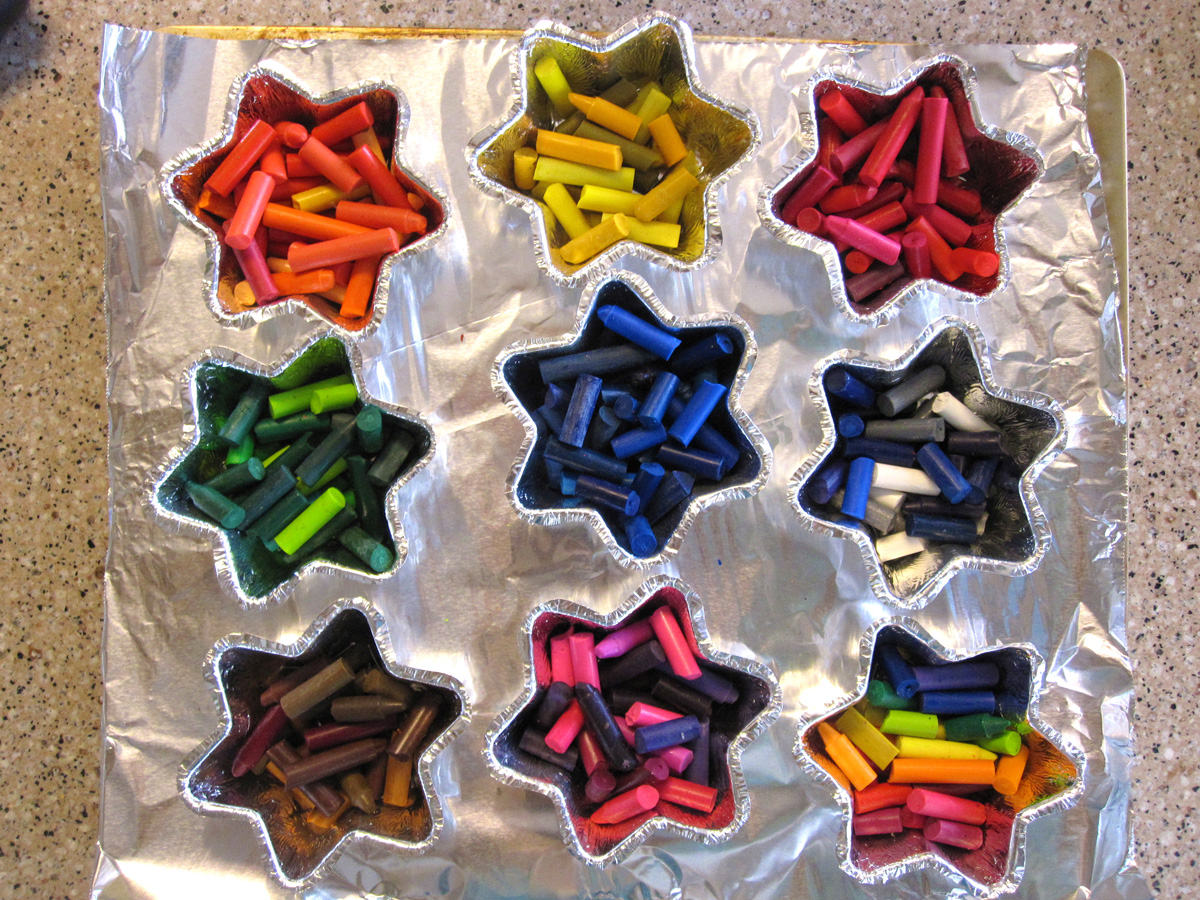
Sorting by color is a great toddler activity!
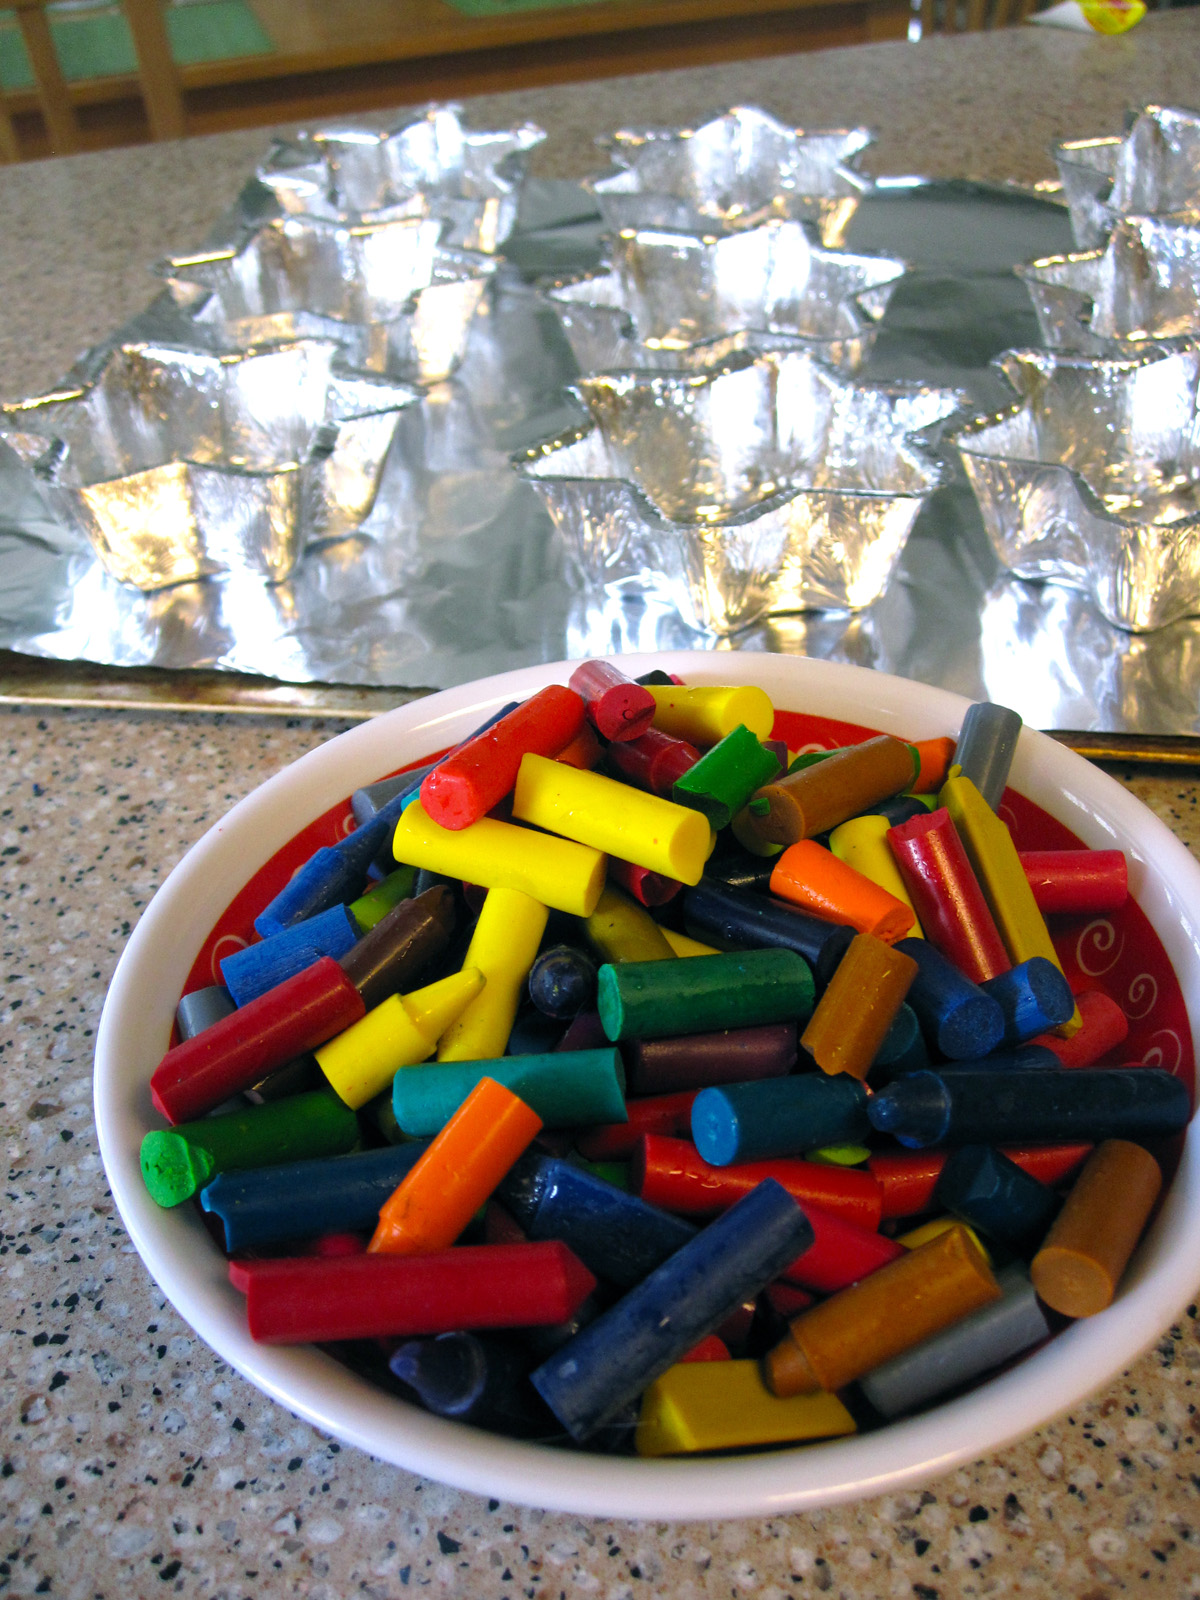
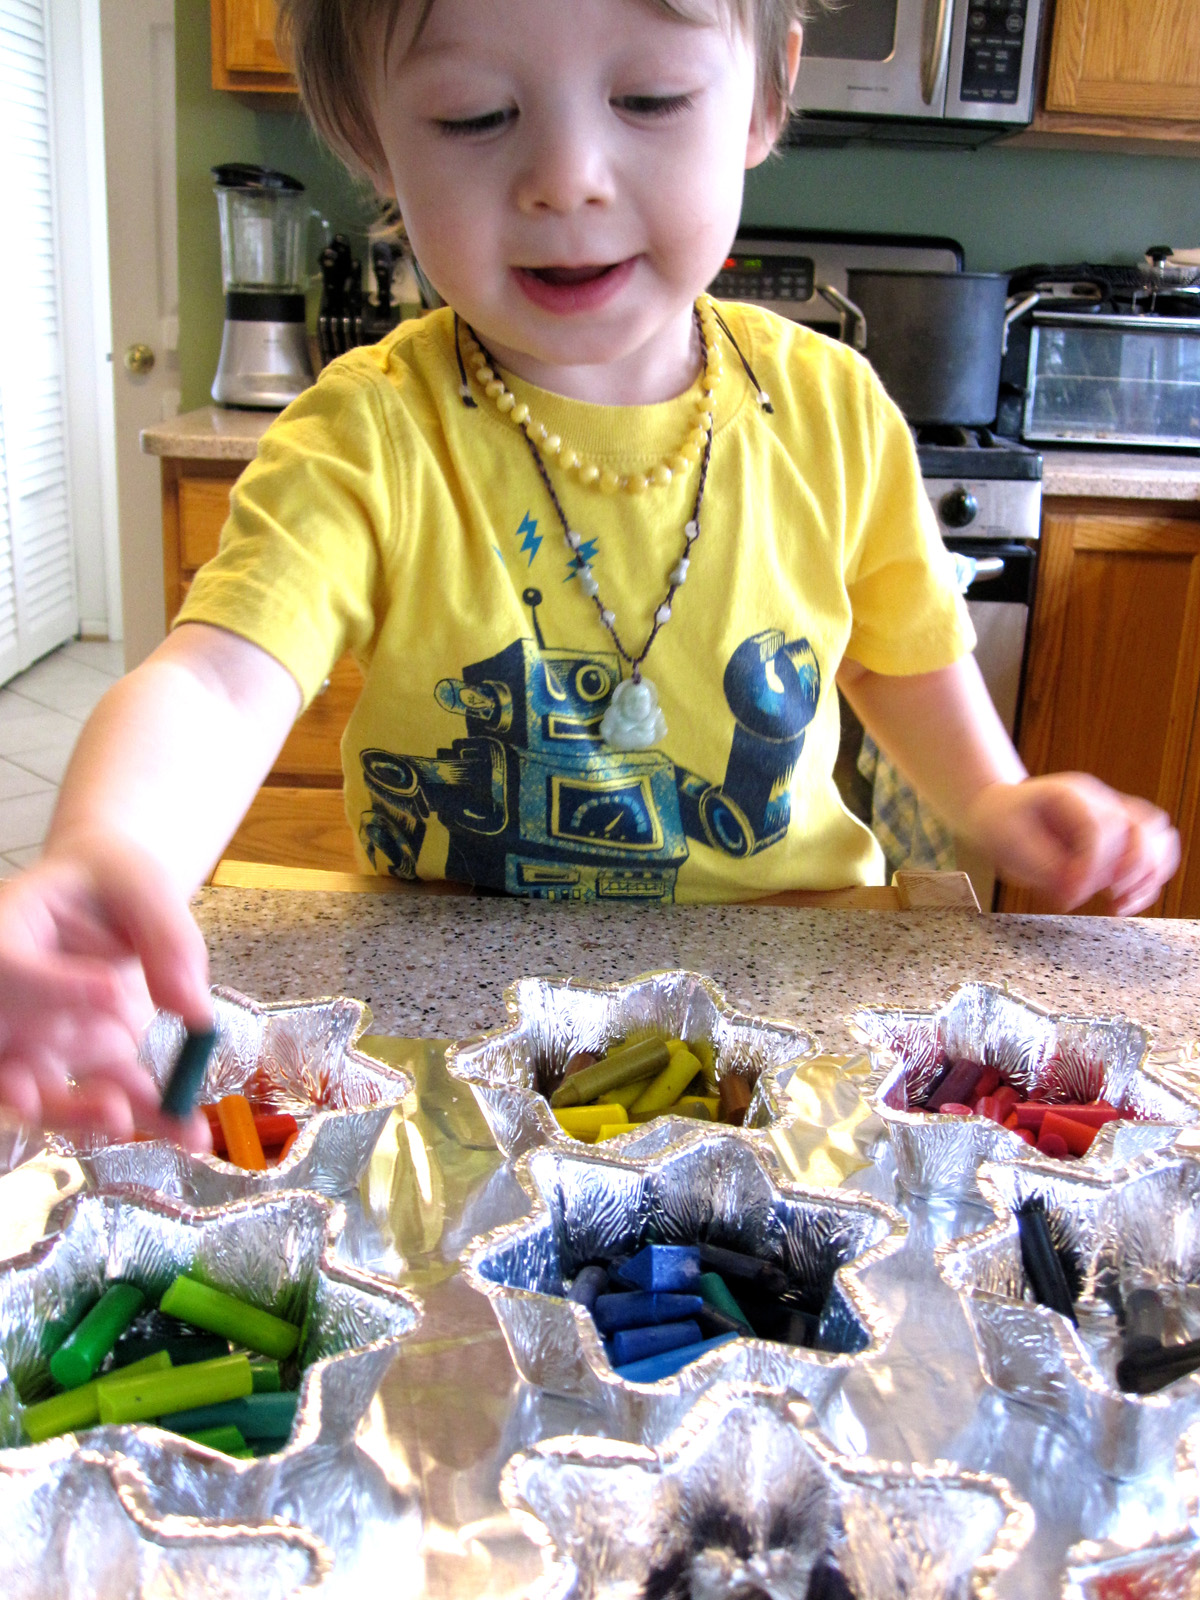
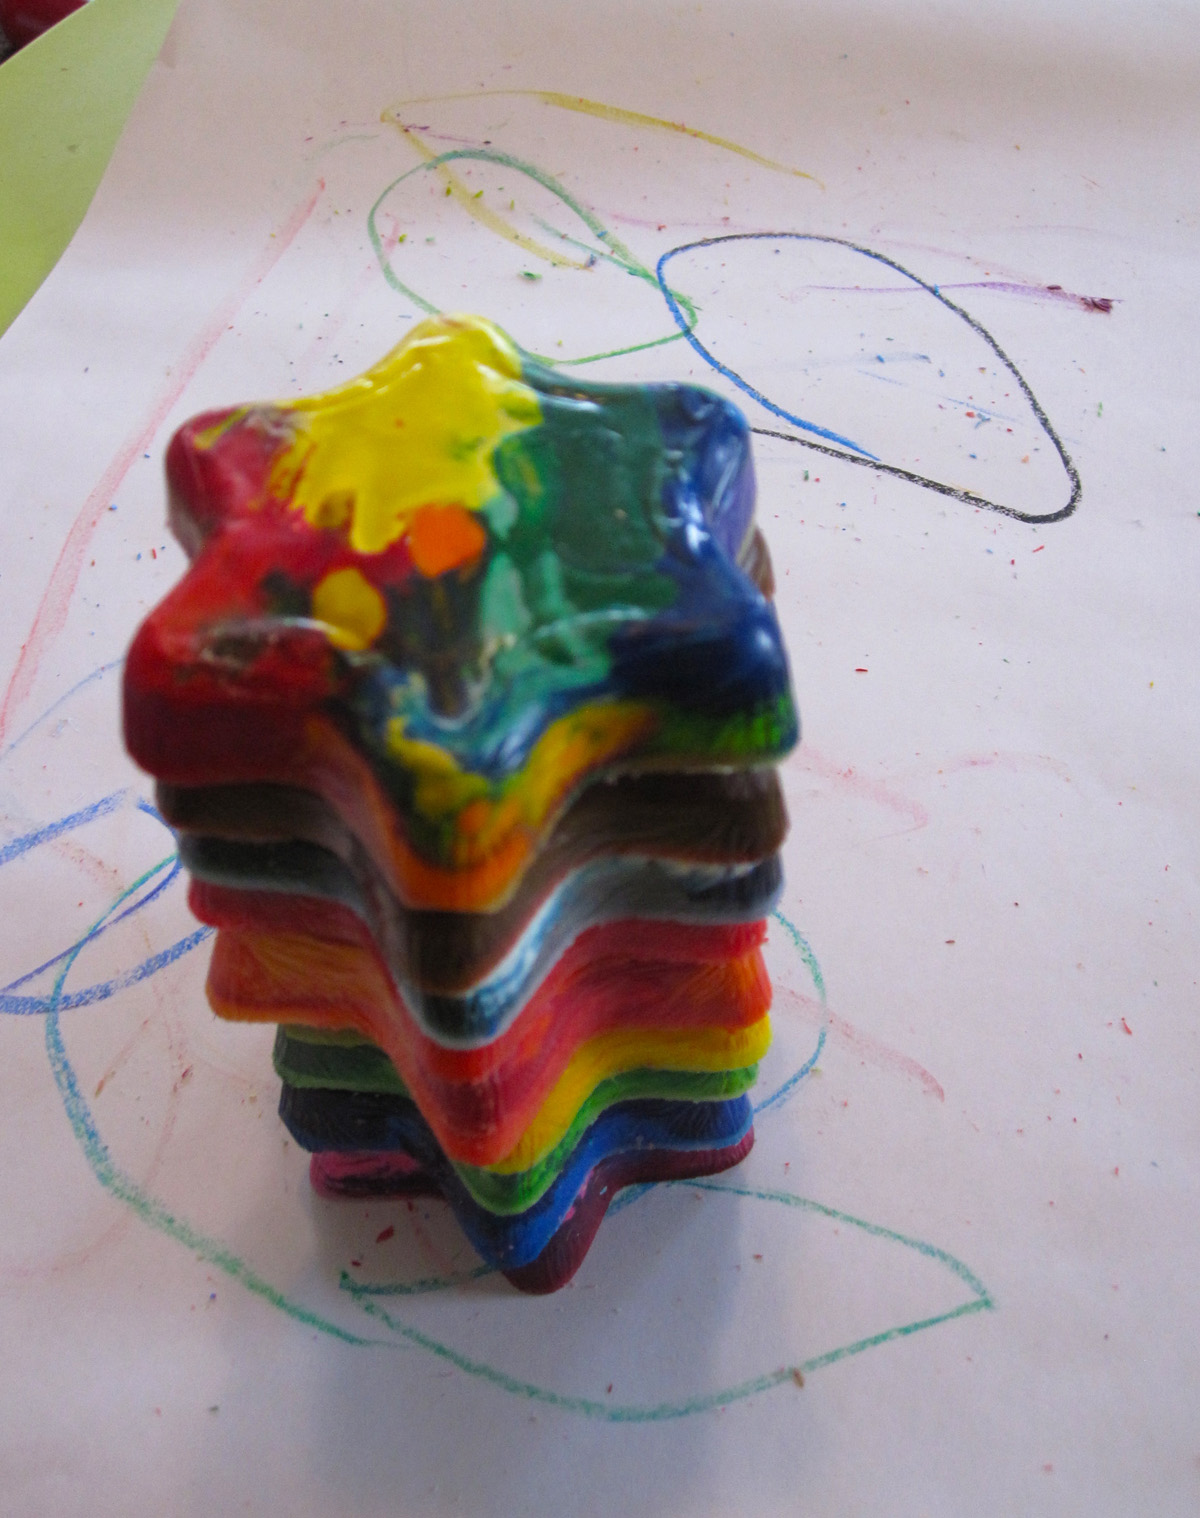
When the crayons were all peeled, I broke them up into a bowl. Jax loves to sort items by color right now, so he helped me put all the like colors together into cupcake tins. I also did a rainbow one with some extras. My tins are Reynolds Wrap Fun Shapes I’ve had forever, but you could use a normal tin or a silicone mold.
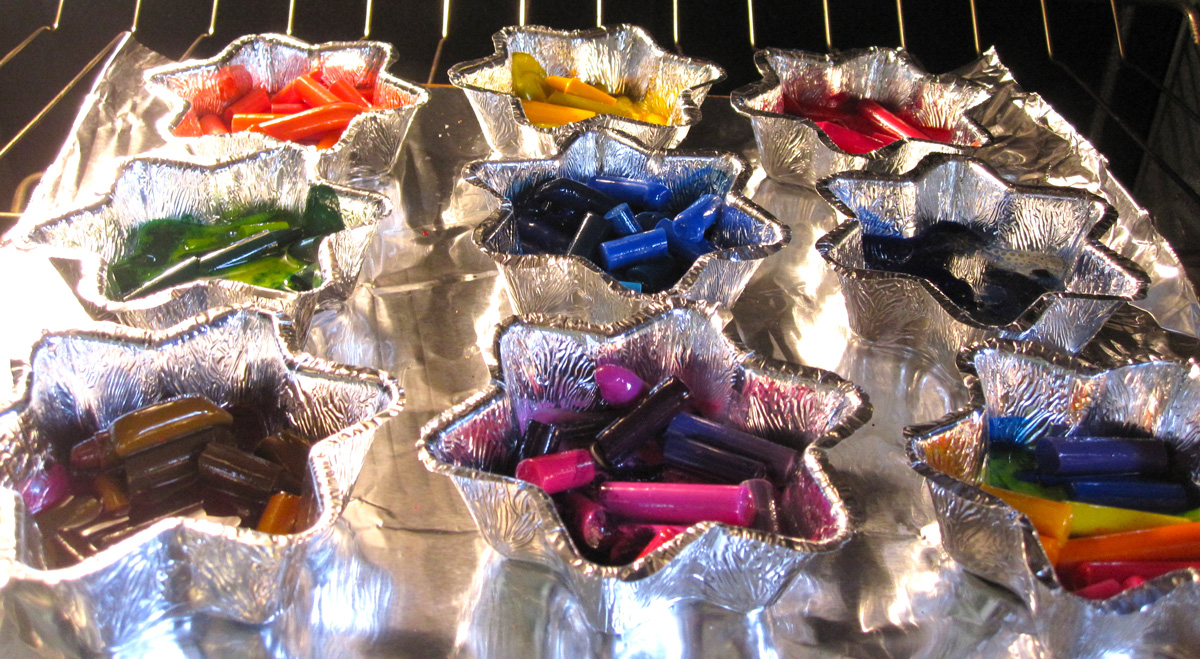
We stuck them in the oven and I watched until they were all melted. It was maybe 20 minutes. The deeper the crayons, the longer it takes. Quality crayons like Crayolas melt the best and color the best. Cheap, waxy crayons (which we unfortunately had a lot of) don’t melt as well or color as dark. I’d recommend Crayolas if you are making these as a gift. I made a trio of crayons (not shown) with just some of the primary color Crayolas we’ve collected, and they color great.
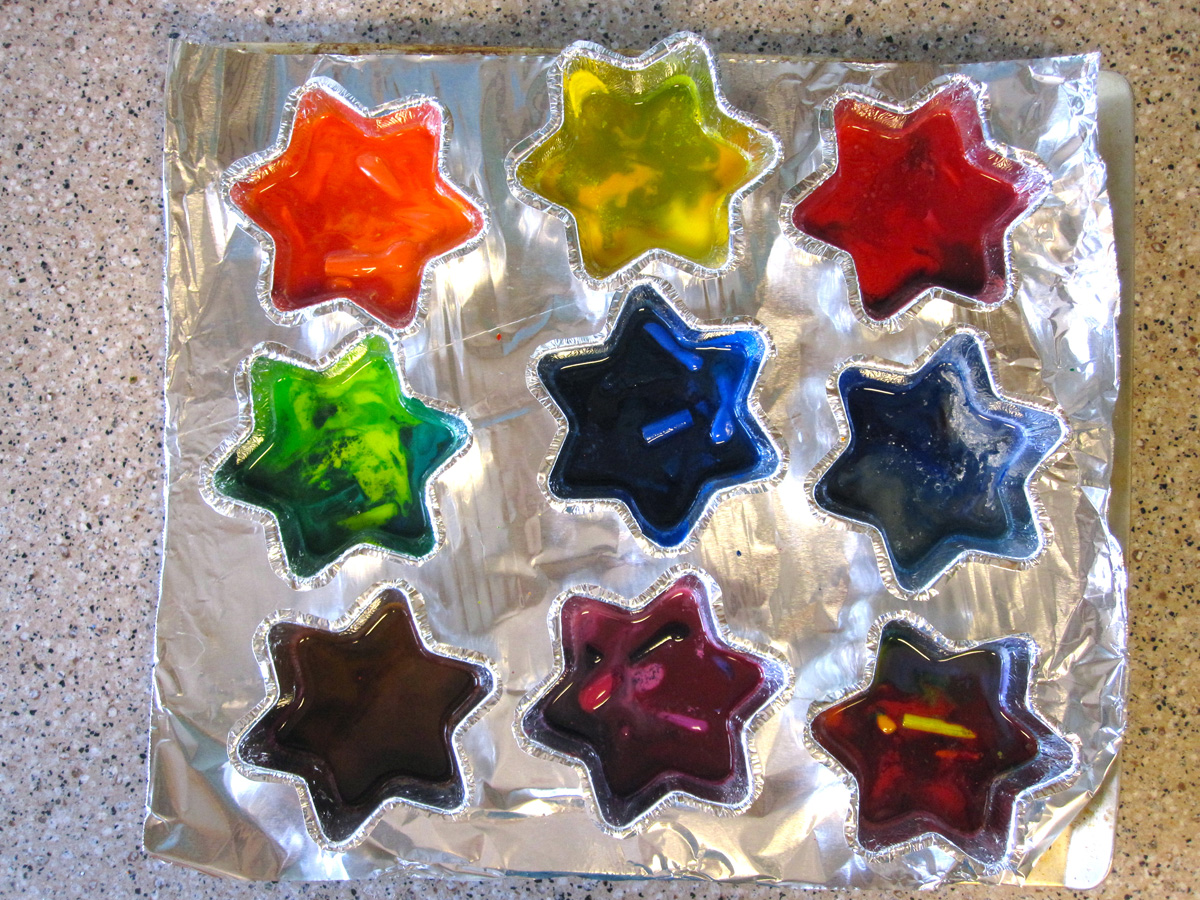
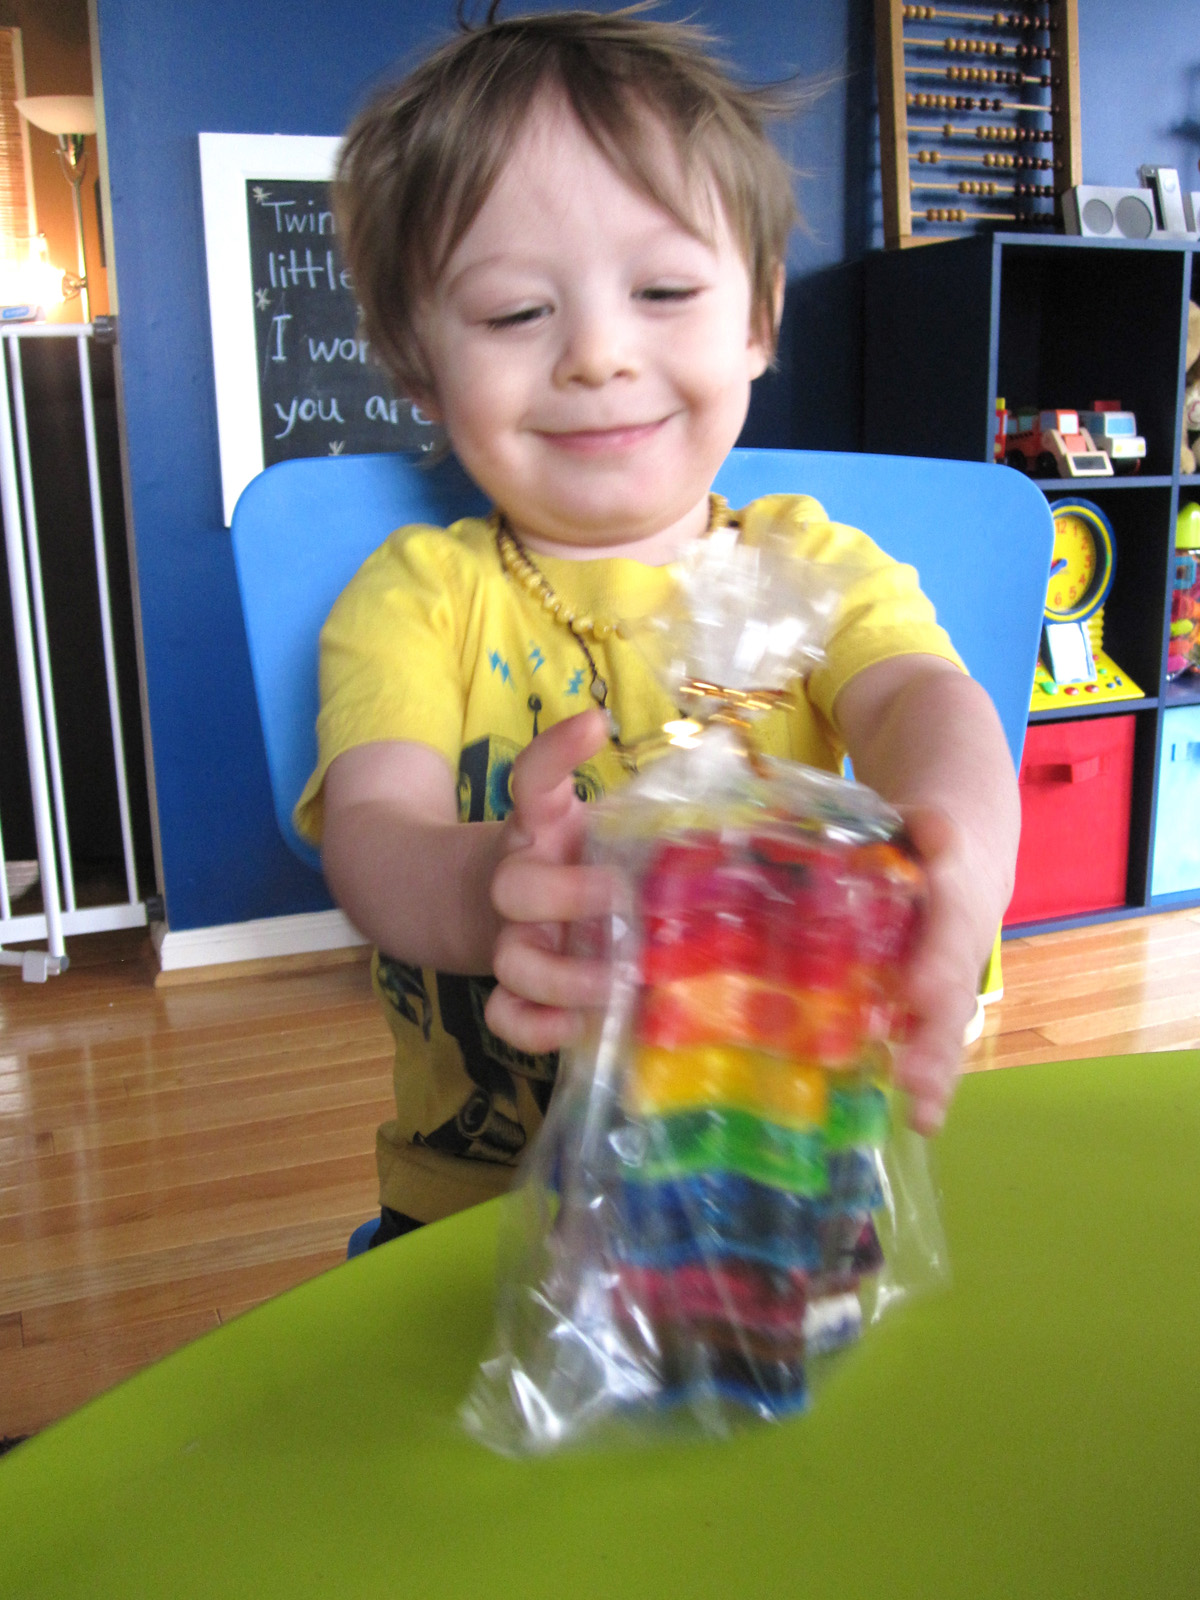
When they were fully melted, I took them out of the oven to cool. I sped up the cooling by sticking them in the fridge. They popped right out of the tins once solid again. They look so cute all stacked in a treat bag! Jax loves then, even though some of them don’t color very dark due to the cheap crayons. I’ll definitely be making these again!
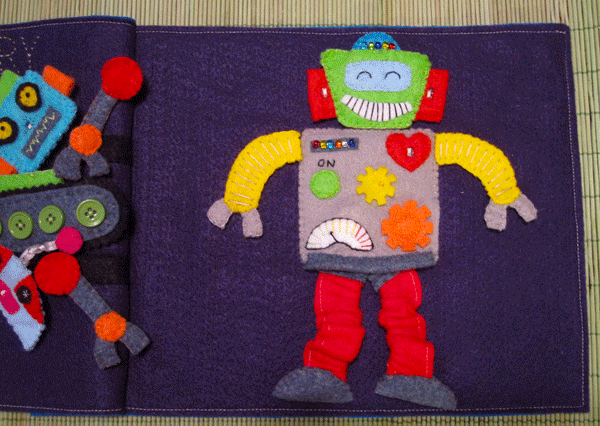
I’ve wanted to create a robot page ever since I learned what a quiet book is. I’m very glad I waited so long to really think it through, because I learned about e-sewing. E sewing is using special electronic components and conducive thread to create interactive textile projects. In simple terms? Push a button and my robot lights up!!
E-sewing is easy, but you have to make your circuits just right, or it will not work. The LilyPad system I used can be spot washed, which is all I’d recommend for a detailed quiet book. I did read somewhere that the conducive thread will eventually need to be replaced years down the road, so that is something to keep in mind. I sewed my thread to a piece of felt and not the actual page, to make it easier to pull off should I need/want to run new lines in the future. Make sure you cut your knot tails short on the back of your work so they don’t touch anything else. If threads from two different parts of your circuits touch, you will have a short and it won’t work.
This page can certainly be made without the electronic components. It is still fun to mix and match the robot parts! My tutorial assumes you are installing the LEDs.
Start out with your body squares. Lay out the decorations on the front piece and the battery holder, button and 1 LED on the inside piece. Lay all the parts out so the + is on the left and the – is on the right, like the photo below. The button and LED will need to line up with the front. Cut a circle out of the green button piece so the button can stick through. You’ll make a button top later. Cut a tiny rectangle out the the heart for the LED. I stitched around both holes to keep them from stretching. Sew down your front pieces. On the white meter, I stitched green, yellow and red lines, as well as a black arrow. For the gears, I stitched them down with a circle in the center of each. Sew some seed beads down along the gray rectangle. I made 2 stitches through each bead for strength. Confirm the placement of the electronics and baste them down. Baste a scrap of felt to the top as the robot’s neck and sew down some snaps.
For each of the next steps you will need to thread a large-eye needle with a length of conducive thread. I only used about 12″ – 18″ at a time. Tie a knot in the end. Make several stitches in the upper + hole of the battery holder. Use a simple running stitch (looks like a dashed line) from the battery holder + hole to the button’s + hole. Make several passes through the hole and tie off.Start a new thread and make several stitches in the button – hole. Running stitch from there to the LED + hole. Make several stitches in that hole and tie off.Start a new thread and make several passes through the LED – hole. Running stitch from there to the battery holder’s top – hole. Stitch through the hole several times and tie off. Steps 1 – 3 complete a circuit. You can put your battery in and test the LED by pressing the button.
Next we need to create half of a second circuit for the head LEDs. The additional circuit needs to be piggy-backed off the first LED. If the circuit is a diamond shape, the body LED is the bottom point, the neck snaps are the left and right points and a head LEDs will be the top point when snapped on. Start a new conducive thread and make several passes through the LED + hole. Running stitch up to the left snap. Make several stitches through all 4 holes on the snap, and make long stitches between each hole in a diamond shape. Tie it off. The idea is to get a lot of coverage with the thread on the snap. Start a new thread and make several passes through the LED – hole. Running stitch up to the right snap and sew it just like the first snap. Tie off your thread. Having the second circuit incomplete should not affect your body LED’s circuit. It should still light when you push the button.
Layer some light cardboard cut a bit smaller than your body under the inner body piece and stitch it down to the page. Since quiet books are squishy, the cardboard will make it a bit easier to press the button. Next we make a button cover. Cut a circle of cardboard that is slightly larger than the button hole in your front body piece. Cut two felt circles that are large enough to cover the cardboard and sew it in between them. Lay the button cover over the button hole and sew it down with four stitches: top, right, bottom and left. Lay your body front over the inner body and test that the button cover presses the button. The button should be sticking up through the hole, making the cover press it easily.
Sew a strip of felt along the bottom of your front body piece to finish it off. Sew the front body piece down to the page, leaving the bottom and the lower half of the right side unstitched. You need to be able to lift up the front to get to the battery for changes. I added a small snap to the corner.
Sew snaps on (with regular thread) for your arms and legs.
Robot Head 1
Sew down your two snaps to the back side of the back piece of head 1. Make sure you use the opposite snap parts as the ones you sewed to the page! (I used the “male” sides on the body parts and the “female” side on the page.) Flip the back piece over and baste your LED down with the + on the left and the – on the right. Have the LED part line up with the center of the mouth.
Thread your needle with conducive thread and sew through the + hole of the LED several times. Make a stitch or two to connect the thread to the left snap (the one on the left when you are looking at the robot’s face.) Tie it off. Start another conducive thread and sew through the – hole of the LED several times. Make a stitch or two to connect the thread to the right snap. You can now test the head by snapping it to the body and pressing the button. Both the body LED and head LED should light up.
Decorate the front head piece. Cut a small rectangular hole in the front head piece for the LED to stick through. Cut a matching hole in the mouth piece. I made red eye pieces with black felt circles. I stitched little white starburst shapes in the eyes for extra cuteness. I sewed the mouth down and stitched around the hole for strength. For the antennae, I braided some gray ribbon and sewed pink circles of felt to the top. Sew the front and back pieces together with the antennae in place.
Robot Head 2
Sew the snaps and LED onto the back piece of head 2 in the same way as head 1, but position the LED to be the nose. Decorate the front piece. Cut a hole for the nose LED and sew around it for strength. I sewed a zigzag line on the mouth piece in lime green. My eyes are yellow circles on top of black circles, with a black French knot in the center. The ears and hat pieces are folded but not sewn, so they are loops that are open on the sides. Sew the front to the back.
Robot Head 3
This head is a little trickier because it has 2 LEDs. The first LED (I did the one on the left) will be sewn to the two snaps like the previous heads. The second LED will be sewn in a circuit to the first LED. Baste the snaps down to the back of the back head piece. The ears are folded pieces of felt. Pin them in place to figure out where the holes need to be for the LEDs. I cut a scrap piece of felt to lay inside the head and do all the conducive stitching (except the stitches that are on the snaps) so the back of the head doesn’t look too messy.
Baste down the two LEDs with the + sides on the left. Thread your needle with conducive thread and make several stitches in the + hole of the LED on the left. Running stitch down the the snap on the left (when looking at the robot’s face) and stitch on the snap as before. Tie off the thread.Start another thread and make several stitches in the – hole of the same LED. Running stitch over to the right snap and sew on the snap as before. Tie off the thread. If you test the head on the body at this point, the left LED should light up. Start a new conducive thread and make several stitches in the + hole of the same LED you’ve been stitching in. Running stitch over to the + hole of the right LED and make several stitches. Tie it off.Start one more conducive thread and make several stitches in the – hole of the first (left hand) LED. Carefully running stitch over to the – hole of the right LED. You don’t want the running stitches to touch any of the others (the stitches you make in the LED holes are fine touching each other.) Make several stitches in the – hole and tie off. Testing the head now should light up both LEDs.
Decorate the head. Sew around the LED holes for strength. Fold the ear pieces down and sew the sides shut. For my mouth, I made long black stitches for teeth. For his hat, I sewed seed beads along the bottom (leave room to stick the hat in between the head pieces) and the sewed the two sides together. I used light blue for the eye piece and stitched arches for the eyes. Sew the front and back of the head together.
Other Parts
For the first set of arms, long gray pieces are layered between circles for the shoulder and wrist joints. Gray claw shapes are layered in the wrist joint.
The yellow arms have the claw shapes layered into the bottom. I made long stitches to make the arms look like tubes.
For the stretchy legs, I cut folded rectangles an inch or so longer than I wanted them to be. With a piece of elastic inside the folded felt, sew across the top, catching the elastic. Continue sewing down the side (I did all this on the machine). When you get the the bottom, stretch the elastic tight before sewing across, again catching the elastic. When you let go, the leg with scrunch up. Clip off the extra elastic. Sew scraps of gray to hide the elastic at the top. Sew the foot pieces to the bottoms.
For the tank-style tread, cut out the black tread with pinking shears. Add a row of buttons to the gray piece and sew it down. cut two scrap rectangles to sew your snaps to. Sew them together and attach it to the back of the tread so it can hang down below the body.
Spare Part Storage
On the facing page, I stitched the words “ROBOT FACTORY” by pinning the word template down and sewing right through the paper. I then ripped the paper away gently. I sewed strips of black felt down to make “shelves” and added snaps to hold all the pieces. Because you have the “female” halves of the snap on both the body and the storage shelves, you will have some orphaned “male” snap halves.
All done!
I love, love, love how this came out!! Hopefully my tutorial and diagrams make sense. This is definitely the most complicated page I’ve had to explain. It was very worth it. I haven’t let Jax play with it much because it is for our vacation, but he already loves to push the button and choose robot parts.
If you make this page, leave a comment with your link or stop by the Facebook page and post a photo. I’d love to see yours!
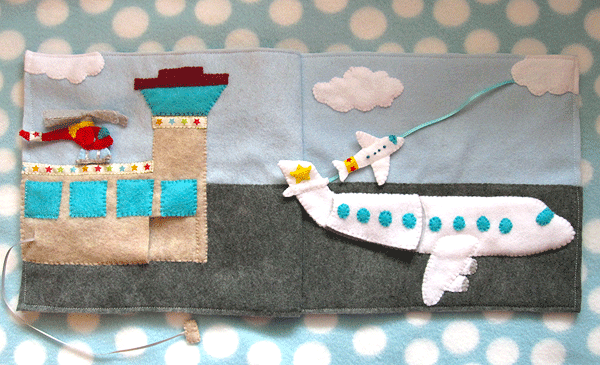
Here’s one more vacation/travel themed page! This page was about 3 weeks in the making due to two weeks of me being quite sick. It was all I could do to make it through each day taking care of Jax and doing as much work for my day job as possible. I still came out 12 hours short in work hours, ugh. Not that I’m well, I knocked the rest of the page out and I’m ready to move on!
What I used:the pattern, felt (in light blue, dark gray, white, natural, brick red, aqua, yellow, blue, red, gray and scraps), thin blue ribbon, thin gray or tan ribbon, decorative ribbon, snaps or Velcro and matching thread.
Background: Sew the windows on to the front of the airport. Cut out the door and a small slit for a ribbon to come through on the left side. Thread a length of ribbon through the slit, coming out of the door for the truck. Pin down your ground and airport pieces. You will need to layer a scrap block of felt behind the door of the airport. Sew down the airport building, leaving the door open. Sew the air traffic control window and roof on and add decorative ribbon if you’d like. (You could add photos of loved ones to the tower and windows of the airport and sew clear vinyl over top.) Pin and sew clouds to the sky. I caught one end of my blue “small plane” ribbon under the cloud in the upper right corner and the other end under edge of the ground. Sew down the ground.
Baggage Truck: Pin the truck bed and cab pieces onto the end of the ribbon. Sew the sides and bottom of the bed (making a pocket for luggage) and all the way around the cab. Add the wind shield and wheels. Sew a folded scrap rectangle of felt to the left end of the ribbon to keep it from going through the slit.
Small Airplane: Make 4 French knot windows on the top small plane piece. Sew the wind shield pieces on each side. Sew the two plane pieces together. Decorate the plane’s tail by sewing some decorative ribbon around it. Take a scrap square of white felt and sew the top and bottom of it to the back of the plane with the blue ribbon running through it. Your stitches will make the accent lines across the base of the wings. Your small plane should then “fly” up and down the ribbon.
Large Airplane: (Because the airplane was wider than my 9″ pages, I had the airplane’s tail sticking off the page so it can fold over when the page closes. My instructions assume you do the same.) Pin the base airplane piece down to the page, leaving the tail unpinned. Cut the top airplane piece into 3 segments. Sew stars to the two tail side, then sew the tail together. Add the tail fins. Sew windows and wind shield to the front two airplane segments. Pin down and sew the engines, wing and front airplane segment. Sew the bottom half of the gray cargo hold piece to the page in the middle segment of the airplane. Fold down the rest of the cargo hold piece and sew the middle segment of the top airplane to it to make a flap that lifts to show the baggage. Sew a snap on to hold the flap closed, and add snaps to secure any bags you make.
Helicopter: Sew the two blade pieces together. Fold the “x” in half where indicated on the pattern and make a few stitches int he center to hold it down. Sew thin ribbon down to both sides of the landing gear background pieces as indicated on the pattern. Sew the two sides together. On the front piece of the helicopter, sew down the wind shield, accent piece and inner door piece. Sew down the door along one side so it opens. On the back piece of the helicopter, sew down the wind shield, accent piece and a snap. Sew the front and back together with the blades and landing gear in place. Sew the other half of the snap to the page above the roof.
Luggage: I didn’t use patterns for my luggage because they are so tiny! I did draw up what I made afterwards, so you can use those as a guide if you’d like. They just need to fit in the cargo hold (and truck bed) and have snaps to attach them.
Jax hasn’t really played with this yet because it is for our beach trip, but he loves the little helicopter and the small plane that takes off. I think he’s going to enjoy it!
I am very behind here. Heck, I’m very behind in life! The weekend before this past one, I came down with a bad cold. It hit hard with a terrible sore throat and fevers. It turned into a regular bad cold as the week went on. Just as I started feeling better, I woke up early on Friday with a high fever again! I spent all day with fevers and no appetite, then Saturday it turned into a stomach virus. Ugh!! I was pretty much in bed all weekend and didn’t eat anything but some toast for Easter brunch. Finally Sunday night I was able to eat a baked potato, and it was heaven!
I did at least hide eggs for Jax on Sunday morning. The egg hunt was a big success. And Jax LOVED having me nap in bed with him both days this weekend. He took 4 – 5 hour naps!
Today I am incredibly weak and only able to eat a few bites at a time, but thankful to be on the mend. I am practically doubled over from this bad cough that is trying to kick the mucus out of my lungs, but it makes me optimistic the cold is ending too.
I have to give a huge, special thank you to Barbara C. Halfway through my terrible (horrible, no-good, very bad) week, a little package arrived. Inside was a gorgeous handmade card (with moving parts!), a Joann’s fabric store gift card, a big bag of amazing stickers for Jax and a thank you note about my blog. Jaw, meet floor. Barbara, are you physic? Your little package of kindness couldn’t have been better timed. That gift card will be used to buy supplies so I can sew a bunch of quiet book pages while on vacation in May. Thank you, thank you, thank you!! Jax went nuts over the stickers – I normally get him dollar store ones. These are quality stickers! His current favorites are the strawberries, “space ships” (space shuttle) and fire engine.
Barbara, you’ve inspired me to pass on your random act of kindness to a fellow blogger who inspires me in the future!
You can follow me on Instagram (now out for Android phones too!) at username iolstephanie. I post a lot!
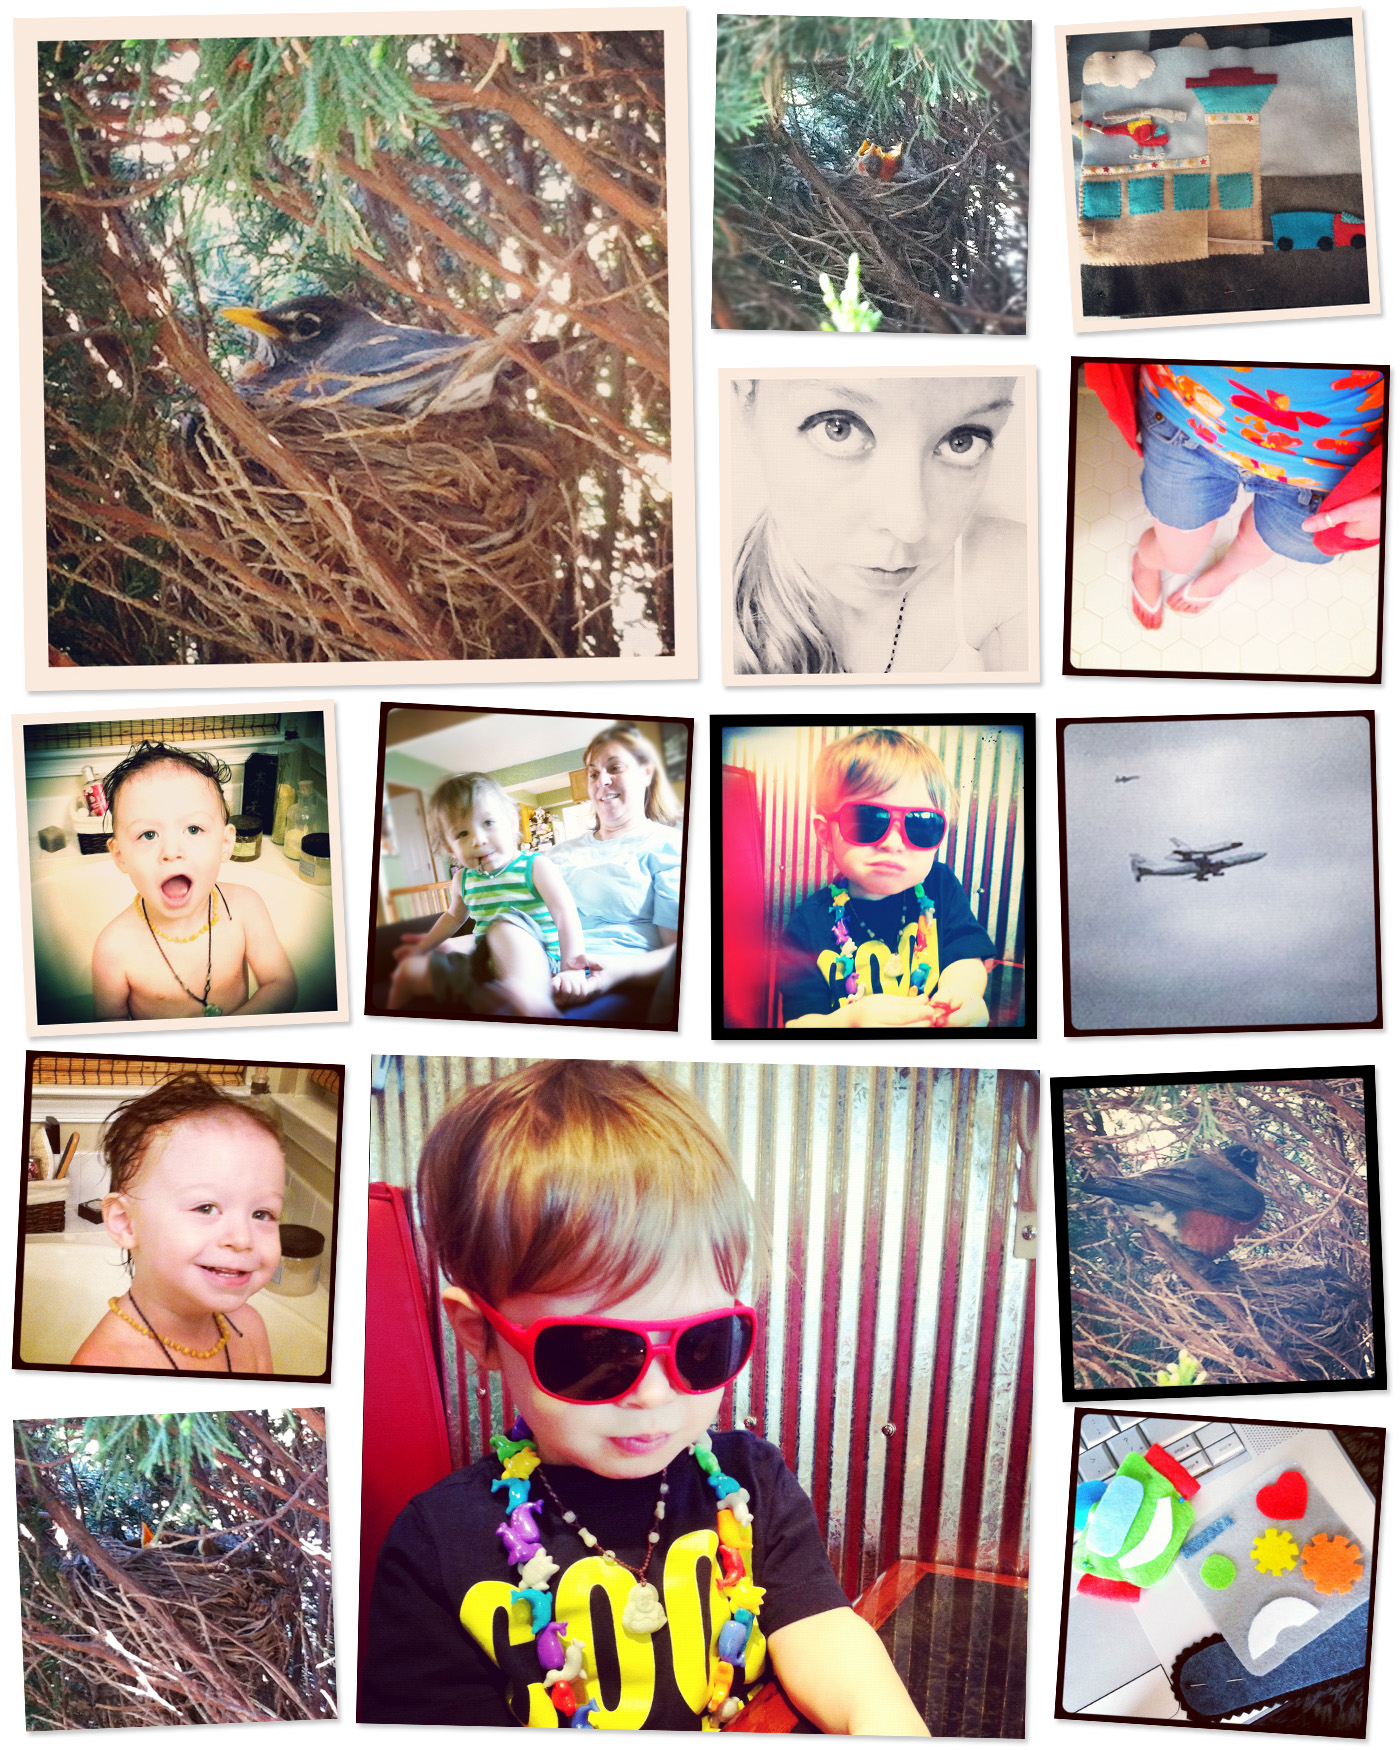
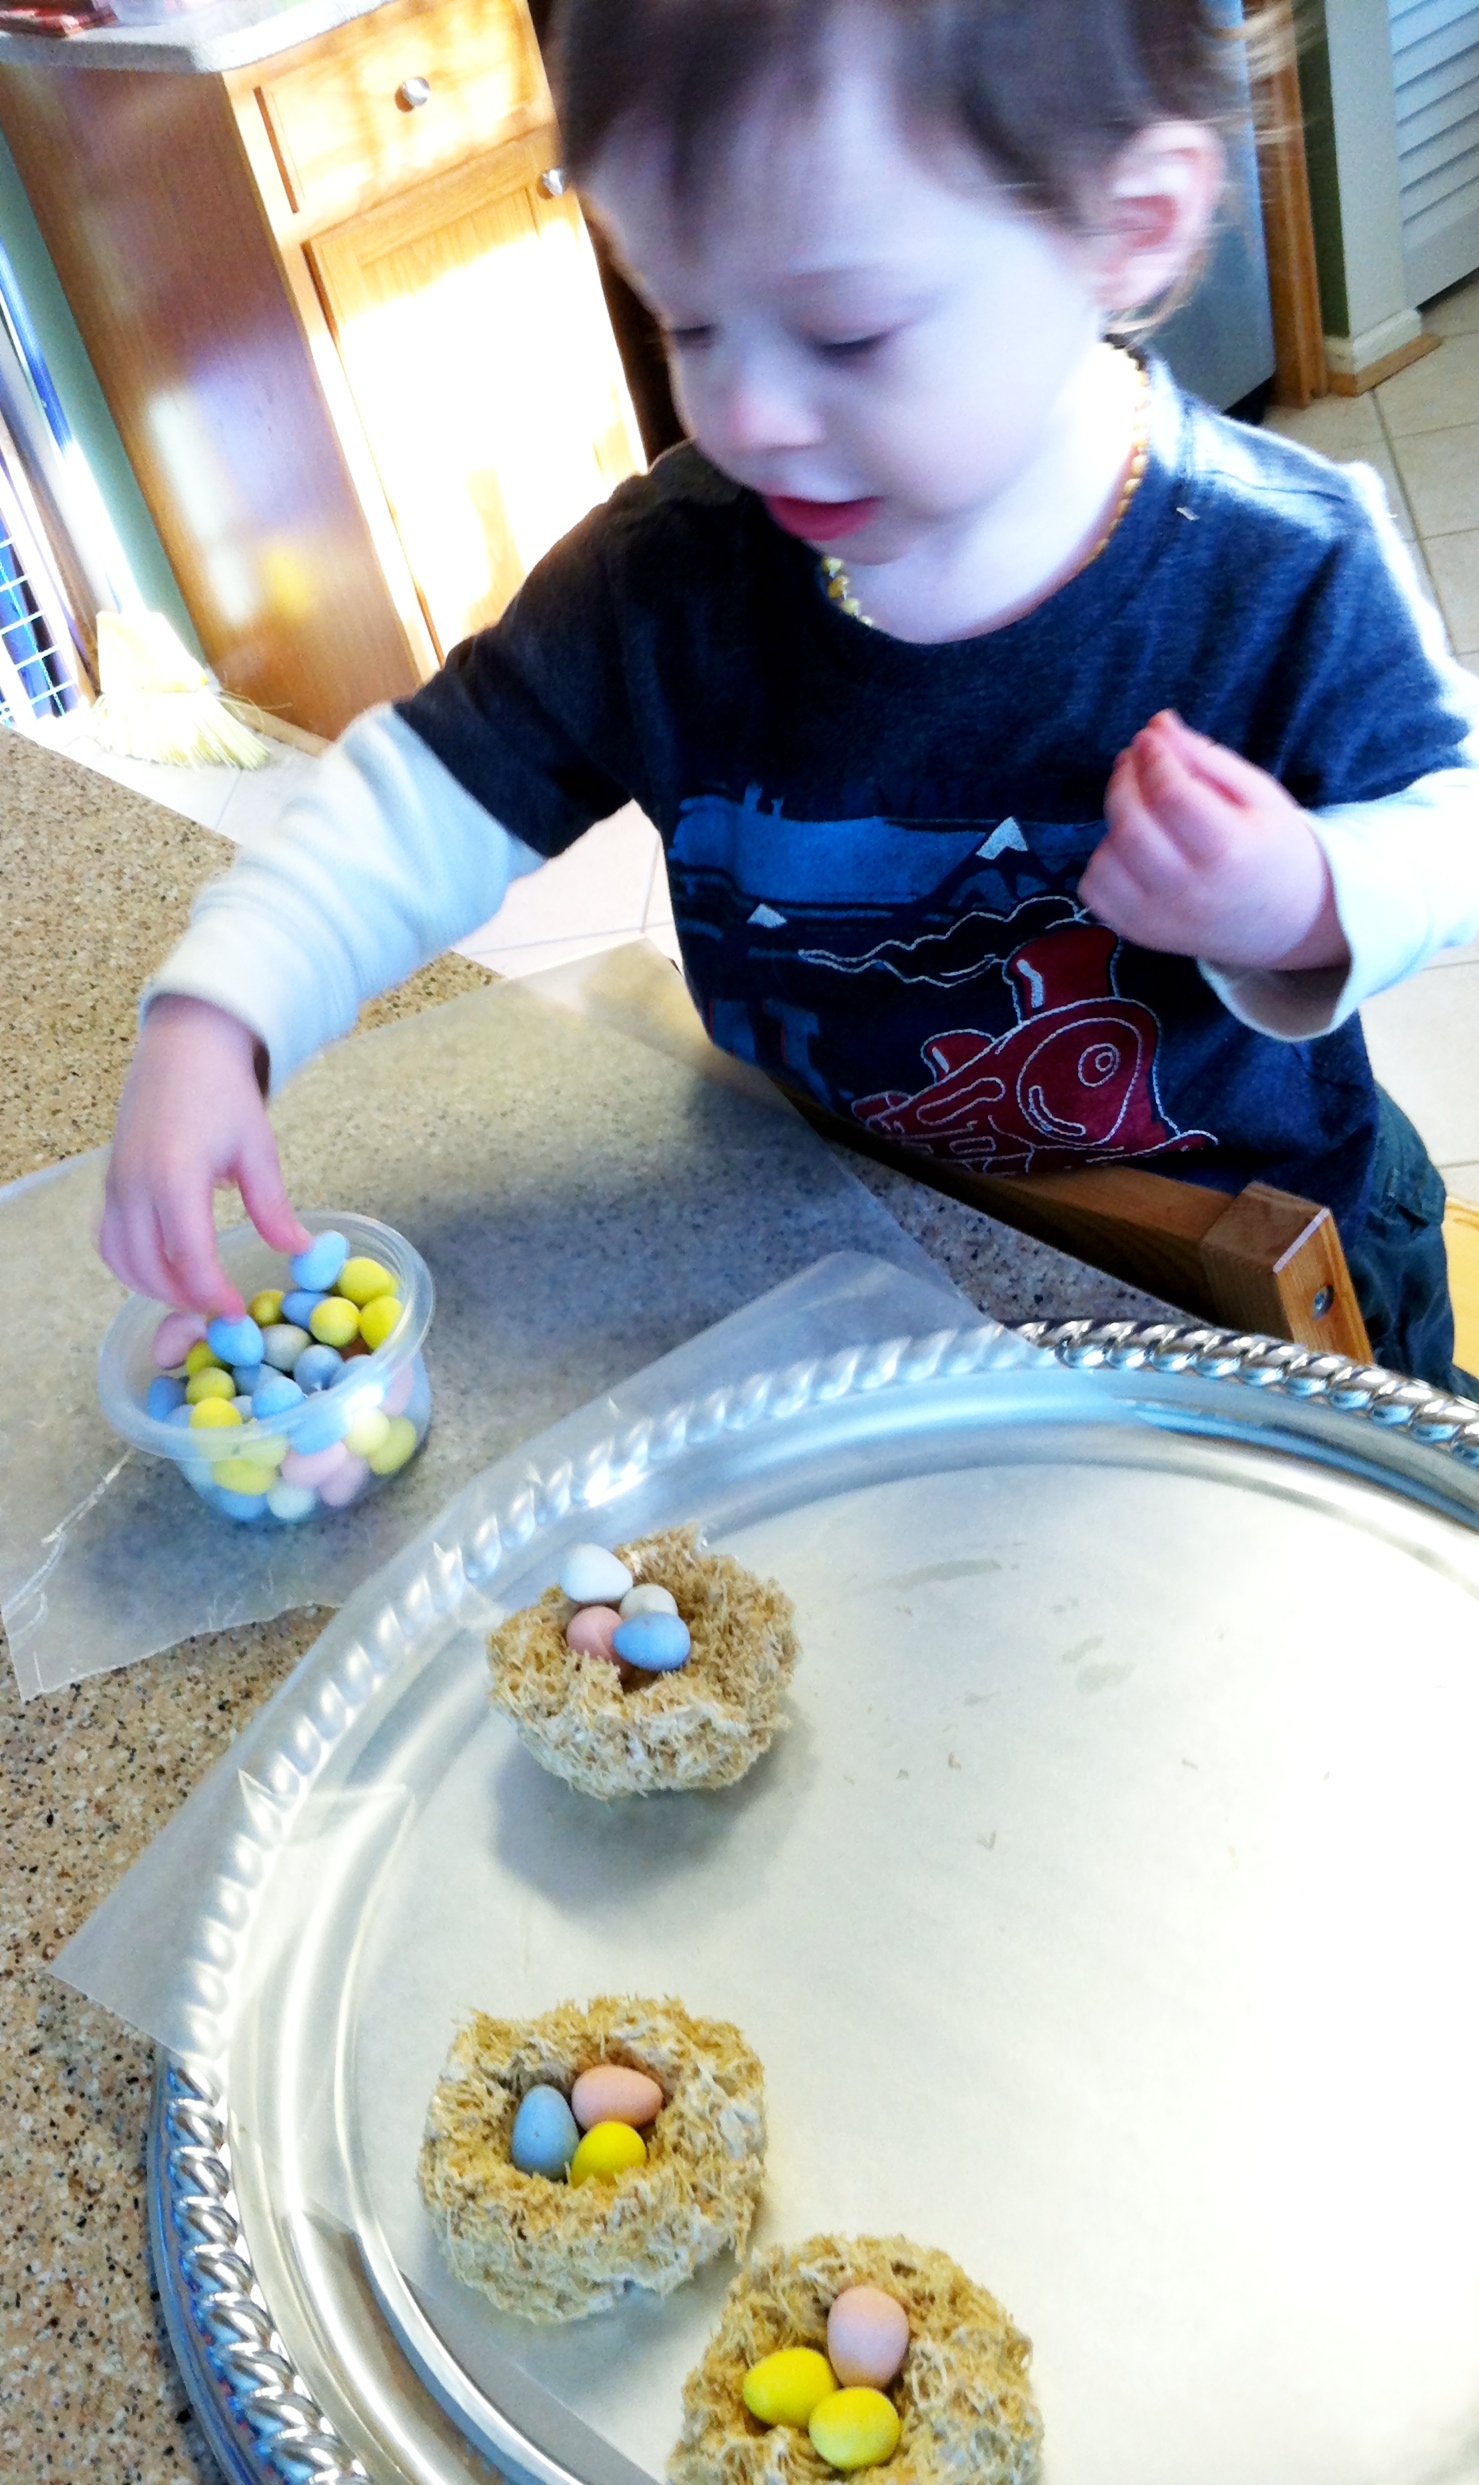
When I saw these bird nests on one of my favorite blogs, Enjoying the Small Things, I knew they’d be a perfect activity for Jax and I. She didn’t go into details, but they are very simple to make. I highly recommend reading her blog. Her photos and words are both so beautiful and I’ve been enjoying watching her little girls grow up for some time.
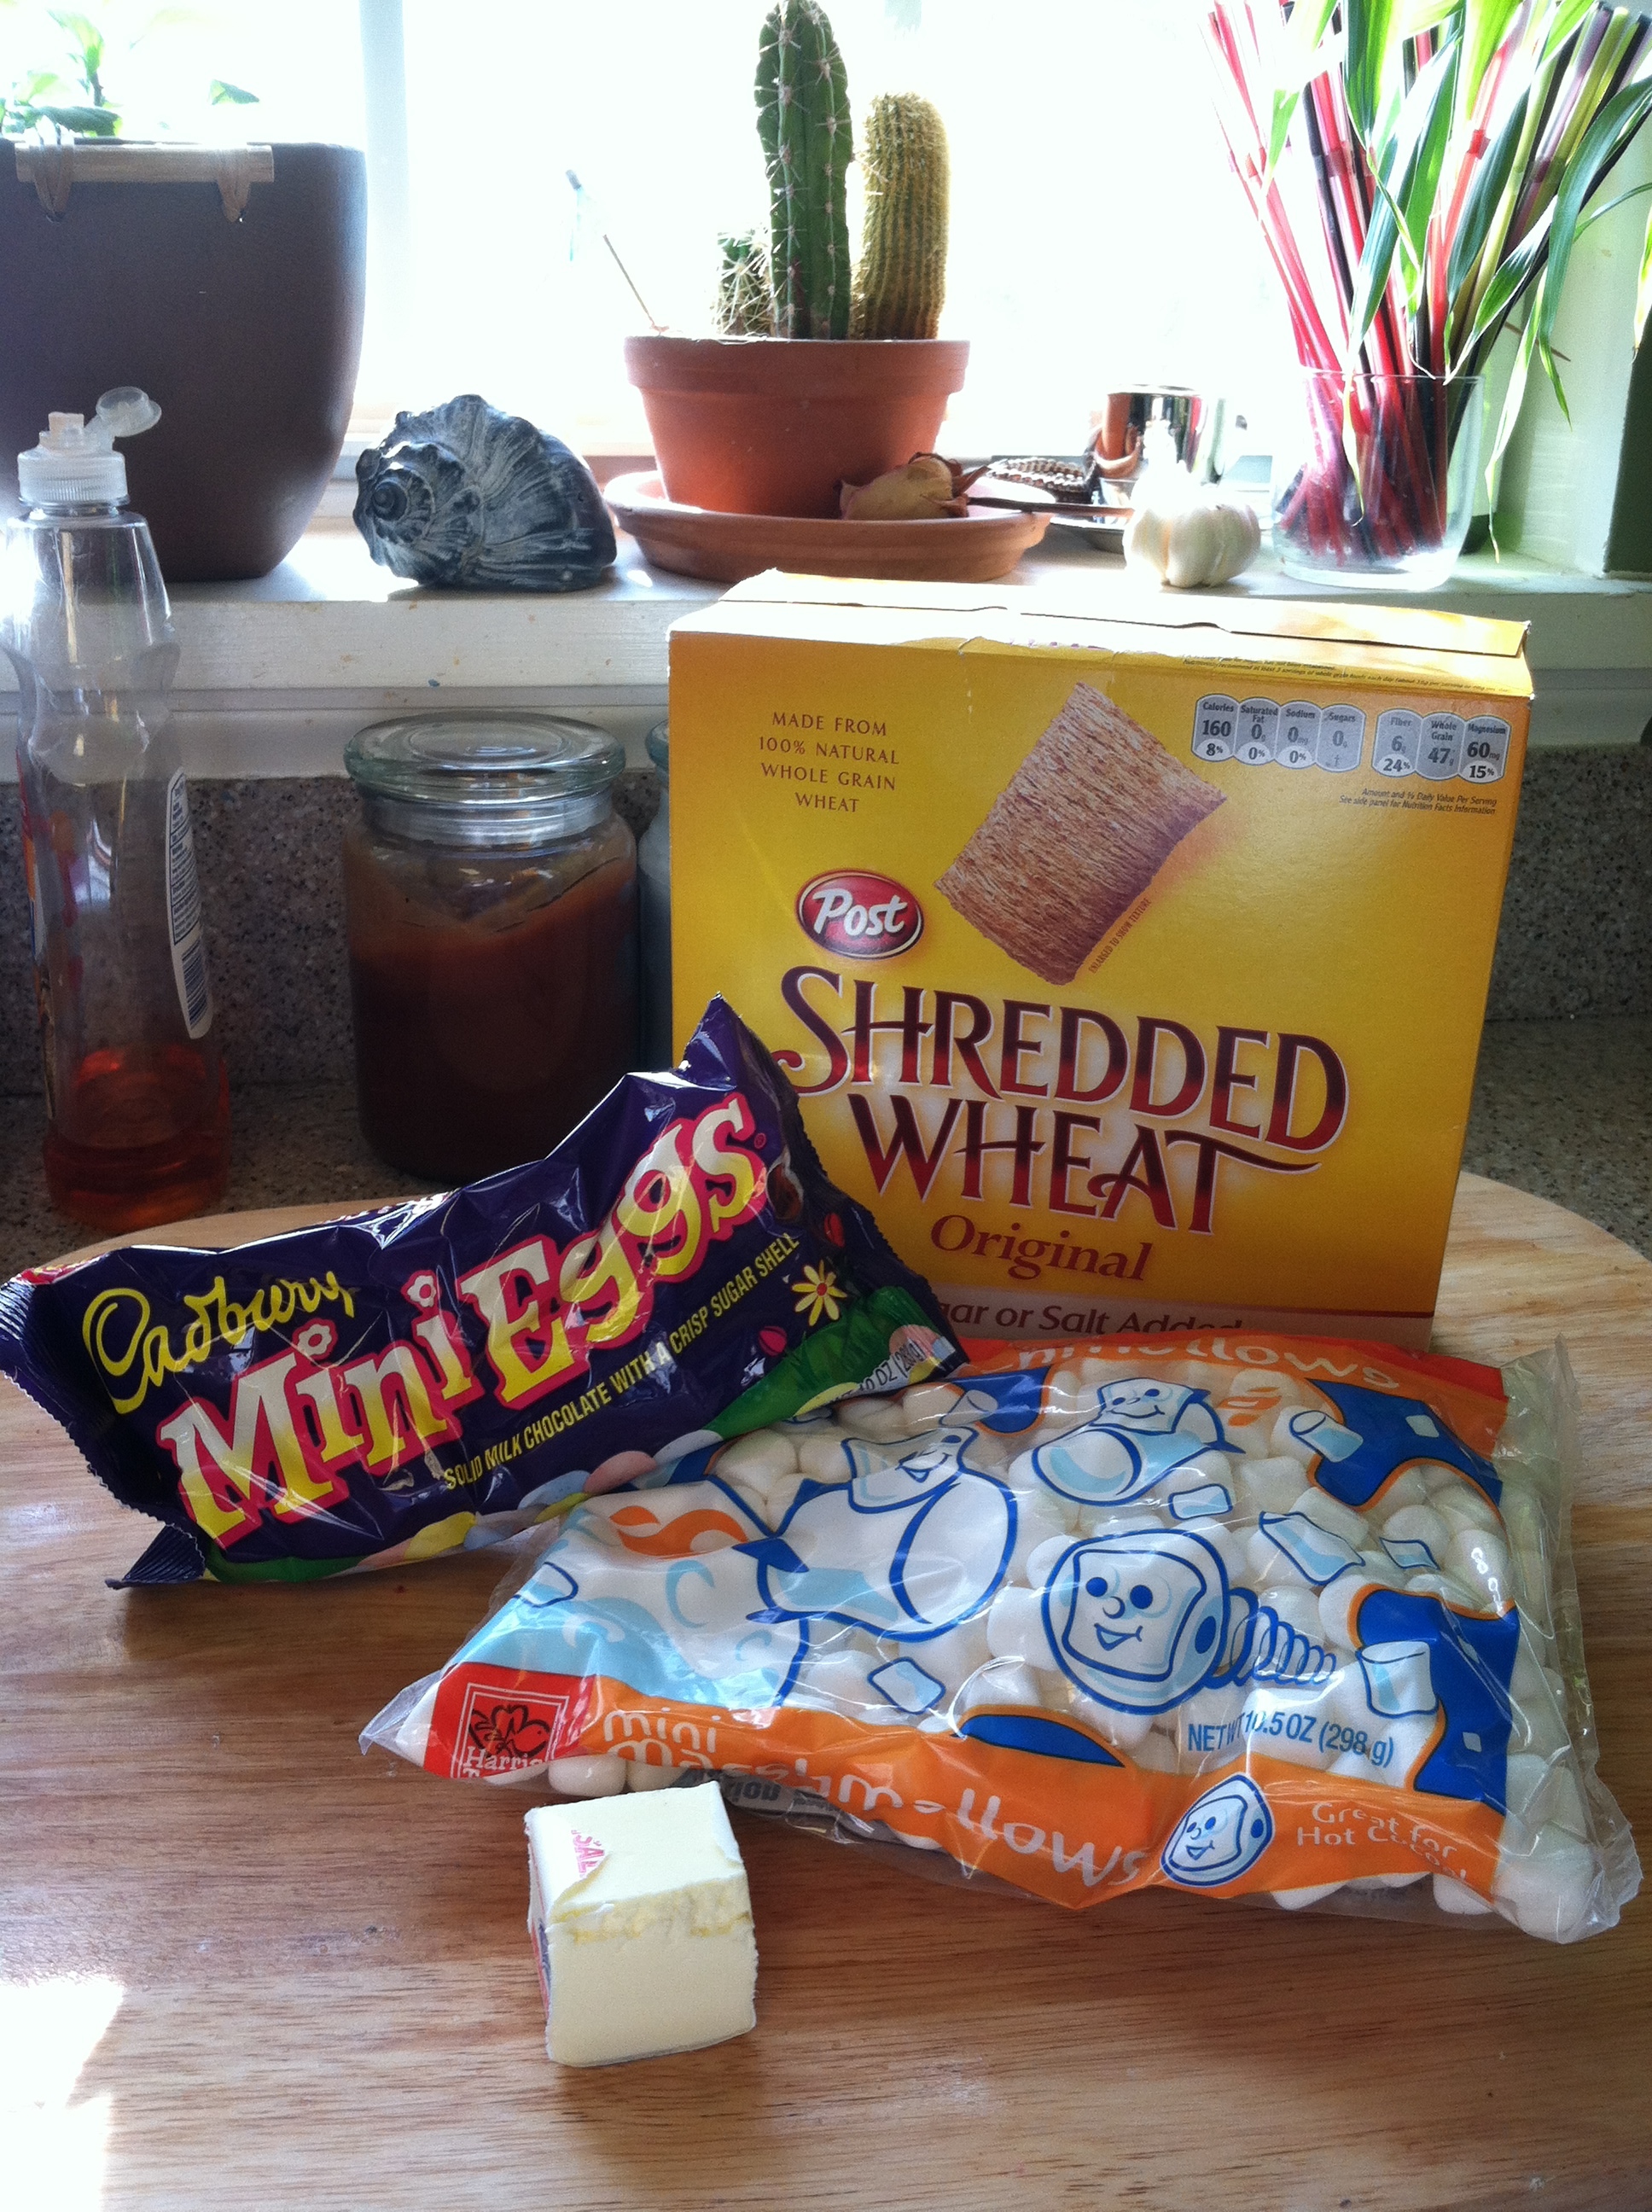
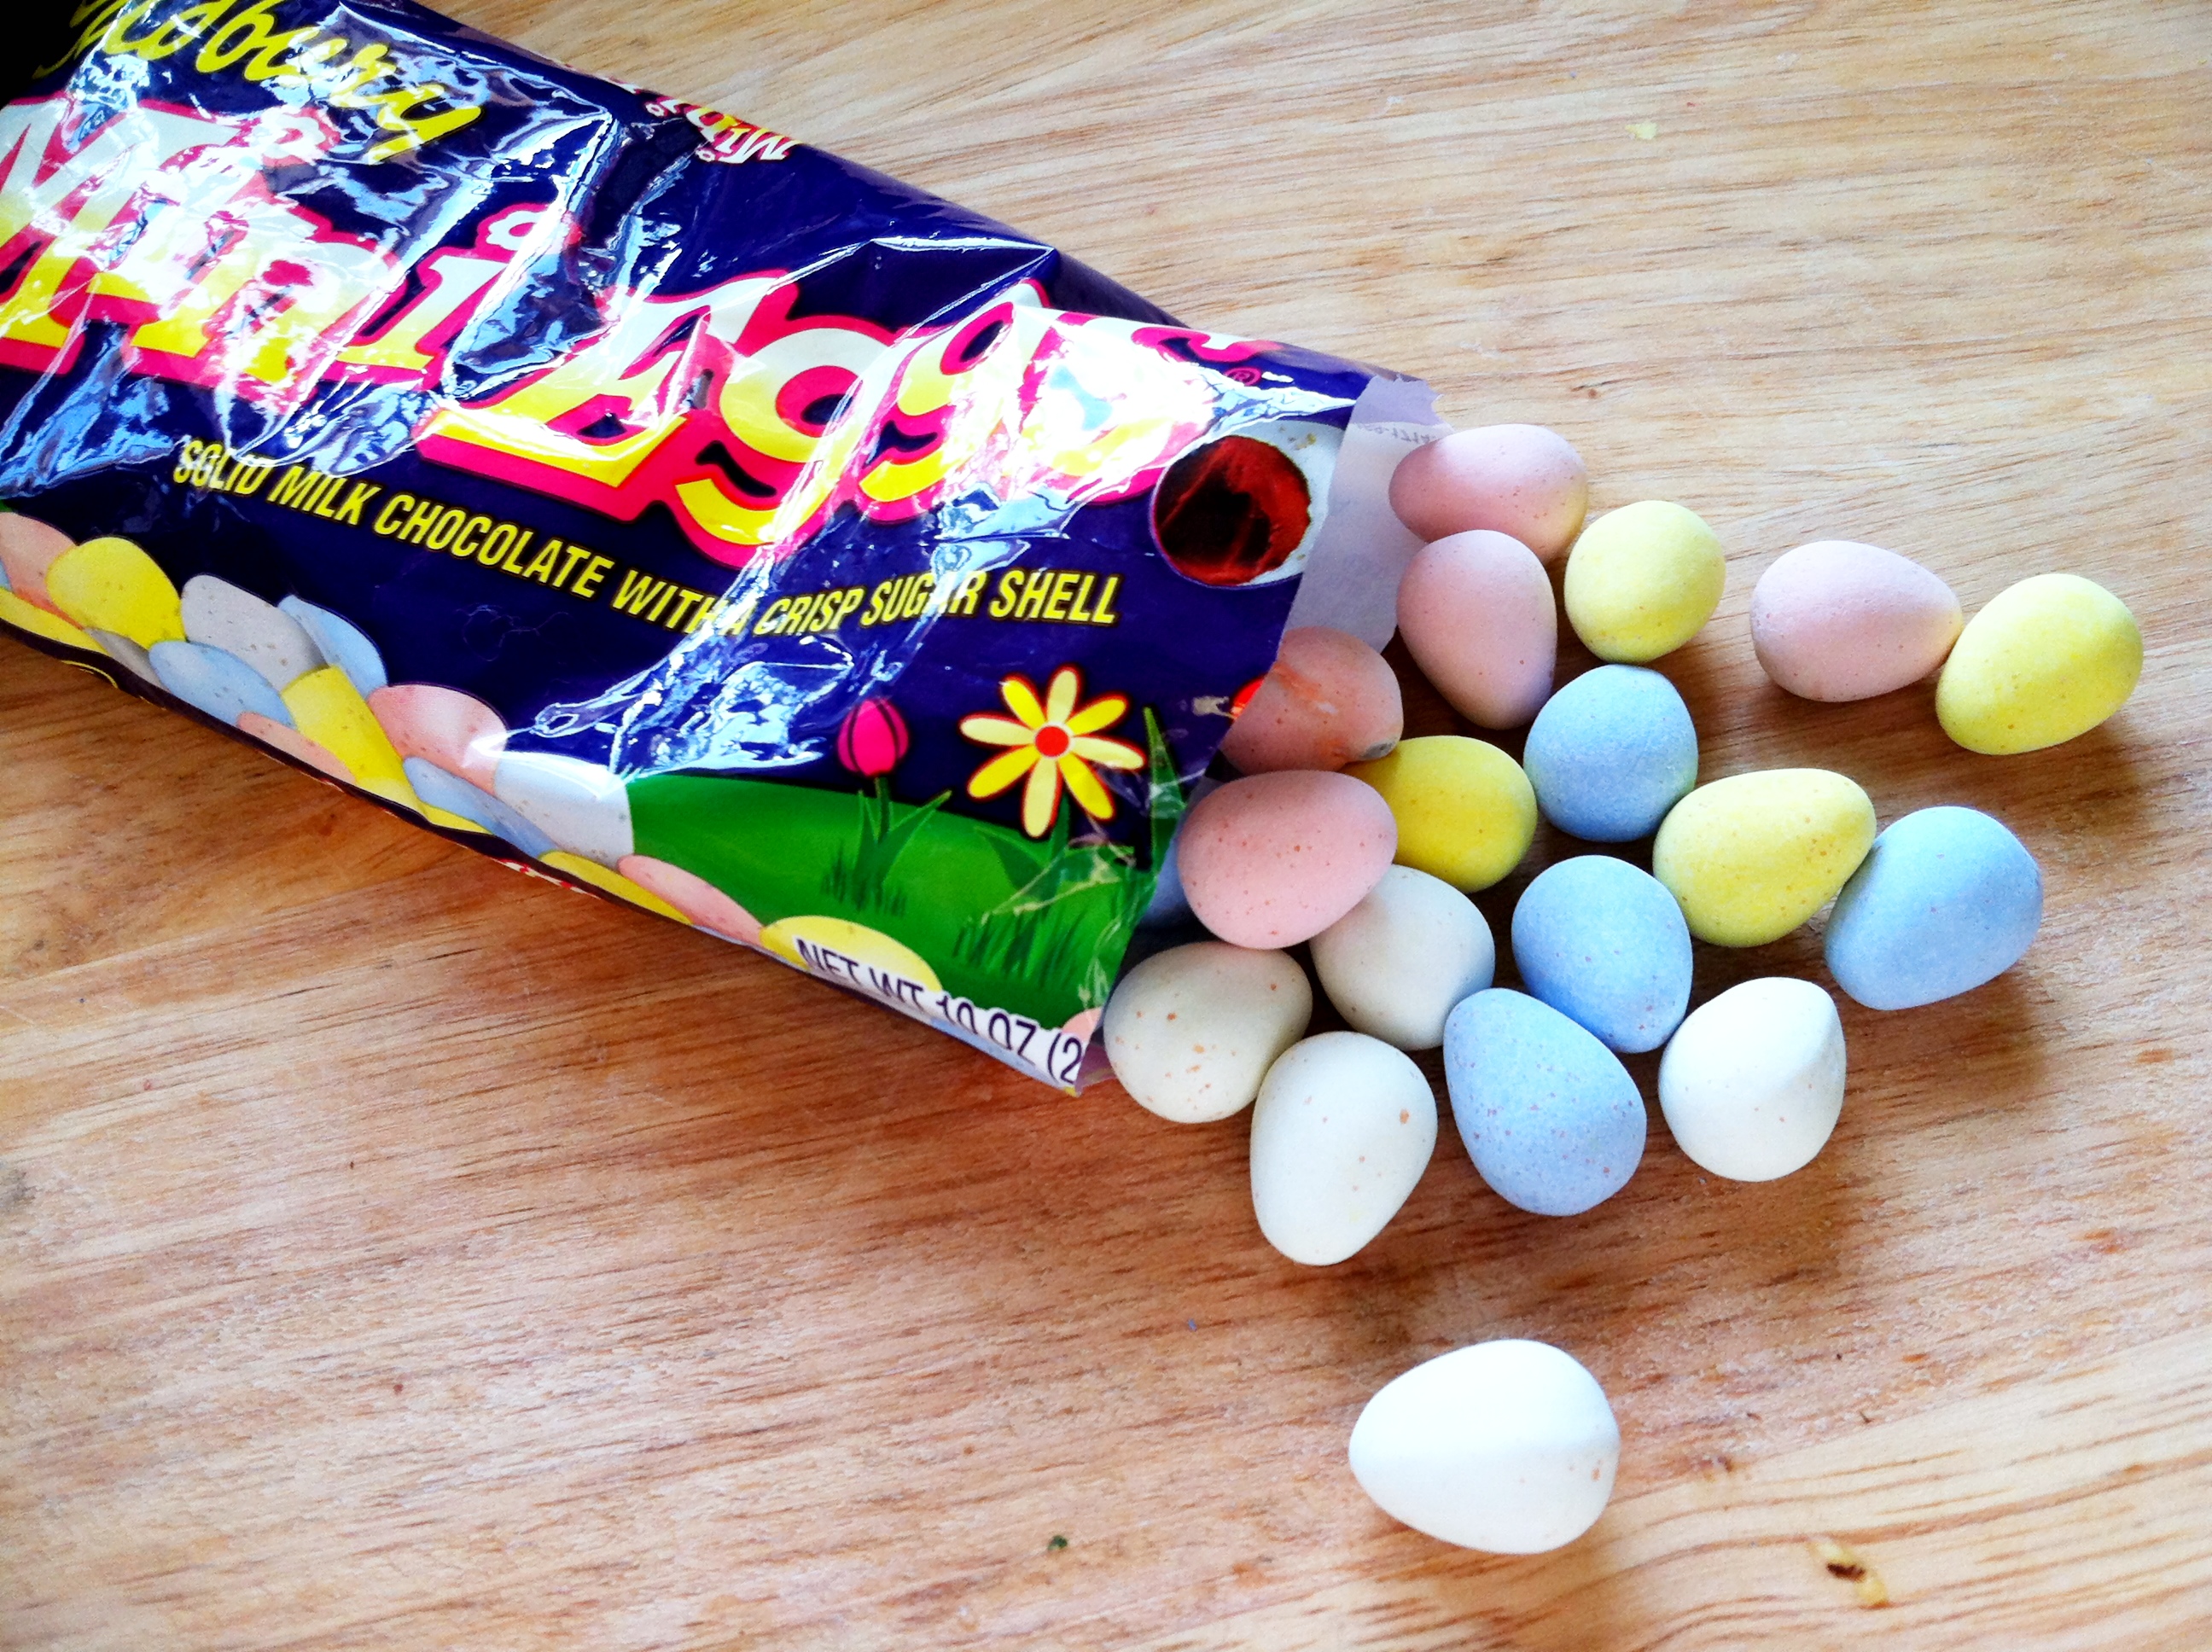
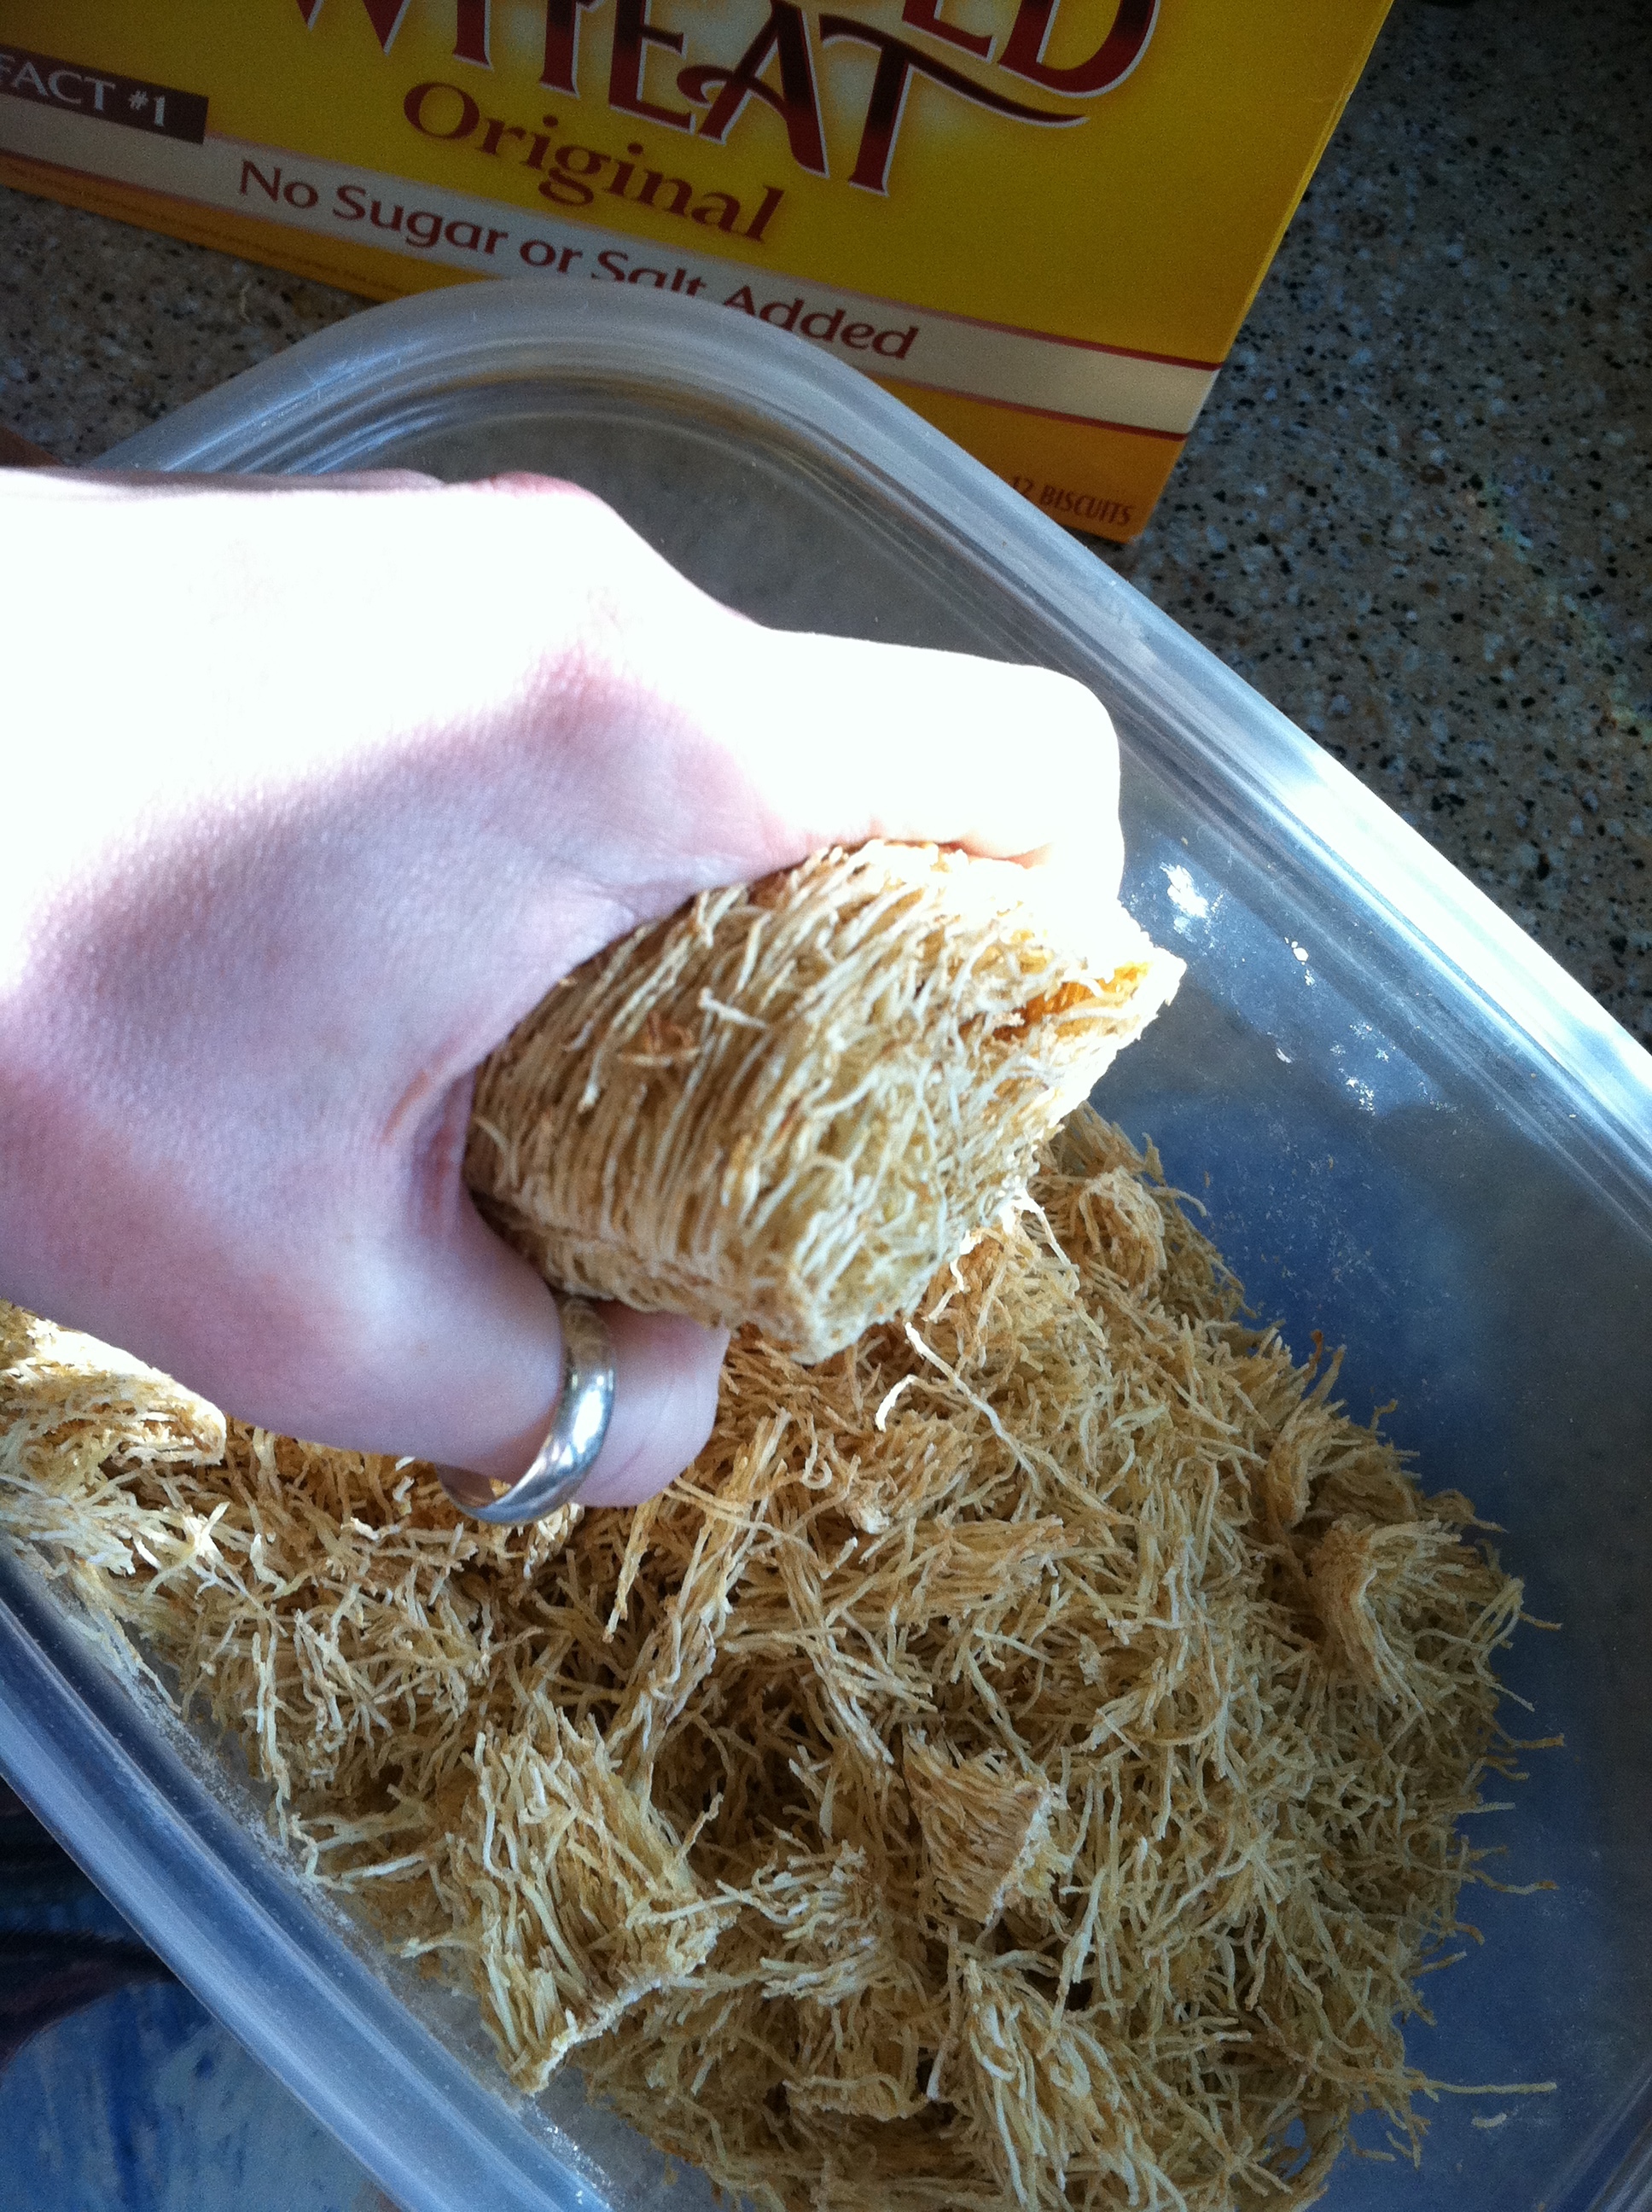
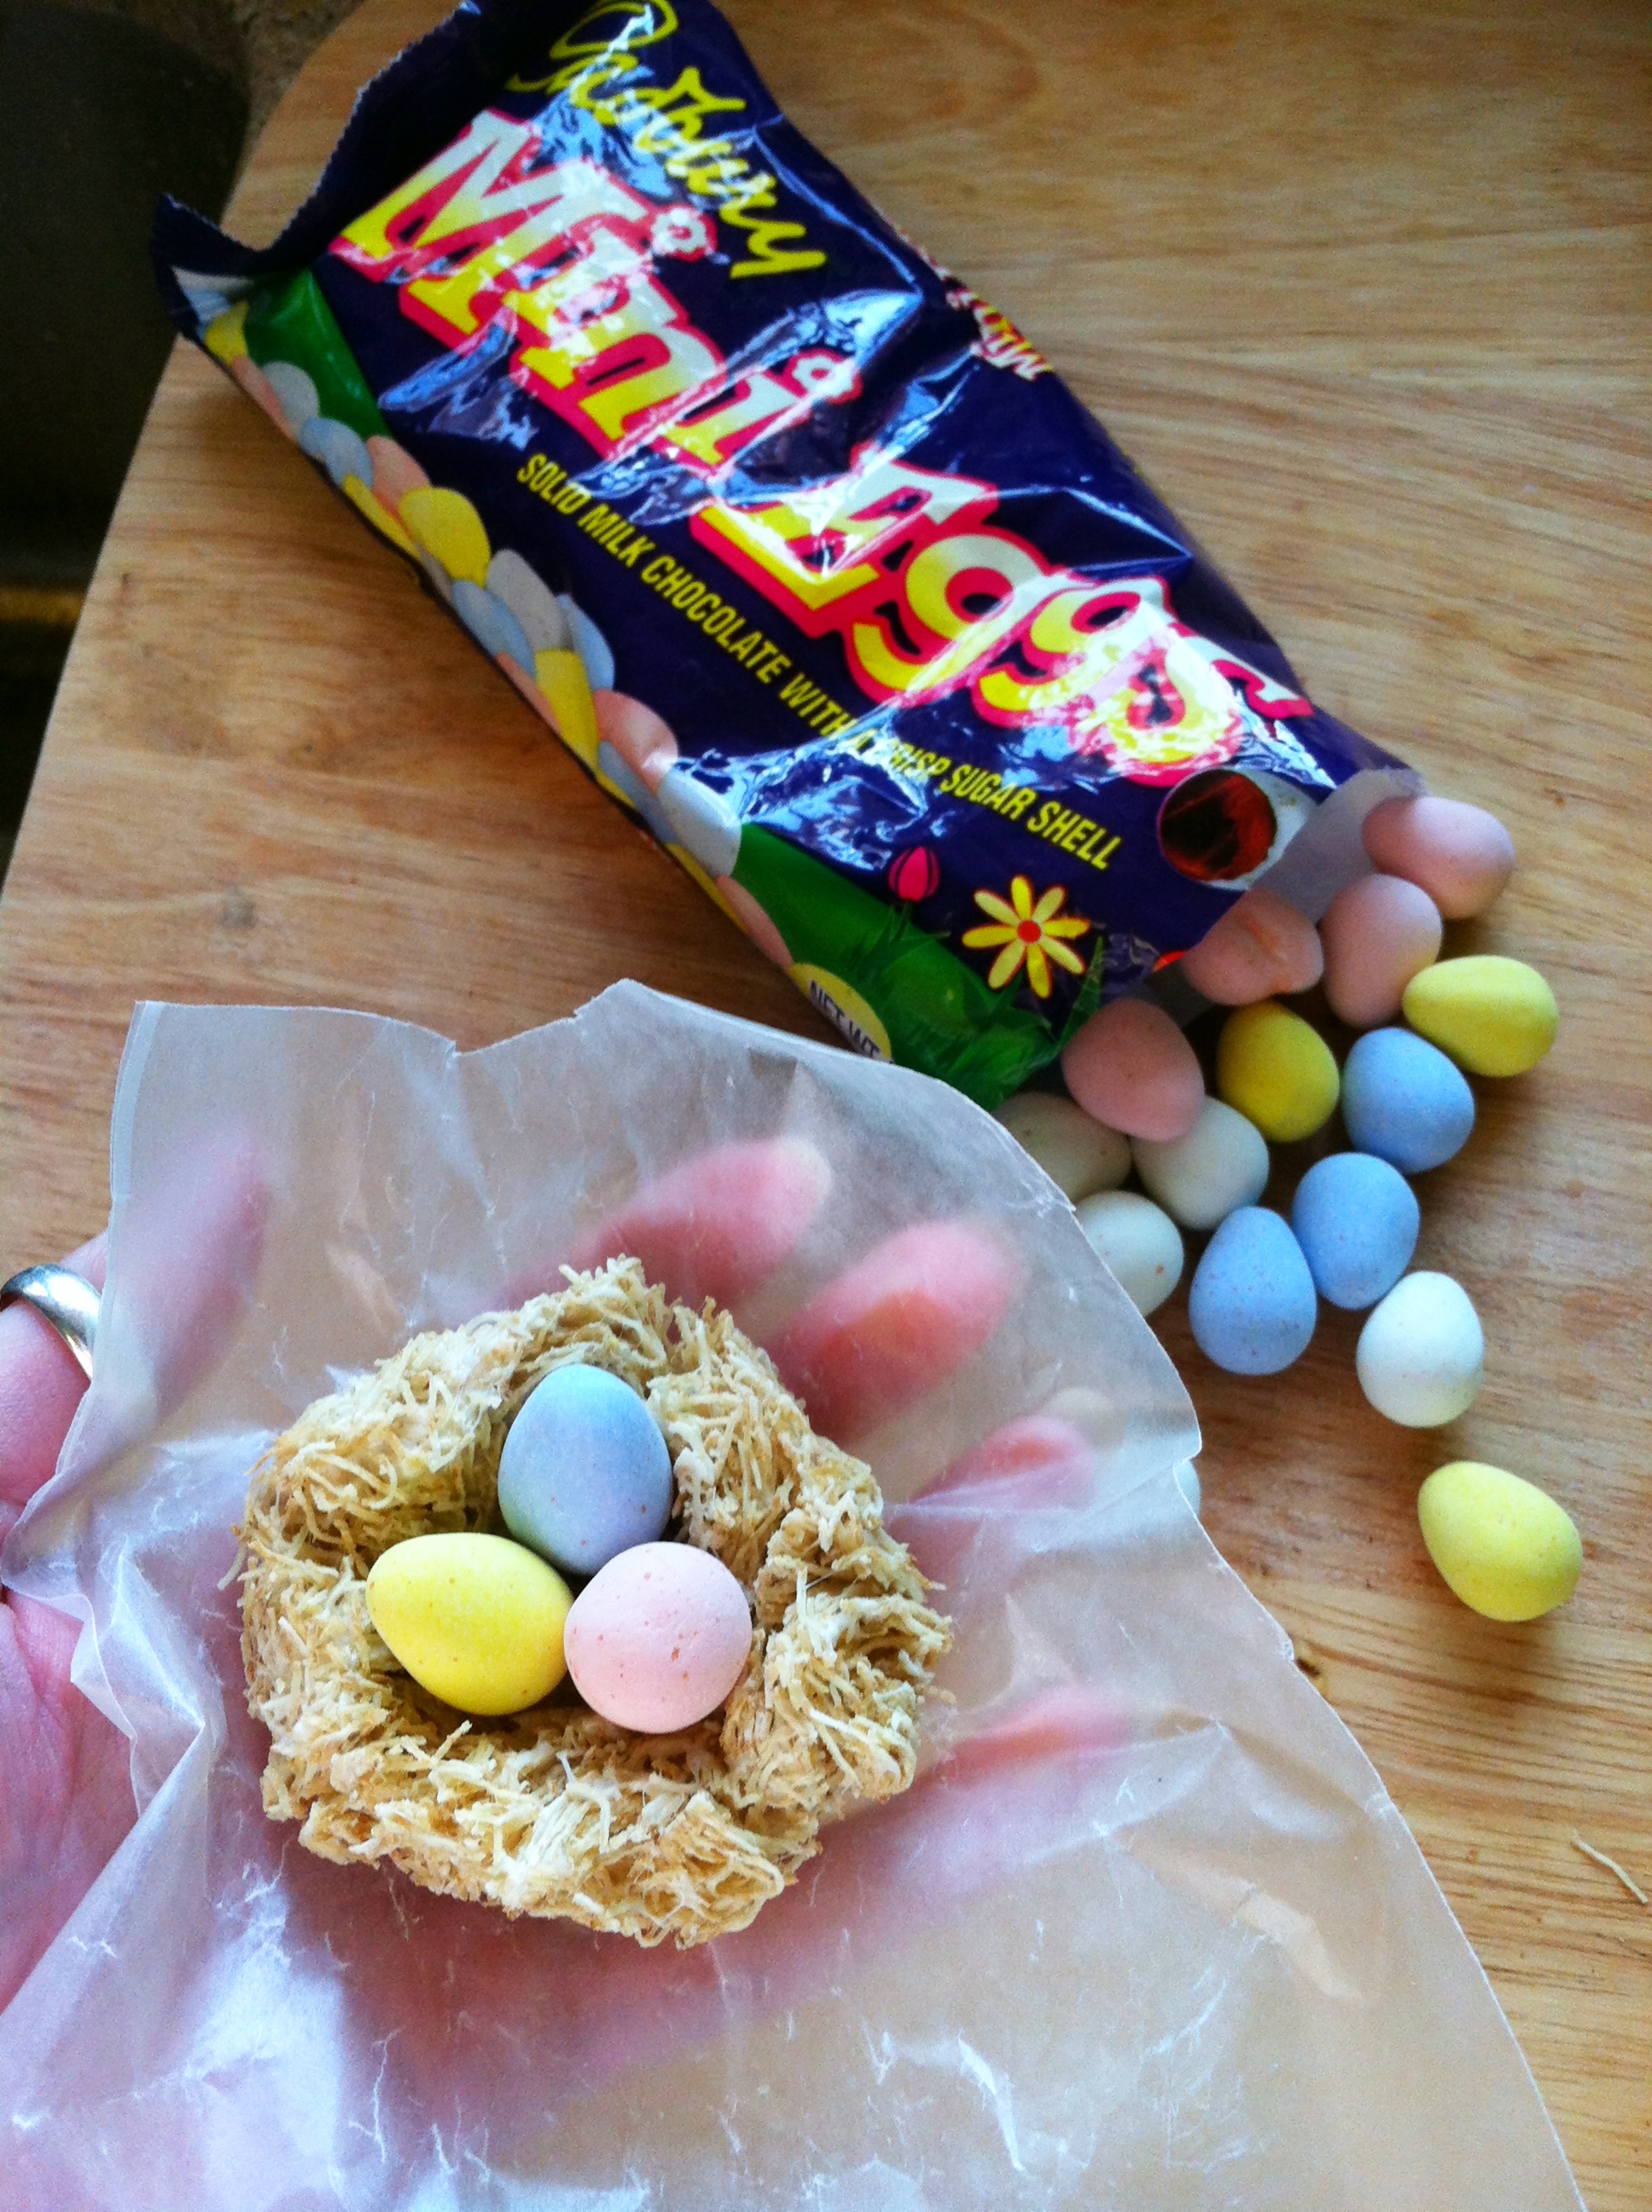
To make the marshmallow treat bird nests you need: a bag of marshmallows, a box of shredded wheat, candy covered chocolate eggs and 2 tbsp of butter. Think rice crispy treats, but with shredded wheat.
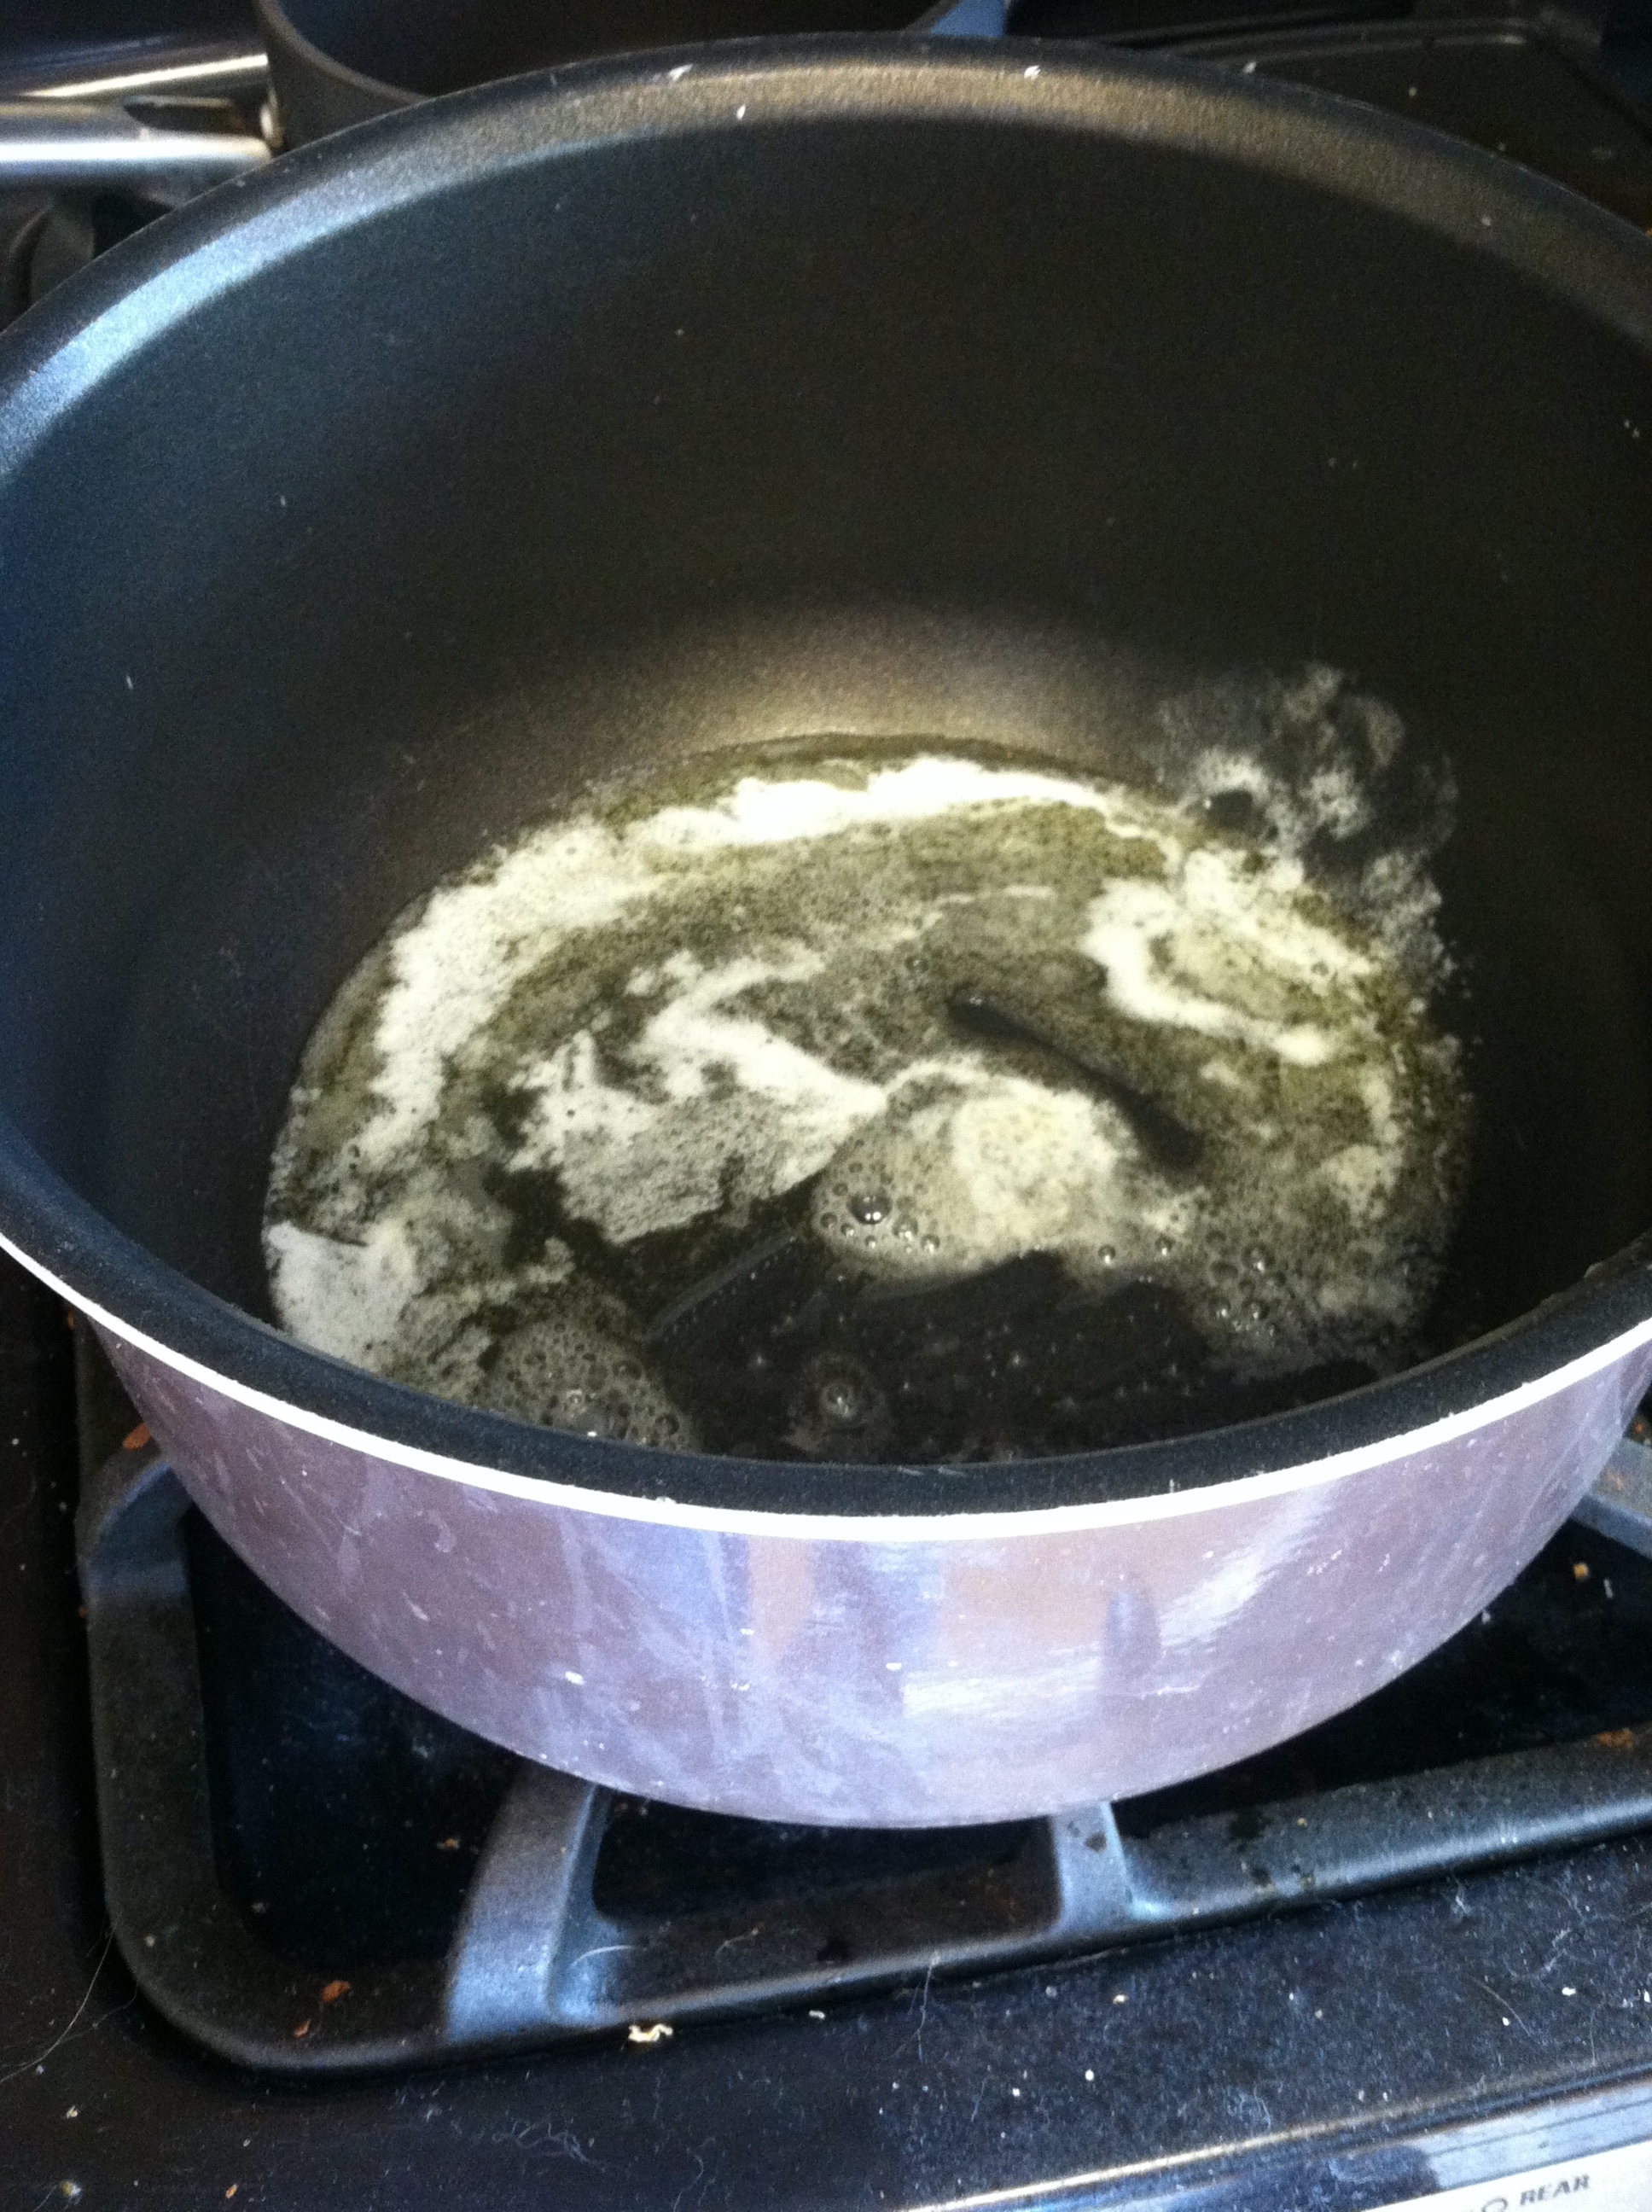
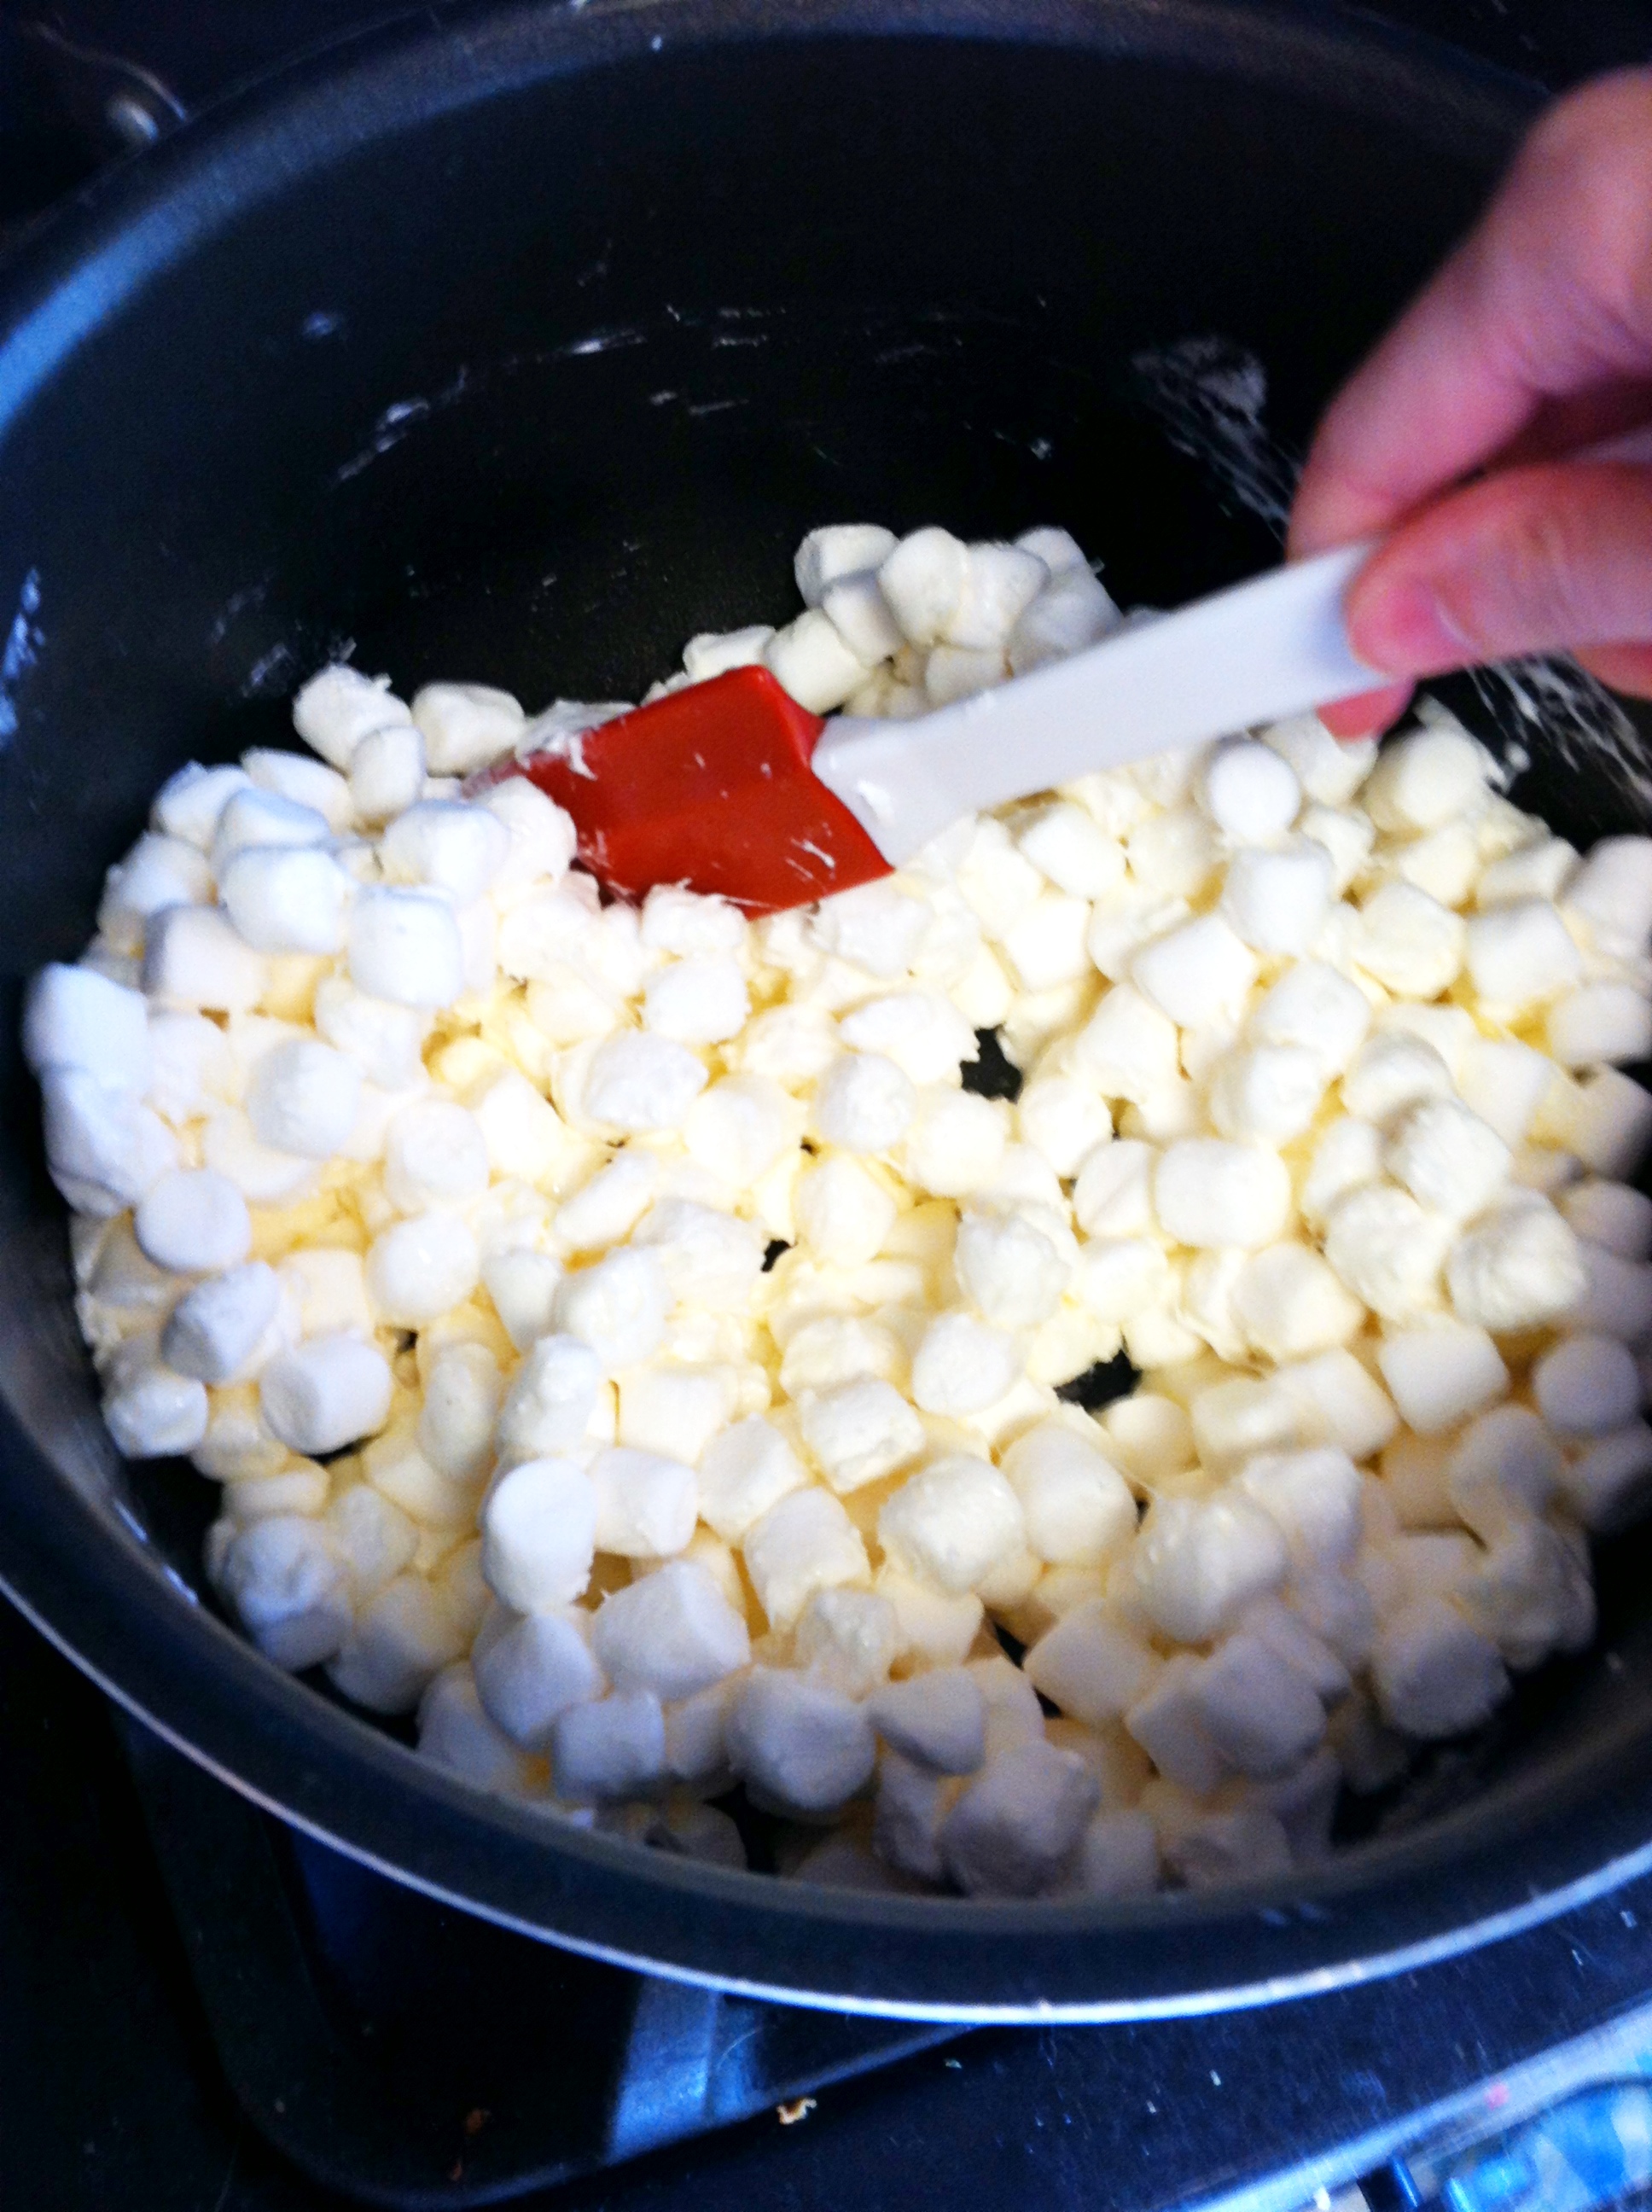
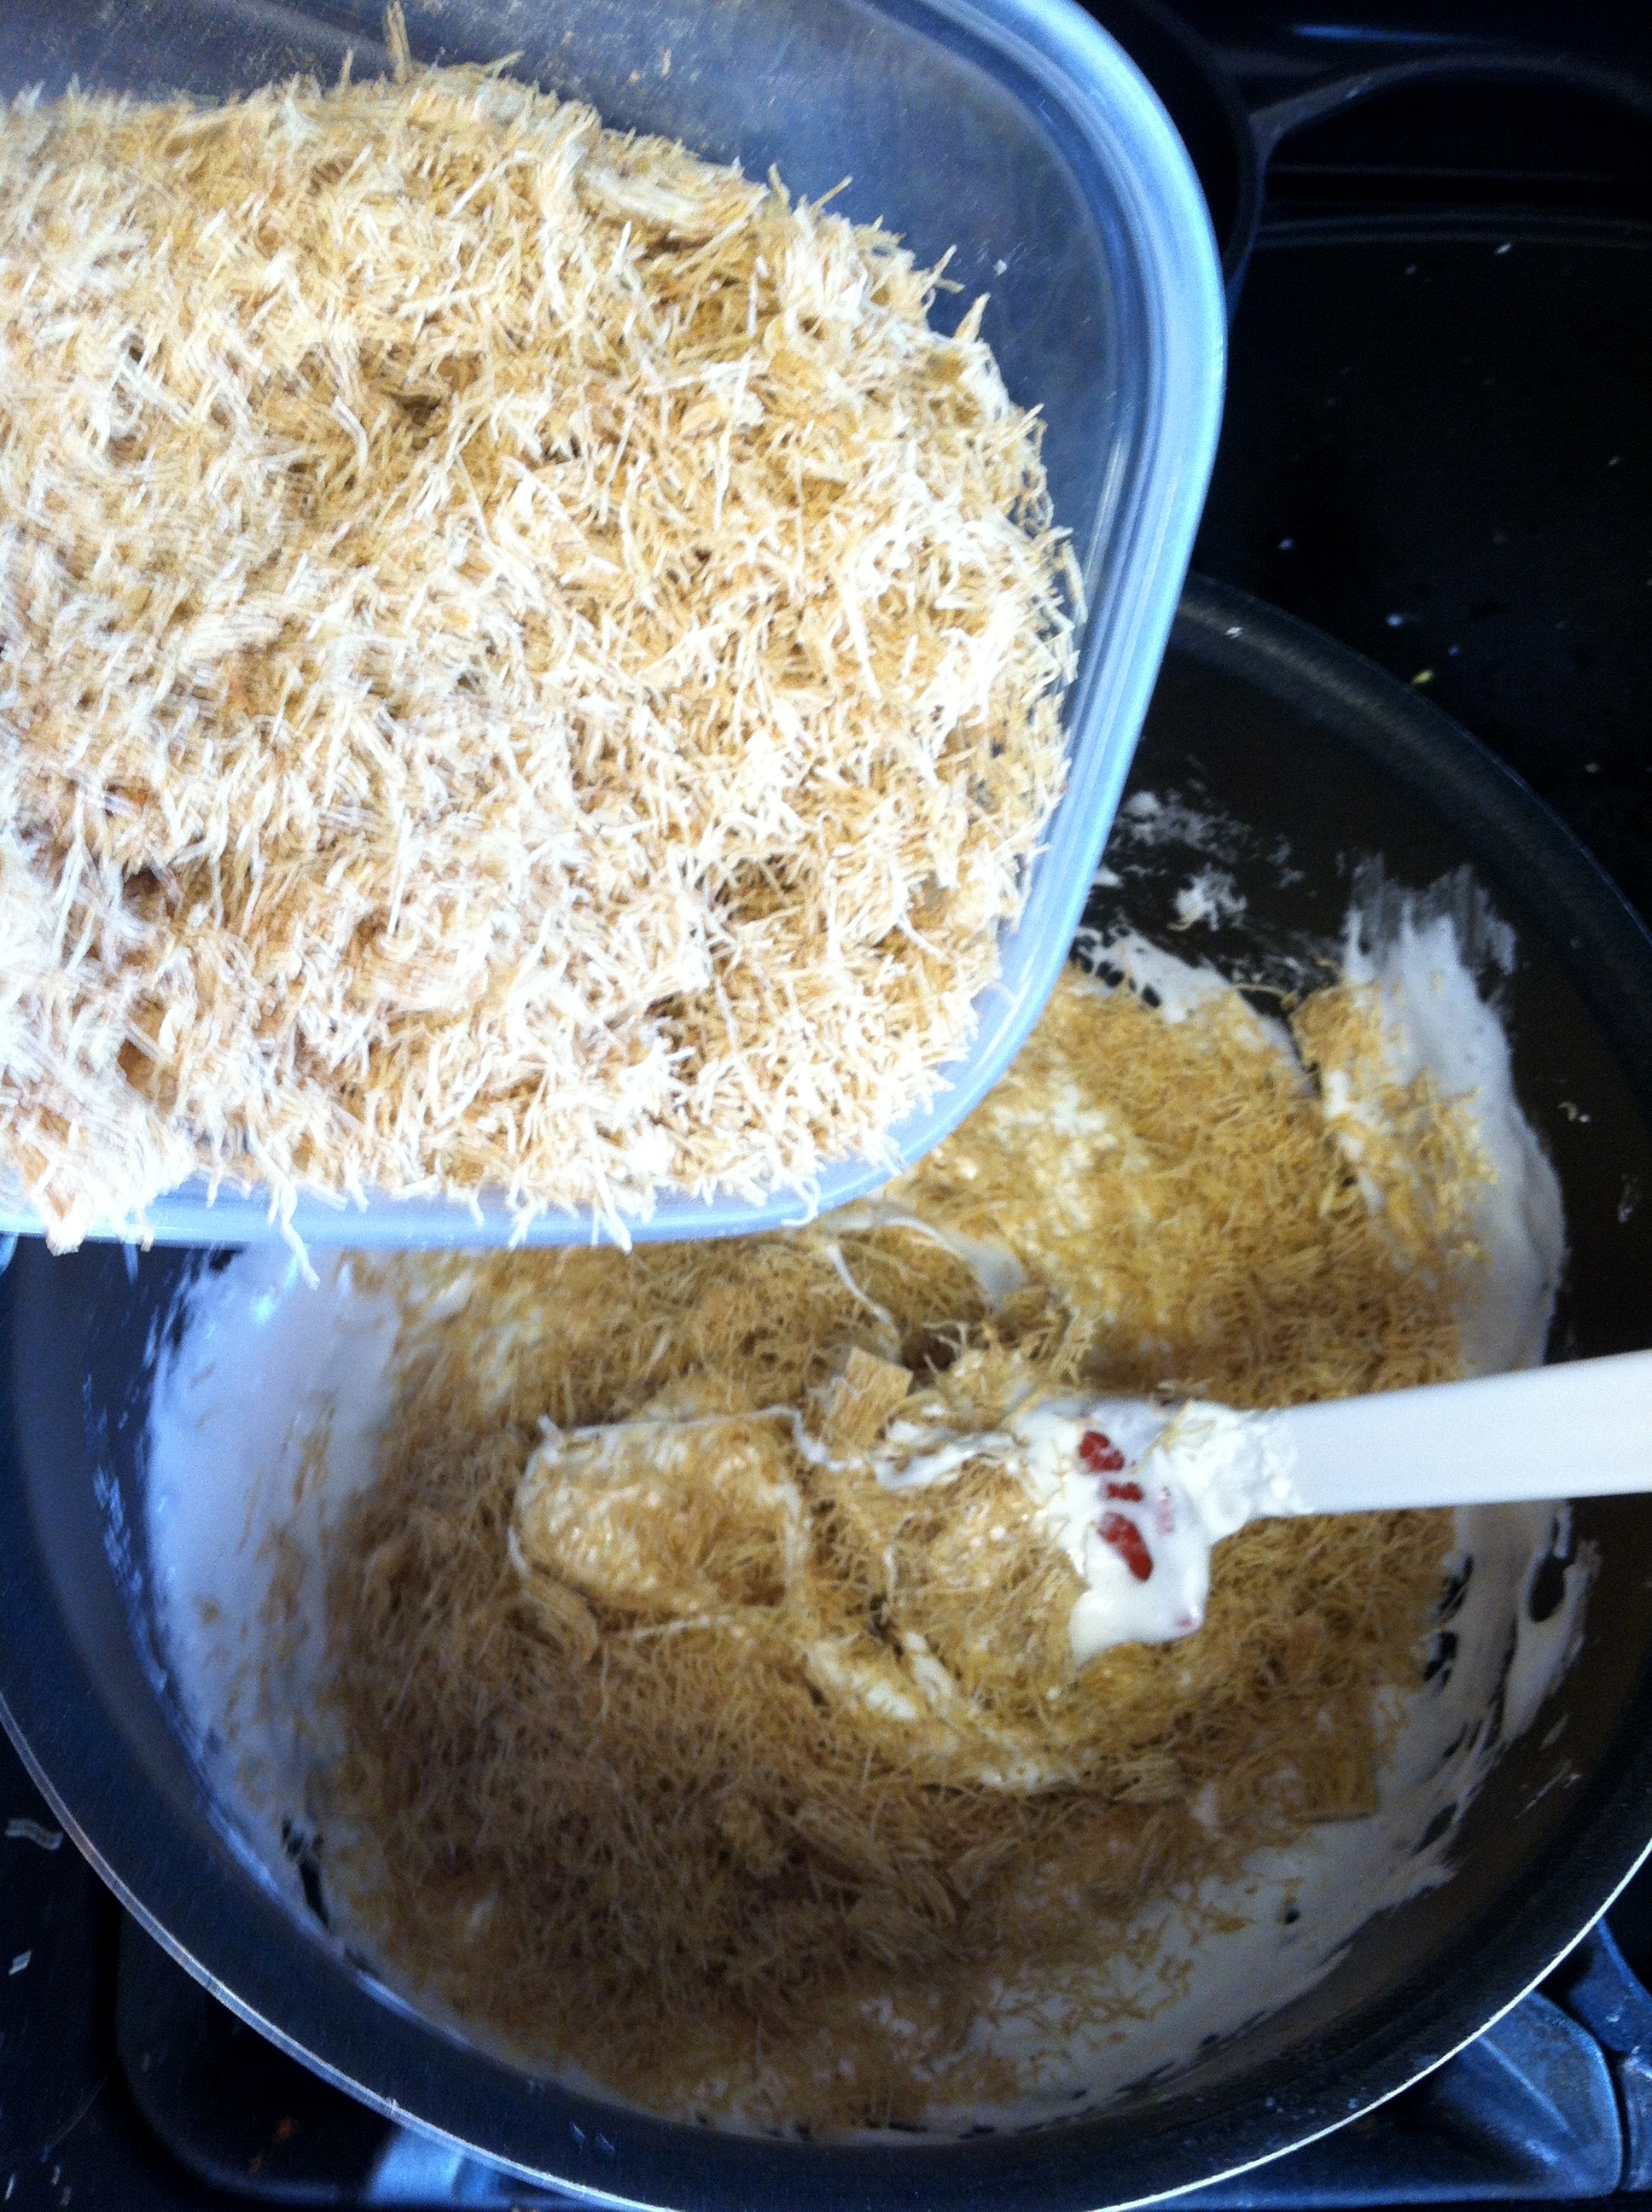
Start by melting the butter on low heat. I used a stock pot so I’d have room to mix in the cereal later. When the butter is melted, add the marshmallows and stir until they are melted and smooth. While stirring, I used my other hand to crumble the shredded wheat biscuits. You could do this beforehand. Remove it from the heat when your marshmallows are melted. I set aside about 2 tbsp of melted marshmallow to act as glue for my candy eggs. Stir the crumbled cereal into the melted marshmallows bit by bit.
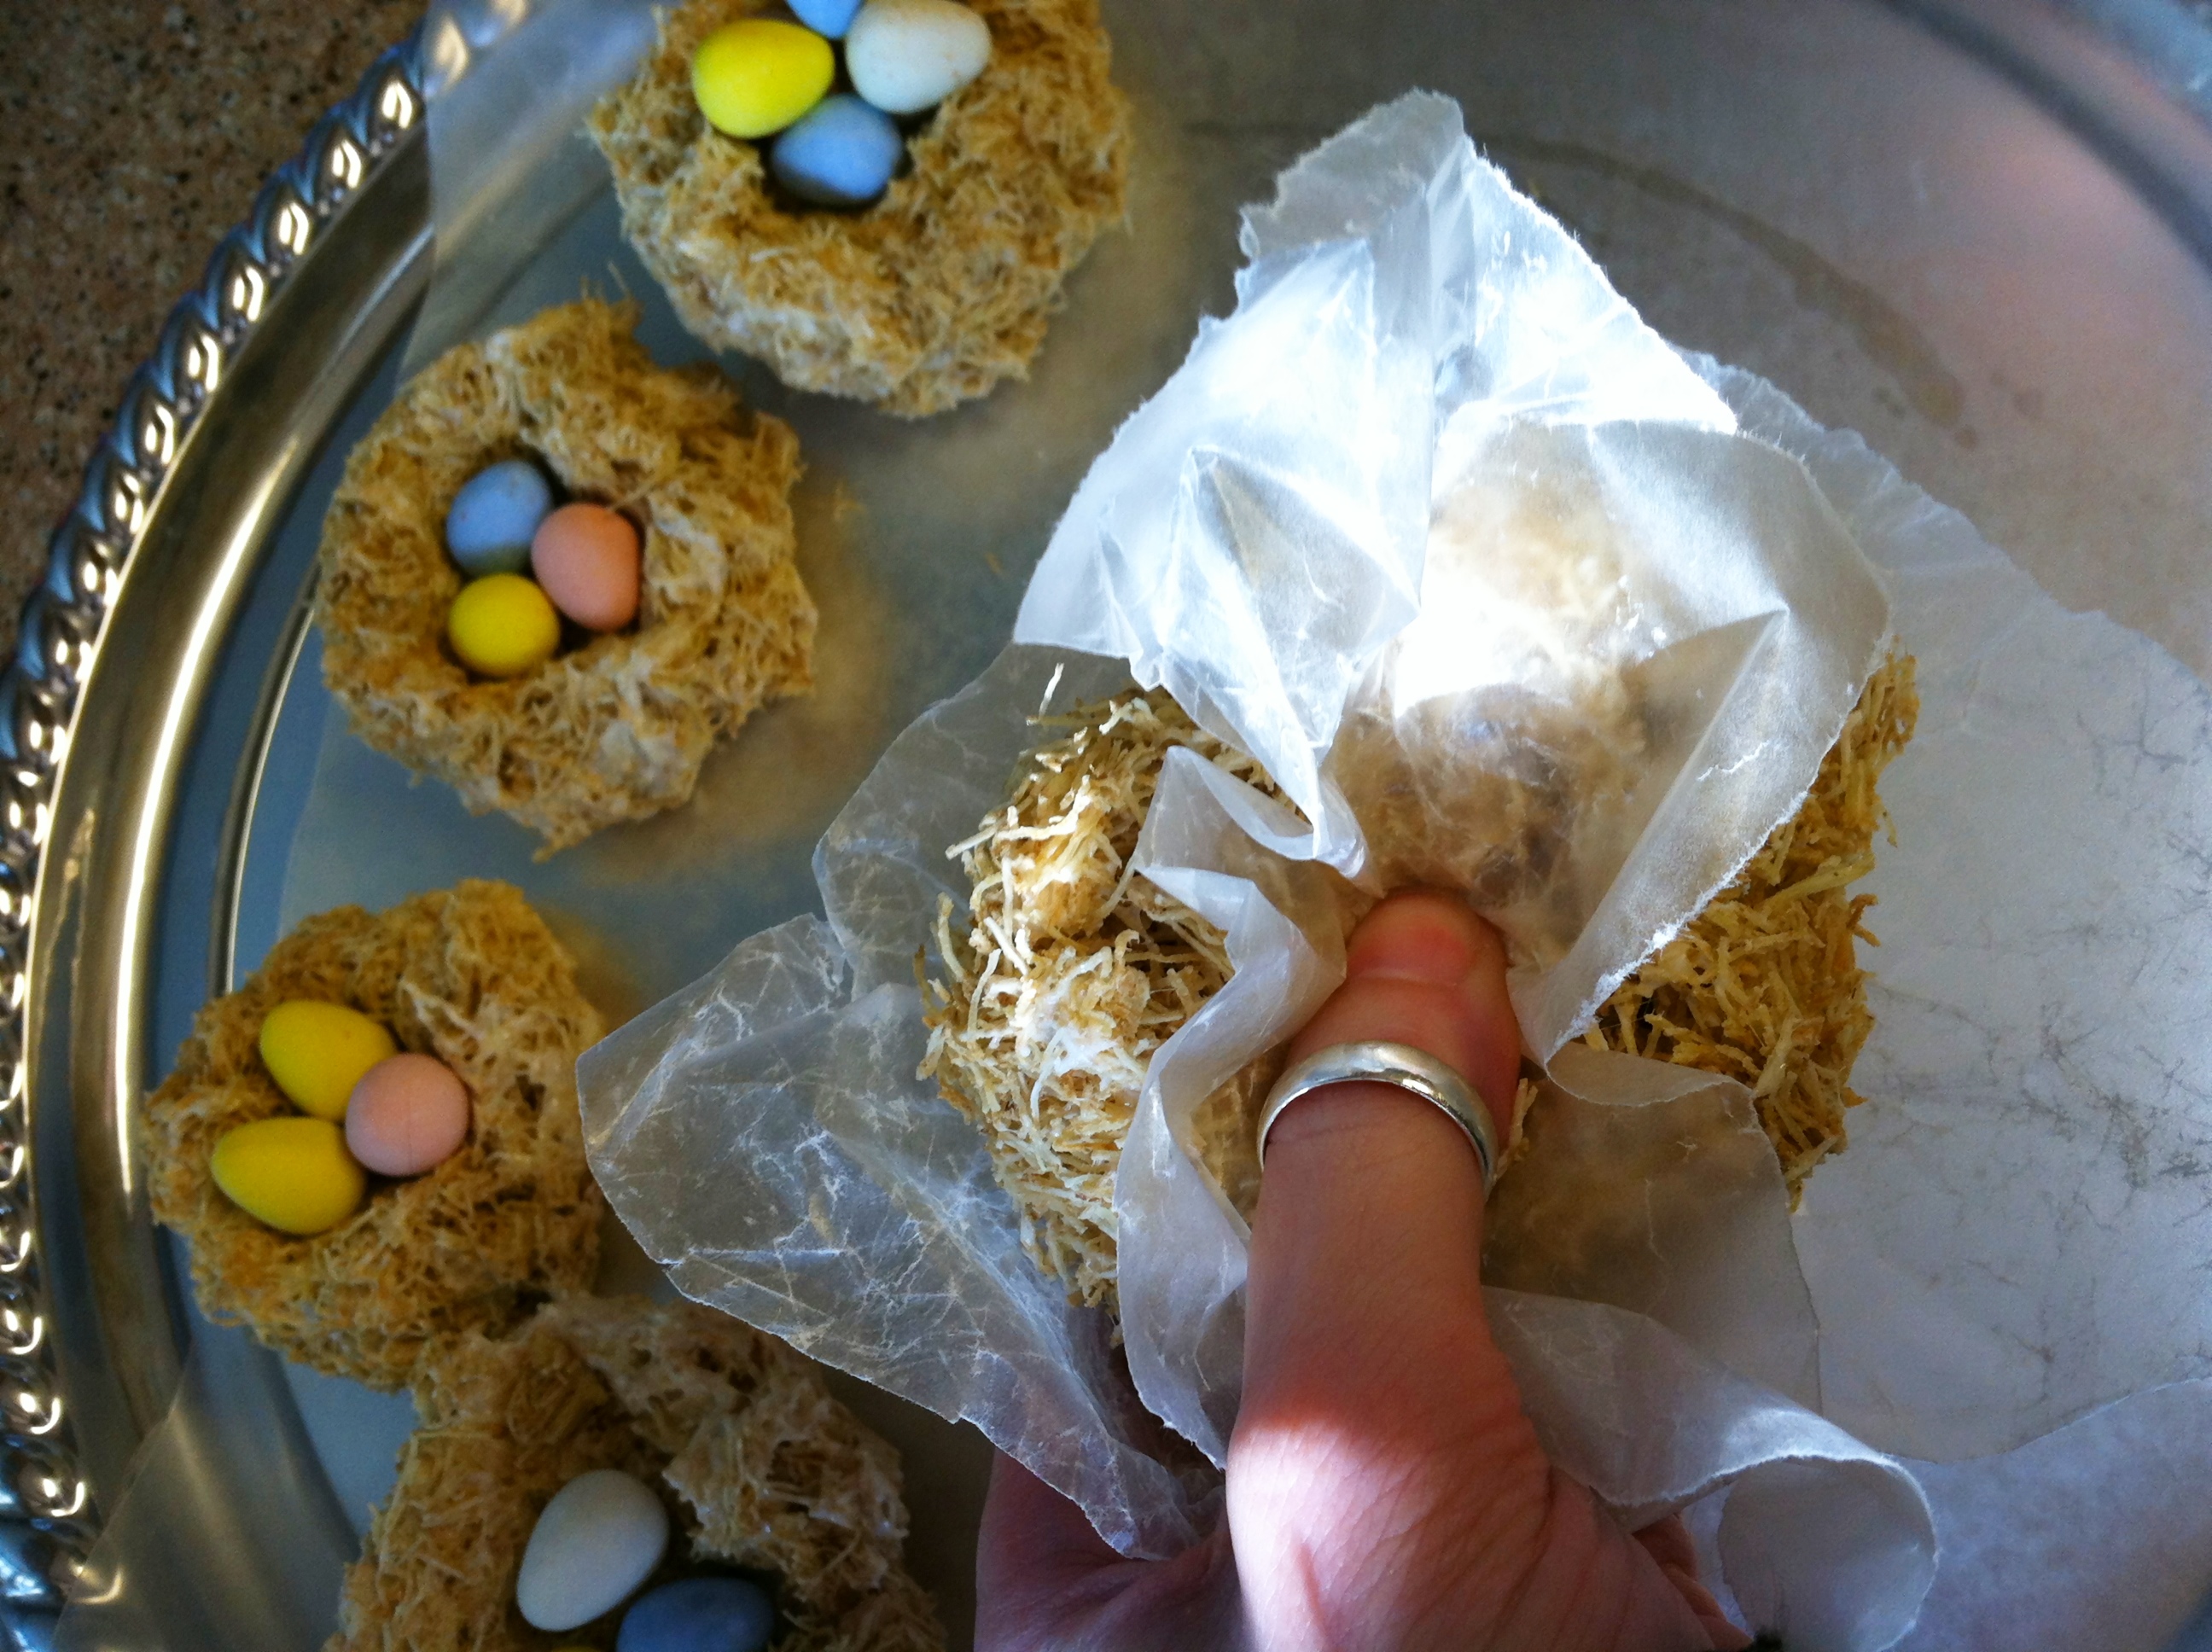
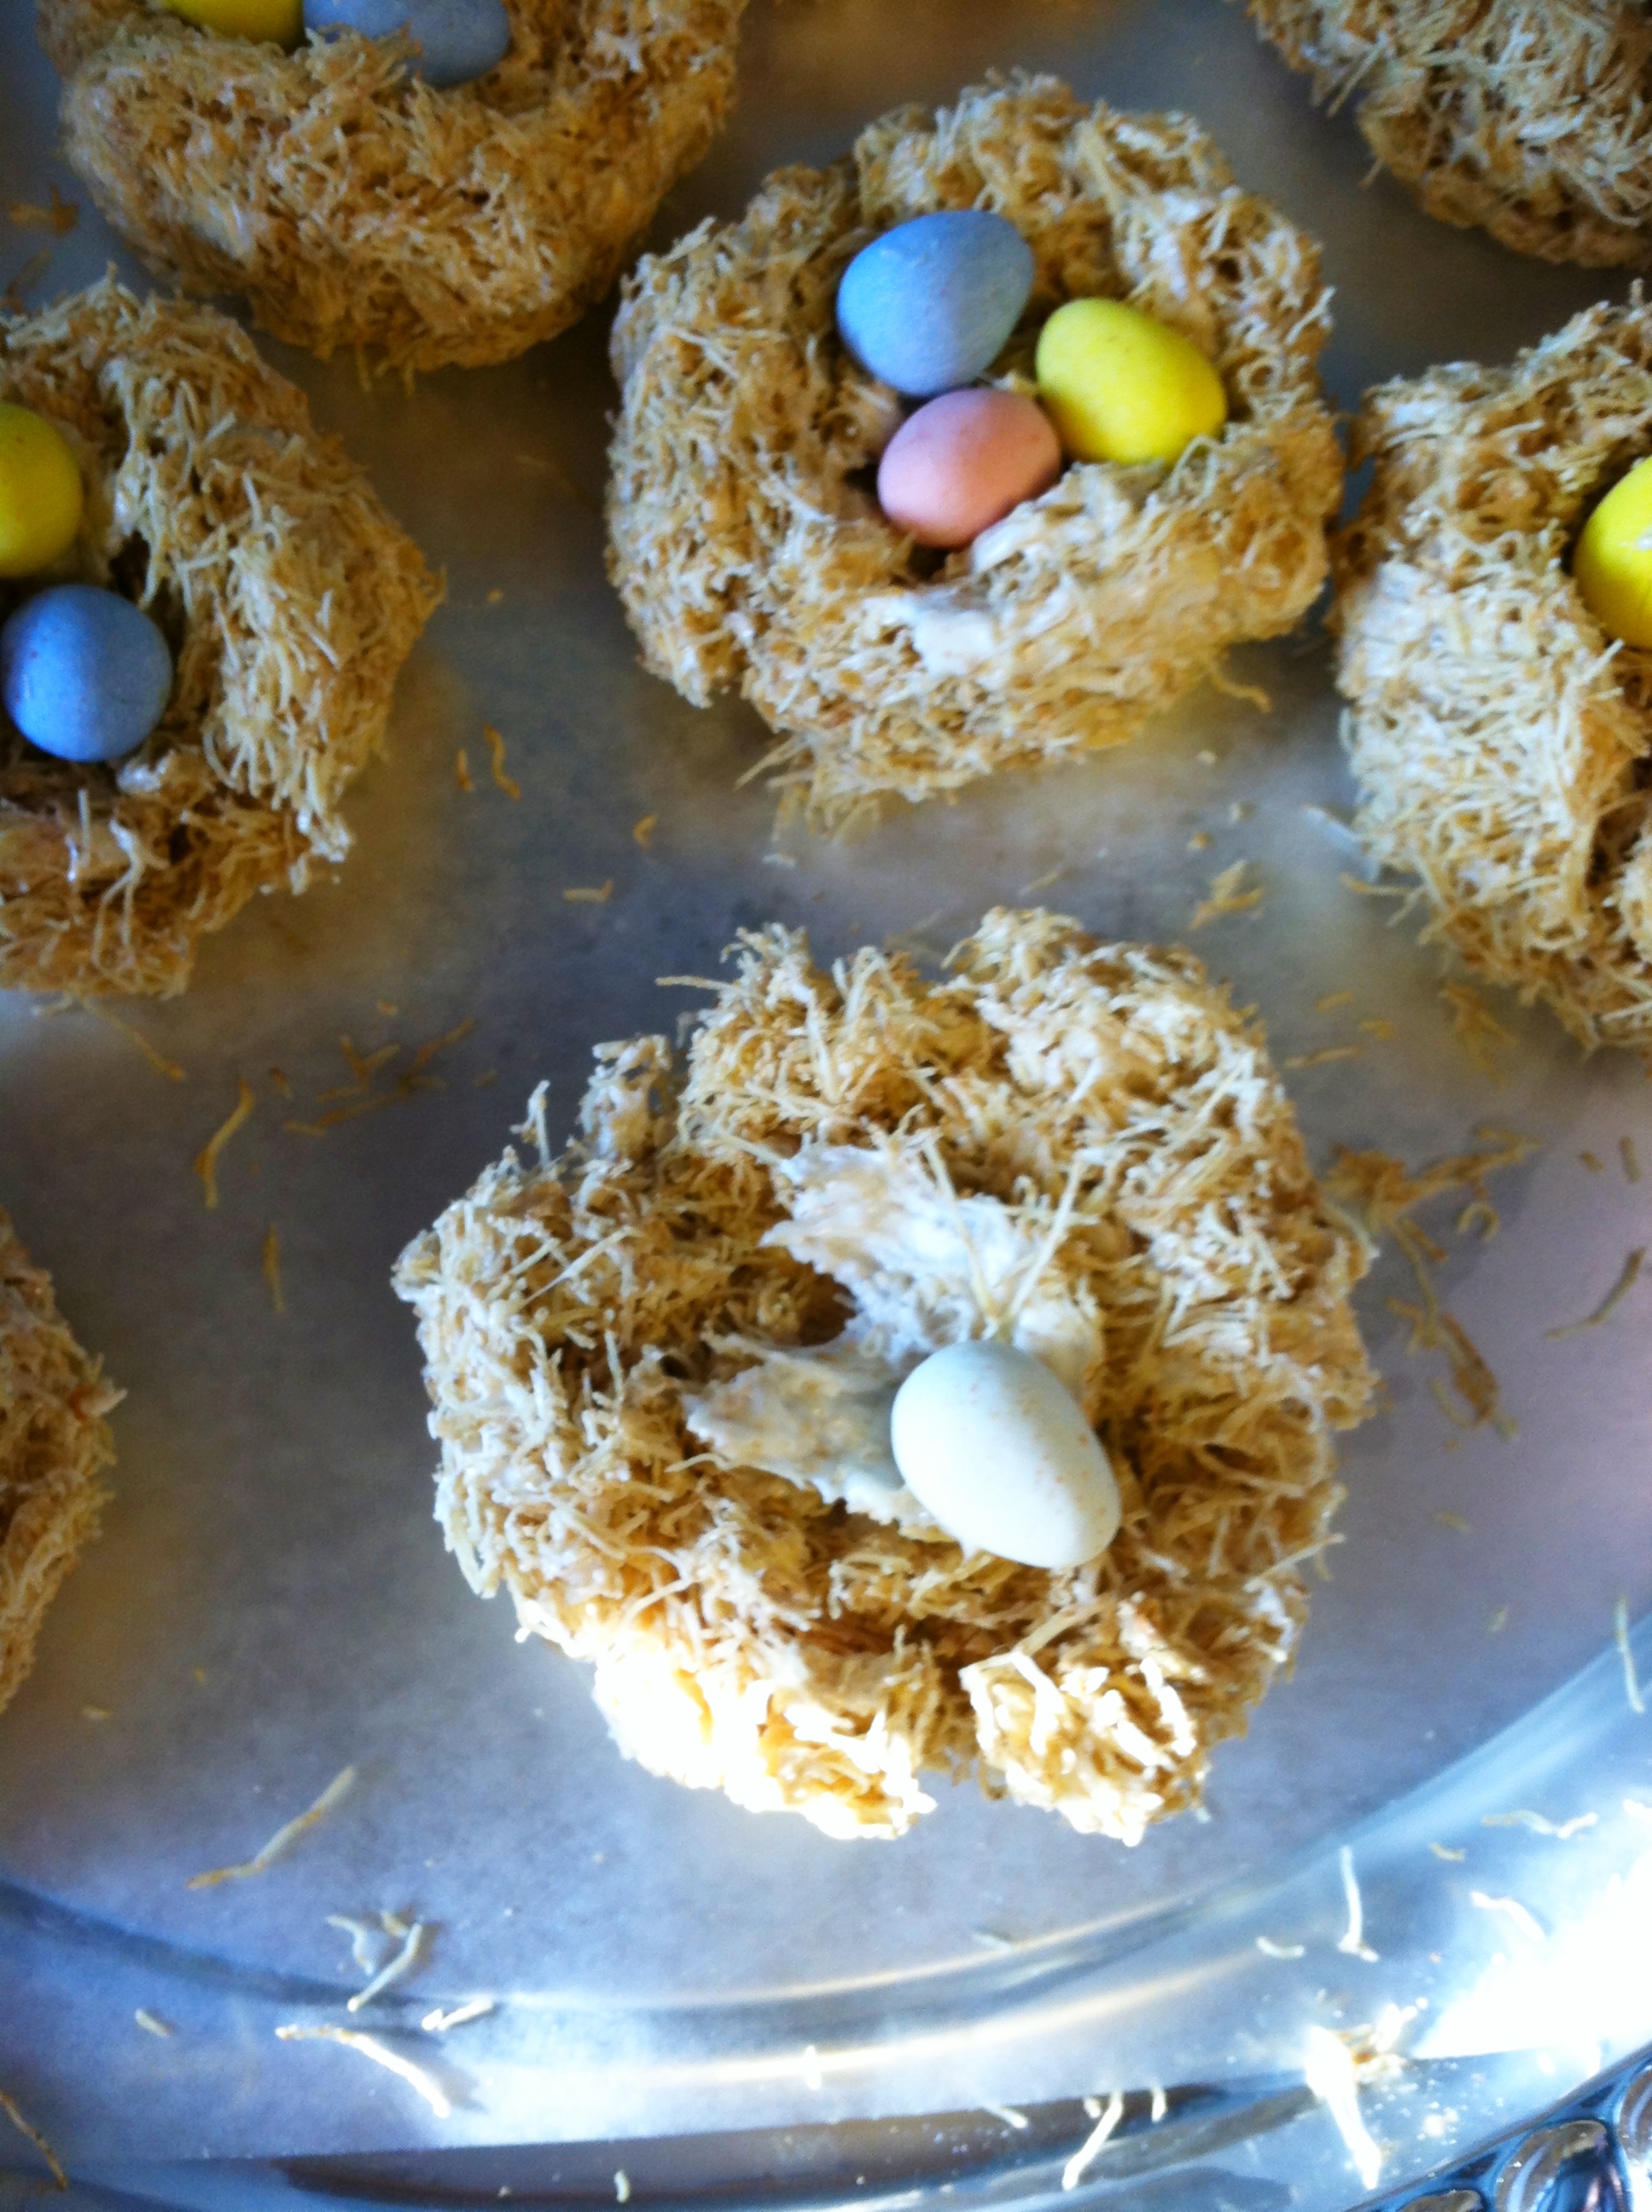
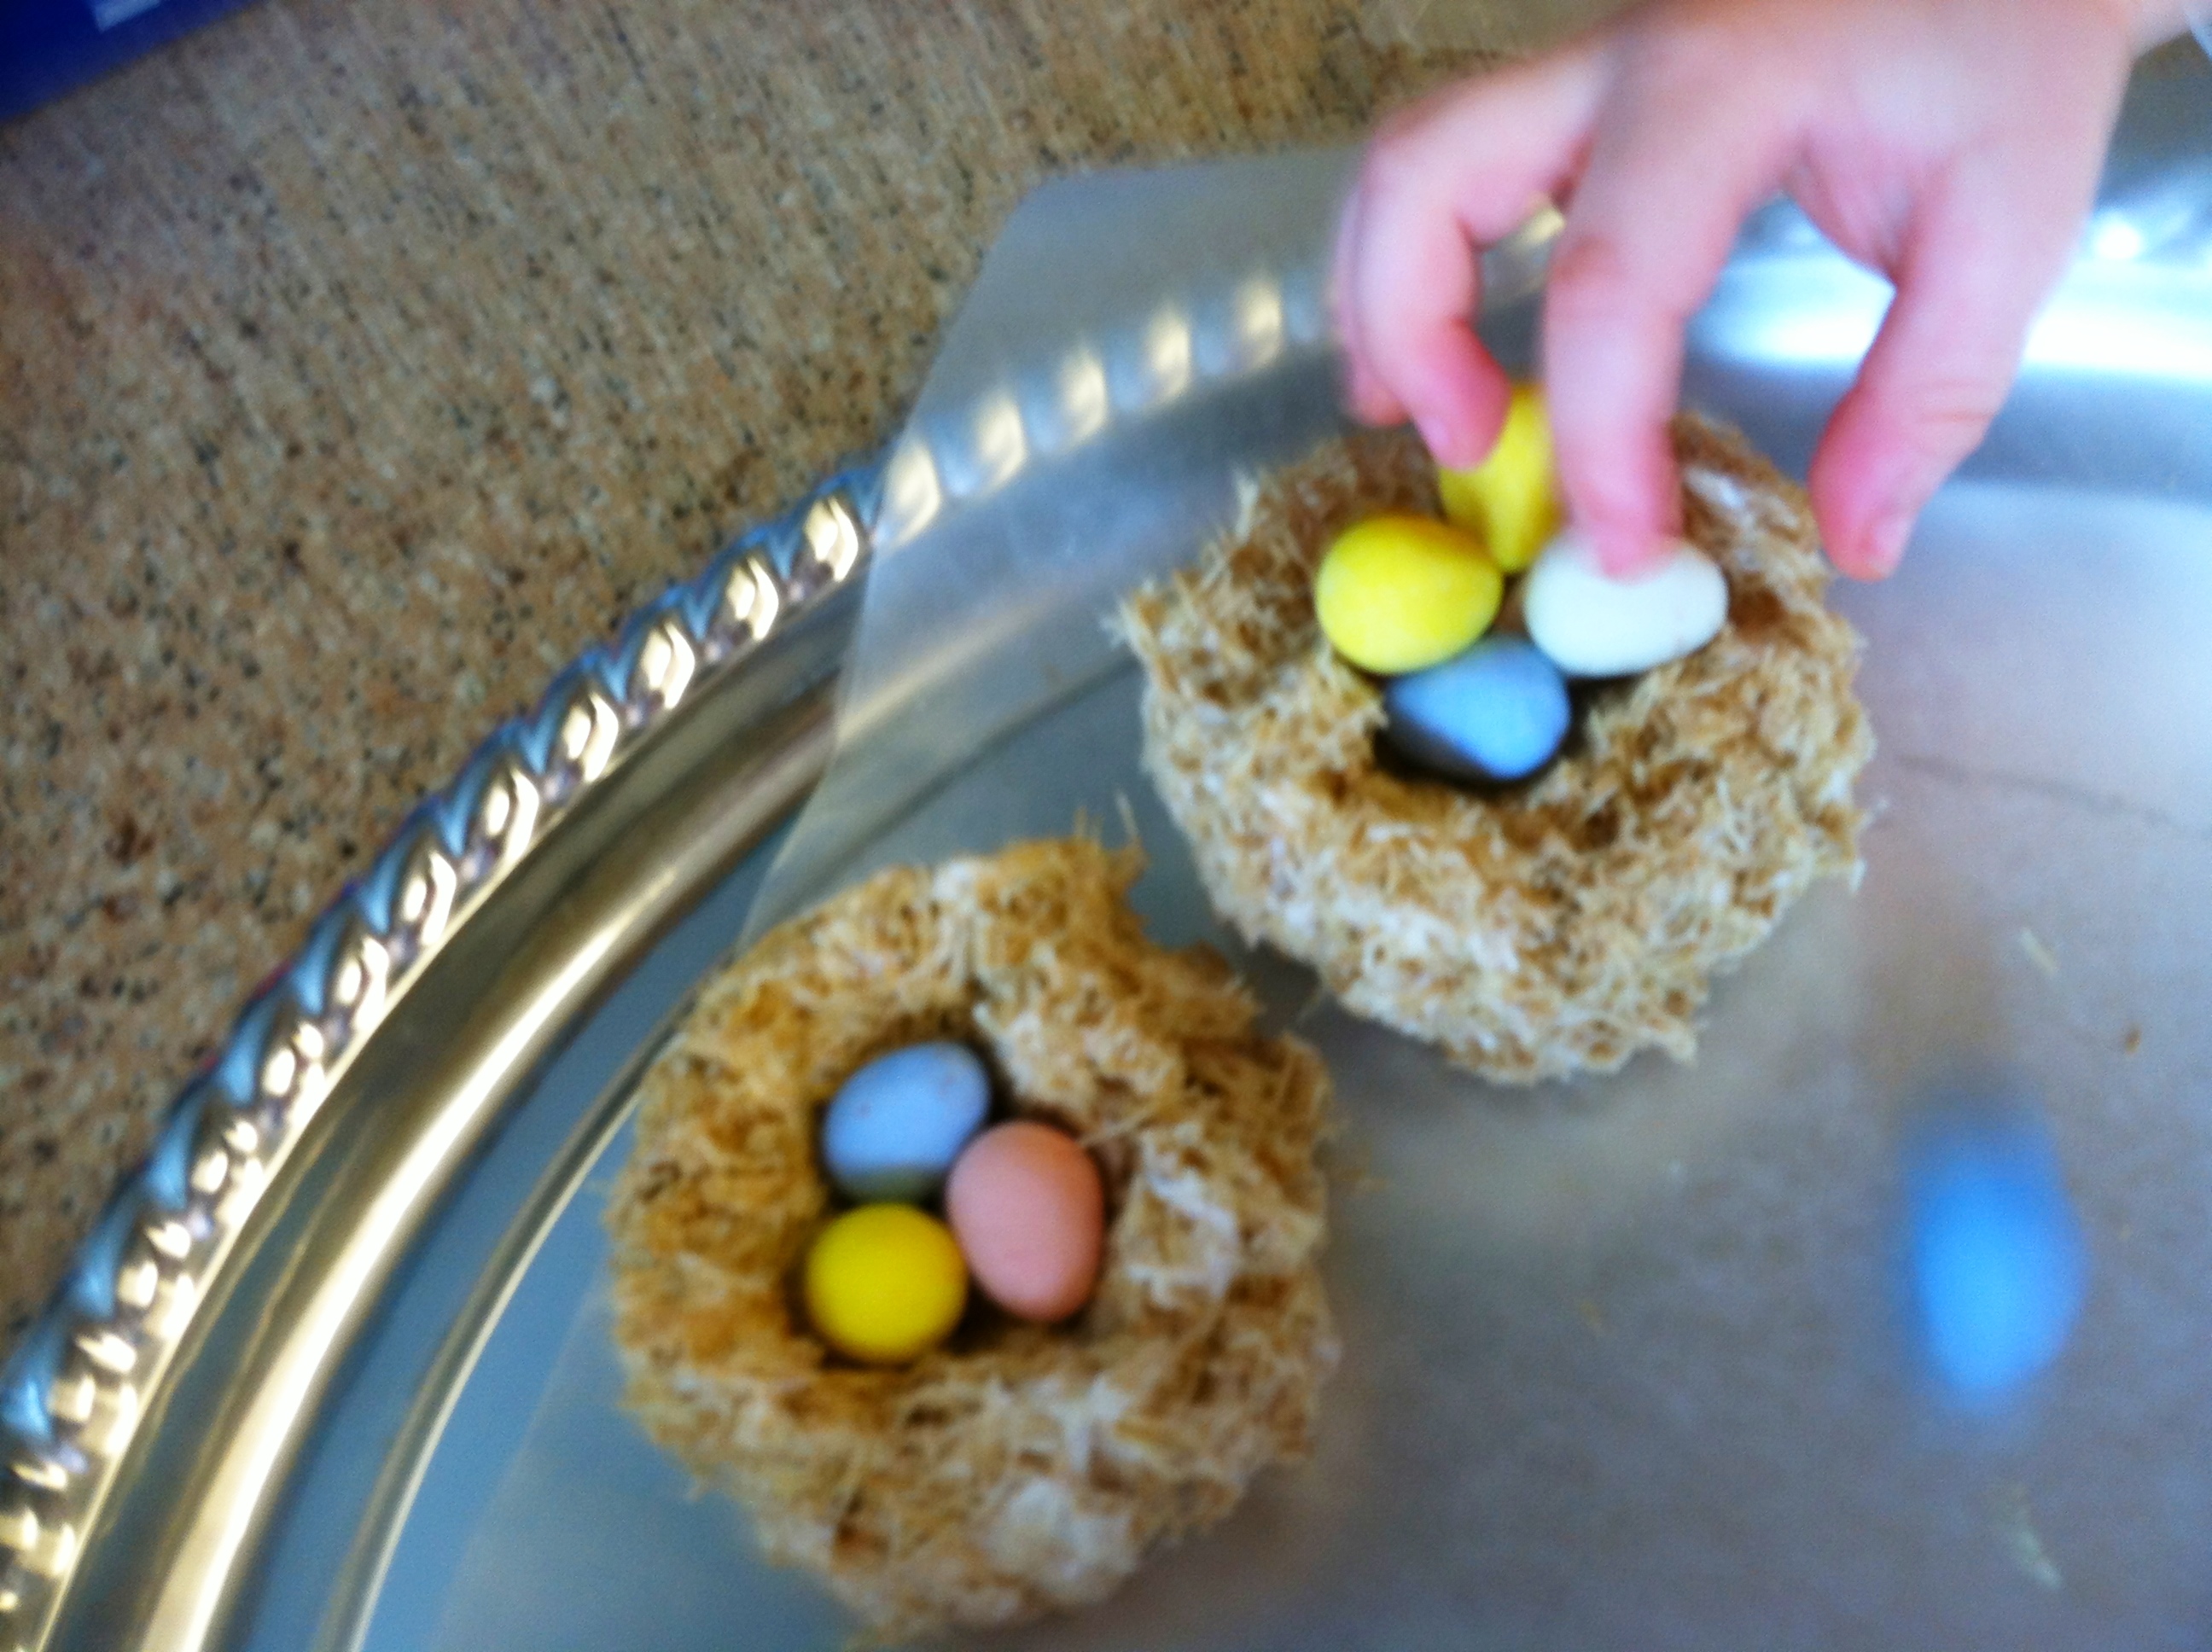
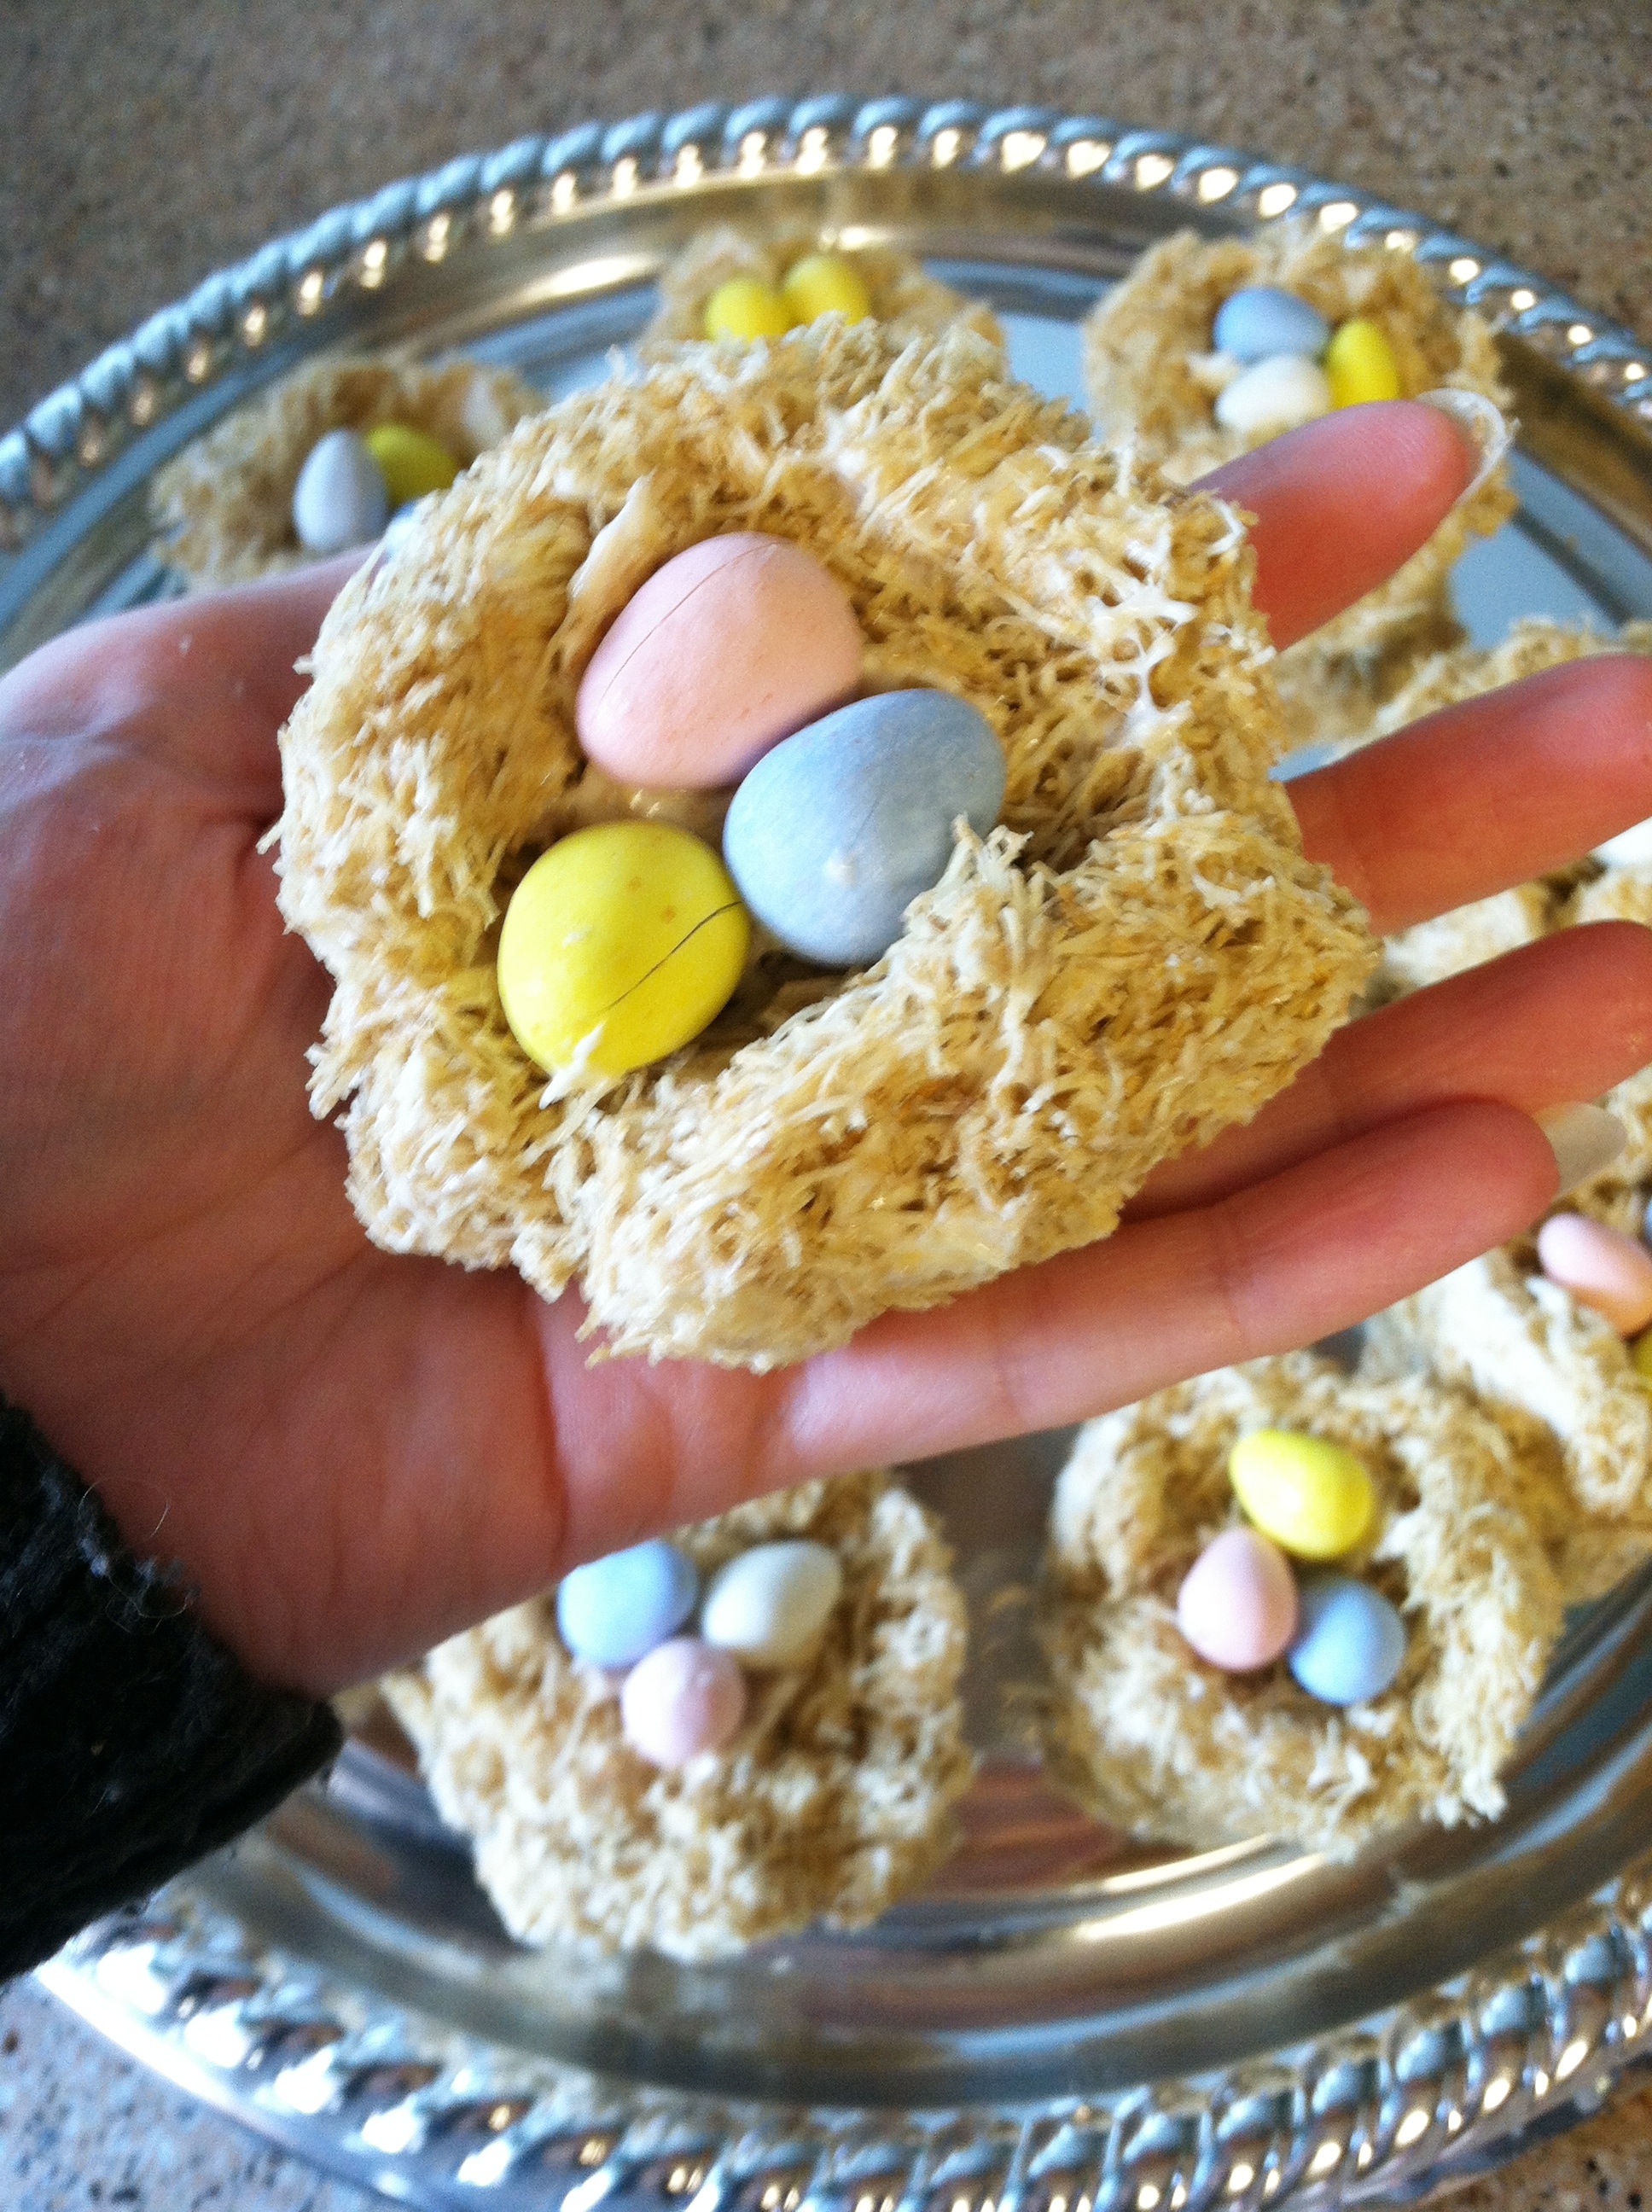
At this point, I called my little helper in from outside. (He had been helping his daddy lay down mulch.) after a hand washing, I put him on egg duty. Jax is very enamoured with baby birds, eggs and nests at the moment. He was thrilled to see a bowl of tiny eggs and watch as I formed a nest. Using a square of waxed paper, I formed a small ball of the marshmallow treat. I then placed another square on top and pushed down to make the hollow of the nest. I added a dollop of the marshmallow I had set aside and Jax placed eggs on top. My little nests held 3 eggs and I made 12 nests.
Jax didn’t realize the eggs were edible until the last nest. He held one up to his mouth and licked it. His eyes got wide and he said, “Oh, delicious!” I gave him permission to eat it and he said “Delicous, chocolate…” while he crunched away.
I’ve been quiet this week, though I’ve been posting updates on the Facebook page. Work has been busy and the days went by in a blur. I did get a special project done last weekend. I sewed a design out of felt to display at the top of the blog. If you are reading on an RSS feed, stop by the site and check it out!
I am in the middle of sewing a two page spread for Jax’s quiet book of an airport. It is going to be really cute, but involves a lot of pieces, similar to the treasure hunt page. I have some photos of it on Facebook. Hopefully I make a lot of progress tomorrow.
Here are some Easter themed links for you. Do you think 2 is too young to dye eggs? I haven’t done it since I was little and I’m itching to!
Crayon and dye eggs may be a good technique to do with Jax. He could color and I could dip them in the dye.
I want to make these twist-on-rice-crispy-treats bird nests featured on one of my favorite blogs, Enjoying the Small Things. Shredded wheat, marshmallows and chocolate eggs. Yum!
Baking mini cakes in mason jars might be the new cake pop. Here’s an Easter twist.
Do you have any Easter traditions? Jax is so young, we are just now forming ours. I want to have him hunt for eggs in the yard. I’m also putting together a basket for him. I’m not sure I’ll put any candy in it this year.