Tag Archives: Sewing

Wool Blend Felt vs Polyester Felt

I’m almost done the city quiet book page that I’ve been creating with my scraps of recycled polyester felt. But for my next quiet book page, I’ll be using beautiful wool blend felt provided by our new sponsor, American Felt and Craft (more on that here.) I’ve never worked with it before, and I’m really excited to try!

I thought it might be nice to compare the wool blend to some craft store felt made from recycled plastic bottles. This is the kind of felt I have used up until this point.

The felts are about the same thickness, but the wool blend is denser.

When you feel the two felts, they are about the same thickness, but you can tell right away the wool is much denser. The polyester definitely has a “right” and “wrong” side – the “wrong” side is super scratchy! The wool blend almost feels just as soft on the back as the front. It’s only a tiny bit rougher than the front.

After pulling hard on the corners of each felt sheet.

In the strength department, the wool blend felt wins hands down. I pulled hard on the corners of each of the felt sheets. The polyester felt stretched and thinned. It got fuzzy and I probably could have ripped it if I kept at it. The wool barely stretched at all.

I tried to smooth and stretch both of the felts back into the original shapes. The wool blend obeyed, but the polyester got fuzzier and stayed mostly stretched.

The above photo also shows how thin the polyester felt is. You can see right through it. The wool is nice and dense, which makes all the colors very rich.

  
wool vs polyester

I’m really looking forward to trying it out! Have you worked with wool felt? What are your thoughts? I’m wonder if it will wear my scissors down fast than the acrylic and polyester felts do. I should finish the city page tomorrow, then I’ll get to move on to the wool camping page! (For progress photos of my pages, join the Facebook page or follow me on Instagram at username iolstephanie.)

Quiet Book Pages from January through June

Back in January, I wrote up a review of all the quiet book pages I had designed and sewn since beginning in September of 2011. Six months have passed and I’ve gotten so much done. Time for another look back!

Click a thumbnail below to visit a post:


Top 5 Most Popular Patterns from January – June

  1. Sandcastle – 5 comments – 5,598 views
  2. Treasure & Pirate Map – 2 comments – 5,590 views
  3. Ice Cream Parlor – 2 comments – 4,487 views
  4. Cook Breakfast – 2 comments – 4,375 views
  5. Itsy Bitsy Spider – 12 comments – 4,054 views

Top 10 Most Popular Patterns

  1. Sock Matching – 13 comments – 14,459 views
  2. Circus Train – 8 comments – 9,337 views
  3. Forest – 7 comments – 8,898 views
  4. Starbucks – 2 comments – 6,378 views
  5. Mailbox & Letters – 2 comments – 5,681 views
  6. Cookie Shapes & Colors – 6 comments – 5,613 views
  7. Sandcastle – 5 comments – 5,598 views
  8. Treasure & Pirate Map – 2 comments – 5,590 views
  9. Rocket Ship – 6 comments – 5,574 views
  10. Astronaut – 2 comments – 5,440 views

I am so very happy to introduce you to Imagine Our Life’s newest sponsor. My addiction to sewing with felt has often lead me to browse online, drooling over the beautiful colors available in wool and wool blend felt. I am putting my heart and soul (and countless hours!) into sewing interactive quiet book pages that Jax will be playing with for years. I want them to last so that he can pass them on to his children. I knew I needed to try wool felt, which is thicker and more durable, and that is where American Felt and Craft really shines!

American Felt and Craft was founded on the idea that creativity means coloring with the whole box of crayons.  This philosophy inspired us to carry the largest selection of felt available anywhere on the internet. Because we know every stitch matters, we only sell heirloom quality felt and sundries.  We carry over 150 colors, shades, and tones to complete your personal work of art. From basic black to bubble gum, whatever you’re looking for, American Felt and Craft has the perfect color!

They had me at “heirloom quality” – because isn’t that exactly what we want to create when we are sewing for our children or grandchildren? You can find American Felt and Craft’s online store here and their Facebook page here. They ship worldwide and carry more that just felt. I’ll be trying out some of their crinkle material to make my campfire nice and crackly! Just look at those amazing felt colors!

Good news for you: American Felt and Craft will be offering a giveaway on an upcoming quiet book page. Can’t wait? You can save 15% off your first order with the code “imagine“.

Baking Cupcakes Quiet Book Page

A quick note:
Don’t forget to enter out blog-iversary giveaway for a chance to win a kit to sew
your very own Farmer’s Market quiet book page! You have until Wednesday.

I am super excited to have this page all done. It’s one of the pages I’ve known I wanted to do since I was first introduced to quiet books. I waited to start planning it because I really wanted to go all out. I’m glad I have so much experience now, because it turned out just how I envisioned!

Baking Cupakes Quiet Book Page

For those of you who belong to our Facebook page, you’ve been seeing a lot of sneak peeks and progress photos while I’ve made this page. I plan to continue that since it is much easier to update there ten make a ton of small progress blog posts. Make sure you join if you don’t want to miss out! (On another side note, I’ve had people ask how they can support this site and my free patterns. You can check out a little page about it here.)

everything put away for storage

This page is another pretend play page featuring cooking (like out Let’s Cook Breakfast page.) The left side features an oven with a cupcake pan, the right side has a mixing bowl and recipe book. The recipe book holds cupcake making ingredients, and the mixing bowl stores cupcake parts and a spoon. There are three cupcakes: chocolate, strawberry and lemon, and they all come apart into three pieces. This is very good practice for manual dexterity. Jax can put the cupcakes in the cupcake tray, but he is still learning how to fit the frosting on top of the cupcake (it goes on like a hat.)

What I used: the pattern, 2 sheets of tan background felt, a 9” x 9” black glitter oven background felt, two 9” x 9” aqua oven door pieces with window holes, felt (in gray, dark gray, white, pink, hot pink, red, yellow, aqua, lavender, purple, cream, cocoa, brown, dark brown, natural and tan), clear vinyl to fit oven window and recipe pocket, two magnetic purse snaps, a scrap of Velcro, two small pompoms, thin aqua ribbon, green ribbon for strawberry stem, decorative ribbon for mixing bowl (mine is this, but from the craft store) and embroidery floss to match.


Oven: I used my sewing machine for the whole oven to speed it up. I started with the cupcake pan’s tray, sewing the 3 cups on like pockets. Then I sewed the tray down to the oven back (I used glittery black – $0.99 for one sheet at the store, but plain black would work too.) I sewed 3 layers of the oven handle together to make it sturdy, and stitched it to the top of the front piece of the oven door. I took two scrap squares of felt (2 pieces thick each) and installed the male half of a magnetic purse snap in each. I sewed these on to the inside piece of the oven door at the top corners. I sandwiched the clear vinyl in the window I cut out of the two door pieces, then sewed all around both it and the door itself. I went around the outside of the door a second time with a zig-zag stitch. I sewed the black oven inside piece down to the left side of my tan background and zig-zag stitched the oven door to the bottom. I installed the other halves of the purse snaps through both the black and tan layers of felt once I saw where the snaps lined up. I sewed the page backing to the whole page, making sure not to sew the oven door closed, then set it aside until the right-hand page was complete.

Mixing Bowl & Spoon: I sewed some decorative ribbon to the bowl (just because I wanted a reason to use it!) front and sewed the front to the back along the top. I then sewed the bowl to the bottom right of the tan background all around the bottom. I sewed the whole page to it’s backing, then sewed the two facing pages together with a length of aqua ribbon caught in the seam. (This will be used later for the recipe book.) I Sewed the pages together like this.

For the spoon, I cut three layers of felt to make it sturdy. I then trimmed the oval part of the top layer about 2mm smaller than the other layers. I sewed them together all around the edged with a blanket stitch, lining up all the edges exactly. This caused the bowl of the spoon to curve like a real one would.

Recipe Book: I started out by stitching the recipe to the right side of the white felt “page”. I did mine totally by hand, but I later made up a pattern for you. The text is done in back stitch. The little felt pictures are sewn down in my usual applique technique of tiny perpendicular stitches around the edges. I sewed the white sugar, flour and backing powder with gray felt to make it show up more. I decorated the cover by back stitching the felt letters on, sewing down the cupcake and adding a pompom. I ran my needle straight through the pompom to sew it on.

I pinned the white page down to the inside of the cover and laid some clear vinyl over the left-hand side and the other end of the aqua ribbon sandwiched in like a bookmark. I sewed the page down, and made two vertical lines of stitched up the middle to make a book spine and close the right side of the clear pocket. I finished the recipe book by added a little Velcro to close it. I happened to have pink in my stash from years ago.

Cupcakes & Liners: The actual cupcakes are simply blanket stitched together all around the edges. For the cupcake liners, I trimmed the tops with my pinking shears to give that zig-zag look, then sewed the fronts to the backs along the sides and bottoms to make little pouches. I also added polka dot ribbon to my chocolate cupcake’s purple liner because I didn’t have the right polka dot felt. You can use whatever felt you’d like for your liners. Be creative!

Lemon: I sewed the four lemon segments to the cream colored rind, the sewed the rind to one of the yellow semi-circles. I sewed the two semi-circles together into the lemon wedge, then sewed it to the front of the lemon glaze. I also outlined mine with an orange-y thread to make it stand out more. I decorated both the front and back lemon glaze pieces with lime green French knots and cream colored stitches to look like sprinkles. I sewed the front and back together, leaving the bottom open so it can go over top of the cupcake and liner like a little hat. I then layered the two whipped cream pieces around it and sewed them together as well.

Strawberry: I had a little roll of pretty pink trim (mini ric-rac would work well too) I got for $0.50 at the fabric store. I stitched it down in two rows of waves on both the font and back of the strawberry icing. I made white French knots to add sprinkles. I sewed tiny brown stitches to the front of the strawberry to be the seeds, then sewed it down to the front of the icing through both layers of the strawberry. When I got to the top where the strawberry hung off of the strawberry, I sandwiched in some loops of green ribbon to make the top of the strawberry and finished the edge with a blanket stitch. I then sewed the front and back of the icing together, leaving the bottom open so it can go over top of the cupcake and liner like a little hat.

Chocolate: The chocolate is made the same way as the other two cupcake tops. I sewed down two shades of chocolate chips and added French knot sprinkles in colors to match my ribbon. I sewed a pom-pom to the top of the front. I then sewed the front and back of the icing together, leaving the bottom open so it can go over top of the cupcake and liner like a little hat.

Baking Ingredients: The baking ingredients are all pretty similar in construction. They are sewn together with a blanket stitch around the outside. Where noted, I use 3 layers of felt for stiffness.

Measuring Cups: I back stitched the letters onto the front of the cups. I sewed little stitches on the white flour/sugar parts to giving it texture. When I stitched the handles, I stuck an extra strip of felt to stiffen it.

Butter & Eggs: These are all just sewed together around the edges.

Vanilla & Baking Powder: I sewed the vanilla/baking powder down tot he front of the spoon, then sewed around the edges of 3 layers of felt for strength.

And that’s it! All the ingredients go into the pocket in the recipe book. I had Jax pull them out and put them into the bowl in the order the recipe asked for. He loved it!

He keeps trying to put the completed cupcakes (liners and all) into the oven pockets. If you want yours to fit into the tray with the liners, you’ll have to make larger pockets. He loves the three flavors I made. I may end up make more in the future. The pattern makes it easy to add on.

I hope you enjoy this pattern! Please send me photos or post on the Facebook page if you make it!

Anniversary Quiet Book Kit Giveaway!

Our little blog is 1 year old this month! While I’ve been making websites since 1997 and blogging since 1998, it wasn’t until I had my little Jax that I decided to create a separate blog for all things crafty, creative and kid-friendly in our lives. It actually took a few months before I started to work on making the site because I needed a name.

When inspiration struck, it was due to two of my favorite songs: Imagine, by John Lennon and Across the Universe by The Beatles.

Images of broken light which dance before me like a million eyes,
they call me on and on across the universe.

To celebrate our 1 year “blog-iversary”, I am giving away a kit to make our farmer’s market quiet book page. This is not a completed page, but the supplies to create your own.

Included:

  • felt (winner decides if the pieces are pre-cut and ready to sew or not)
  • wooden tags (winner decides if the vegetables are painted on or not)
  • Velcro (the green Velcro will be cut into the needed shapes if the felt is cut)
  • ribbon & ric-rac
  • yellow seed beads
  • embroidery thread
  • needles (hand-sewing and beading)
  • (I do not have any more of the seed packet beads I added to my page, and they are no longer sold. These will not be included in the kit.)

How to enter:

  1. To enter, leave a comment in the blog comment form below. Make sure you fill in your email address where it asks so I can contact you if you win.
  2. For a bonus second entry, retweet the following tweet first, then tell me you did (include your twitter name) in your blog comment.

The winner will be chosen randomly in a week on Wednesday June 13th.

Good Luck!

Very Hungry Caterpillar Felt Board

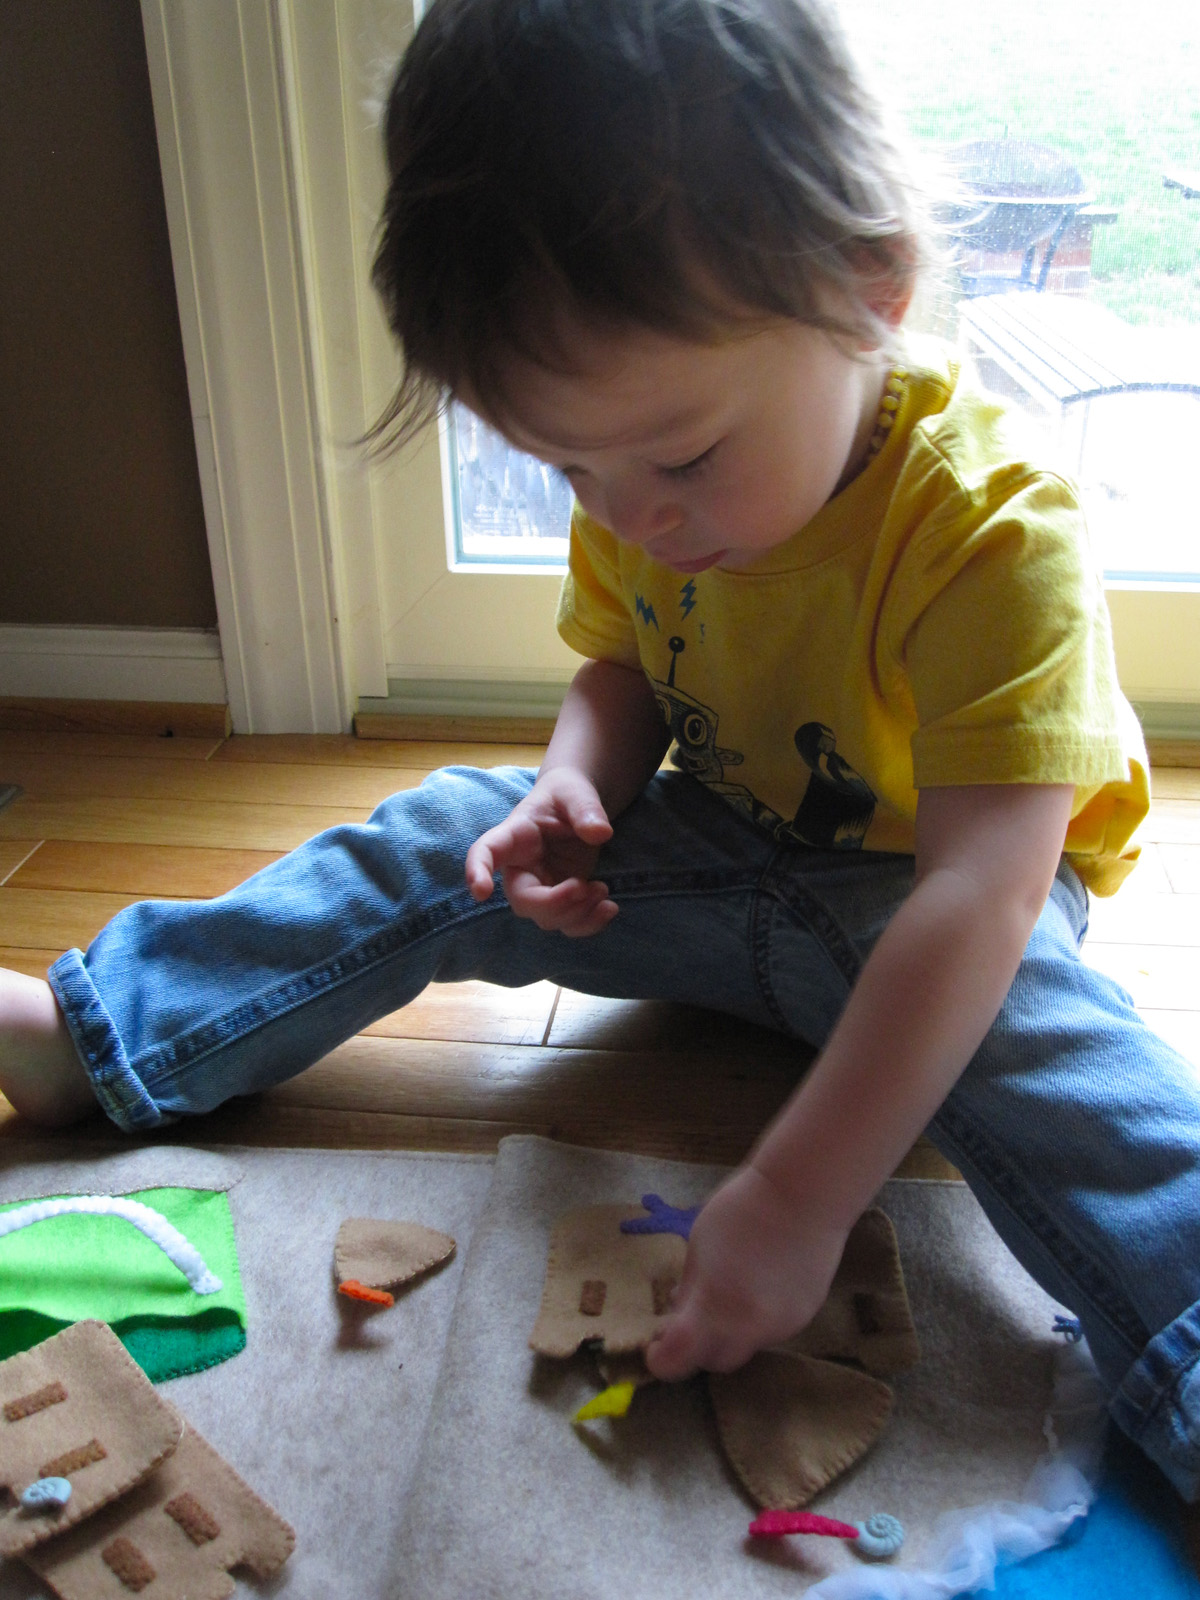
I’ve been quiet here on the blog while working on a large sewing project, though I’ve been posting regular updates on the Facebook page. I took a break from quiet book sewing to make a birthday present for one of Jax’s friends who was turning 2 years old. His friend adores all of Eric Carle’s books and was planning a Very Hungry Caterpillar themed party.

I’ve been itching to try my hand at making a felt version of all the pretty food featured in that book, and I was excited to finally have the perfect reason to! I knew they would appreciate a handmade gift, so two weeks before the party, I started tackling the project.

The felt items were made using only s felt from my scrap bags (I sort all my felt scraps by color and store them in freezer bags) with the exception of the black background felt. I would have preferred to have a white background like the book, but I was purchasing  felt board to save time and money, and white wasn’t an option. (You could make your own felt board by covering a blank art canvas with flannel fabric.) I purchased this black felt board. It comes in green and purple, but I wanted to easily match the background to a felt color, so I chose black. The colors really pop on it!

Because so much detail went into each piece, they were all heavy and wouldn’t stick to the board without the help of Velcro. I used Snag-Free Velcro so they wouldn’t snag each other when tucked away together in their pocket. Each item was sew to a base piece of black felt, trimmed to size, then backed with another piece of black felt with some Velcro sewn to it. I sewed to backings on by hand with a back stitch, only going through the two black layers of felt so the stitches wouldn’t show on the front.

The Pattern
I’m afraid that I can’t post a pattern for this project here on my blog because I want to respect Eric Carle’s copyright. He does have a coloring sheet you could enlarge and use to make your own set. However, I have a PDF of all the sketches I did for my set, and I’d be happy to send it on to any of you lovely friends who would like to have it for your personal use. Please leave a comment below using the blog’s comment form (not the Facebook comment form – I don’t get notified of those!) In the email field, include the address you’d like me to send the PDF link to. I’ll do my best to send you an email within a day or two with the link.

Here is a quick run-down of how I made each item:

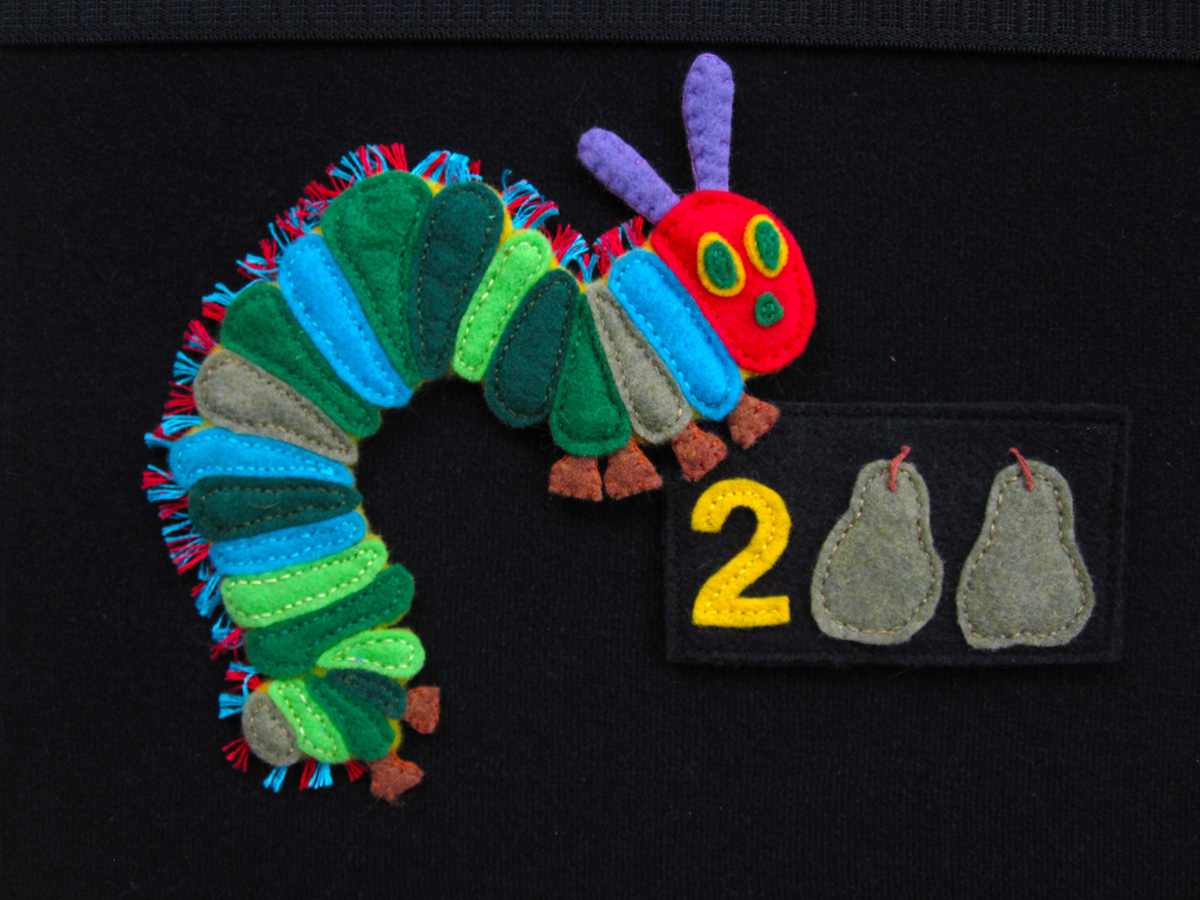
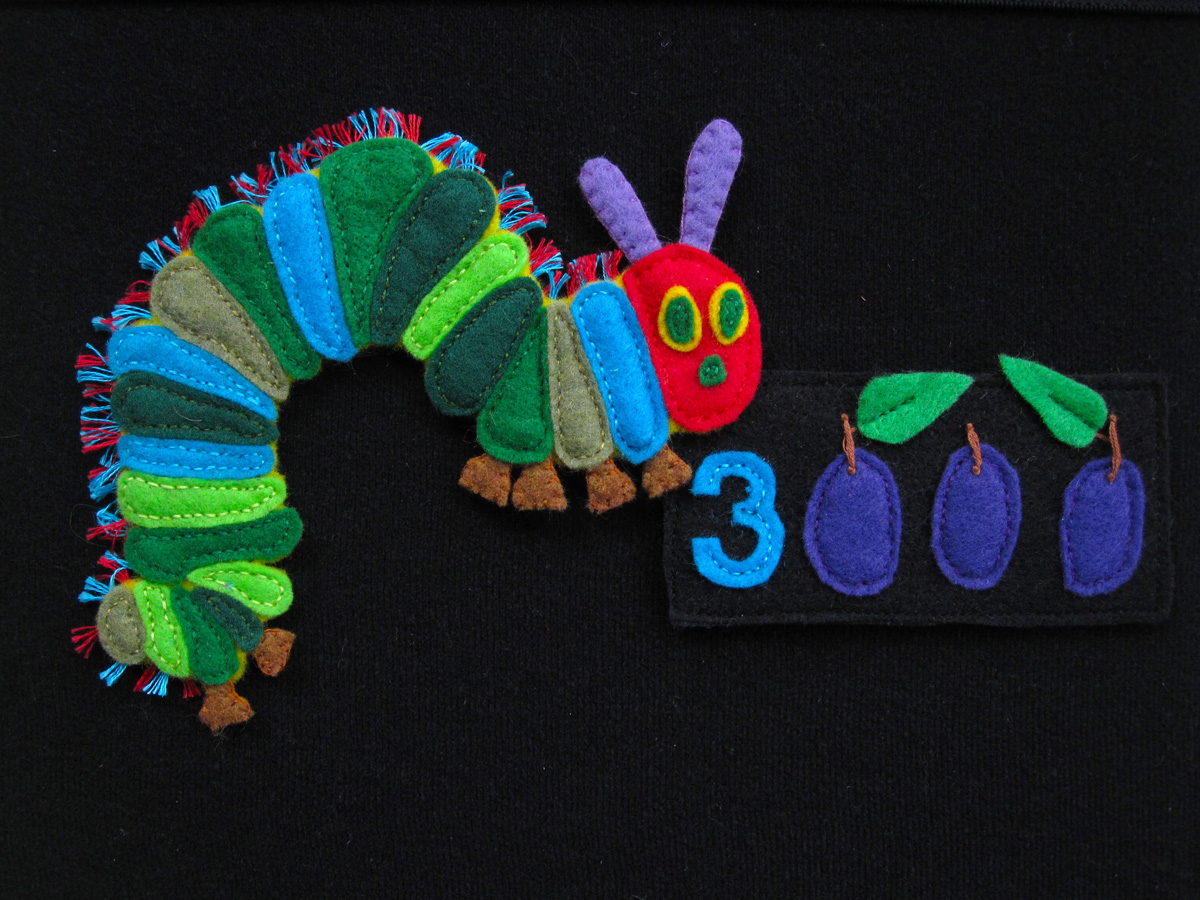
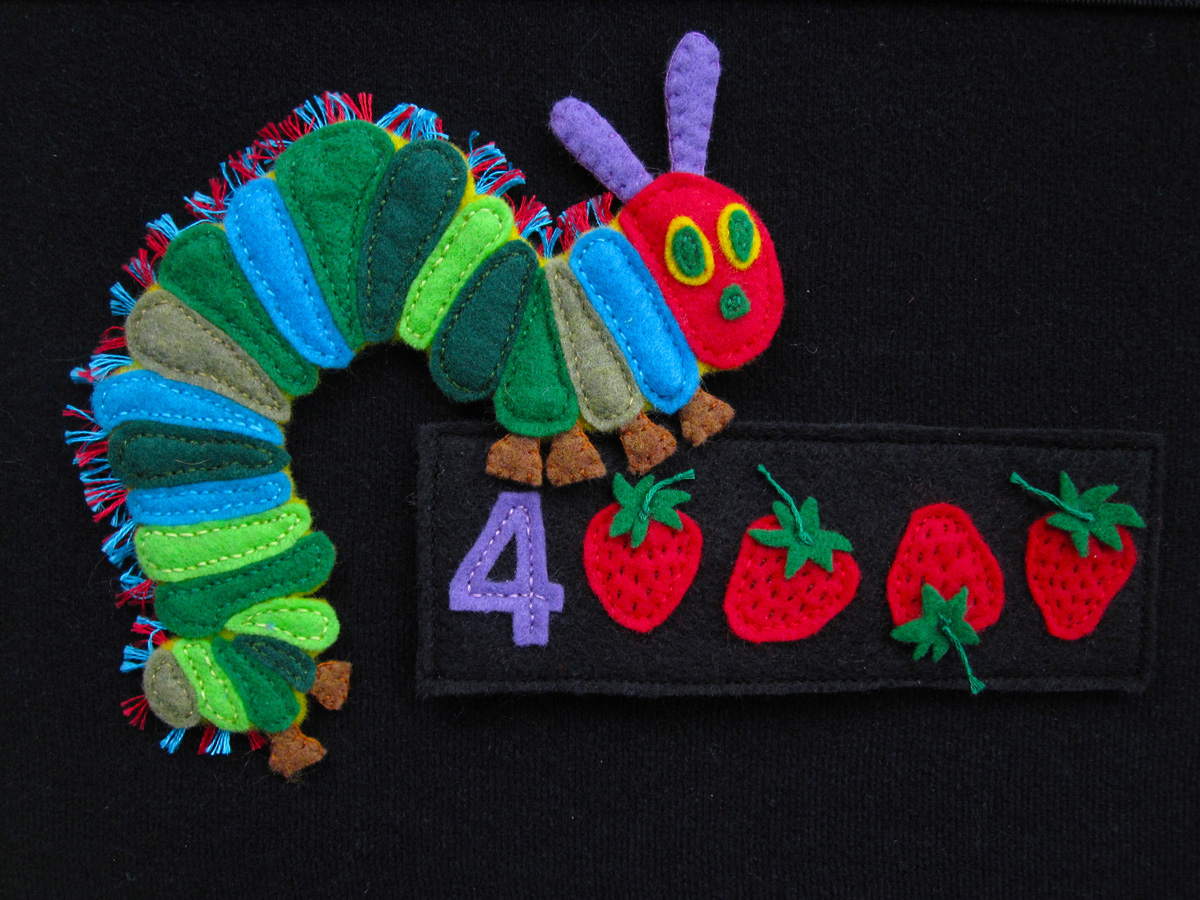
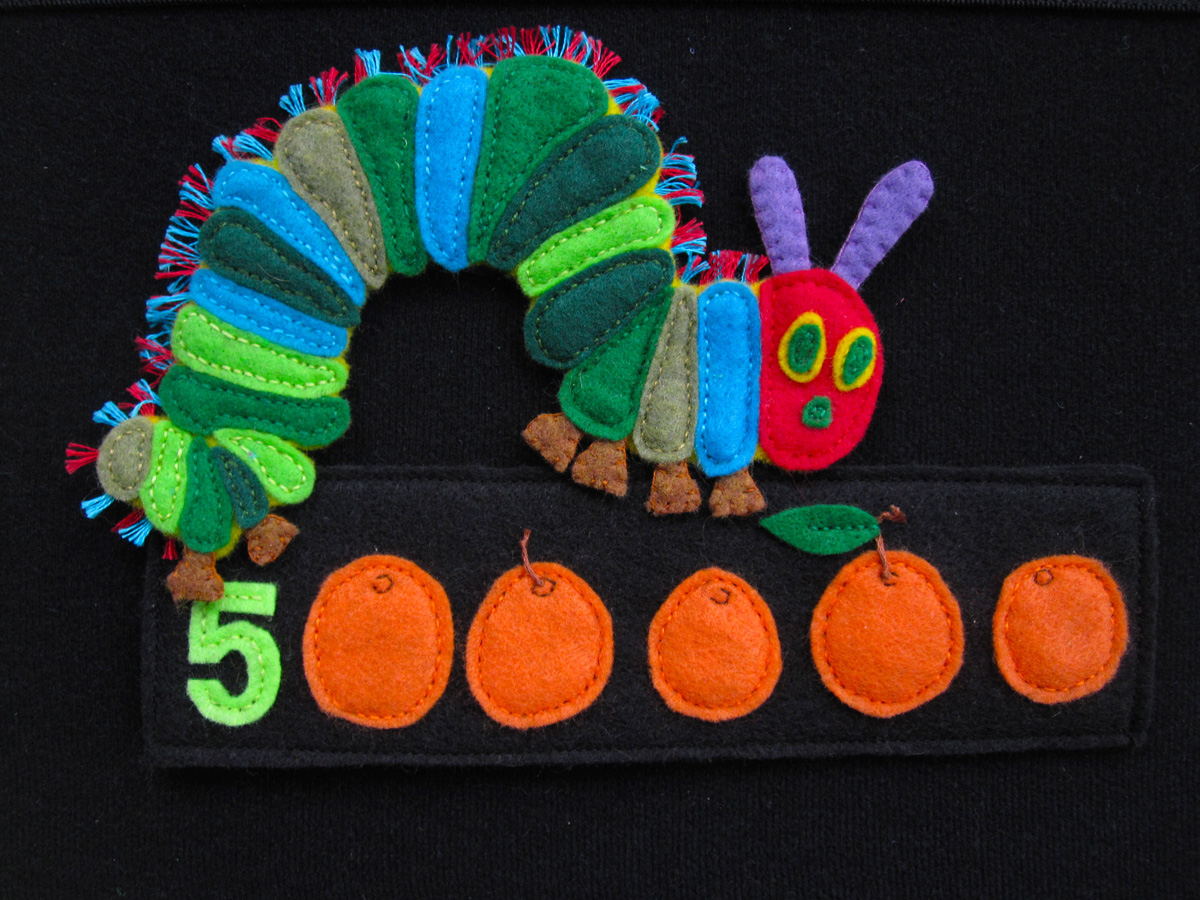
Fruits 1 – 5: For the sets of fruits the caterpillar starts out eating, I used rectangles of black felt as the background of each group instead of having tiny, separate fruits and numbers that would get lost. I sewed the fruits down to the background using back stitch and 2 strands of floss. For the stems, I used all 6 strands of floss: I made a knot in the end of my floss and came up from the back. I tied another knot flush against the felt to hold it in place, then made a knot at the end of the stem and cut of the rest. For some of the stems I went back down into the felt after the top knot to hold them in a certain position. Leaves were sewn down with a line of back stitch along the vein. For the strawberry tops, I made an x-shaped stitch in the center before doing the stem. The numbers are sewn on with back stitch down the center. I stitched little circles and open circles on the oranges to make the navels. I sewed all the rectangles to backing pieces with Velcro using the sewing machine to save time.


[img src=”http://www.imagineourlife.com/wp-content/uploads/2012/06/oranges.jpg” w=”600″ h=”200″]

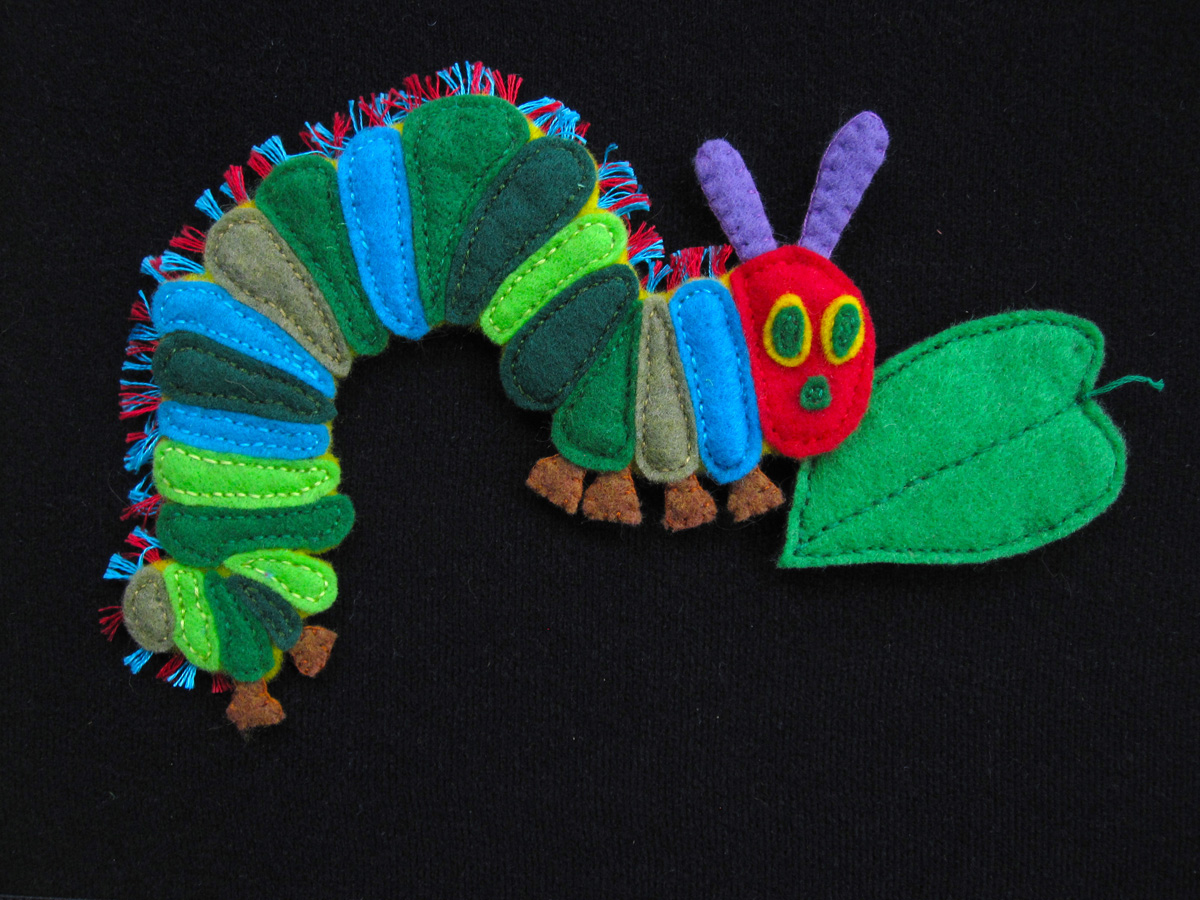
The Very Hungry Caterpillar: I tackled this guy first, as he is the star of the show. The caterpillar and the butterfly were the only ones I used yellow felt as the background for sewing down all the details (I still used black for the back side with the Velcro.) I cut his segments out of various colors of green and blue. The color variations are more subtle in the book, but I was working with what I had. Each segment is back stitched down. You may need to trim them up to get them just right – different felt stretches different amounts – especially with little, tiny pieces. for the feet and antennae, I used 3 layers of felt to make them stiff and blanket stitched round the edges.

The fuzzy fringe along the caterpillar’s back was the most annoying part of the whole project, but I didn’t want to leave it out! I made each little fringe the same way I did the fruit stems, but without the knot at the end: knot the floss, go through the back of the caterpillar (the yellow piece only), make another knot, then cut off and repeat. I alternated red and aqua blue, then went back and spread out the strands and gave him a “hair cut” so they were all even. To finish him off, I sandwiched the feet and antennae between the front piece and the black back piece with Velcro and sewed them together.

Leaf: I back stitched around the outside and down the center vein, then made a stem and sewed on the backing.

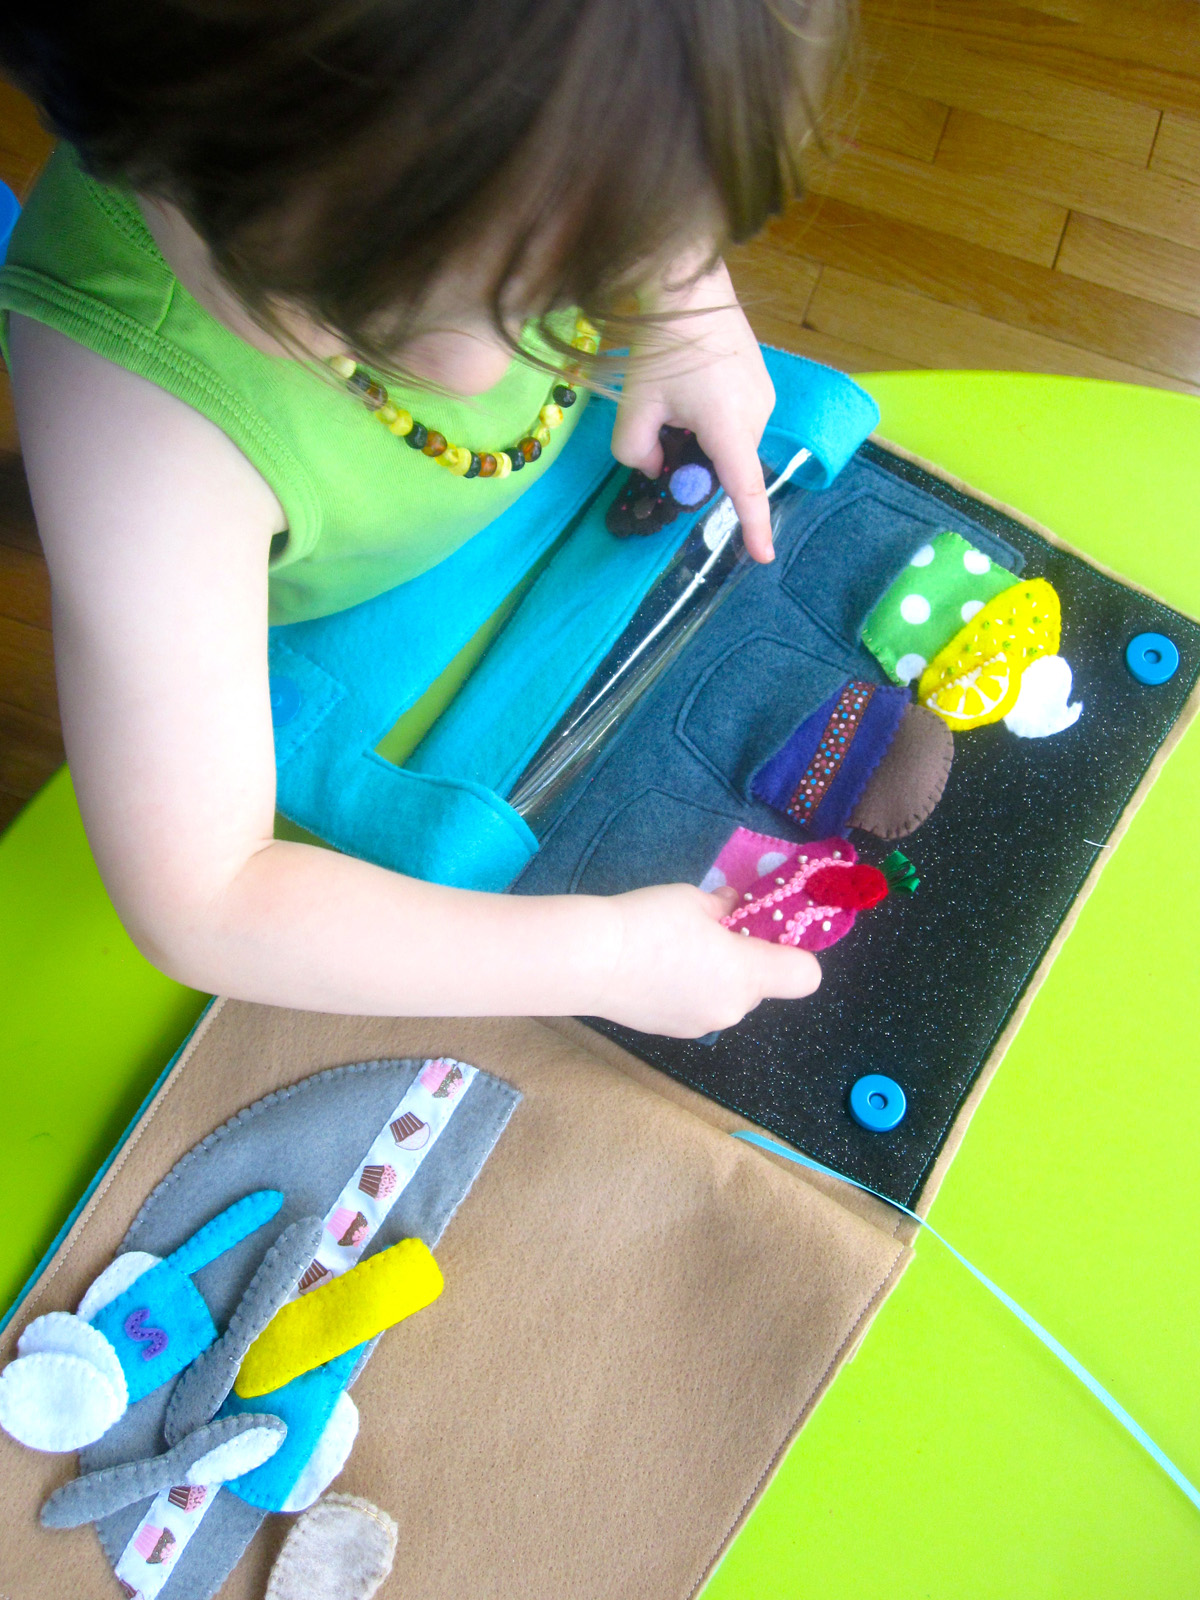
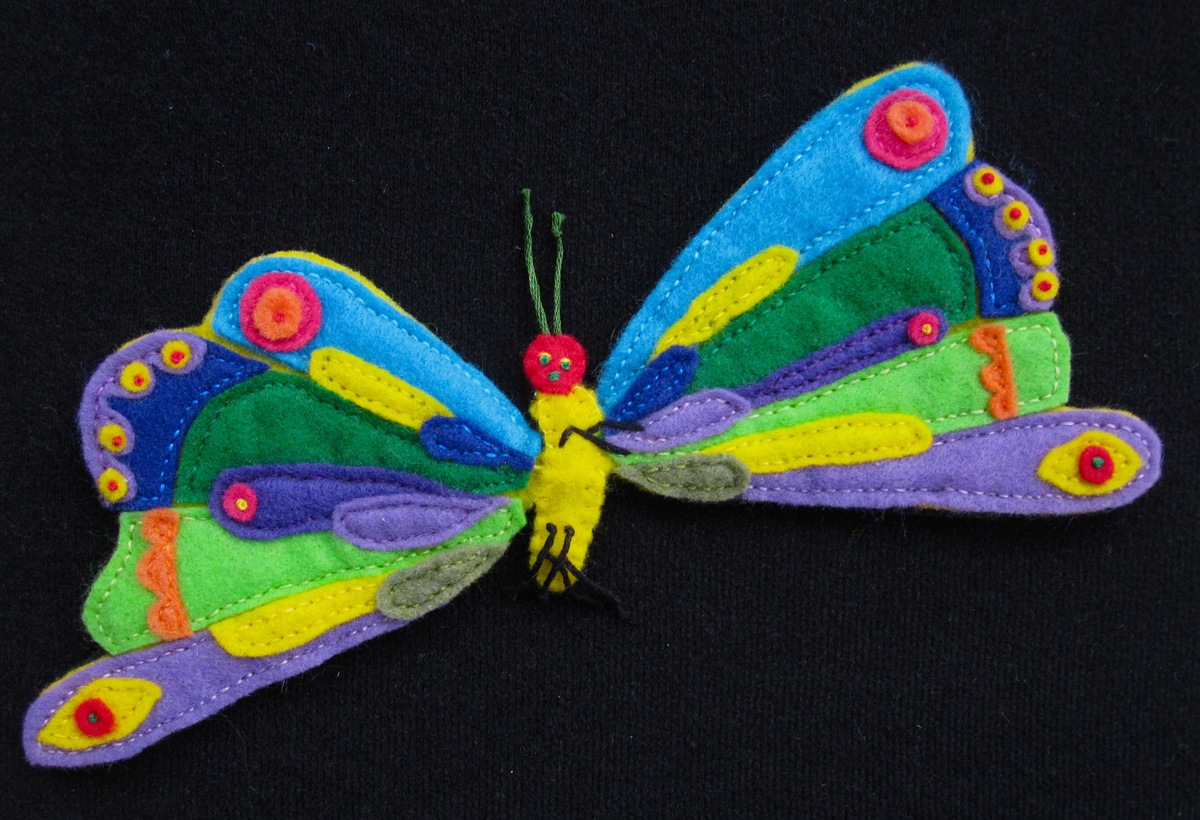
The Beautiful Butterfly: I took liberties when translating the butterfly from the book to a felt design, so you could certainly “wing it”! In fact, I only used my computer sketch for the basic shape, and ended up cutting out most of the pieces by hand. (I later drew them on the computer, so they are included in my PDF sketches.) Everything is back stitched down except the tiny felt circles – I have French knots in the center of those.  I added two layers of yellow to his skinny body to add strength before sewing on the head. His face is satin stitched on and his legs and antennae are done the way I made the fruit stems. His arms are long stitches I added at the end. When he was all decorated,  I cut out a backing of black felt to match, added Velcro and back stitched it on, only going through the yellow layer.

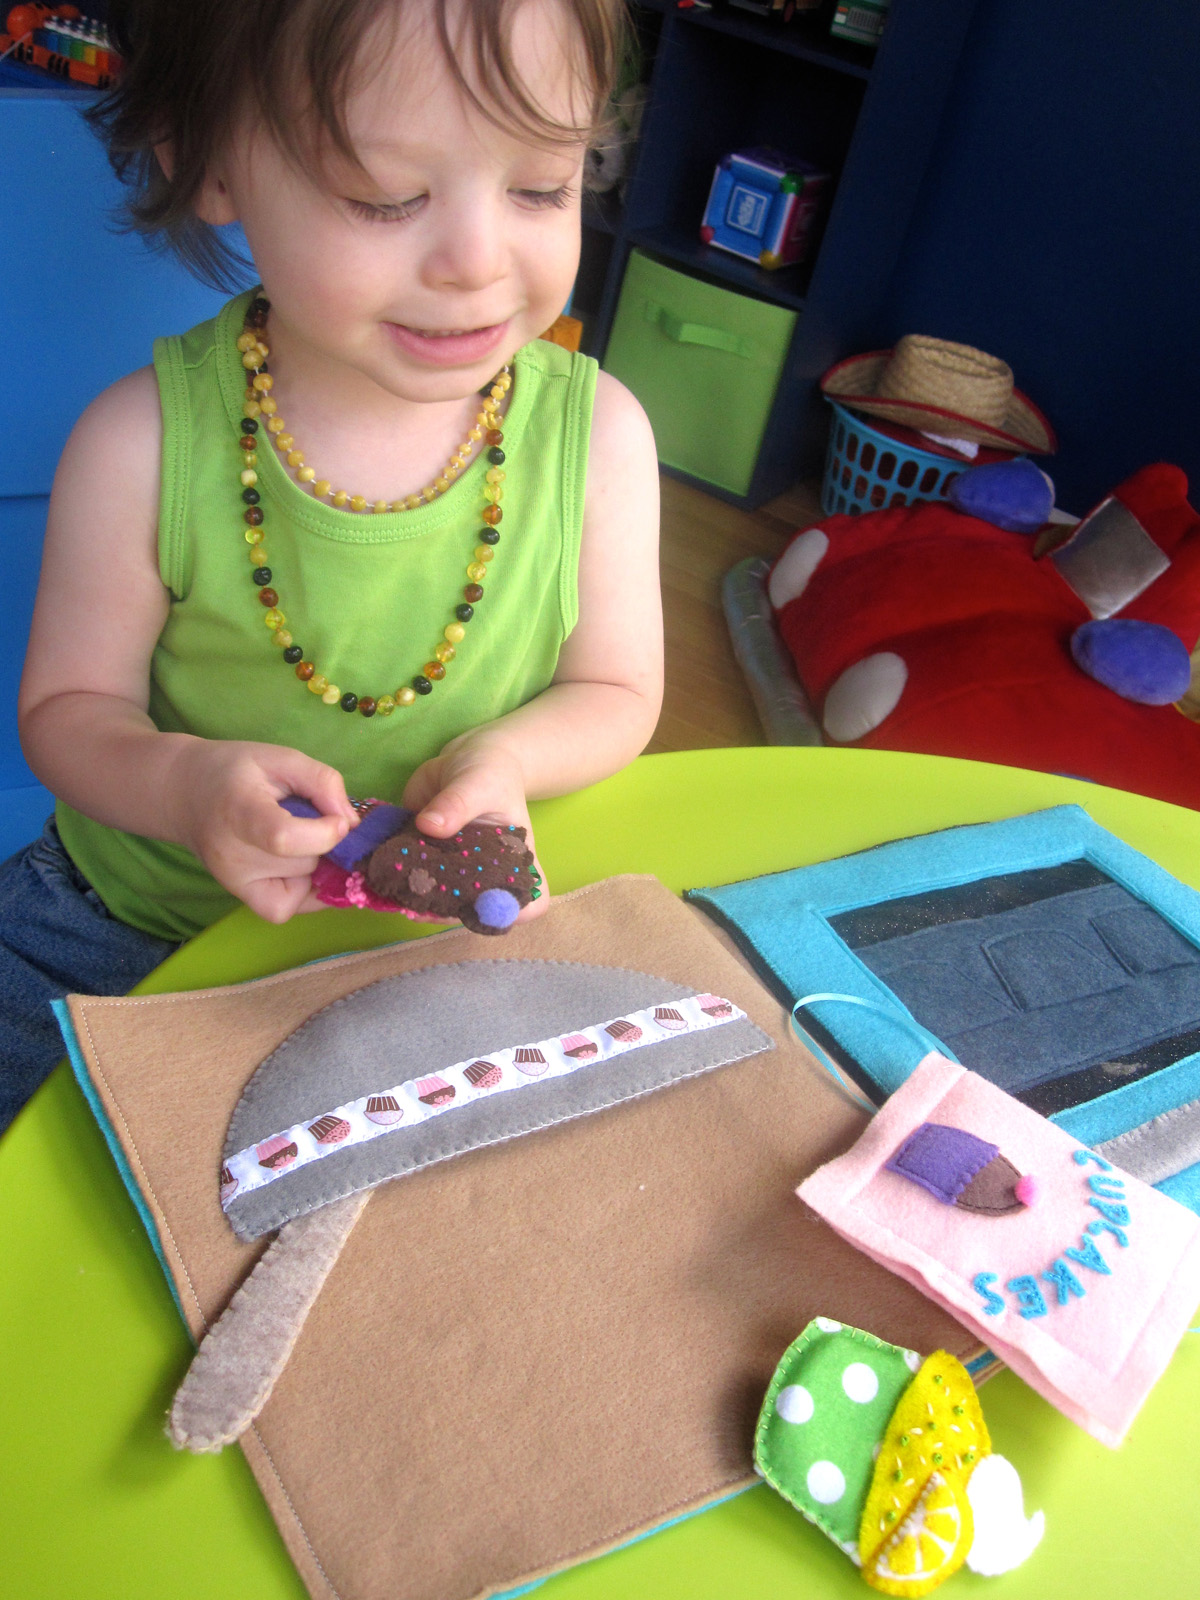
All the junk food items are sewn down to black felt then trimmed to size. The backs are all done the same: I cut out black felt to fit the finished item, sewed on Velcro, then back stitched it to the front, only going through the two black layers.

Chocolate Cake: I sewed the top and layer on, plus some dark brown back stitch to show the corner of the cake. I made light brown stitches to add texture to the top and then sewed the cherry on.

Ice Cream: I back stitched a grid design on the cone, then sewed around the edge of the ice cream scoop.

Pickle: After sewing it down, I made lines of little dashed stitches to add the bumpy texture then added a stem.

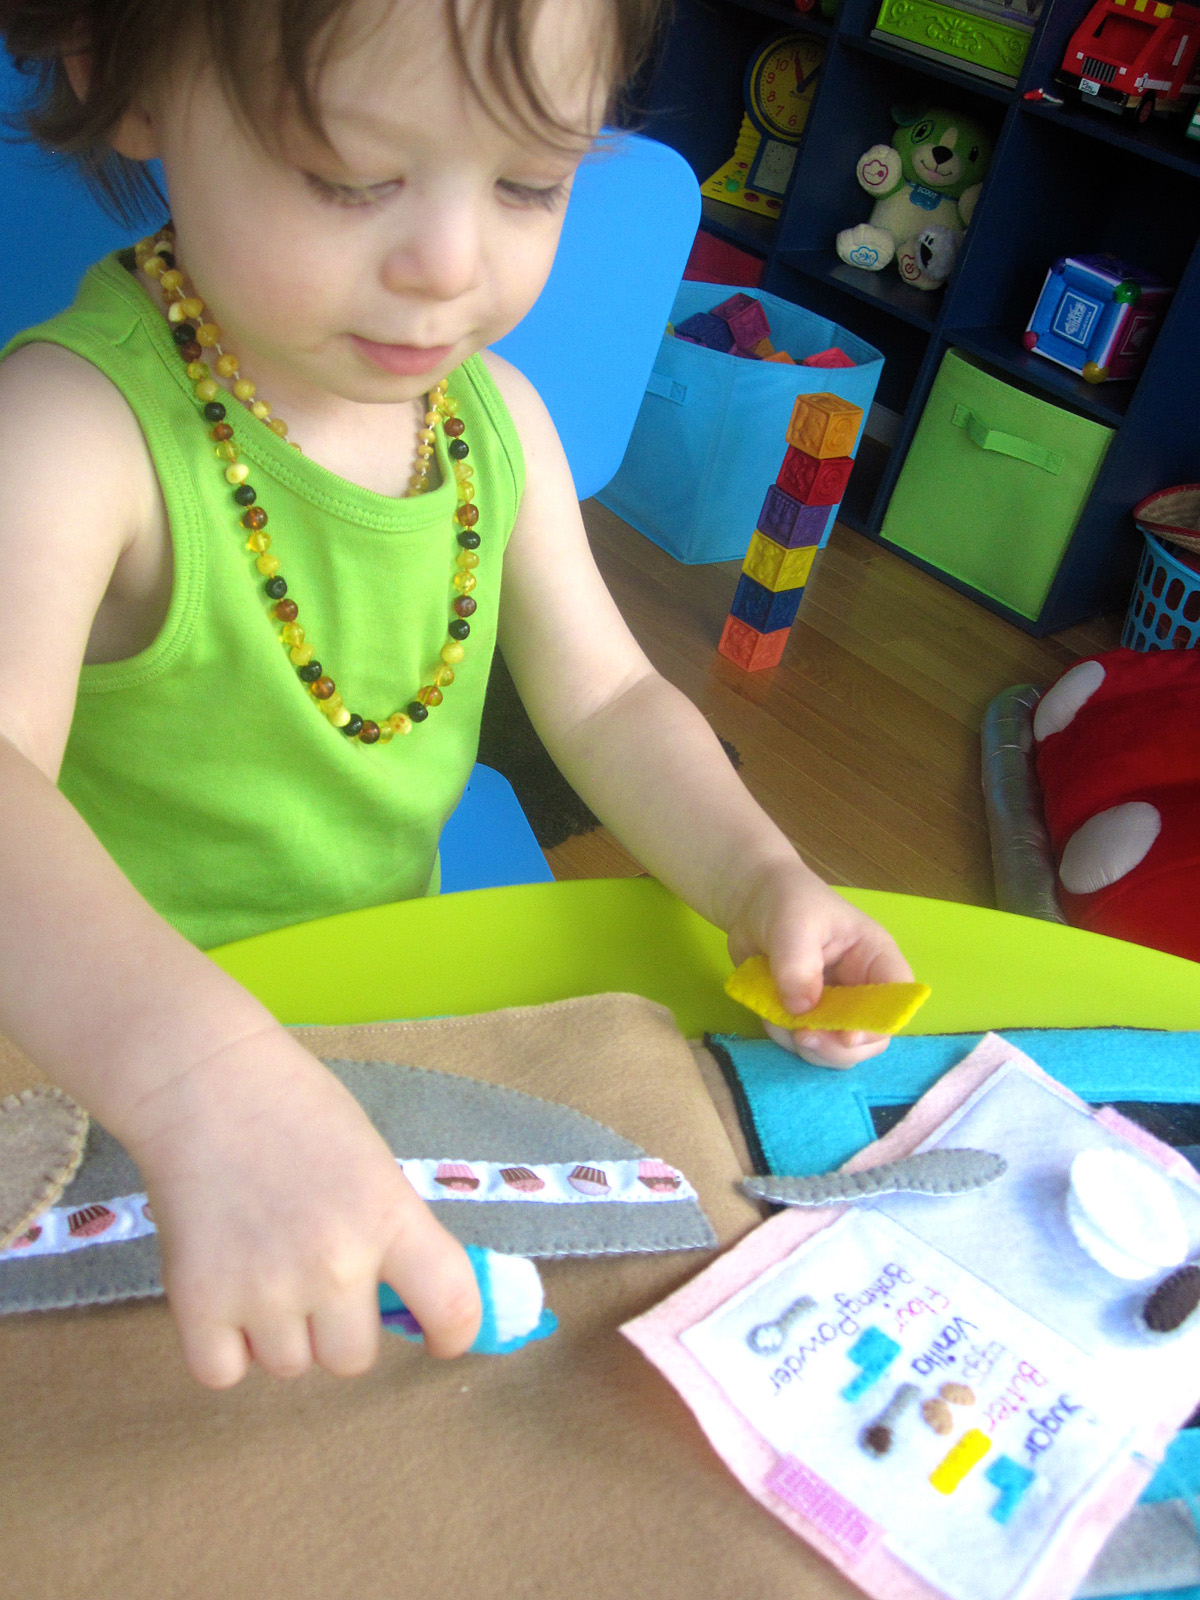
Cheese: I sewed a strip of dark yellow down the side to match the book, then sewed around the edges, I didn’t bother to cut out the holes in the cheese in the black felt.

Salami: After sewing down the body of the salami and the pink ends, I sewed down little scraps and made white stitches to match the book. I stitched a bit of brown thread to the “tied” end and tied it in a knot.

Lollipop: I sewed down the middle of a long strip of brown felt to make the stick. I took a long strip of yellow with a point at one end and sewed it down to the blue circle (starting with the tapered end in the center) in a spiral, then sewed down the exposed edges of the blue circle.

Pie Slice: The pie crust is sewn down around the edges, except for the extra crust along the top-back of the slice. I made a basting stitch that I pulled tight to give it a little ruffle. The pie filling is sewn down with scrap circles in pinks and reds to make the cherries.

Sausage: The sausage is simply sewn down around the edges with little brown ties added on to each end like the salami.

Cupcake: I cut out the top of the cupcake liner using pinking shears to give it a zigzag. I sewed down the cupcake, then sewed down the cupcake liner using vertical lines of back stitch.

Watermelon Slice: The watermelon is sewn down around the edges. The seeds I cut by hand (very hard to do because they are so tiny. Use sharp, micro-tip scissors!) the sewn down with a few stitches running vertically down the middle.


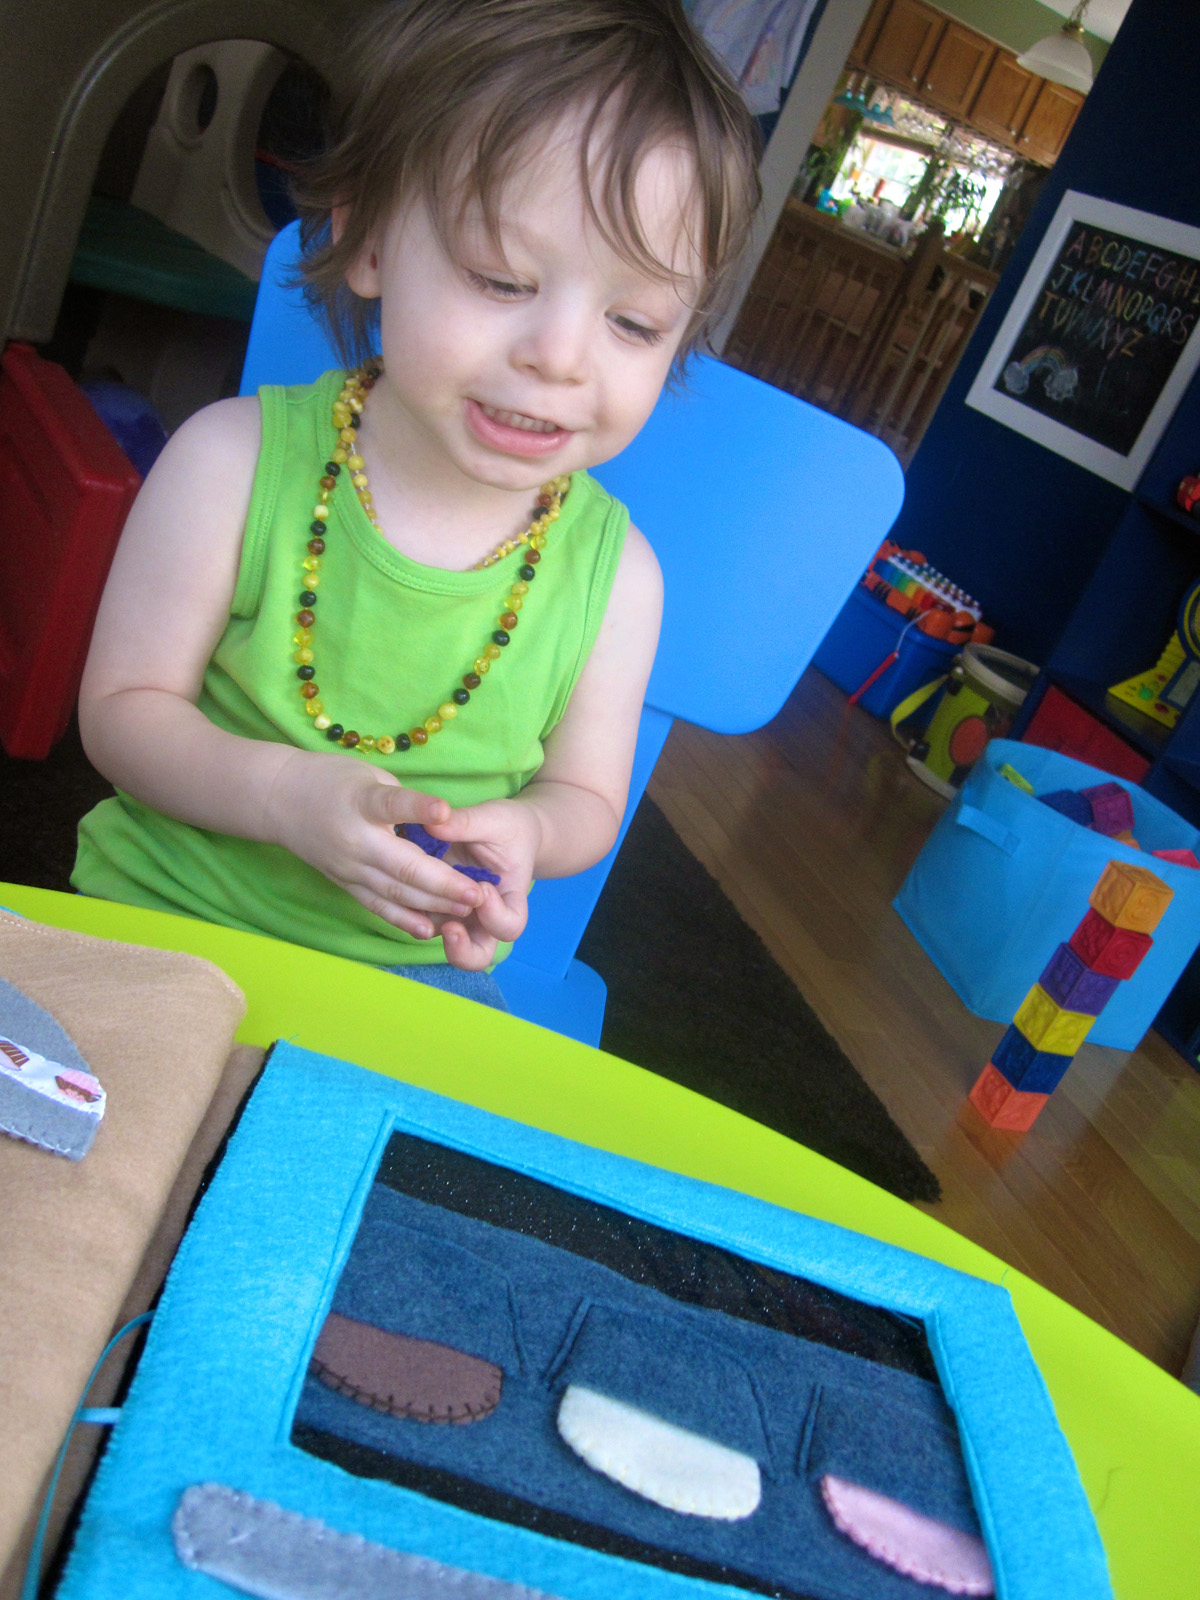
Because this felt set is a gift and I went with a 12″ x 12″ travel size felt board, I wanted to sew a quick case for it. I had limited time – just a few hours on on Saturday – so I don’t have many photos to the process, but I’ll do my best to explain it.

I made the case so it could be zipped shut for travel or storage, opened flat or hung from a door knob at toddler height for play time. I used Eric Carle fabric in Very Hungry Caterpillar white/green and Grouchy Ladybug Grass green/lime. I already had a 36″ white separating zipper and clear vinyl. I purchased a pack of fusible fleece.

The finished size of the case when unfolded is 14″ wide by 28″ high (with the 12″ square felt board.) I cut rectangles out of both fabrics and the fusible fleece that were 15″ x 29″. I ironed the fusible fleece to the back of the green liner fabric according to the instructions. I cut a 14″ x 7″ rectangle of vinyl for the pocket. I sewed ribbon over the sharp upper edge of the vinyl, but it would be easiest to just use some bias tape. (I didn’t have any on hand.) I sewed the pocket down to the liner/fleece piece with a regular stitch followed by a zigzag to cover the sharp edges. I also divided it into a 4.5″ pocket and left the rest a large pocket for the book and bigger pieces.


I cut strips of the green fabric and lined them with the fusible fleece before making them into 1″ wide straps. There are a zillion ways to make straps. I started with a 2″ width, ironed .5″ edges in on each side, folded it in half and pressed, then sewed down each side and the ends.

For the felt board, I sewed down two 11″ strips of black elastic. (See the photo at the top for an example.) I folded the ends of mine under (towards the center of the case) and sewed them with a zigzag on the machine. It is probably easiest if you sew the elastic on by hand after finishing the zipper so you don’t have to deal with the elastic folding your fabric in.

The zipper is the hardest part to explain – especially without photos. You may need to search around for zipper tutorials before tackling it. I drew some sketches of the steps I took. I used a zipper foot when sewing the zipper on.

Here is the finished case when closed!


I hope you enjoyed reading about this project! I had so much fun doing it, and I was very proud to hand it off to its new owner. If you create a felt board case or Very Hungry Caterpillar felt set of your own, let me know! I’d love to see it…

Reader Gallery – Dinosaur Quiet Book Page

I love seeing what others create with my quiet book patterns! Now that they have been online for a little while, I’m starting to see so many great photos of the work you all have done! Keep the photos coming!

I will be featuring galleries of each page. If you’ve used one of my patterns and would like to share what you’ve done here on Imagine Our Life, submit it ion the Facebook Page or email it to me. I will link to your blog if you have one. If your photo is posted here and you’d rather it not be, just let me know.

This first gallery is for the Dinosaur quiet book page. The ribbons on the dinosaurs’ backs make it a very easy page to customize. I’m amazed at how different it looks just with different colored ribbons! Some of you took it even further and made a 2-page spread with volcanoes and additional dinosaurs. They are all great!

Photo Credits: Adriana A., Jen at Beebee Bellies, Bridget Mc., Ginna K., Rachel at her threaded needle, Jessica at Just Enough Style, Loree H., Susan at More Holiness Give Me and Philippa H.

Farmer’s Market Quiet Book Page

At last, I have another quiet book pattern for you! I got a little bit carried away on the details of this one, as I did everything but the veggies while on vacation at the beach. Feel free to simplify things wherever you need to.

Someone on the Facebook page suggested I do a farmer’s market page, and I loved the idea! I thought it was a great way to feature vegetables. Jax recently fell in love with this classic Sesame Street song from a sing-along DVD we got at the thrift store, so was is perfect timing.

This page features sorting and matching. I also added some seed packet buttons I found at the thrift store. (I’d originally planned to make potatoes, but when I realized all but one of my veggies matched the buttons, I switched to a super cute turnip!) They have the veggie names so Jax can read them when he gets older. Right now he just tells me the letters he sees. The seed buttons are no longer sold, though I did see some on Etsy.

All of the bins and baskets have green Velcro (the soft loop side) for the green inside part. I used Babyville hook & loop tape I bought at Joann’s fabric store. I didn’t use the hook side. I find that the hook side of Velcro ruins felt when you pull it off. Instead, I used snag-free Velcro on the back of my veggies. While they don’t stick quite as strong to the loop unless you press down, they do zero damage to the page or the other veggies!

What I used: The pattern, background felt in sky blue and olive green, felt (in natural, tan, 2 browns, red, orange, yellow, 4 greens, purple, violet and white), thin green gingham ribbon, tiny olive green ric-rac, varigated green ric-rac, seed packet buttons and wood tags (that I painted to have the matching veggie shown.)

Background, Sign & Large Basket: I pinned olive green down to my sky blue background. Once all the baskets were sewn down, I went back and sewed down the exposed edges of the olive green. For the sign, I sewed down all the yellow letters to the green backing, then outlined them with a back stitch in dark brown. For the large basket, I cut scrap strips of natural felt and wove them together a little larger than the basket shape. I pinned it together and trimmed the woven strips to fit, then sewed it all down to the page. I cut the green Velcro (loop side) into the basket top shape and sewed it down.

Vegetable Bins & Baskets: For the top baskets I cut three shapes for each. One was the base, one was cut into horizontal strips and one cut into vertical strips. I woven and sewed down the baskets the same way I did the large one. When I sewed them to the page, I let them puff up a bit to give a rounded shape. The tops are green loop Velcro.

For the middle bins, I laid down the tan backing piece, then the brown inner shadow piece, then the Velcro top piece and then finally three tan wood slats and pinned everything down. I used 2 French knots at each end of the wood slats, then did a running stitch across the top and bottoms. I did more running stitch around the top of the bin’s backing, then sewed down the Velcro.

For the bottom barrels I sewed down the barrel and the Velcro. I did a back stitch following the curve of the Velcro to make the lip of the barrel. I did a stem stitch to make the barrel’s slats. A back stitch would work well too.

I used plain wooden tags that I painted with craft acrylics as labels, sewing them on with loops of ribbon. If you have printable fabric, you could make tags that way to avoid painting.

Carrots: I decorated both sides with long, horizontal stitches in an orange-brown thread and sewed snag-free Velcro to one side. I sewed the two sides together with bits of tiny ric-rac sticking out of the top. I got my ric-rac at the craft store in the $1 trim bin.

Peapods: I sewed 3 peas down to one of the larger pod pieces and sewed snag-free Velcro to the other. I laid the smaller pod piece on top and sewed all three layers together around the edges. The top piece will become a little pocket.

Tomatoes: I sewed the green bits down to the fronts and snag-free Velcro to the backs before sewed them together.

Eggplants: I sewed snag-free Velcro to the backs of each eggplant, then sewed the purple pieces together. I layered the green tops around them and sewed them together as well.

Turnips: I sewed the violet tops to the white shapes then sewed snag-free to the backs. I sewed the front sand backs together with loops of variegated ric-rac sticking out of the top. That was also from the $1 trim bin.

Corn Cobs: I decorated my corn cobs with yellow seed beads. If your child will be playing with it unsupervised, I’d suggest skipping that step. For the corn silk, I tied a little bunch of cream-colored embroidery floss with a knot at the end. When I sewed the two sides of the corn ears together, I put the knot between them with the tassel stitching out of the top. I made sure to make a few stitches through the knot. I layered the green leaves over the bottoms of the ears and sewed them on. I sewed my snag-free Velcro on last, making sure to only go through the back layer.

For the seed packet buttons, I just sewed them on randomly by the big basket like they were laying out on the farmer’s market table.

I love this page! And I really love that all the little pieces use Velcro but don’t stick to each other or cause pulls in the felt. Jax knew just what to do when he sat down with the page. He knows all the veggies except the turnip. We’re working on that one!

Sewing Basics – Embroidery Floss and Back Stitch

I will be featuring some hand sewing basics here for those of you who are new to it. If you have a special request, please let me know!

Embroidery Floss

When I sew with felt, I almost always use 2 strands of embroidery floss. Embroidery floss comes in 6-ply – 6 strands put together. I generally use DMC or Anchor, but sometimes buy bulk packs of cheaper stuff. The brand name floss tangles a lot less. It comes in a skein – an elongated coil that is banded at the top and bottom with paper rings. You can just pull on one of the tails to get the length of thread you need, but the skein will most likely get messy. I recommend buying paper bobbins and winding your new skeins around them. Write the color number on the side and pop them in a craft box for storage.

Threading the Needle & Getting Started


Let’s get started! Cut off twice the length of thread you want to work with. I usually cut about 4 feet that will end up 2 feet once folded. Separate out one of the six strands of floss and hold one tight to it. Use your other hand to slide the other 5 strands in a bunch down the length. Make sure the bunch doesn’t start to get too tight and tangle. A little wiggle here and there will keep it from tightening. When you have your single strand, fold it in half so the ends meet. (You can set aside the rest of the thread to use a little later, or wind it around the bobbin for storage if you won’t need that color again for a while.)


Now, thread your needle, with the two ends going through the needle eye together. I like to get the ends of the thread damp then pinch them between my thumb and forefinger, with just a couple mm sticking out. Then I slide the hole of the needle down onto the thread, wiggling back and forth slightly. Trim the ends of the thread first with sharp scissors if they are at all frayed. (I use these.) Pull the ends through the needle for a few inches. You should have a loop at the end of your thread.


Ready to stitch? I’ll be doing a back stitch, so my first stitch will be a simple straight one. Come up through the back of your felt, but don’t pull the thread all the way through. Come back down to make your stitch, then pass your needle through the loop at the end of the thread. Gently pull it tight to secure your thread. Quick, easy and no knot!

Back Stitch

A back stitch will give you a nice straight line of dashed stitches with no space in between them. Start with your first stitch already done. Come up through your felt from back to front at the spot you want your stitch to end. (So if each stitch is 3 mm long, come up 3 mm from the last stitch.) Go back down through your felt in the same spot your first stitch ended. Your two stitches will be sharing the same hole in your felt where they meet.


Continue on the same way – come up where you want each stitch to end, then go back down through the previous stitch’s hole.


Here is what the front looks like:

And here is the back:

Tying off the Thread

There are many ways to tie off your thread – use whatever works best for the situation. This is what I tend to do most often to keep the back of my work neat.


On the back of your work, run the needle through one of the stitches, but don’t pull it all the way though. Pass the needle through the loop your thread makes then pull tight into a knot. Go back through the stitch the opposite way and repeat making the knot. I don’t like cut my thread close to the knots, so I run my needle through several stitches before snipping it.

All done!

Rainbow Quiet Book Page

“It’s a rainy, sunny day. The rainbow‘s here to play!”

Jax loves color and he really loves rainbows! It was inevitable that a rainbow page had to happen. It took a while for me to decide what exactly to do. My first thought was a rainbow stacker that comes out of a cloudy pocket. But, I’d need to make each ring 2 sheets of felt thick for strength… 6 x 2 = Way too thick for a quiet book page!! So I changed plans and made a rainbow puzzle.


The base of the puzzle is a ring. When you store it in the cloud pocket it looks like a rainbow. Along one section is a row of snaps. There are rainbow color puzzle pieces that snap on. Jax is not good with snaps yet, so this is good practice for him. (If you use Velcro, I recommend this snag-free version that won’t catch on your felt!) The puzzle pieces have pipe cleaners in them so they become playthings themselves.

What I used: The pattern, sky blue background felt, felt (in white, red, orange, yellow, green, blue and purple), 6 snaps, several pipe cleaners and thread to match. I also made a little rainbow necklace as a little surprise inside one of the cloud pockets. I used pony beads from the thrift store.

Cloud Pockets: Sew the across the top of the two layers of felt on each cloud. I used sky blue thread. Pin the pockets onto your background felt and sew the sides and bottom down. I used a machine to go through all the layers quickly and neatly.

Puzzle Base: First sew half of a snap to each ring. (To find your snap placement, stack all the rings and mark a dot where you want it.) Pin the orange ring to one of the red rings and sew them together along the outside of the orange. Pin the yellow on top and sew it down the same way. Continue through the all the colors. Pin the red backing on to the back side and sew it together around the outside. Carefully trim the inner circle if needed to even it up. Using purple thread, sew through all the layers around the inner hole.

Puzzle Pieces: For each puzzle piece I prepared a length of pipe cleaner with the ends folded in twice to hide the pointy wire end. (You could also duct tape around the folder end to be extra careful.) I sewed the other half of the snaps to one side of each backing and free-hand stitched the color names to the fronts. Sew the fronts and backs together, inserting the pipe cleaners when they are halfway sewn.

I hope you enjoy this page! Please stop by the Facebook page and share your creation if you make it. You could change it up to be a ROY G BIV rainbow if you prefer.


Jax adores it! And, maybe it will save me from having to draw him eleventy billion rainbows a day… But, probably not!

LED Robot Quiet Book Page

Quiet books, welcome to the 21st century!

I’ve wanted to create a robot page ever since I learned what a quiet book is. I’m very glad I waited so long to really think it through, because I learned about e-sewing. E sewing is using special electronic components and conducive thread to create interactive textile projects. In simple terms? Push a button and my robot lights up!!


E-sewing is easy, but you have to make your circuits just right, or it will not work. The LilyPad system I used can be spot washed, which is all I’d recommend for a detailed quiet book. I did read somewhere that the conducive thread will eventually need to be replaced years down the road, so that is something to keep in mind. I sewed my thread to a piece of felt and not the actual page, to make it easier to pull off should I need/want to run new lines in the future. Make sure you cut your knot tails short on the back of your work so they don’t touch anything else. If threads from two different parts of your circuits touch, you will have a short and it won’t work.

This page can certainly be made without the electronic components. It is still fun to mix and match the robot parts! My tutorial assumes you are installing the LEDs.


My supply list:

The Body

Start out with your body squares. Lay out the decorations on the front piece and the battery holder, button and 1 LED on the inside piece. Lay all the parts out so the + is on the left and the – is on the right, like the photo below. The button and LED will need to line up with the front. Cut a circle out of the green button piece so the button can stick through. You’ll make a button top later. Cut a tiny rectangle out the the heart for the LED. I stitched around both holes to keep them from stretching. Sew down your front pieces. On the white meter, I stitched green, yellow and red lines, as well as a black arrow. For the gears, I stitched them down with a circle in the center of each. Sew some seed beads down along the gray rectangle. I made 2 stitches through each bead for strength. Confirm the placement of the electronics and baste them down. Baste a scrap of felt to the top as the robot’s neck and sew down some snaps.

For each of the next steps you will need to thread a large-eye needle with a length of conducive thread. I only used about 12″ – 18″ at a time. Tie a knot in the end. Make several stitches in the upper + hole of the battery holder. Use a simple running stitch (looks like a dashed line) from the battery holder + hole to the button’s + hole. Make several passes through the hole and tie off. Start a new thread and make several stitches in the button – hole. Running stitch from there to the LED + hole. Make several stitches in that hole and tie off. Start a new thread and make several passes through the LED – hole. Running stitch from there to the battery holder’s top – hole. Stitch through the hole several times and tie off. Steps 1 – 3 complete a circuit. You can put your battery in and test the LED by pressing the button.

Next we need to create half of a second circuit for the head LEDs. The additional circuit needs to be piggy-backed off the first LED. If the circuit is a diamond shape, the body LED is the bottom point, the neck snaps are the left and right points and a head LEDs will be the top point when snapped on. Start a new conducive thread and make several passes through the LED + hole. Running stitch up to the left snap. Make several stitches through all 4 holes on the snap, and make long stitches between each hole in a diamond shape. Tie it off. The idea is to get a lot of coverage with the thread on the snap. Start a new thread and make several passes through the LED – hole. Running stitch up to the right snap and sew it just like the first snap. Tie off your thread. Having the second circuit incomplete should not affect your body LED’s circuit. It should still light when you push the button.


Layer some light cardboard cut a bit smaller than your body under the inner body piece and stitch it down to the page. Since quiet books are squishy, the cardboard will make it a bit easier to press the button. Next we make a button cover. Cut a circle of cardboard that is slightly larger than the button hole in your front body piece. Cut two felt circles that are large enough to cover the cardboard and sew it in between them. Lay the button cover over the button hole and sew it down with four stitches: top, right, bottom and left. Lay your body front over the inner body and test that the button cover presses the button. The button should be sticking up through the hole, making the cover press it easily.


Sew a strip of felt along the bottom of your front body piece to finish it off. Sew the front body piece down to the page, leaving the bottom and the lower half of the right side unstitched. You need to be able to lift up the front to get to the battery for changes. I added a small snap to the corner.

Sew snaps on (with regular thread) for your arms and legs.

Robot Head 1


Sew down your two snaps to the back side of the back piece of head 1. Make sure you use the opposite snap parts as the ones you sewed to the page! (I used the “male” sides on the body parts and the “female” side on the page.) Flip the back piece over and baste your LED down with the + on the left and the – on the right. Have the LED part line up with the center of the mouth.

Thread your needle with conducive thread and sew through the + hole of the LED several times. Make a stitch or two to connect the thread to the left snap (the one on the left when you are looking at the robot’s face.) Tie it off. Start another conducive thread and sew through the – hole of the LED several times. Make a stitch or two to connect the thread to the right snap. You can now test the head by snapping it to the body and pressing the button. Both the body LED and head LED should light up.

Decorate the front head piece. Cut a small rectangular hole in the front head piece for the LED to stick through. Cut a matching hole in the mouth piece. I made red eye pieces with black felt circles. I stitched little white starburst shapes in the eyes for extra cuteness. I sewed the mouth down and stitched around the hole for strength. For the antennae, I braided some gray ribbon and sewed pink circles of felt to the top. Sew the front and back pieces together with the antennae in place.

Robot Head 2


Sew the snaps and LED onto the back piece of head 2 in the same way as head 1, but position the LED to be the nose. Decorate the front piece. Cut a hole for the nose LED and sew around it for strength. I sewed a zigzag line on the mouth piece in lime green. My eyes are yellow circles on top of black circles, with a black French knot in the center. The ears and hat pieces are folded but not sewn, so they are loops that are open on the sides. Sew the front to the back.

Robot Head 3


This head is a little trickier because it has 2 LEDs. The first LED (I did the one on the left) will be sewn to the two snaps like the previous heads. The second LED will be sewn in a circuit to the first LED. Baste the snaps down to the back of the back head piece. The ears are folded pieces of felt. Pin them in place to figure out where the holes need to be for the LEDs. I cut a scrap piece of felt to lay inside the head and do all the conducive stitching (except the stitches that are on the snaps) so the back of the head doesn’t look too messy.

Baste down the two LEDs with the + sides on the left. Thread your needle with conducive thread and make several stitches in the + hole of the LED on the left. Running stitch down the the snap on the left (when looking at the robot’s face) and stitch on the snap as before. Tie off the thread. Start another thread and make several stitches in the – hole of the same LED. Running stitch over to the right snap and sew on the snap as before. Tie off the thread. If you test the head on the body at this point, the left LED should light up. Start a new conducive thread and make several stitches in the + hole of the same LED you’ve been stitching in. Running stitch over to the + hole of the right LED and make several stitches. Tie it off. Start one more conducive thread and make several stitches in the – hole of the first (left hand) LED. Carefully running stitch over to the – hole of the right LED. You don’t want the running stitches to touch any of the others (the stitches you make in the LED holes are fine touching each other.) Make several stitches in the – hole and tie off. Testing the head now should light up both LEDs.

Decorate the head. Sew around the LED holes for strength. Fold the ear pieces down and sew the sides shut. For my mouth, I made long black stitches for teeth. For his hat, I sewed seed beads along the bottom (leave room to stick the hat in between the head pieces) and the sewed the two sides together. I used light blue for the eye piece and stitched arches for the eyes. Sew the front and back of the head together.


Other Parts

For the first set of arms, long gray pieces are layered between circles for the shoulder and wrist joints. Gray claw shapes are layered in the wrist joint.

The yellow arms have the claw shapes layered into the bottom. I made long stitches to make the arms look like tubes.

For the stretchy legs, I cut folded rectangles an inch or so longer than I wanted them to be. With a piece of elastic inside the folded felt, sew across the top, catching the elastic. Continue sewing down the side (I did all this on the machine). When you get the the bottom, stretch the elastic tight before sewing across, again catching the elastic. When you let go, the leg with scrunch up. Clip off the extra elastic. Sew scraps of gray to hide the elastic at the top. Sew the foot pieces to the bottoms.

For the tank-style tread, cut out the black tread with pinking shears. Add a row of buttons to the gray piece and sew it down. cut two scrap rectangles to sew your snaps to. Sew them together and attach it to the back of the tread so it can hang down below the body.

Spare Part Storage

On the facing page, I stitched the words “ROBOT FACTORY” by pinning the word template down and sewing right through the paper. I then ripped the paper away gently. I sewed strips of black felt down to make “shelves” and added snaps to hold all the pieces. Because you have the “female” halves of the snap on both the body and the storage shelves, you will have some orphaned “male” snap halves.

All done!

I love, love, love how this came out!! Hopefully my tutorial and diagrams make sense. This is definitely the most complicated page I’ve had to explain. It was very worth it. I haven’t let Jax play with it much because it is for our vacation, but he already loves to push the button and choose robot parts.


If you make this page, leave a comment with your link or stop by the Facebook page and post a photo. I’d love to see yours!

Are you ready to take it to the next level? Here’s my LED robot *costume* tutorial!

Airport Quiet Book Page

Do you want to make and sell items from this pattern? Commercial licenses are available!

Here’s one more vacation/travel themed page! This page was about 3 weeks in the making due to two weeks of me being quite sick. It was all I could do to make it through each day taking care of Jax and doing as much work for my day job as possible. I still came out 12 hours short in work hours, ugh. Not that I’m well, I knocked the rest of the page out and I’m ready to move on!


What I used: the pattern, felt (in light blue, dark gray, white, natural, brick red, aqua, yellow, blue, red, gray and scraps), thin blue ribbon, thin gray or tan ribbon, decorative ribbon, snaps or Velcro and matching thread.

Background: Sew the windows on to the front of the airport. Cut out the door and a small slit for a ribbon to come through on the left side. Thread a length of ribbon through the slit, coming out of the door for the truck. Pin down your ground and airport pieces. You will need to layer a scrap block of felt behind the door of the airport. Sew down the airport building, leaving the door open. Sew the air traffic control window and roof on and add decorative ribbon if you’d like. (You could add photos of loved ones to the tower and windows of the airport and sew clear vinyl over top.) Pin and sew clouds to the sky. I caught one end of my blue “small plane” ribbon under the cloud in the upper right corner and the other end under edge of the ground. Sew down the ground.

Baggage Truck: Pin the truck bed and cab pieces onto the end of the ribbon. Sew the sides and bottom of the bed (making a pocket for luggage) and all the way around the cab. Add the wind shield and wheels. Sew a folded scrap rectangle of felt to the left end of the ribbon to keep it from going through the slit.


Small Airplane: Make 4 French knot windows on the top small plane piece. Sew the wind shield pieces on each side. Sew the two plane pieces together. Decorate the plane’s tail by sewing some decorative ribbon around it. Take a scrap square of white felt and sew the top and bottom of it to the back of the plane with the blue ribbon running through it. Your stitches will make the accent lines across the base of the wings. Your small plane should then “fly” up and down the ribbon.

Large Airplane: (Because the airplane was wider than my 9″ pages, I had the airplane’s tail sticking off the page so it can fold over when the page closes. My instructions assume you do the same.) Pin the base airplane piece down to the page, leaving the tail unpinned. Cut the top airplane piece into 3 segments. Sew stars to the two tail side, then sew the tail together. Add the tail fins. Sew windows and wind shield to the front two airplane segments. Pin down and sew the engines, wing and front airplane segment. Sew the bottom half of the gray cargo hold piece to the page in the middle segment of the airplane. Fold down the rest of the cargo hold piece and sew the middle segment of the top airplane to it to make a flap that lifts to show the baggage. Sew a snap on to hold the flap closed, and add snaps to secure any bags you make.

Helicopter: Sew the two blade pieces together. Fold the “x” in half where indicated on the pattern and make a few stitches int he center to hold it down. Sew thin ribbon down to both sides of the landing gear background pieces as indicated on the pattern. Sew the two sides together. On the front piece of the helicopter, sew down the wind shield, accent piece and inner door piece. Sew down the door along one side so it opens. On the back piece of the helicopter, sew down the wind shield, accent piece and a snap. Sew the front and back together with the blades and landing gear in place. Sew the other half of the snap to the page above the roof.

Luggage: I didn’t use patterns for my luggage because they are so tiny! I did draw up what I made afterwards, so you can use those as a guide if you’d like. They just need to fit in the cargo hold (and truck bed) and have snaps to attach them.

Jax hasn’t really played with this yet because it is for our beach trip, but he loves the little helicopter and the small plane that takes off. I think he’s going to enjoy it!


Sandcastle Quiet Book Page

Do you want to make and sell items from this pattern? Commercial licenses are available!

Sandcastle Quiet Book Page

Our latest quiet book page is another beach themed one for our upcoming vacation. Jax is thrilled with it and couldn’t wait to try it out. It is a very simple page featuring sandcastle parts you can build into any structure you’d like, then store away in the bucket.

Here is what I used for this page: the pattern, natural-colored background felt, felt (in natural, tan, brown, medium green, lime green, white, aqua, pink, hot pink, violet, orange and yellow), a scrap of white tulle, white mini ric-rac and seaside buttons (from the craft store – left over from my iSpy page.)

Bucket: Sew the two layers of your handle together. Lay the bucket pieces onto the background and decide how you’d like it to be. I wanted mine to be buried in the sand at an angle. Pin the bottom layer of the bucket to the page, and sew it down across the top. Cut out a scrap of natural felt to be the sand the bucket is buried in and pin it to the top layer of the bucket. Sew across the top of the sand piece to attach it to the bucket front. Pin the bucket front and handle to the page, layering the right side of the handle under all bucket layers. Sew the left side of the handle to the bucket front layer. Sew through both bucket layers down the sides, then sew around the sand on the bottom, making a large pocket that goes from the top of the bucket to the bottom of the sand.

Ocean: Cut a wavy aqua piece of felt to fit in the upper left corner of the left page. Sew it down. Cut a strip of white tulle and a length of white mini ric-rac long enough to follow the ocean’s edge. Pin it down to the edge, twisting it randomly along the way. Sew small stitches through both the tulle and the ric-rac – just enough to hold it down but not totally smush it. Add shell and starfish buttons if you’d like.

Sandcastle: Cut small brown rectangle to use as windows, and sew them to the fronts of the castle segments. Decorate all the fronts. For the starfish, I sewed it down then added a star burst of straight stitches in the center. For the shell, I stitched a spiral. For the door, I only sewed it down across the bottom, and I added a little crab button underneath. I added some leftover shell buttons to some pieces. Sew all your flags together. Layer them between the roof pieces when you sew the two sides together. Sew all fronts to backs, then you are done!

Jax wouldn’t let me put this page away after I showed it to him. He wanted to keep playing with it, and started making castles for his little wooden farm animals. I’d say this page was a success!